摘要:涂鸦线稿秒变绝美图像,ControlNet-Scribble2Img适配华为云ModelArts,提供更加便利和创新的图像生成体验,将你的想象变为真实的图像。
本文分享自华为云社区《AIGC拯救手残党:涂鸦线稿秒变绝美图像》,作者:Emma_Liu 。
什么是ControlNet?简而言之,文本到图像的生成涉及使用预训练的扩散模型来生成基于某些文本的图像。

从输入图像中提取特定信息的过程称为注释(在paper中)或预处理(在 ControlNet extension中)。
这个扩散模型是在数十亿张图片上预训练的,当我们输入文字时,模型会根据输入的内容生成一张图片。然而,有时输出结果与我们的意图并不完全一致。这就是ControlNet的作用…
ControlNet最早是在L.Zhang等人的论文《Adding Conditional Control to Text-to-Image Diffusion Model》中提出的,目的是提高预训练的扩散模型的性能。特别是,在预训练的扩散模型中加入另一个神经网络模型(ControlNet),使我们对输出有更多的控制。
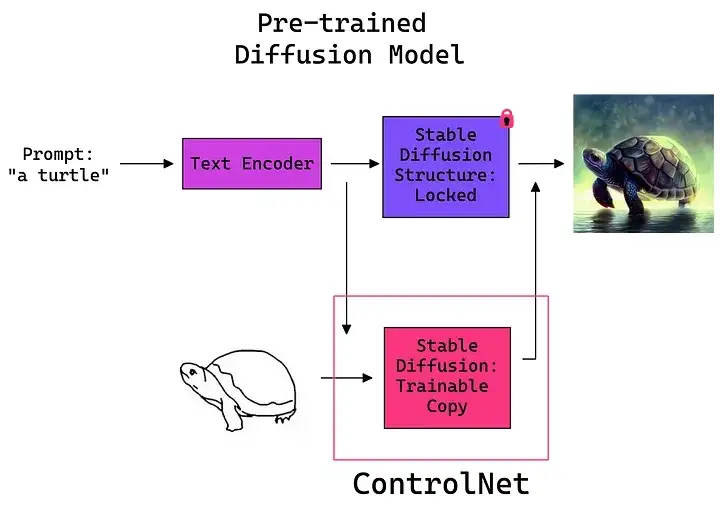
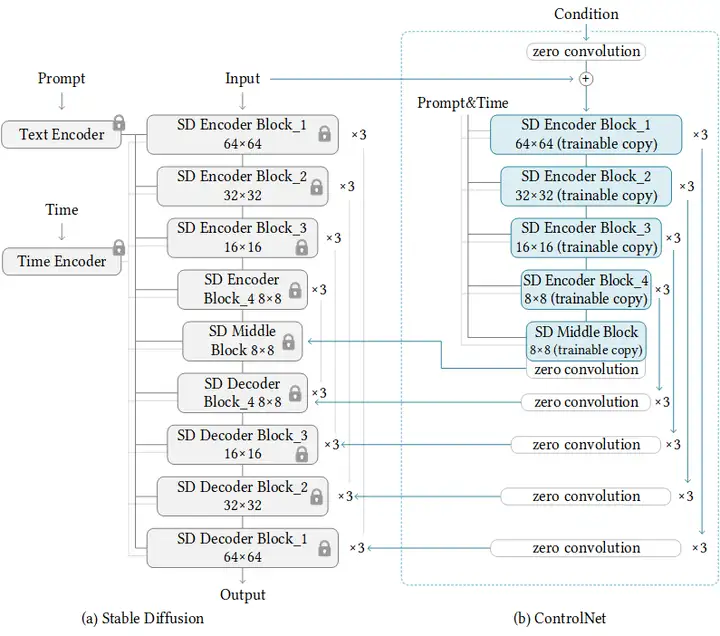
ControlNet 的工作原理是将可训练的网络模块附加到稳定扩散模型的U-Net (噪声预测器)的各个部分。Stable Diffusion 模型的权重是锁定的,在训练过程中它们是不变的。在训练期间仅修改附加模块。
研究论文中的模型图很好地总结了这一点。最初,附加网络模块的权重全部为零,使新模型能够利用经过训练和锁定的模型。
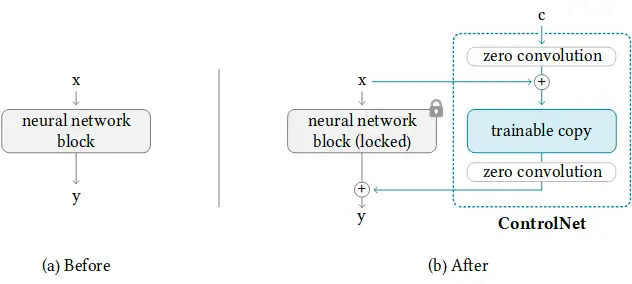
训练 ControlNet 包括以下步骤:
ControlNet提供了八个扩展,每个扩展都可以对扩散模型进行不同的控制。这些扩展是Canny, Depth, HED, M-LSD, Normal, Openpose, Scribble, and Semantic Segmentation.
Scribble 用于预处理用户绘制的涂鸦, 这个预处理程序不应该用在真实的图像上。由于它能够根据简单的草图生成令人惊叹、逼真或改进的图像。理想情况下,不需要任何提示。通过输入一个基本的图画,模型可以推断出细节和纹理,从而产生一个更高质量的图像。
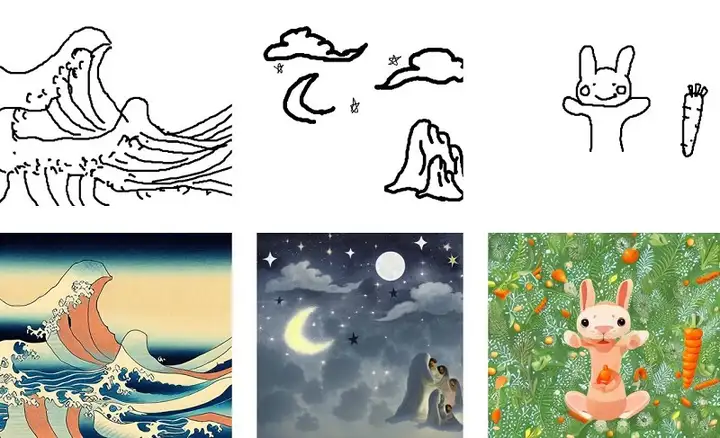
下面是用ModelArts的Notebook适配Scribble2img生成的几幅图,一起来看看吧。
浮世绘风格的海浪 || 满天繁星 || 小兔子和萝卜
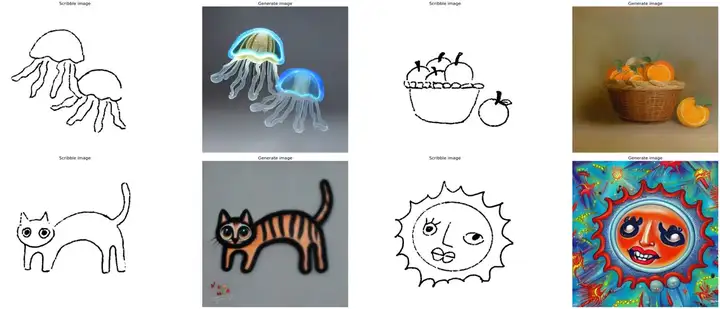
发光水母||一筐橙子||小花喵||微笑的太阳
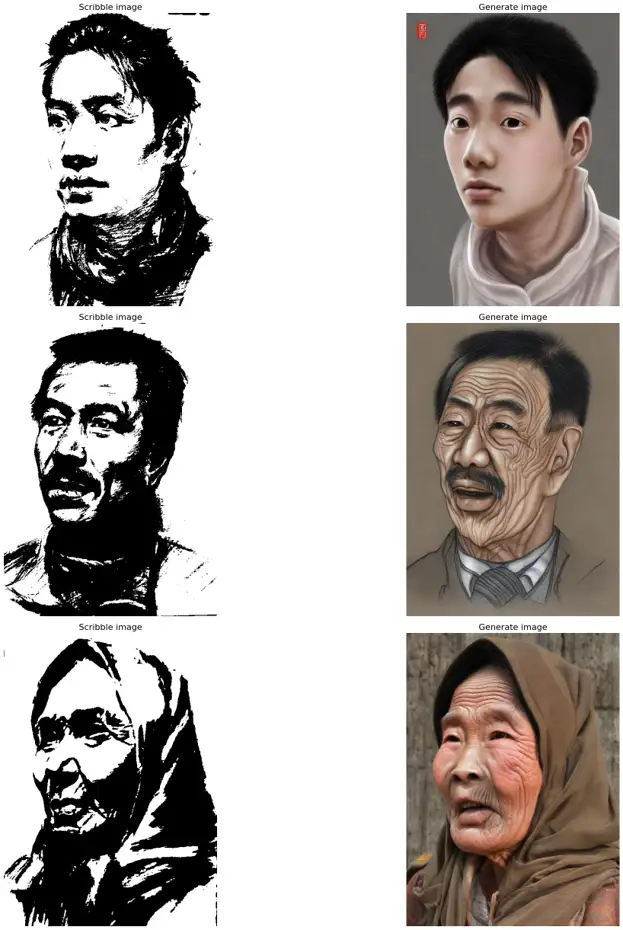
尝试用自己画的素描生成,效果也不错
接下来让我们从零开始,在ModelArts上一起来体验Scribble2img涂鸦生图的乐趣吧。
本文介绍如何在ModelArts来实现 ControlNet-Scribble2img 涂鸦生成图像。
AI Gallery - Notebook链接:拯救手残党:AI涂鸦一键成图 (huaweicloud.com)
ModelArts 是面向开发者的一站式 AI 开发平台,为机器学习与深度学习提供海量数据预处理及交互式智能标注、大规模分布式训练、自动化模型生成,及端-边-云模型按需部署能力,帮助用户快速创建和部署模型,管理全周期 AI 工作流。
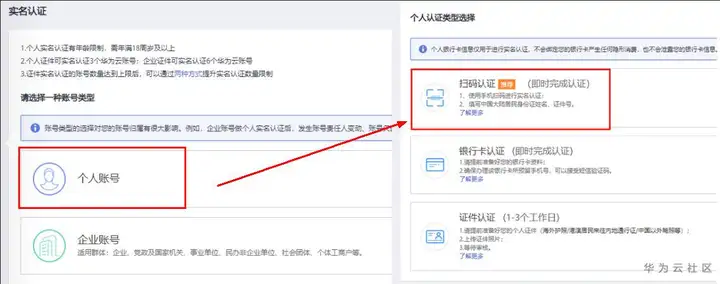
在使用ModelArts之前,需要进入华为云官网 https://www.huaweicloud.com/ ,然后注册华为云账号,再进行实名认证。主要分为3步(注册–>实名认证–>服务授权)(如有已完成部分,请忽略)
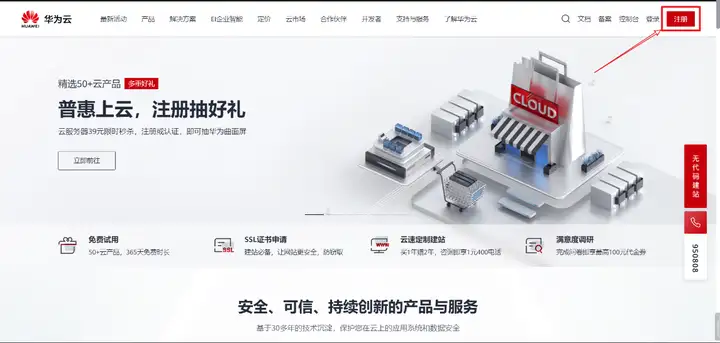
点去完成 实名认证,账号类型选"个人",个人认证类型推荐使用"扫码认证"。
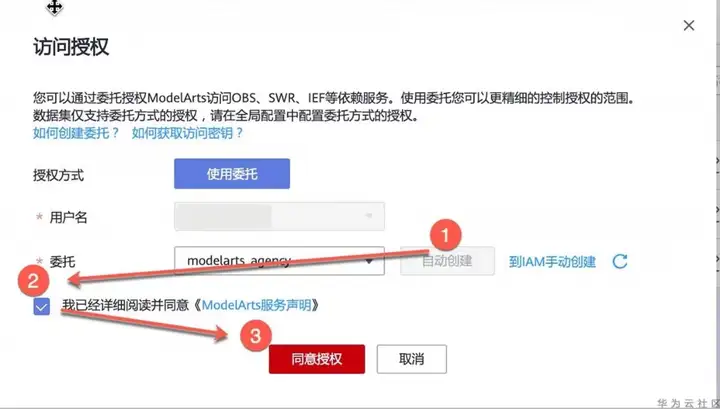
进入ModelArts 控制台数据管理页面,上方会提示访问授权,点击【服务授权】按钮,按下图顺序操作:
check GPU & 拷贝代码及数据
为了更快的准备数据和模型,将其转存在了华为云OBS中,方便大家使用。
!nvidia-smi
import os
import moxing as mox
parent = "/home/ma-user/work/ControlNet"
bfp = "/home/ma-user/work/ControlNet/openai/clip-vit-large-patch14/pytorch_model.bin"
sfp = "/home/ma-user/work/ControlNet/models/control_sd15_scribble.pth"
if not os.path.exists(parent):
 mox.file.copy_parallel('obs://modelarts-labs-bj4-v2/case_zoo/scribble2img/ControlNet',parent)
 if os.path.exists(parent):
 print('Download success')
 else:
        raise Exception('Download Failed')
elif os.path.exists(bfp)==False or os.path.getsize(bfp)!=1710671599:
 mox.file.copy_parallel('obs://modelarts-labs-bj4-v2/case_zoo/scribble2img/ControlNet/openai/clip-vit-large-patch14/pytorch_model.bin', bfp)
elif os.path.exists(sfp)==False or os.path.getsize(sfp)!=5710757851:
 mox.file.copy_parallel('obs://modelarts-labs-bj4-v2/case_zoo/scribble2img/ControlNet/models/control_sd15_scribble.pth', sfp)
else:
 print("Model Package already exists!")复制
安装库,大约耗时1min,请耐心等待。
%cd /home/ma-user/work/ControlNet
!pip uninstall torch torchtext -y
!pip install torch==1.12.1 torchvision==0.13.1 torchaudio==0.12.1
!pip install omegaconf==2.1.1 einops==0.3.0
!pip install pytorch-lightning==1.5.0
!pip install transformers==4.19.2 open_clip_torch==2.0.2
!pip install gradio==3.24.1
!pip install translate==3.6.1复制
导包并加载模型,加载约40s,请耐心等待。
import numpy as np
from PIL import Image as PilImage
import cv2
import einops
import matplotlib.pyplot as plt
from IPython.display import HTML, Image
from base64 import b64decode
from translate import Translator
import torch
from pytorch_lightning import seed_everything
import config
from cldm.model import create_model, load_state_dict
from ldm.models.diffusion.ddim import DDIMSampler
from annotator.util import resize_image, HWC3
model = create_model('./models/cldm_v15.yaml')
model.load_state_dict(load_state_dict('./models/control_sd15_scribble.pth', location='cuda'))
model = model.cuda()
ddim_sampler = DDIMSampler(model)复制
涂鸦生成图像函数定义
def process(input_image, prompt, a_prompt, n_prompt, num_samples, image_resolution, ddim_steps, strength, scale, seed, eta):
    trans = Translator(from_lang="ZH",to_lang="EN-US")
    prompt = trans.translate(prompt)
 a_prompt = trans.translate(a_prompt)
 n_prompt = trans.translate(n_prompt)
 guess_mode = False
    # 图像预处理
 with torch.no_grad():
 if type(input_image) is str:
 input_image = np.array(PilImage.open(input_image))
 img = resize_image(HWC3(input_image), image_resolution)
 else:
 img = resize_image(HWC3(input_image['mask'][:, :, 0]), image_resolution)  # scribble
 H, W, C = img.shape
        # 初始化检测映射
 detected_map = np.zeros_like(img, dtype=np.uint8)
 detected_map[np.min(img, axis=2) > 127] = 255
        control = torch.from_numpy(detected_map.copy()).float().cuda() / 255.0
        control = torch.stack([control for _ in range(num_samples)], dim=0)
        control = einops.rearrange(control, 'b h w c -> b c h w').clone()
        # 设置随机种子
 if seed == -1:
            seed = random.randint(0, 65535)
 seed_everything(seed)
 if config.save_memory:
 model.low_vram_shift(is_diffusing=False)
 cond = {"c_concat": [control], "c_crossattn": [model.get_learned_conditioning([prompt + ', ' + a_prompt] * num_samples)]}
 un_cond = {"c_concat": None if guess_mode else [control], "c_crossattn": [model.get_learned_conditioning([n_prompt] * num_samples)]}
        shape = (4, H // 8, W // 8)
 if config.save_memory:
 model.low_vram_shift(is_diffusing=True)
        # 采样
 model.control_scales = [strength * (0.825 ** float(12 - i)) for i in range(13)] if guess_mode else ([strength] * 13)  # Magic number.
        samples, intermediates = ddim_sampler.sample(ddim_steps, num_samples,
                                                     shape, cond, verbose=False, eta=eta,
 unconditional_guidance_scale=scale,
 unconditional_conditioning=un_cond)
 if config.save_memory:
 model.low_vram_shift(is_diffusing=False)
        # 后处理
 x_samples = model.decode_first_stage(samples)
 x_samples = (einops.rearrange(x_samples, 'b c h w -> b h w c') * 127.5 + 127.5).cpu().numpy().clip(0, 255).astype(np.uint8)
        results = [x_samples[i] for i in range(num_samples)]
 return [255 - detected_map] + results复制
在/home/ma-user/work/ControlNet/test_imgs/ 此路径下,我们预置了一些线稿供您测试。当然您可以自己上传您的涂鸦画至此路径下,然后更改图像路径及其他参数后,点击运行。
参数说明
images:生成图像张数
img_path:输入图像路径,黑白稿
prompt:提示词(建议填写)
a_prompt:正面提示(可选,要附加到提示的其他文本)
n_prompt: 负面提示(可选)
image_resolution: 对输入的图片进行最长边等比resize
scale:classifier-free引导比例
seed: 随机种子
ddim_steps: 采样步数,一般15-30,值越大越精细,耗时越长
eta: 控制在去噪扩散过程中添加到输入数据的噪声量。0表示无噪音,1.0表示更多噪音。eta对图像有微妙的、不可预测的影响,所以您需要尝试一下这如何影响您的项目。
strength: 这是应用 ControlNet 的步骤数。它类似于图像到图像中的去噪强度。如果指导强度为 1,则 ControlNet 应用于 100% 的采样步骤。如果引导强度为 0.7 并且您正在执行 50 个步骤,则 ControlNet 将应用于前 70% 的采样步骤,即前 35 个步骤。
#@title Scribble2img
img_path = "test_imgs/cat.jpg" #@param {type:"string"}
prompt = "小花猫" #@param {type:"string"}
num_samples = 1
# Added Prompt
a_prompt = "质量最好,非常详细" #@param {type:"string"}
# Negative Prompt
n_prompt = "裁剪,质量最差,质量低" #@param {type:"string"}
image_resolution = 512 #@param {type:"raw", dropdown}
scale = 4.3 #@param {type:"slider", min:0.1, max:30, step:0.1}
seed = 1773327477 #@param {type:"slider", min:-1, max:2147483647, step:1}
eta = 0.02 #@param {type:"slider", min:-1.00, max:3.00, step:0.01}
ddim_steps = 15 #@param {type:"slider", min:1, max:100, step:1}
guess_mode = False
strength = 1.0
np_imgs = process(img_path, prompt, a_prompt, n_prompt, num_samples, image_resolution, ddim_steps, strength, scale, seed, eta)
src = PilImage.fromarray(~np_imgs[0])
dst = PilImage.fromarray(np_imgs[1])
fig = plt.figure(figsize=(25, 10))
ax1 = fig.add_subplot(1, 2, 1)
plt.title('Scribble image', fontsize=16)
ax1.axis('off')
ax1.imshow(src)
ax2 = fig.add_subplot(1, 2, 2)
plt.title('Generate image', fontsize=16)
ax2.axis('off')
ax2.imshow(dst)
plt.show()复制
在右侧有交互式控件,可以简单调整参数,然后运行即可,等待生成。
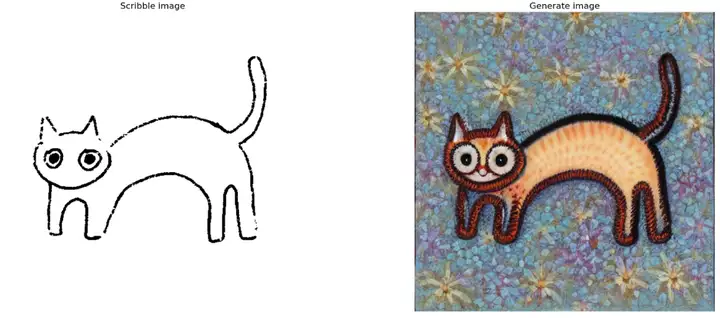
当所提供的图像或简笔画与描述Prompt相关度低或无关时,模型可能生成偏向图像或偏向Prompt的内容,也可能生成无意义的内容;因此建议描述Prompt与所上传的图像紧密相关并且尽可能详细。
如果想进行可视化部署,可以继续以下步骤: Gradio应用启动后可在下方页面进行涂鸦生成图像,您也可以分享public url在手机端,PC端进行访问生成图像。
import gradio as gr
# 画布生成函数
def create_canvas(w, h):
 img = np.zeros(shape=(h-2, w-2, 3), dtype=np.uint8) + 255
 im = cv2.copyMakeBorder(img,1,1,1,1,cv2.BORDER_CONSTANT)
 return im
block = gr.Blocks().queue()
with block:
 with gr.Row():
 gr.Markdown("##  涂鸦生成图像 ")
 with gr.Row():
 with gr.Column():
 canvas_width = gr.Slider(label="画布宽度", minimum=256, maximum=1024, value=512, step=1)
 canvas_height = gr.Slider(label="画布高度", minimum=256, maximum=1024, value=512, step=1)
 create_button = gr.Button(label="Start", value='开启画布!')
 gr.Markdown(value='点击下面右上角小铅笔图标,改变你的刷子宽度,让它变的更细 (Gradio不允许开发人员设置画笔宽度,因此需要手动设置) ')
 input_image = gr.Image(source='upload', type='numpy', tool='sketch')
 create_button.click(fn=create_canvas, inputs=[canvas_width, canvas_height], outputs=[input_image])
            prompt = gr.Textbox(label="Prompt")
 run_button = gr.Button(label="运行")
 with gr.Accordion("高级选项", open=False):
 num_samples = gr.Slider(label="Images", minimum=1, maximum=12, value=1, step=1)
 image_resolution = gr.Slider(label="Image Resolution", minimum=256, maximum=768, value=512, step=64)
                strength = gr.Slider(label="Control Strength", minimum=0.0, maximum=2.0, value=1.0, step=0.01)
 ddim_steps = gr.Slider(label="Steps", minimum=1, maximum=100, value=20, step=1)
                scale = gr.Slider(label="Guidance Scale", minimum=0.1, maximum=30.0, value=9.0, step=0.1)
                seed = gr.Slider(label="Seed", minimum=-1, maximum=2147483647, step=1, randomize=True)
                eta = gr.Number(label="eta (DDIM)", value=0.0)
 a_prompt = gr.Textbox(label="Added Prompt", value='质量最好,非常详细')
 n_prompt = gr.Textbox(label="Negative Prompt",
                                      value='裁剪,质量最差,质量低')
 with gr.Column():
 result_gallery = gr.Gallery(label='Output', show_label=False, elem_id="gallery").style(grid=2, height='auto')
 ips = [input_image, prompt, a_prompt, n_prompt, num_samples, image_resolution, ddim_steps, strength, scale, seed, eta]
 run_button.click(fn=process, inputs=ips, outputs=[result_gallery])
block.launch(share=True)复制
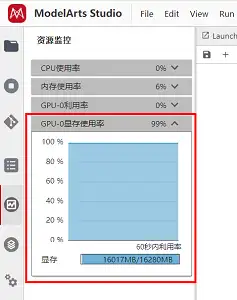
请注意: 图像生成消耗显存,您可以在左侧操作栏查看您的实时资源使用情况,点击GPU显存使用率即可查看,当显存不足时,您生成图像可能会报错,此时,您可以通过重启kernel的方式重置,然后重头运行即可规避。或更换更高规格的资源
