摘要:又双叒叕种草了家装新风格?想要尝试却又怕踩雷?如果能够轻松Get量身定制的家装风格图,那该多好啊。现在,这一切都成为了可能!
本文分享自华为云社区《又双叒叕种草了新家装风格?AI帮你家居换装!》,作者:Emma_Liu。
你是否曾经想过,如果能够轻松地看到自己家居的不同风格,该有多好呢?现在,这一切都变得可能了!
让你的眼睛仔细观察这些图片,你会发现它们展现了不同的风格和氛围,从现代简约到古典优雅,从温馨舒适到时尚前卫,应有尽有。但是,你知道吗?这些图片都是由AI生成的!
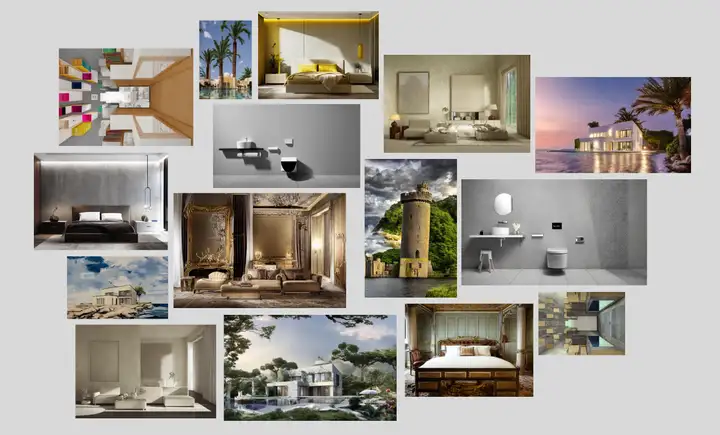
它们看起来非常逼真,仿佛是真实的照片一样。这就是人工智能的奇妙之处,让我们可以轻松地预览不同的家居风格,不必实际进行装修。让我们一起来感受AI技术的魅力吧!
装修风格参考

现代极简风卧室
图一是原图,我要基于图一的装修布局重新装修一下,图二是M-LSD线段检测器的输出图像,图三是加入prompt为:现代极简风卧室生成图像,图四再补充一些prompt:现代极简风卧室,床是黄色的,墙是浅咖色。不得不说效果真不错!

卫生间
图一这种简单布局的卫生间我很是喜欢,康康其他风格的侘寂风卫生间 - 图二、三

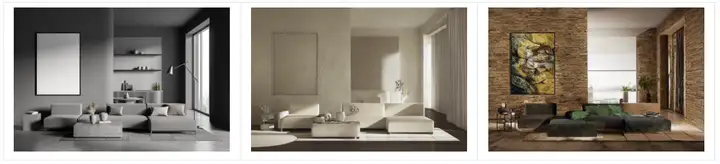
客厅
换装ing——奶油风客厅——无名(不填prompt也可以生成不错的图片,很多惊喜诶)
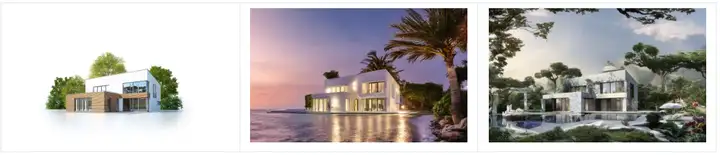
别墅
我已经在幻想住上大别墅了✨看看别墅的效果怎么样
浪漫的海边别墅、新中式别墅
我想尝试用建筑设计图来看看能不能生成…哇,绝绝子——简约风,现代风

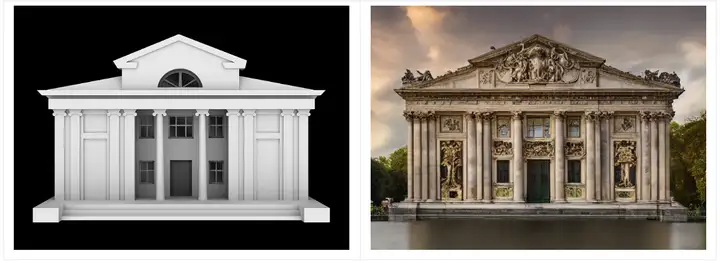
其他建筑
建模图变——欧式建筑
厂房变办公楼、大型超市、别墅(这样式的别墅)

好神奇,它是怎么做到的呢,来看看模型的介绍。
建筑的稳定扩散 | ControlNet模型-MLSD,随意创建建筑物、房间内部或外部以及独特的场景
ControlNet 最早是在L.Zhang等人的论文《Adding Conditional Control to Text-to-Image Diffusion Model》中提出的,目的是提高预训练的扩散模型的性能。它引入了一个框架,支持在扩散模型 (如 Stable Diffusion ) 上附加额外的多种空间语义条件来控制生成过程。为稳定扩散带来了前所未有的控制水平。
Mobile LSD (M-LSD): 《Towards Light-weight and Real-time Line Segment Detection》是用于资源受限环境的实时和轻量级线段检测器,M-LSD利用了极其高效的LSD体系结构和新的训练方案,包括SoL增强和几何学习方案。模型可以在GPU、CPU甚至移动设备上实时运行。
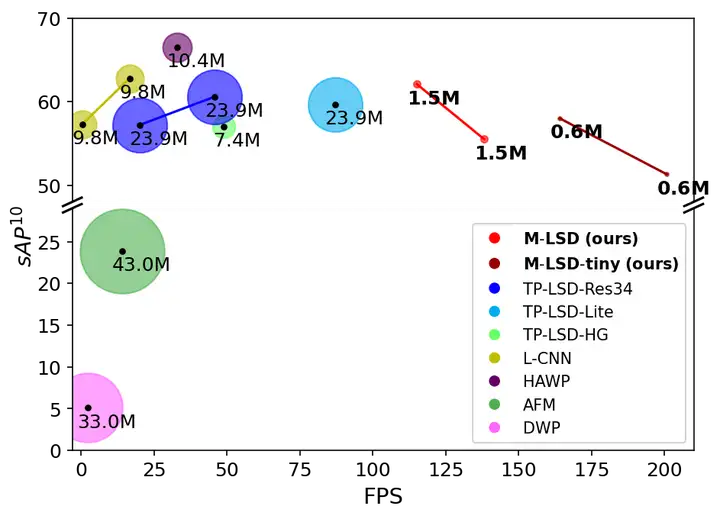
图1 GPU上M-LSD和现有LSD方法的比较
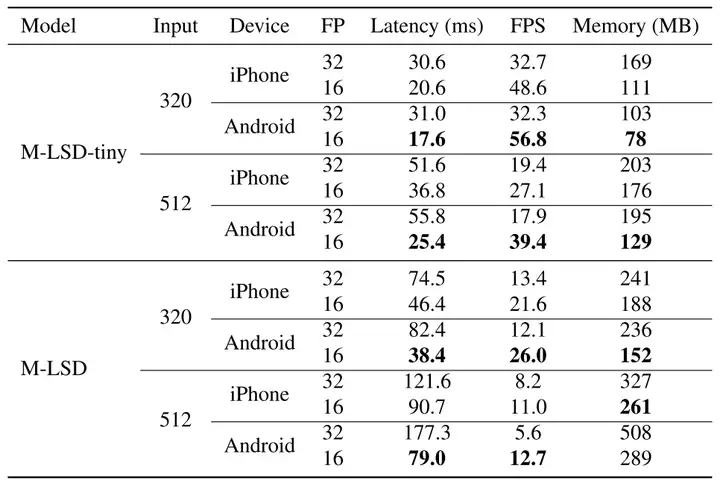
图2 移动设备上的推理速度和内存使用情况.
案例以分享至AI Gallery - AI建筑风格修改: ControlNet-MLSD,一起来运行代码,实现你的新装吧。
!pip install transformers==4.29.0
!pip install diffusers==0.16.1
!pip install accelerate==0.17.1
!pip install gradio==3.32.0
!pip install translate==3.6.1
使用mlsd, sd-controlnet-mlsd, stable-diffusion-v1-5预训练模型,为方便大家使用,已转存到华为云OBS中。
import os
import moxing as mox
pretrained_models = ['mlsd', 'sd-controlnet-mlsd', 'stable-diffusion-v1-5']
for pretrained_model in pretrained_models:
 model_dir = os.path.join(os.getcwd(), pretrained_model)
 if not os.path.exists(model_dir):
 mox.file.copy_parallel(f'obs://modelarts-labs-bj4-v2/case_zoo/ControlNet/ControlNet_models/{pretrained_model}', model_dir)
 if os.path.exists(model_dir):
 print(f'{pretrained_model} download success')
 else:
 raise Exception(f'{pretrained_model} download Failed')
 else:
 print(f"{pretrained_model} already exists!")
import torch
from PIL import Image
from mlsd import MLSDdetector
from translate import Translator
from diffusers.utils import load_image
from diffusers import StableDiffusionControlNetPipeline, ControlNetModel, UniPCMultistepScheduler
mlsd = MLSDdetector()
controlnet = ControlNetModel.from_pretrained("sd-controlnet-mlsd", torch_dtype=torch.float16)
pipe = StableDiffusionControlNetPipeline.from_pretrained("stable-diffusion-v1-5", controlnet=controlnet, safety_checker=None, torch_dtype=torch.float16)
pipe.scheduler = UniPCMultistepScheduler.from_config(pipe.scheduler.config)
pipe.enable_model_cpu_offload()
首先,传入的图片会通过mlsd detector输出黑白线条图,然后基于此mlsd图像,通过controlnet和stable diffusion生成图像。
from PIL import Image
import matplotlib.pyplot as plt
import numpy as np
ori = Image.open("1920245540.jpg")
mlsd = MLSDdetector()
mlsd_img = mlsd(ori, thr_v=0.1, thr_d=0.1, detect_resolution=512, image_resolution=512, return_pil=True)
trans = Translator(from_lang="ZH",to_lang="EN-US")
prompt = "现代极简风卧室,床是黄色的,墙是浅咖色"
en_prompt = trans.translate(prompt)
gen_img = pipe(en_prompt, mlsd_img, num_inference_steps=20).images[0]
fig = plt.figure(figsize=(25, 10))
ax1 = fig.add_subplot(1, 3, 1)
plt.title('Orignial image', fontsize=16)
ax1.axis('off')
ax1.imshow(ori)
ax2 = fig.add_subplot(1, 3, 2)
plt.title('ML Detector image', fontsize=16)
ax2.axis('off')
ax2.imshow(mlsd_img)
ax3 = fig.add_subplot(1, 3, 3)
plt.title('Generate image', fontsize=16)
ax3.axis('off')
ax3.imshow(gen_img)
plt.show()
Gradio应用启动后可在下方页面上传图片根据提示生成图像,您也可以分享public url在手机端,PC端进行访问生成图像。
参数说明
img_path:输入图像路径
prompt:提示词(建议填写)
n_prompt: 负面提示(可选)
num_inference_steps: 采样步数,一般15-30,值越大越精细,耗时越长
image_resolution: 对输入的图片进行最长边等比resize
detect_resolution:Hough Resolution,检测分辨率,值越小-线条越粗糙
value_threshold: Hough value threshold (MLSD),值越大-检测线条越多,越详细
distance_threshold: Hough distance threshold (MLSD),值越大-距离越远,检测到的线条越少
对比一下参数value_threshold,distance_threshold,当value_threshold值变大时,如图二所示,检测到的线段越少,获取到的信息也就越少,对控制生成后的图像来说,会缺失掉很多的细节;当distance_threshold值变大时,如图三所示,越远处的物体,提取到的线段越少,图像会更专注于前面的部分。这对于来调整生成的图像是一个很好的参考。

thr_v=0.1, thr_d=0.1

thr_v=0.5, thr_d=0.1
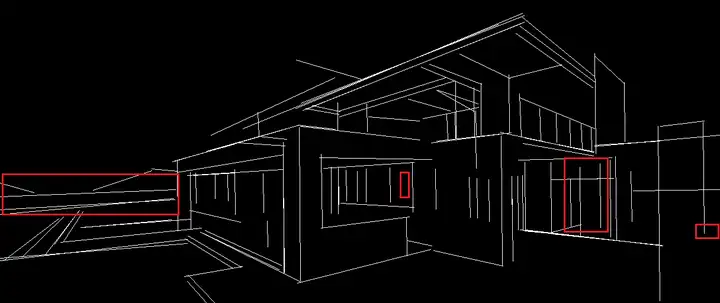
thr_v=0.1, thr_d=20
import gradio as gr
def mlsd(img, prompt, num_inference_steps, thr_v, thr_d, n_prompt, detect_resolution, image_resolution):
    trans = Translator(from_lang="ZH",to_lang="EN-US")
    prompt = trans.translate(prompt)
 n_prompt = trans.translate(n_prompt)
 mlsd = MLSDdetector()
 mlsd_img = mlsd(img, thr_v=0.1, thr_d=0.1, detect_resolution=512, image_resolution=512, return_pil=True)
 gen_img = pipe(prompt, mlsd_img, num_inference_steps=20, negative_prompt=n_prompt).images[0]
    result = [mlsd_img, gen_img]
 return result
block = gr.Blocks().queue()
with block:
 with gr.Row():
 gr.Markdown("##  Control Stable Diffusion with MLSD")
 with gr.Row():
 with gr.Column():
 input_image = gr.Image(source='upload', type="numpy")
            prompt = gr.Textbox(label="描述")
 run_button = gr.Button(label="Run")
 with gr.Accordion("高级选项", open=False):
 num_inference_steps = gr.Slider(label="图像生成步数", minimum=1, maximum=100, value=20, step=1)
 value_threshold = gr.Slider(label="Hough value threshold (MLSD)", minimum=0.01, maximum=2.0, value=0.1, step=0.01)
 distance_threshold = gr.Slider(label="Hough distance threshold (MLSD)", minimum=0.01, maximum=20.0, value=0.1, step=0.01)
 n_prompt = gr.Textbox(label="否定提示",
                                      value='lowres, extra digit, fewer digits, cropped, worst quality, low quality')
 detect_resolution = gr.Slider(label="Hough Resolution", minimum=128, maximum=1024, value=512, step=1)
 image_resolution = gr.Slider(label="Image Resolution", minimum=256, maximum=768, value=512, step=64)
 with gr.Column():
 result_gallery = gr.Gallery(label='Output', show_label=False, elem_id="gallery").style(columns=2, height='auto')
 ips = [input_image, prompt, num_inference_steps, value_threshold, distance_threshold, n_prompt, detect_resolution, image_resolution]
 run_button.click(fn=mlsd, inputs=ips, outputs=[result_gallery])
block.launch(share=True)