本文分享自华为云社区《绘制一切》,作者: 雨落无痕 。
相关链接:
Notebook案例地址:绘制一切
AI Gallery:https://developer.huaweicloud.com/develop/aigallery/home.html
也可通过AI Gallery,搜索【绘制一切】一键体验!
通过一键点击标记选定对象,即可实现移除指定对象、填补指定对象、替换一切场景,涵盖了包括目标移除、目标填充、背景替换等在内的多种典型图像修补应用场景。
它的整体框架如图所示:
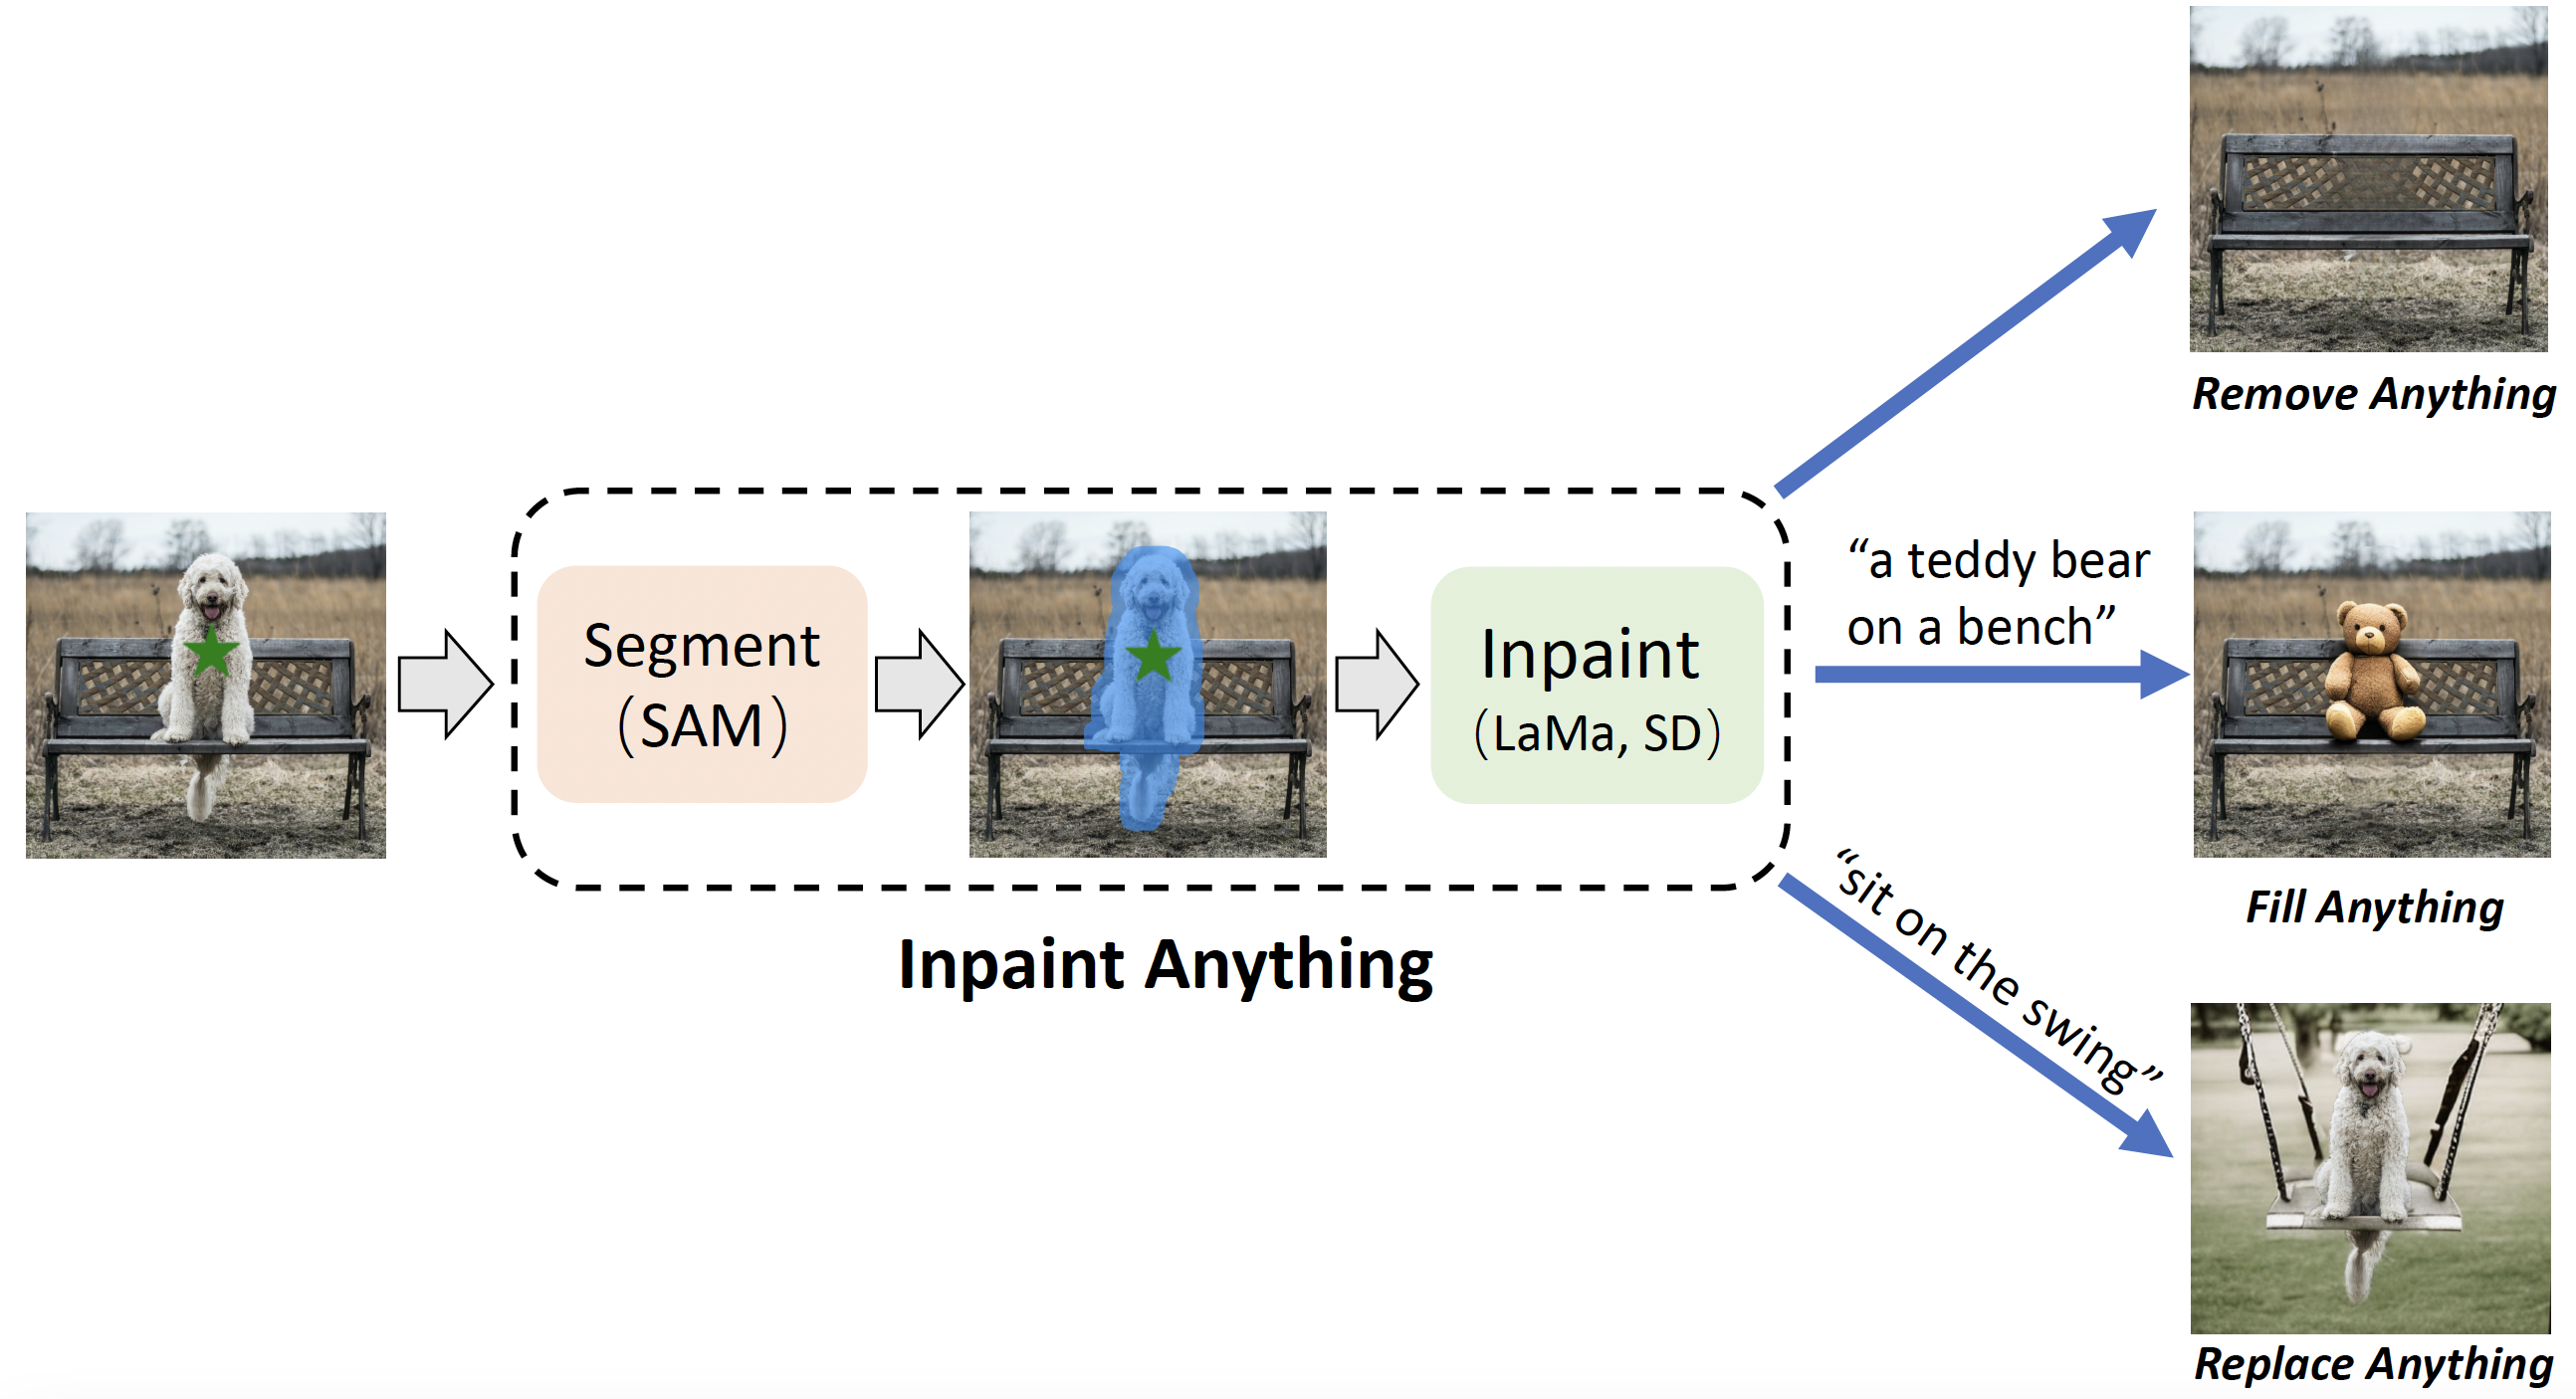
Inpaint Anything结合了 SAM、图像修补模型(例如 LaMa)和 AIGC 模型(例如 Stable Diffusion)等视觉基础模型。

将三个模型结合到一起,我们可以做出很多的功能。本文就实现了在图片/视频中移除一切物体、在图片中填充一切物体和在图片中替换一切背景这三种功能,其具体实现步骤如下:

以下为具体通过ModelArts实现Inpaint Anything的流程。
使用方法:
🔹 本案例需使用 Pytorch-1.8 GPU-P100 及以上规格运行
🔹 点击Run in ModelArts,将会进入到ModelArts CodeLab中,这时需要你登录华为云账号,如果没有账号,则需要注册一个,且要进行实名认证,参考《ModelArts准备工作_简易版》 即可完成账号注册和实名认证。 登录之后,等待片刻,即可进入到CodeLab的运行环境
🔹 出现 Out Of Memory ,请检查是否为您的参数配置过高导致,修改参数配置,重启kernel或更换更高规格资源进行规避❗❗❗
下面让我们从零开始,一起来体验Inpaint Anything绘制一切的乐趣吧!
拷贝代码,并安装依赖库
import os
import torch
import os.path as osp
import moxing as mox
path = osp.join(os.getcwd(),'Inpaint-Anything')
if not os.path.exists(path):
    mox.file.copy_parallel('obs://modelarts-labs-bj4-v2/case_zoo/Inpaint-Anything', path)
    if os.path.exists(path):
        print('Download success')
    else:
        raise Exception('Download Failed')
else:
    print("Model Package already exists!")
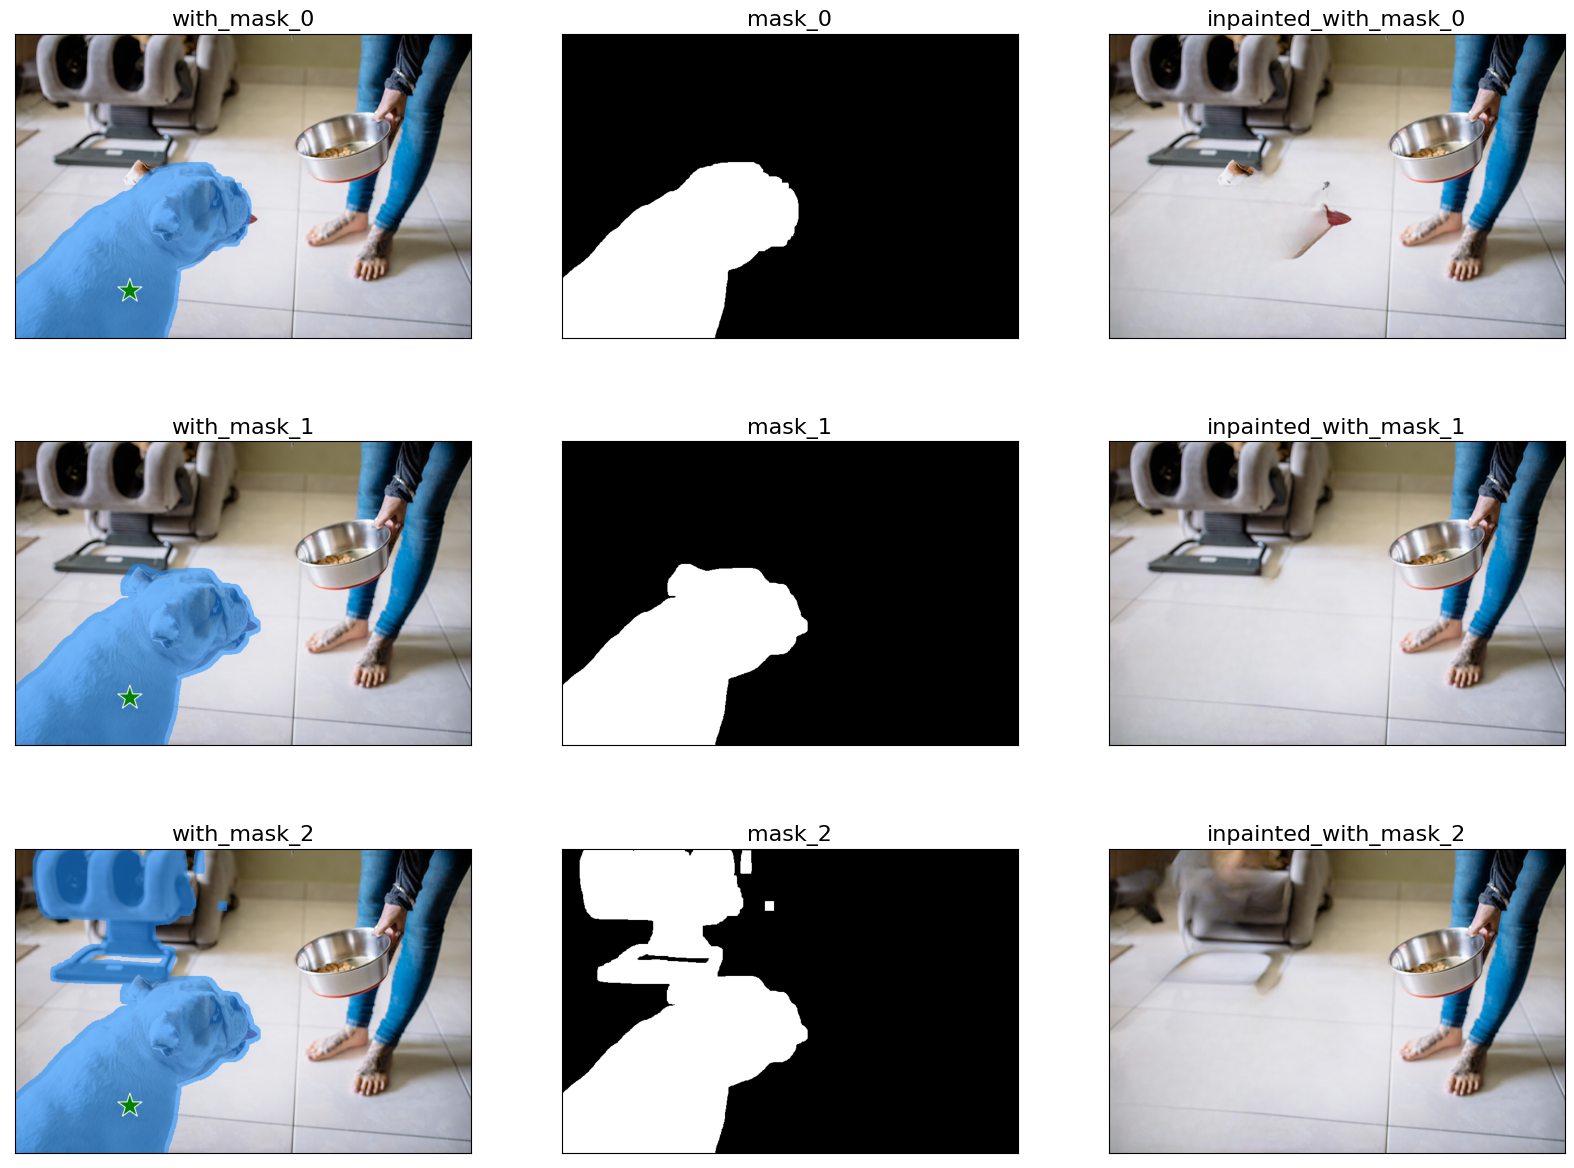
!python remove_anything.py \
    --input_img ./example/remove-anything/dog.jpg \
    --coords_type key_in \
    --point_coords 200 450 \
    --point_labels 1 \
    --dilate_kernel_size 15 \
    --output_dir ./results \
    --sam_model_type "vit_h" \
    --sam_ckpt ./pretrained_models/sam_vit_h_4b8939.pth \
    --lama_config ./lama/configs/prediction/default.yaml \
    --lama_ckpt ./pretrained_models/big-lama
import cv2
import matplotlib.pyplot as plt
def show_original_image(image_path, modify_image_path):
    image = cv2.imread(image_path)
    image = cv2.cvtColor(image, cv2.COLOR_BGR2RGB)
    with_point_image = cv2.imread(modify_image_path + 'with_points.png')
    with_point_image = cv2.cvtColor(with_point_image, cv2.COLOR_BGR2RGB)
    fig = plt.figure(figsize=(20, 10))
    ax1 = fig.add_subplot(1, 2, 1)
    plt.title('Original image', fontsize=16)
    ax1.axis('off')
    ax1.imshow(image)
    ax2 = fig.add_subplot(1, 2, 2)
    plt.title('With_Point image', fontsize=16)
    ax2.axis('off')
    ax2.imshow(with_point_image)
    plt.show()
def show_modify_image(modify_image_path, image_class):
    fig = plt.figure(figsize=(20, 15))
    save_path = modify_image_path
    index = 1
    for i in range(0,3):
        for image_item in image_class:
            file_name = image_item + str(i) + '.png'
            file_path = save_path + file_name
            image = cv2.imread(file_path)
            image = cv2.cvtColor(image, cv2.COLOR_BGR2RGB)
            ax = fig.add_subplot(3,3,index)
            ax.xaxis.set_visible(False)
            ax.yaxis.set_visible(False)
            plt.title(image_item + str(i), fontsize=16)
            ax.imshow(image)
            index = index + 1
    plt.show()
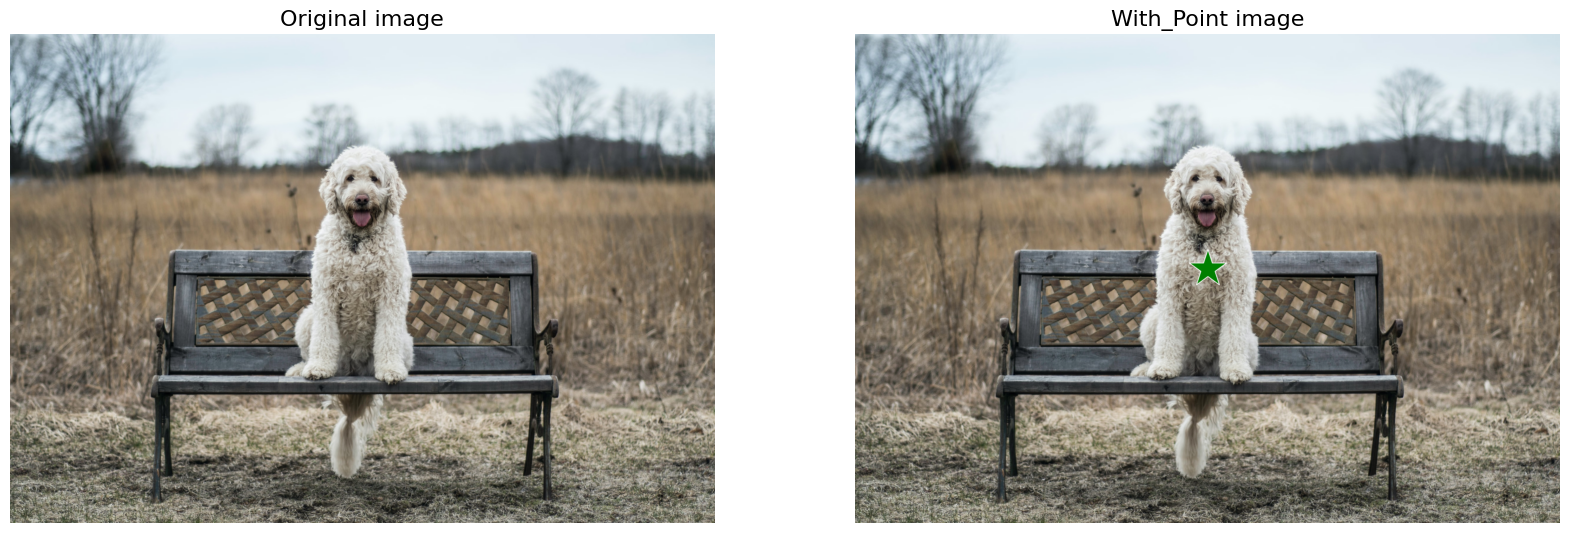
image_path = './example/remove-anything/dog.jpg'
modify_image_path = './results/dog/'
image_class = ['with_mask_','mask_','inpainted_with_mask_']
show_original_image(image_path, modify_image_path)
show_modify_image(modify_image_path,image_class)

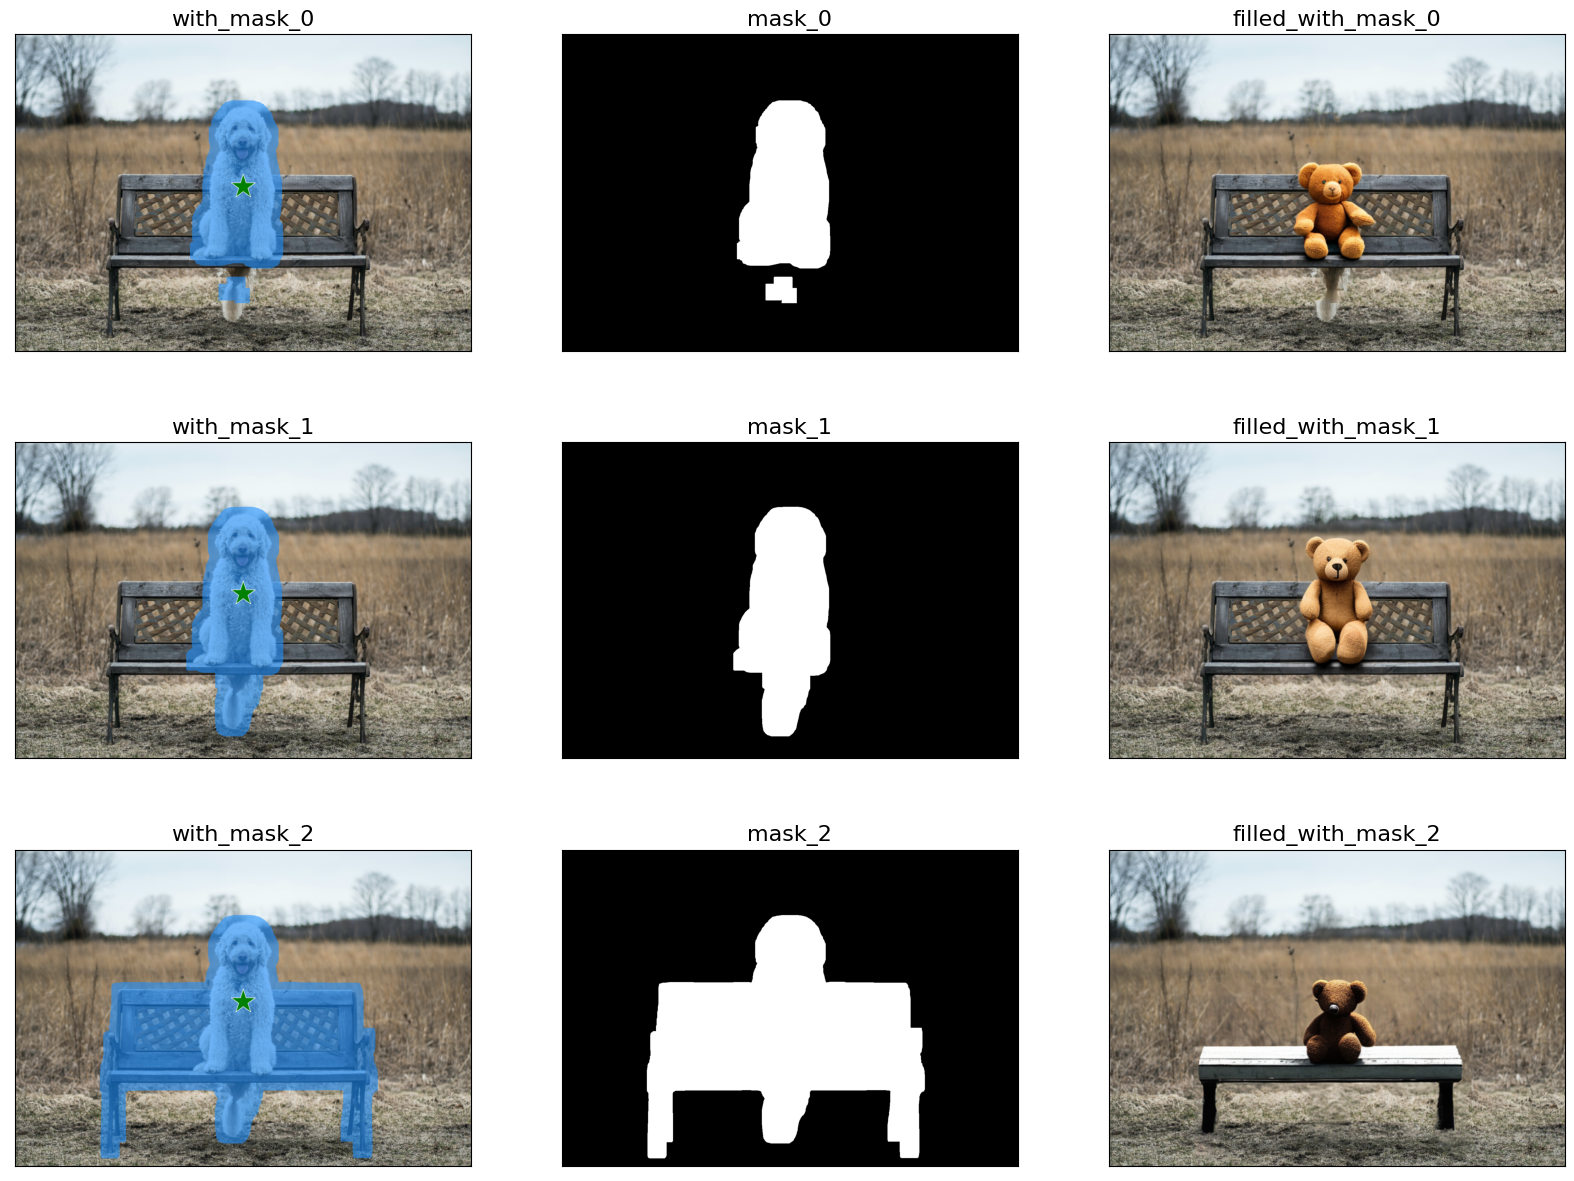
!python fill_anything.py \
    --input_img ./example/fill-anything/sample1.png \
    --coords_type key_in \
    --point_coords 750 500 \
    --point_labels 1 \
    --text_prompt "a teddy bear on a bench" \
    --dilate_kernel_size 50 \
    --output_dir ./results \
    --sam_model_type "vit_h" \
    --sam_ckpt ./pretrained_models/sam_vit_h_4b8939.pth \
    --model_path "stable-diffusion-2-inpainting"
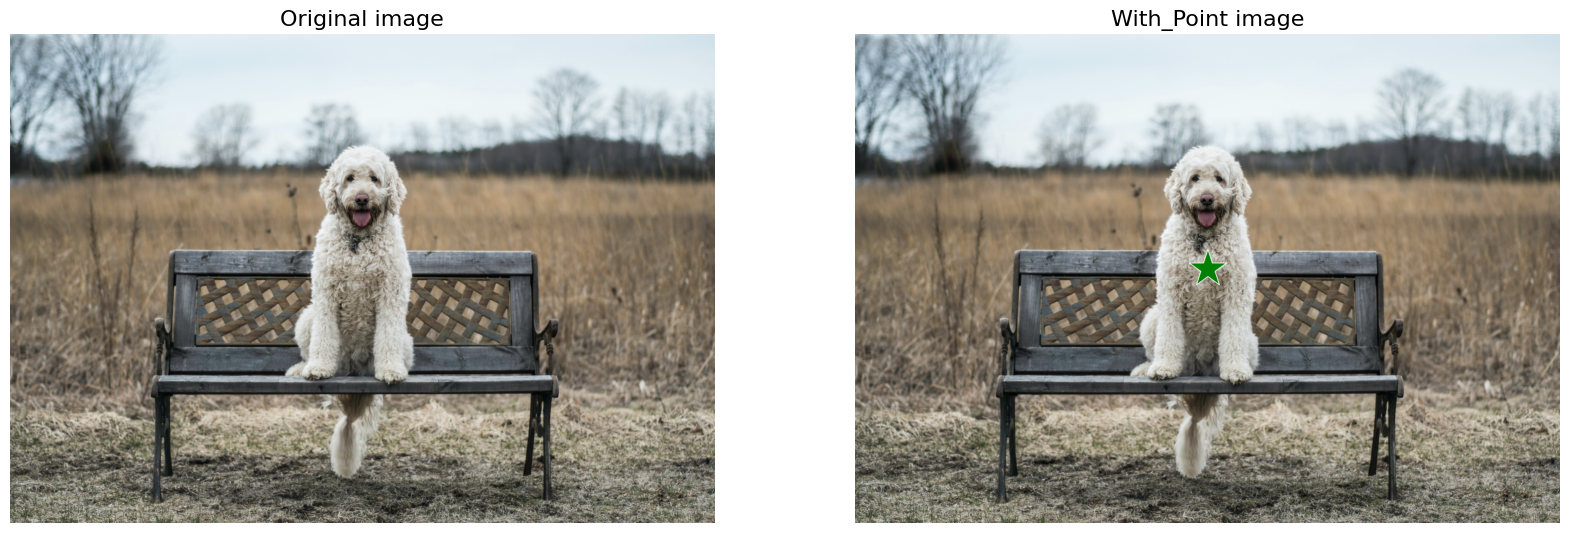
image_path = './example/fill-anything/sample1.png'
modify_image_path = './results/sample1/'
image_class = ['with_mask_','mask_','filled_with_mask_']
show_original_image(image_path, modify_image_path)
show_modify_image(modify_image_path,image_class)
!python replace_anything.py \
    --input_img ./example/replace-anything/dog1.png \
    --coords_type key_in \
    --point_coords 750 500 \
    --point_labels 1 \
    --text_prompt "sit on the swing" \
    --output_dir ./results \
    --sam_model_type "vit_h" \
    --sam_ckpt ./pretrained_models/sam_vit_h_4b8939.pth \
    --model_path "stable-diffusion-2-inpainting"
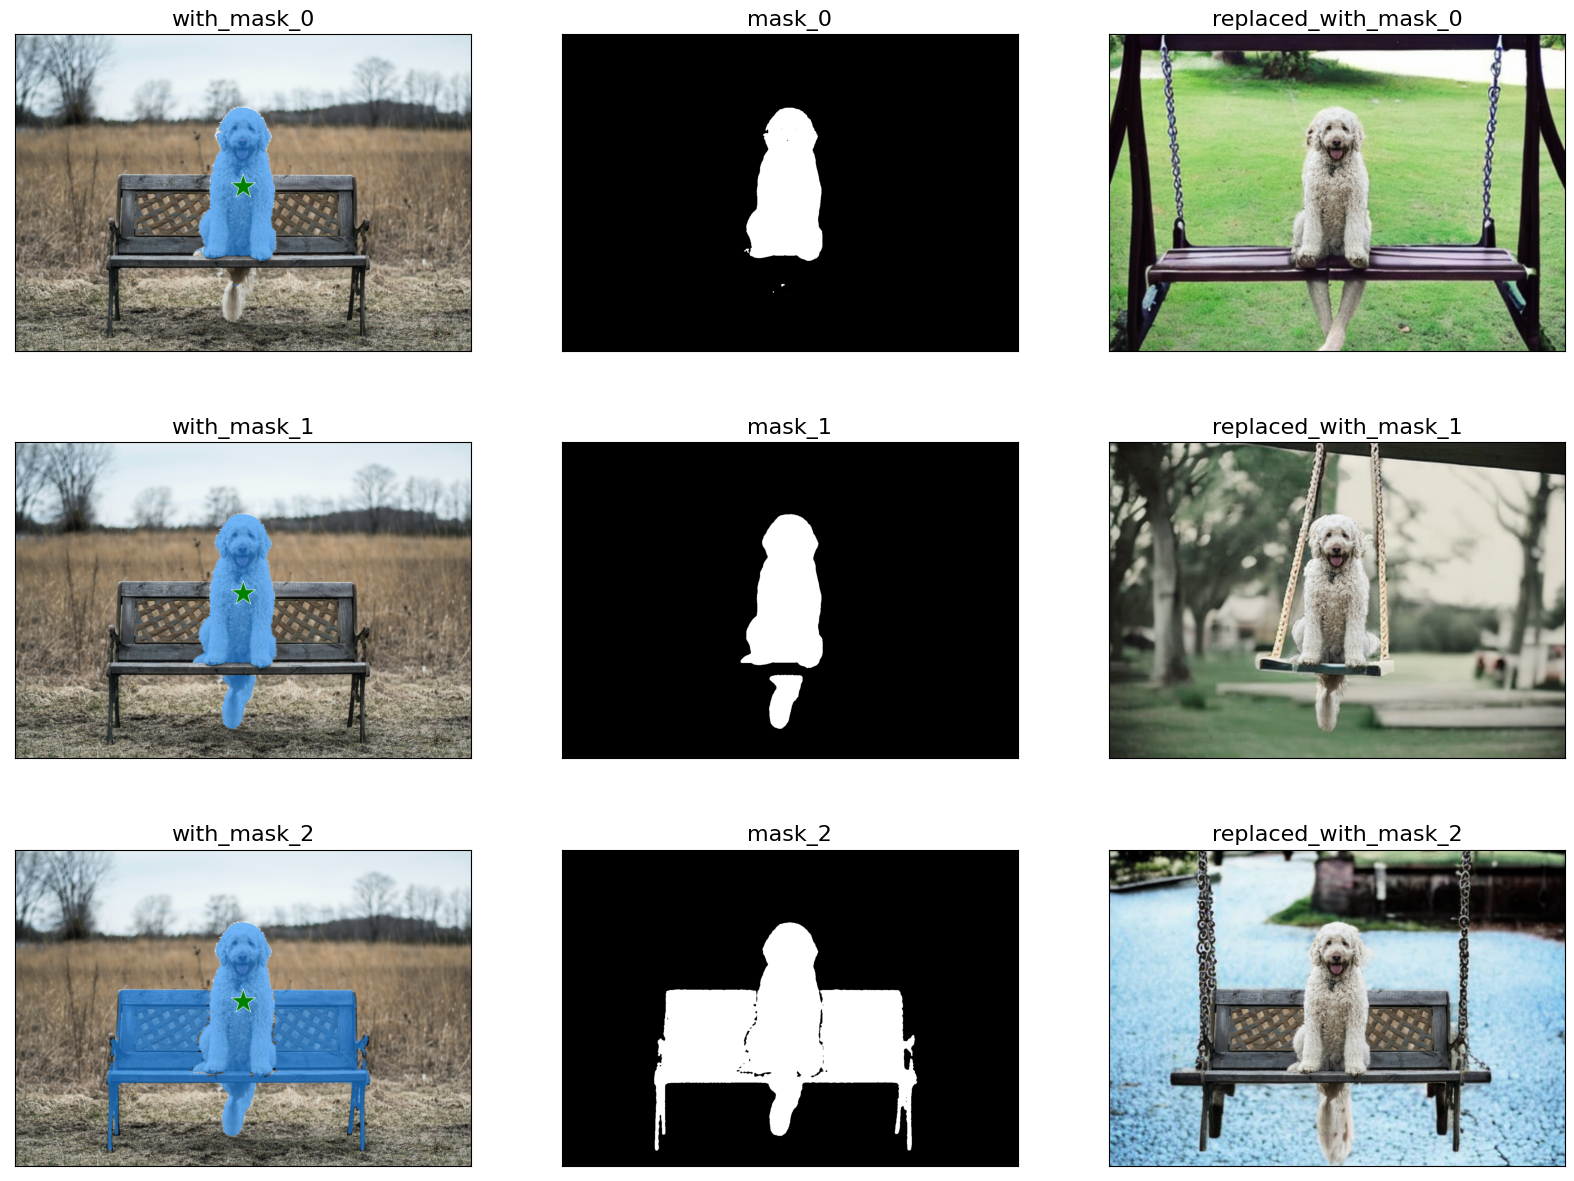
image_path = './example/replace-anything/dog1.png'
modify_image_path = './results/dog1/'
image_class = ['with_mask_','mask_','replaced_with_mask_']
show_original_image(image_path, modify_image_path)
show_modify_image(modify_image_path,image_class)
!python remove_anything_video.py \
    --input_video ./example/video/paragliding/original_video.mp4 \
    --coords_type key_in \
    --point_coords 652 162 \
    --point_labels 1 \
    --dilate_kernel_size 15 \
    --output_dir ./results \
    --sam_model_type "vit_h" \
    --sam_ckpt ./pretrained_models/sam_vit_h_4b8939.pth \
    --lama_config lama/configs/prediction/default.yaml \
    --lama_ckpt ./pretrained_models/big-lama \
    --tracker_ckpt vitb_384_mae_ce_32x4_ep300 \
    --vi_ckpt ./pretrained_models/sttn.pth \
    --mask_idx 2 \
    --fps 25
from ipywidgets import Output, GridspecLayout
from IPython import display
filepaths = ["./example/video/paragliding/original_video.mp4","./results/w_mask_15.mp4",
             "./results/removed_w_mask_15.mp4"]
grid = GridspecLayout(1,len(filepaths))
for i, filepath in enumerate(filepaths):
    out = Output()
    with out:
        display.display(display.Video(filepath, embed=True,width=250,height=140))
    grid[0, i] = out
grid
运行完成后,从左到右依次为原始视频,选中(去除)对象的视频,去除后的视频。
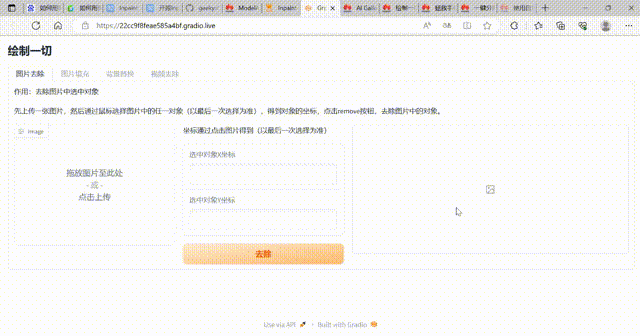
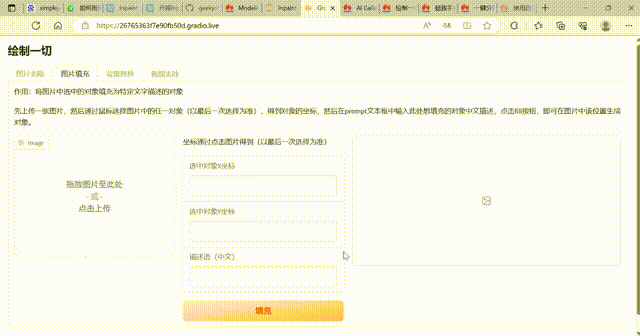
为了方便大家使用一键分割案例,当前增加了Gradio可视化部署案例演示。
示例效果如下:
图片去除
图片填充
背景替换