04.使用 github actions+docker 自动部署前后端分离项目 zhontai (.net core+vue)

使用,github,actions,docker,自动,部署,前后,分离,项目,zhontai,net,core,vue · 浏览次数 : 314

小编点评

## Key Build Complete and Cloud Server Firewall Port Configuration This summary provides a step-by-step guide on how to build the frontend and deploy it to a cloud server. **Step 1: Build the Frontend** * Use `actions/checkout@v3` to pull the repository code. * Use `actions/setup-node@v3` to install Node.js v18.17.1. * Use `actions/setup-dotnet@v3` to install .NET Core v3.2.0. * Use `actions/upload-artifact@v3` to upload the build artifacts. **Step 2: Build the Docker Image** * Build a Docker image using the `docker build` command. * Use `docker run` to start an Nginx container with the built image. * Mount the `dist` directory into the container. * Copy the `nginx.conf` file to the container. * Start the Nginx container. **Step 3: Configure Nginx Server** * Modify the `nginx.conf` file to configure the server. * Use `docker container ls -a` to check if the container already exists. * Use `docker run` to start an Nginx container with the modified `nginx.conf` file. **Step 4: Deploy the Front-End** * Use `docker exec` to access the Nginx container. * Start the `nginx` service. * Use `docker logs` to monitor the server output. **Additional Notes:** * Ensure the `remote_*` variables in the workflow are configured correctly. * This example uses a basic Nginx configuration with a single container. * You can modify the code and settings to suit your specific needs. * Refer to the referenced documentation for further details and configuration options.

正文

前言

Github Actions是什么?是 GitHub 提供的一种持续集成/持续部署(CI/CD)工作流程自动化服务,助力项目的自动化构建、测试和部署。
依托于平台,本文将分享使用 GitHub Actions 完成对一个.Net Core+Vue 的前后端分离项目 zhontai 的构建,并使用 docker 部署到云服务器(阿里云)

使用说明

经过一番尝试学习,个人感受是其功能齐全,文档完善,使用 GitHub 托管仓库完成自己的 CI/CD,不再需要自己搞构建服务了。
关于使用费用问题:每个用户/组织都有免费的使用额度:2000 分钟/月, 不同的项目归类到不同的组织,完全足够使用了。

本文环境

后端 asp.net core7.0 项目的部署

执行步骤及重点

  1. 新建 github actions 配置文件: .github\workflows\test-deploy.yml

    • 仓库的 .github/workflows 目录中定义将会被 github actions 识别
    • 测试可以用,生产则可以用 on: workflow_dispatch 指定手动构建
  2. 拉取分支

    • actions 库:actions/checkout@v3
  3. 安装 Dotnet7

    • actions 库:actions/setup-dotnet@v3
  4. 执行打包生成 publish_output 目录

    • dotnet publish ./src/hosts/ZhonTai.Host -c Release -o ./publish_output --self-contained true --runtime linux-x64 --framework net7.0
  5. 使用 ssh 部署到服务器

    • actions 库:easingthemes/ssh-deploy@v4.1.8
    • 将 publish_output 复制到 docker 目录,在将 docker 目录,将其上传到服务器后执行脚本
    • ssh 连接后需要创建挂载目录,一个数据库的目录,一个上传目录
    • 默认 ZhonTai.Host 的端口是 8000
    • 创建挂载目录:mkdir /root/zhontai/volumns/upload -p
    • docker 运行:docker run --name my-zhontai-apihost -d -p 9902:8000 -e -v /root/zhontai/volumns/admindb.db:/app/admindb.db -v /root/zhontai/volumns/upload:/app/wwwroot/upload zhontai/apihost:latest
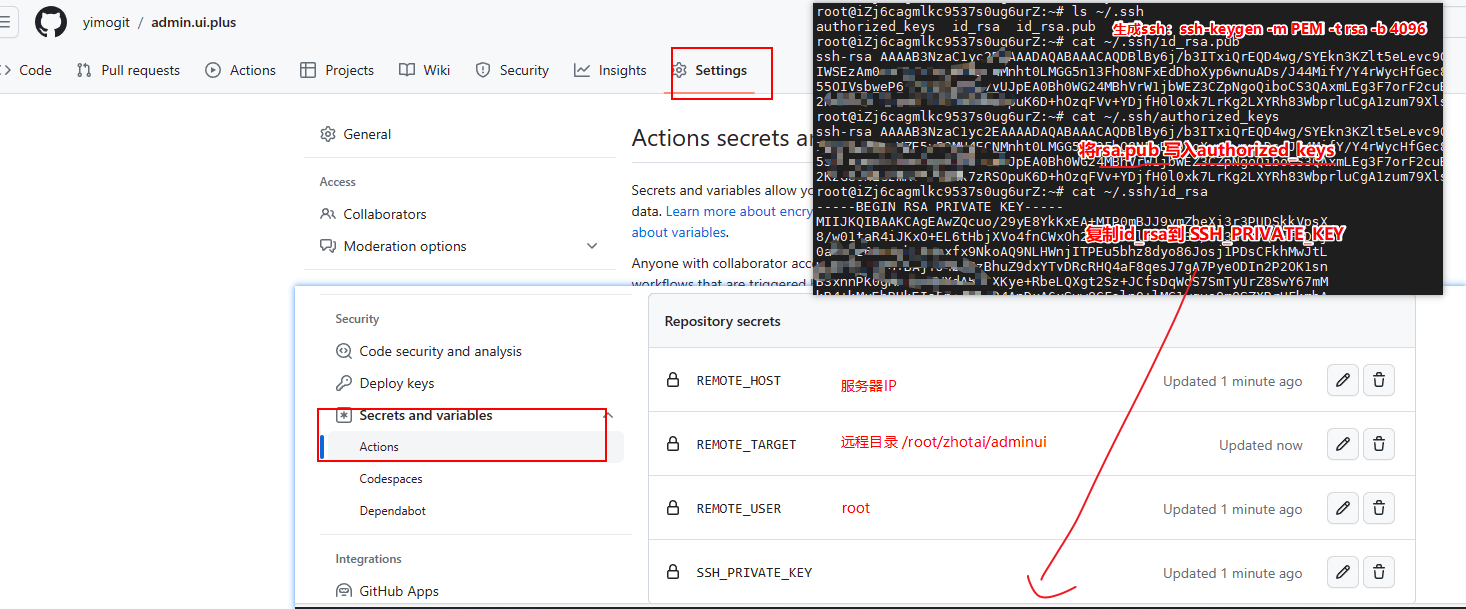
  6. ssh 使用需要配置的环境变量

    • ${{ secrets.SSH_PRIVATE_KEY }}:服务器的 ssh 密钥:~/.ssh/id_rsa 内容
    • ${{ secrets.REMOTE_HOST }}:服务器 IP: xxx.xxx.xxx.xxx
    • ${{ secrets.REMOTE_USER }}:用户名 root
    • ${{ secrets.REMOTE_TARGET }}:远程目录 /root/zhontai/api
  7. 配置需要的环境变量

    • 配置路径:项目->Settings->Security->Secrets and variables->Actions->New repository secret
    • ssh 的生成参考ssh-deploy 配置部分
    • ssh-keygen -m PEM -t rsa -b 4096 生成 ssh,然后复制公钥到 authorized_keys
    • 设置完最好是重启下
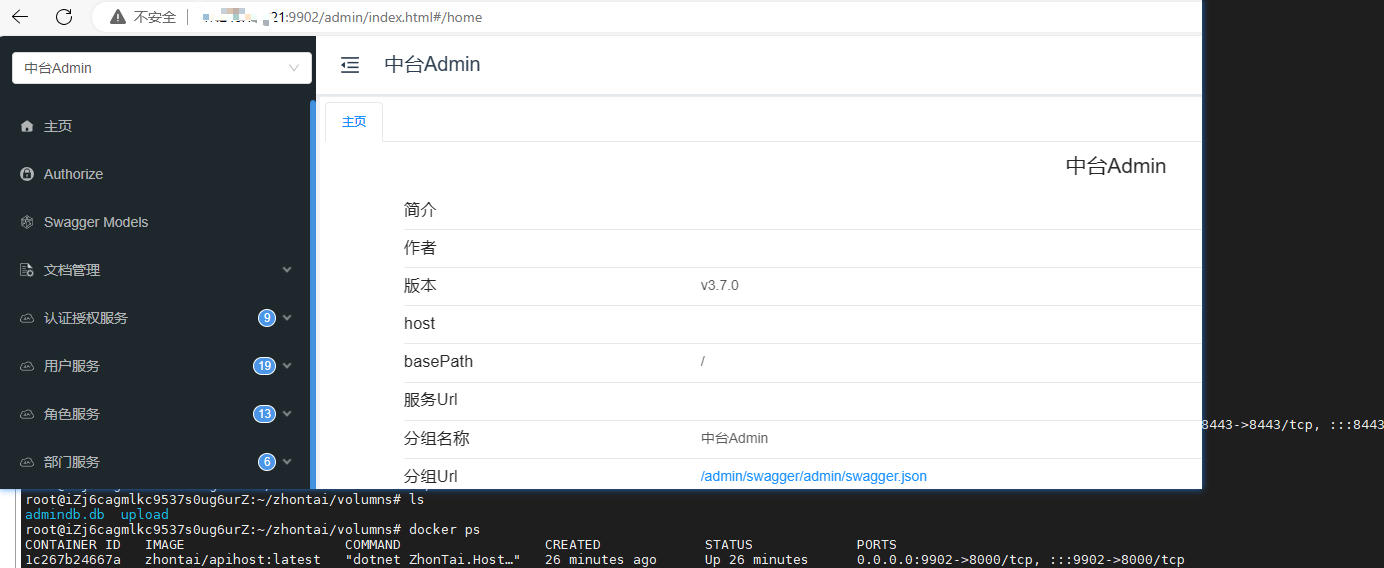
  8. 构建完成

    • 记得开启云服务器的防火墙端口:9902,即可在浏览器中访问到前台页面

.github/workflows/test-deploy.yml

# test-deploy.yml
name: 后端测试环境直接部署
# 手动构建
#on: workflow_dispatch
on:
  push:
    branches:
      - master
jobs:
  build:
    runs-on: ubuntu-latest
    steps:
      # 拉取仓库文件
      - name: 拉取master分支代码
        uses: actions/checkout@v3
        with:
          # 默认当前分支
          ref: 'master'
      # action命令,安装Dotnet7
      - name: 安装 Dotnet7
        uses: actions/setup-dotnet@v3
        with:
          dotnet-version: 7.0.400
      # 执行打包命令
      - run: dotnet --version && dotnet publish ./src/hosts/ZhonTai.Host -c Release -o ./publish_output --self-contained true --runtime linux-x64 --framework net7.0
      # 将dist复制到docker目录中
      - run: cp ./publish_output ./docker -rf
      # 使用 ssh 将api-dist文件拷贝到 linux
      - name: 使用ssh部署
        uses: easingthemes/ssh-deploy@v4.1.8
        with:
          SSH_PRIVATE_KEY: ${{ secrets.SSH_PRIVATE_KEY }}
          ARGS: '-rlgoDzvc -i --delete'
          SOURCE: 'docker'
          REMOTE_HOST: ${{ secrets.REMOTE_HOST }}
          REMOTE_USER: ${{ secrets.REMOTE_USER }}
          TARGET: ${{ secrets.REMOTE_TARGET }}
          EXCLUDE: '/node_modules/'
          SCRIPT_BEFORE: |
            mkdir ${{ secrets.REMOTE_TARGET }} -p
          SCRIPT_AFTER: |
            cd ${{ secrets.REMOTE_TARGET }}
            cd docker
            docker build --rm -f ./Dockerfile -t zhontai/apihost:latest .
            # 检查容器是否存在
            if docker container ls -a | grep -q "my-zhontai-apihost"; then
                echo "容器已存在"
                # 停止并移除容器
                docker stop my-zhontai-apihost
                docker rm my-zhontai-apihost
            fi
            # 容器挂载的路径
            mkdir /root/zhontai/volumns/upload -p
            docker run --name my-zhontai-apihost -d -p 9902:8000  -e ASPNETCORE_ENVIRONMENT=Testing  -v /root/zhontai/volumns/admindb.db:/app/admindb.db -v /root/zhontai/volumns/upload:/app/wwwroot/upload zhontai/apihost:latest

docker/Dockerfile

  • 打包在 GitHub Actions 完成,生成了 publish_output,所以只需要运行时镜像部署即可
  • 指定工作目录为 /app
  • 指定监听应用端口,Admin.Core 默认端口为 8000,启动库为 ZhonTai.Host
# 使用 ASP.NET Core 运行时镜像作为最终镜像
FROM mcr.microsoft.com/dotnet/aspnet:7.0 AS runtime

WORKDIR /app

# 复制构建好的应用程序文件
COPY ./publish_output /app

# 设置运行时环境变量
ENV ASPNETCORE_URLS=http://+:8000

# 指定容器启动时要执行的命令
ENTRYPOINT ["dotnet", "ZhonTai.Host.dll"]

前台 vue 项目的部署

整个过程类似镜像构建一样,一步步设置自己需要的环境,然后执行命令或者设置对应的操作,可以在使用前过一遍中文文档有个大概的了解,本文就跳过基础介绍直接说实现方式及重点

执行的步骤及重点

  1. 新建 github actions 配置文件: .github\workflows\test-deploy.yml

    • 仓库的 .github/workflows 目录中定义将会被 github actions 识别
    • 测试可以用,生产则可以用 on: workflow_dispatch 指定手动构建
  2. 拉取分支

    • actions 库:actions/checkout@v3
  3. 安装 node v18.17.1

    • actions 库:actions/setup-node@v3
  4. 执行打包生成 dist 目录

    • npm install && npm run build
    • 默认打包使用的 production 环境的配置,如需打包其他环境则可以使用npm run build --mode testing 指定环境 testing,并使用 .env.testing 环境变量文件
    • 使用echo -e "\nVITE_API_URL=${{ secrets.API_HOST }}" >> .env.production 将配置中的 API_HOST 写入环境变量中
  5. 使用 ssh 部署到服务器

    • actions 库:easingthemes/ssh-deploy@v4.1.8
    • 将 dist 复制到 docker 目录,在将 docker 目录,将其上传到服务器后执行脚本
  6. ssh 使用需要配置的环境变量

    • ${{ secrets.SSH_PRIVATE_KEY }}:服务器的 ssh 密钥
    • ${{ secrets.REMOTE_HOST }}:服务器 IP
    • ${{ secrets.REMOTE_USER }}:用户名
    • ${{ secrets.REMOTE_TARGET }}:远程目录
    • ${{ secrets.API_HOST }}: 接口地址,配置后写入VITE_API_URL=xxx.com
  7. 配置需要的环境变量

    • 配置路径:项目->Settings->Security->Secrets and variables->Actions->New repository secret
    • ssh 的生成参考ssh-deploy 配置部分
    • ssh-keygen -m PEM -t rsa -b 4096 生成 ssh,然后复制公钥到 authorized_keys
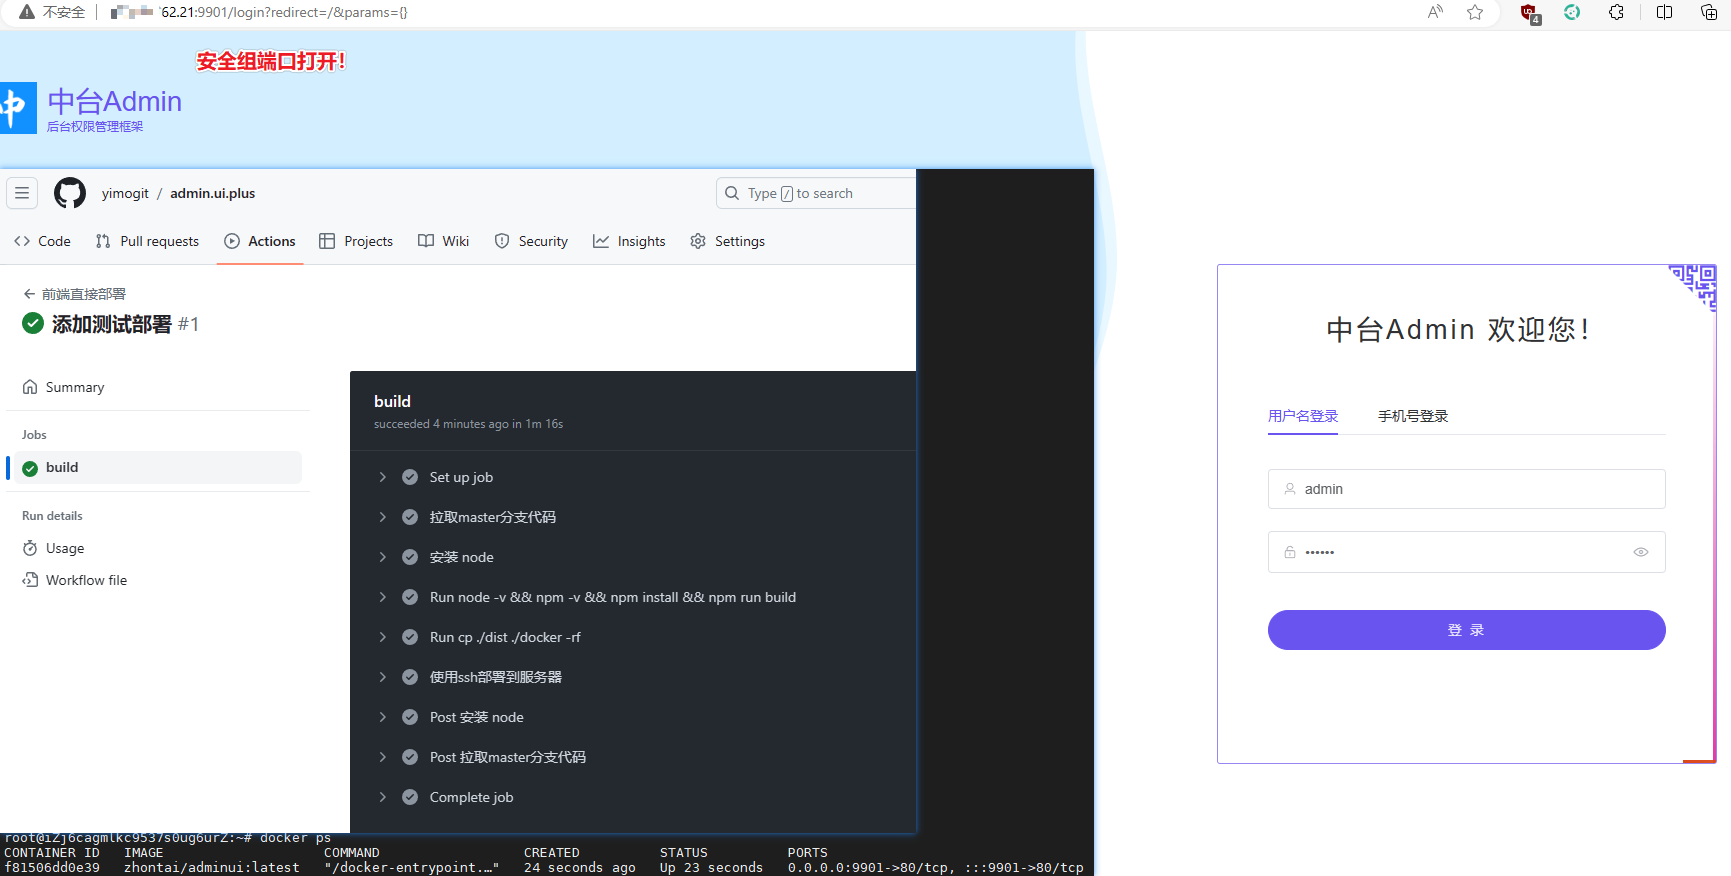
  8. 构建完成

    • 记得开启云服务器的防火墙端口:9901,即可在浏览器中访问到前台页面

.github/workflows/test-deploy.yml

  • 完整的部署配置
# test-deploy.yml
name: 前端直接部署
# 手动构建
# on: workflow_dispatch
# 自动构建
on:
  push:
    branches:
      - master
jobs:
  build:
    runs-on: ubuntu-latest
    steps:
      # 拉取仓库文件
      - name: 拉取master分支代码
        uses: actions/checkout@v3
        with:
          # 默认当前分支
          ref: 'master'
      # action命令,安装Node v18.17.1
      - name: 安装 node
        uses: actions/setup-node@v3
        with:
          node-version: 18.17.1
          cache: 'npm'
      # 执行打包命令
      - run: |
          if [ -n "${{ secrets.API_HOST }}" ]; then
            # 使用设置中的接口地址
            echo -e "\nVITE_API_URL=${{ secrets.API_HOST }}" >> .env.production
          fi
      - run: node -v && npm -v && npm install && npm run build
      # 将dist复制到docker目录中
      - run: cp ./dist ./docker -rf
      # 使用 ssh 将dist文件拷贝到 linux
      - name: 使用ssh部署到服务器
        uses: easingthemes/ssh-deploy@v4.1.8
        with:
          SSH_PRIVATE_KEY: ${{ secrets.SSH_PRIVATE_KEY }}
          ARGS: '-rlgoDzvc -i --delete'
          SOURCE: 'docker'
          REMOTE_HOST: ${{ secrets.REMOTE_HOST }}
          REMOTE_USER: ${{ secrets.REMOTE_USER }}
          TARGET: ${{ secrets.REMOTE_TARGET }}
          EXCLUDE: '/node_modules/'
          SCRIPT_BEFORE: |
            mkdir ${{ secrets.REMOTE_TARGET }} -p
          SCRIPT_AFTER: |
            cd ${{ secrets.REMOTE_TARGET }}
            cd docker
            docker build --rm -f ./Dockerfile -t zhontai/adminui:latest .
            # 检查容器是否存在
            if docker container ls -a | grep -q "my-zhontai-adminui"; then
                echo "容器已存在,停止并移除容器"
                docker stop my-zhontai-adminui
                docker rm my-zhontai-adminui
            fi
            docker run --name my-zhontai-adminui -d -p 9901:80 zhontai/adminui:latest

docker/Dockerfile

  • 使用 nginx 1.18 镜像,添加前端页面及 nginx 配置
  • 对应使用脚本:docker build --rm -f ./Dockerfile -t zhontai/adminui:latest .
FROM nginx:1.18
EXPOSE 80
COPY ./dist /usr/share/nginx/html
COPY ./nginx.conf /etc/nginx/conf.d/default.conf

docker/nginx.conf

  • nginx v1.18 的配置,外层没有 http 节点了
  • 并且会覆盖默认的 default.conf 才行
server {
    listen       80;
    server_name  localhost;
    charset utf-8;
    location / {
        root   /usr/share/nginx/html;
        try_files $uri $uri/ /index.html;
        index  index.html index.htm;
    }

    #error_page  404              /404.html;
    error_page   500 502 503 504  /50x.html;
    location = /50x.html {
        root   html;
    }
}

一些碎碎念

  1. 本文的做法适用于测试,如果要构建生产,还需要更加严谨,比如需要手动执行,而不是自动构建,以及可以将打包和部署分开,生成构建物体,快速回滚部署
  2. 本文为了演示远程 docker,所以每次都是构建了 docker,其实也可以直接上传到服务器目录,不需要重启 docker
  3. 文章大部分都是用命令完成,方便迁移到其他构建工具,后续也可以直接在Github使用。

不完全踩坑记录

  • ssh部署:看了好久才看明白,一开始生成了没有复制到authorized_keys,然后生成了密钥没重启就是连接不上
  • docker nginx:nginx.conf挂载的地址不对,之前的旧版本是在/etc/nginx/nginx.conf,新的在/etc/nginx/conf.d/default.conf
  • nginx.conf的格式新版去掉了http节点,直接配置server节点就行,配置文件没对,导致误以为是我history模式nginx写法不对
  • 覆盖.env.production中接口地址的配置,想要换行加一句,试了好多次才行:echo -e "\nVITE_API_URL=xxx" >> .env.production
  • api项目挂载的位置搞错了几次:数据库和文件上传的地址分别是:/app/admindb.db,/app/wwwroot/upload
  • api项目挂载文件需要先行创建目录,启动后将会生成数据库
  • api项目的端口默认8000

时间过得太快了,周末两天第一次沉下心研究了一天Github Actions,各种尝试踩坑,第二天将过程整理分享出来,写完这句,发现眨眼间就周一了。
似乎学习,能让我在迷茫中找到些许方向吧。

By 易墨 转载请注明出处

相关资料

项目说明

如果对部署的项目感兴趣可以参考前两篇文章

Github Actions 相关地址

本文使用到的 action 库

与04.使用 github actions+docker 自动部署前后端分离项目 zhontai (.net core+vue)相似的内容:

04.使用 github actions+docker 自动部署前后端分离项目 zhontai (.net core+vue)

本文将分享使用 GitHub Actions 完成对一个.Net Core+Vue 的前后端分离项目 zhontai 的构建,并使用 docker 部署到云服务器(阿里云),及对docker部署.Net Core+Vue的一些经验分享。

.NET周报 【4月第5期 2023-04-30】

国内文章 基于 Github 平台的 .NET 开源项目模板. 嘎嘎实用! https://www.cnblogs.com/NMSLanX/p/17326728.html 大家好,为了使开源项目的维护和管理更方便一些,出于个人需求写了一款开源项目的模板,该模板基于 Github 平台,并使用 .NE

.NET周报 【4月第1期 2023-04-02】

国内文章 探索 SK 示例 -- GitHub 存储库中的机器人 https://www.cnblogs.com/shanyou/p/17280627.html 微软 3月22日 一篇文章“Semantic-kernel 嵌入和记忆:使用聊天UI探索GitHub Repos”[1] ,文章中进行了展

[转帖]Nginx 使用与异常处理

http://jartto.wang/2017/04/15/nginx-exception-handling/ 以前总是偷懒使用 Http-Server 来启动一个本地服务,后来花时间学习了一下 Nginx,感觉挺好用。总结整理一下,就当打点存档了。 一、简单介绍 Nginx — Ngine X,是

[转帖]使用 sysdig 进行监控和调试 linux 机器

https://cizixs.com/2017/04/27/sysdig-for-linux-system-monitor-and-analysis/ sysdig 简介 sysdig 官网 上对自己的介绍是: Open Source Universal System Visibility With

2023-04-26-微信安全模式下消息解析

在微信公众号的使用过程中,为了提高信息传输的安全性,可以在服务器配置中将消息加解密模式指定为安全模式。 启用安全模式后,公众号主动调用API的情况并不会受影响,只有被动回复用户的消息时才需要对消息进行加解密。 官方提供了5种开发语言的示例代码,参照官方给的C++示例代码,本文给出go语言的解密实现:

[转帖]UBUNTU时间同步

从UBUNTU16.04开始,就开始使用timedatectl/timesyncd服务进行时间同步,而不是常用的ntpdate/ntp。如果安装了chrony,那么timedatectl将会让位于chrony,避免两个同步服务出现竞争,这也同样适用于ntpd。 ntpdate已被timedatect

[转帖]Linux 流量监控工具:iptraf-ng 的安装与使用

环境 Linux/Ubuntu 18.04 + 安装iptraf-ng-1.2.1,可编译安装,安装包链接:iptraf-ng-1.2.1.zip 解压iptraf-ng-1.2.1 unzip ./iptraf-ng-1.2.1.zip 安装ncurses(系统是ubuntu18.04) sudo

[转帖]使用 TiFlash

TiDB试用 来源:TiDB 浏览 490 扫码 分享 2021-04-20 20:57:48 使用 TiFlash 按表构建 TiFlash 副本 查看表同步进度 使用 TiDB 读取 TiFlash 智能选择 Engine 隔离 手工 Hint 三种方式之间关系的总结 使用 TiSpark 读取

[转帖]使用 BR 命令行备份恢复

TiDB试用 来源:TiDB 浏览 404 扫码 分享 2021-04-20 20:49:42 使用 BR 命令行进行备份恢复 BR 命令行描述 命令和子命令 常用选项 使用 BR 命令行备份集群数据 备份全部集群数据 备份单个数据库的数据 备份单张表的数据 使用表库过滤功能备份多张表的数据 备份数