参考链接:redis学习
redis如何在linux安装
redis是内存性数据库,断电,数据丢失,进程重启,数据丢失
得配置redis的数据持久化,防止数据丢失
redis支持ms复制,读写分离,防止单点故障,数据丢失
[root@localhost ~]# cd /opt/
[root@localhost opt]# yum install redis -y
用yum安装的redis,默认配置文件在/etc/redis.conf
[root@localhost opt]# vim /etc/redis.conf # 打开如下参数即可
# 这里是绑定redis的启动地址,如果你支持远程连接,就改为0.0.0.0
bind 0.0.0.0
# 更改端口
port 6500
# 设置redis的密码
requirepass haohaio
# 默认打开了安全模式
protected-mode yes
# 打开一个redis后台运行的参数
daemonize yes
bind 0.0.0.0
port 6500
requirepass haohaio
protected-mode yes
daemonize yes
[root@localhost opt]# ps -ef | grep redis
root      27057   3041  0 00:04 pts/1    00:00:00 grep --color=auto redis
[root@localhost opt]# systemctl start redis
[root@localhost opt]# ps -ef | grep redis
root      27131   3041  0 00:04 pts/1    00:00:00 grep --color=auto redis
# 为什么systemctl start redis无法连接呢?
# 是因为这个命令默认连接的是6379端口,我们更改了redis端口,因此无法连接了
# 使用如下的命令,指定配置文件启动
[root@localhost opt]# redis-server /etc/redis.conf

# 检查redis的进程
[root@localhost opt]# ps -ef | grep redis
root      27178      1  0 00:05 ?        00:00:00 redis-server 0.0.0.0:6500
root      27184   3041  0 00:05 pts/1    00:00:00 grep --color=auto redis
-p 指定端口
-h 指定ip地址
auth指令,用于密码验证
[root@localhost opt]# redis-cli -p 6500 -h 10.0.0.129
10.0.0.129:6500> ping
(error) NOAUTH Authentication required.
10.0.0.129:6500>
10.0.0.129:6500> auth haohaio
OK
10.0.0.129:6500> ping
PONG
10.0.0.129:6500> flushdb  # 清空redis库
OK
10.0.0.129:6500> keys *  # 列出redis所有的key
(empty list or set)
向redis中写入一些数据,重启进程,查看数据是否会丢失
# 先杀死所有的redis进程,再重新写一个配置文件
[root@localhost opt]# pkill -9 redis
[root@localhost opt]# mkdir /s25redis
[root@localhost opt]# cd /s25redis/
[root@localhost s25redis]# vim no_rdb_redis.conf

bind 0.0.0.0
daemonize yes
[root@localhost s25redis]# redis-server no_rdb_redis.conf
[root@localhost s25redis]# ps -ef | grep redis
root     111958      1  0 23:06 ?        00:00:00 redis-server 0.0.0.0:6379
root     111964   3041  0 23:06 pts/1    00:00:00 grep --color=auto redis
以下的操作,都是为了演示,redis如果不配置持久化,数据会丢失
[root@localhost s25redis]# redis-cli
127.0.0.1:6379> ping
PONG
127.0.0.1:6379> set name wohaoe
OK
127.0.0.1:6379> set name2 nimenebue
OK
127.0.0.1:6379> keys *
1) "name2"
2) "name"
127.0.0.1:6379> exit
[root@localhost s25redis]# pkill -9 redis
[root@localhost s25redis]# redis-server no_rdb_redis.conf
[root@localhost s25redis]# redis-cli
127.0.0.1:6379> keys *
(empty list or set)
127.0.0.1:6379>
[root@localhost s25redis]# cd /s25redis
[root@localhost s25redis]# vim s25_rdb_redis.conf
daemonize yes		          # 后台运行
port 6379				      # 端口
logfile /data/6379/redis.log  # 指定redis的运行日志,存储位置
dir /data/6379		          # 指定redis的数据文件,存放路径
dbfilename  s25_dump.rdb	  # 指定数据持久化的文件名字
bind 127.0.0.1		          # 指定redis的运行ip地址
# redis触发save指令,用于数据持久化的时间机制
# 900秒之内有1个修改的命令操作,如set .mset,del
save 900 1
# 在300秒内有10个修改类的操作
save 300 10
# 60秒内有10000个修改类的操作
save 60  10000
daemonize yes
port 6379
logfile /data/6379/redis.log
dir /data/6379
dbfilename  s25_dump.rdb
bind 127.0.0.1
save 900 1
save 300 10
save 60  10000
# 写入了一个key
set  name  很快就下课让大家去吃饭
# 快速的执行了10次的修改类的操作
set name hehe
set name1 haha
...

# 新浪微博,1秒中内,写入了20w个新的key,因此也就是每分钟,进行一次数据持久化了
# 2.创建redis的数据文件夹,
[root@localhost s25redis]# mkdir -p /data/6379

# 3.杀死之前所有的redis,防止扰乱实验
[root@localhost s25redis]# pkill -9 redis

# 4.指定配置了rdb的redis配置文件,启动
[root@localhost s25redis]# redis-server s25_rdb_redis.conf
[root@localhost s25redis]# ps -ef | grep redis
root     113393      1  0 23:29 ?        00:00:00 redis-server 127.0.0.1:6379
root     113406   3041  0 23:29 pts/1    00:00:00 grep --color=auto redis

# 5.如果没有触发redis的持久化时间机制,数据文件是不会生成的,数据重启进程也会丢

# 6.可以通过编写脚本,让redis手动执行save命令,触发持久化,在redis命令行中,直接输入save即可触发持久化
127.0.0.1:6379> set name chaochao
OK
127.0.0.1:6379> set addr shahe
OK
127.0.0.1:6379> set age 18
OK
127.0.0.1:6379> keys *
1) "age"
2) "addr"
3) "name"
127.0.0.1:6379> save
OK
127.0.0.1:6379> exit
[root@localhost s25redis]# pkill -9 redis
[root@localhost s25redis]# redis-server s25_rdb_redis.conf
[root@localhost s25redis]# redis-cli
127.0.0.1:6379> keys *
1) "addr"
2) "age"
3) "name"
127.0.0.1:6379>

# 7.存在了rdb持久化的文件之后,重启redis进程,数据也不会丢了,redis在重启之后,会读取s25_dump.rdb文件中的数据
[root@localhost ~]# cd /data/6379/
[root@localhost 6379]# ls
redis.log  s25_dump.rdb

# 8.rdb的弊端在于什么,如果没有触发持久化机制,就发生了机器宕机,数据就会丢失了,因此redis有一个更好的AOF持久化机制
把修改类的redis命令操作,记录下来,追加写入到AOF文件中,且是我们能够看得懂的日志文件
[root@localhost ~]# cd /s25redis/
[root@localhost s25redis]# pkill -9 redis
[root@localhost s25redis]# vim s25_aof_redis.conf
# 写入如下内容
daemonize yes
port 6379
logfile /data/6379aof/redis.log
dir /data/6379aof/
appendonly yes	        # 开启aof功能
appendfsync everysec	# 每秒钟持久化一次
daemonize yes
port 6379
logfile /data/6379aof/redis.log
dir /data/6379aof/
appendonly yes
appendfsync everysec
[root@localhost s25redis]# mkdir -p /data/6379aof/
[root@localhost s25redis]# redis-server s25_aof_redis.conf
[root@localhost s25redis]# ps -ef | grep redis
root     114730      1  0 23:49 ?        00:00:00 redis-server *:6379
root     114750   3041  0 23:49 pts/1    00:00:00 grep --color=auto redis
[root@localhost ~]# cd /data/
[root@localhost data]# ls
6379  6379aof
[root@localhost data]# cd 6379aof/
[root@localhost 6379aof]# ls
appendonly.aof  redis.log
[root@localhost s25redis]# redis-cli
127.0.0.1:6379> keys *
(empty list or set)
127.0.0.1:6379> set name zhunbeixiakechifan
OK
127.0.0.1:6379> set name2 xinkudajiale
OK
127.0.0.1:6379> keys *
1) "name2"
2) "name"
127.0.0.1:6379>
127.0.0.1:6379> exit
[root@localhost s25redis]# pkill -9 redis
[root@localhost s25redis]# redis-server s25_aof_redis.conf
[root@localhost s25redis]# redis-cli
127.0.0.1:6379> keys *
1) "name"
2) "name2"
127.0.0.1:6379>
在一台机器上运行2个及以上的redis,是redis支持多实例的功能,基于端口号的不同,就能够运行多个相互独立的redis数据库
什么是多实例
就是机器上运行了多个redis相互独立的进程
互不干扰的独立的数据库
叫做多个redis数据库的实例,基于配置文件区分即可
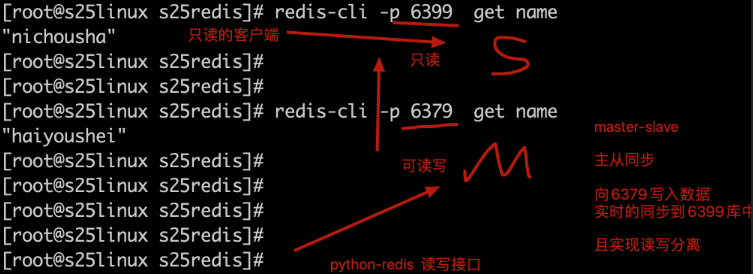
如图是redis的多实例功能,且配置主从同步的图
[root@localhost s25redis]# vim s25-master-redis.conf
port 6379
daemonize yes
pidfile /s25/6379/redis.pid
loglevel notice
logfile "/s25/6379/redis.log"
dbfilename dump.rdb
dir /s25/6379
protected-mode no
[root@localhost s25redis]# vim s25-slave-redis.conf
port 6389
daemonize yes
pidfile /s25/6389/redis.pid
loglevel notice
logfile "/s25/6389/redis.log"
dbfilename dump.rdb
dir /s25/6389
protected-mode no
slaveof  127.0.0.1  6379  # 也可直接在配置文件中,定义好复制关系,启动后,立即就会建立复制
[root@localhost s25redis]# mkdir -p /s25/{6379,6389}
[root@localhost s25redis]# redis-server s25-master-redis.conf
[root@localhost s25redis]# redis-server s25-slave-redis.conf
[root@localhost s25redis]# ps -ef | grep redis
root       4476      1  0 09:54 ?        00:00:00 redis-server *:6379
root       4480      1  0 09:54 ?        00:00:00 redis-server *:6389
root       4493   3186  0 09:55 pts/0    00:00:00 grep --color=auto redis
# 通过一条命令,配置他们的复制关系,注意,这个命令只是临时配置redis的复制关系,想要永久修改,还得修改配置文件
[root@s25linux s25redis]# redis-cli -p 6389 slaveof 127.0.0.1 6379
OK
[root@localhost s25redis]# redis-cli -p 6379 info replication
# Replication
role:master
connected_slaves:1
slave0:ip=127.0.0.1,port=6389,state=online,offset=141,lag=1
master_repl_offset:141
repl_backlog_active:1
repl_backlog_size:1048576
repl_backlog_first_byte_offset:2
repl_backlog_histlen:140
[root@localhost s25redis]# redis-cli -p 6389 info replication
# Replication
role:slave
master_host:127.0.0.1
master_port:6379
master_link_status:up
master_last_io_seconds_ago:2
master_sync_in_progress:0
slave_repl_offset:169
slave_priority:100
slave_read_only:1
connected_slaves:0
master_repl_offset:0
repl_backlog_active:0
repl_backlog_size:1048576
repl_backlog_first_byte_offset:0
repl_backlog_histlen:0
此时可以向6379中写入数据,能够同步到6389中
6389是一个只读的数据库,无法写入数据
[root@localhost s25redis]# redis-cli -p 6389
127.0.0.1:6389> keys *
(empty list or set)
127.0.0.1:6389>
[root@localhost s25redis]# redis-cli -p 6379
127.0.0.1:6379> keys *
(empty list or set)
127.0.0.1:6379>
[root@localhost s25redis]# redis-cli -p 6379
127.0.0.1:6379> set name nichousha
OK
127.0.0.1:6379> keys *
1) "name"
127.0.0.1:6379> get name
"nichousha"
127.0.0.1:6379>
[root@localhost s25redis]# redis-cli -p 6389
127.0.0.1:6389> keys *
1) "name"
127.0.0.1:6389> get name
"nichousha"
127.0.0.1:6389> set name1 "chounizadi"
(error) READONLY You can't write against a read only slave.
127.0.0.1:6389>
[root@localhost s25redis]# redis-cli -p 6379
127.0.0.1:6379> keys *
1) "name"
127.0.0.1:6379> set name2 "chounizadile"
OK
127.0.0.1:6379> keys *
1) "name2"
2) "name"
127.0.0.1:6379>
[root@localhost s25redis]# redis-cli -p 6389
127.0.0.1:6389> keys *
1) "name2"
2) "name"
127.0.0.1:6389>
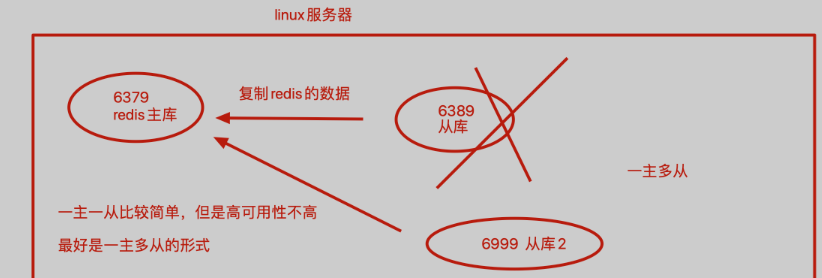
[root@localhost s25redis]# vim s25-slave2-redis.conf
port 6399
daemonize yes
pidfile /s25/6399/redis.pid
loglevel notice
logfile "/s25/6399/redis.log"
dbfilename dump.rdb
dir /s25/6399
protected-mode no
slaveof  127.0.0.1  6379
[root@localhost s25redis]# mkdir -p /s25/6399
[root@localhost s25redis]# redis-server s25-slave2-redis.conf
[root@localhost s25redis]# redis-cli -p 6399 info replication
# Replication
role:slave
master_host:127.0.0.1
master_port:6379
master_link_status:up
master_last_io_seconds_ago:6
master_sync_in_progress:0
slave_repl_offset:3003
slave_priority:100
slave_read_only:1
connected_slaves:0
master_repl_offset:0
repl_backlog_active:0
repl_backlog_size:1048576
repl_backlog_first_byte_offset:0
repl_backlog_histlen:0
[root@localhost s25redis]# redis-cli -p 6399
127.0.0.1:6399> keys *
1) "name"
2) "name2"
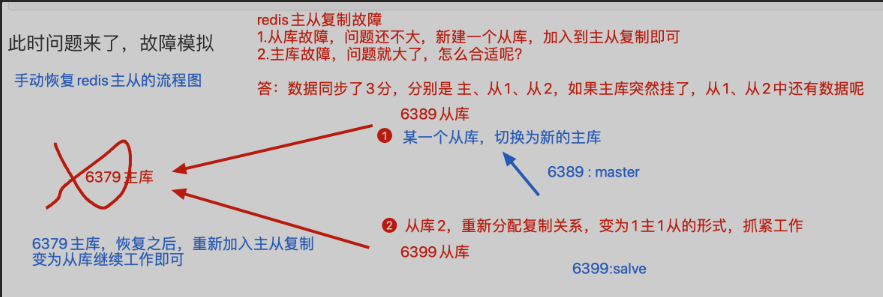
# 1.环境准备,准备3个redis的数据库实例,分别是 6379、6389、6399,配置好一主两从的关系
[root@localhost s25redis]# ps -ef | grep redis
root       4476      1  0 09:54 ?        00:00:02 redis-server *:6379
root       4480      1  0 09:54 ?        00:00:01 redis-server *:6389
root       5049      1  0 10:29 ?        00:00:00 redis-server *:6399
root       5153   3186  0 10:34 pts/0    00:00:00 grep --color=auto redis
# 分别查看复制关系
[root@localhost s25redis]# redis-cli -p 6379 info replication
# Replication
role:master
connected_slaves:2
slave0:ip=127.0.0.1,port=6389,state=online,offset=3507,lag=1
slave1:ip=127.0.0.1,port=6399,state=online,offset=3507,lag=1
master_repl_offset:3507
repl_backlog_active:1
repl_backlog_size:1048576
repl_backlog_first_byte_offset:2
repl_backlog_histlen:3506

# 2.此时直接干掉主库即可
# kill 6379的pid即可
[root@localhost s25redis]# kill -9 4476

# 3.此时留下2个孤零零的从库,没有了主人,还没法写入数据,很难受

# 4.此时一位从库,不乐意了,翻身农奴做主人,去掉自己的从库身份,没有这个从库的枷锁,我就是我自己的主人
[root@localhost s25redis]# redis-cli -p 6399 slaveof no one
OK
[root@localhost s25redis]# redis-cli -p 6399 info replication
# Replication
role:master
connected_slaves:0
master_repl_offset:0
repl_backlog_active:0
repl_backlog_size:1048576
repl_backlog_first_byte_offset:0
repl_backlog_histlen:0

# 5.此时6399已然是主库了,修改6389的复制信息,改为6399即可
[root@localhost s25redis]# redis-cli -p 6389 slaveof 127.0.0.1 6399
OK

# 6.此时检查他们的复制关系
[root@localhost s25redis]# redis-cli -p 6389 info replication
# Replication
role:slave
master_host:127.0.0.1
master_port:6399
master_link_status:up
master_last_io_seconds_ago:8
master_sync_in_progress:0
slave_repl_offset:29
slave_priority:100
slave_read_only:1
connected_slaves:0
master_repl_offset:0
repl_backlog_active:0
repl_backlog_size:1048576
repl_backlog_first_byte_offset:0
repl_backlog_histlen:0
[root@localhost s25redis]# redis-cli -p 6399 info replication
# Replication
role:master
connected_slaves:1
slave0:ip=127.0.0.1,port=6389,state=online,offset=43,lag=0
master_repl_offset:43
repl_backlog_active:1
repl_backlog_size:1048576
repl_backlog_first_byte_offset:2
repl_backlog_histlen:42

# 7.此时可以向主库6399写入数据,6389查看数据即可
从库挂掉,无所谓,重新再建立一个从库,加入主从复制即可
你会发现,如此的手动切换复制关系,是很难受的,如果在夜里凌晨四点,redis主库突然挂了,该怎么办?
因此该怎么办?
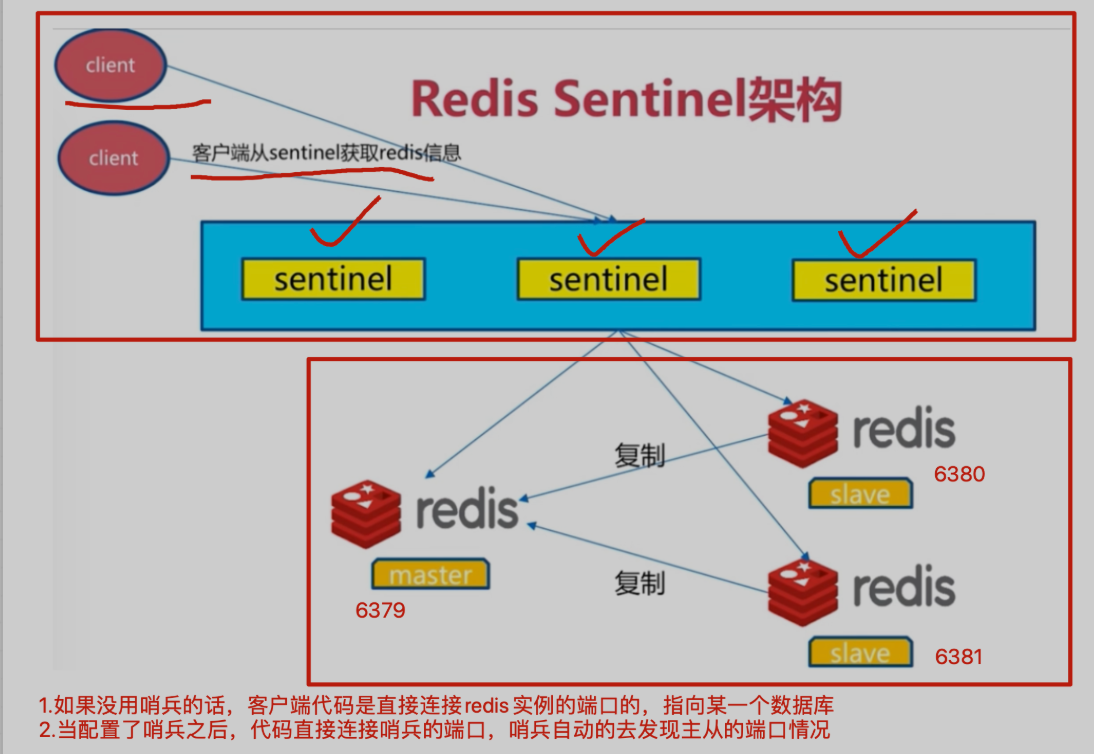
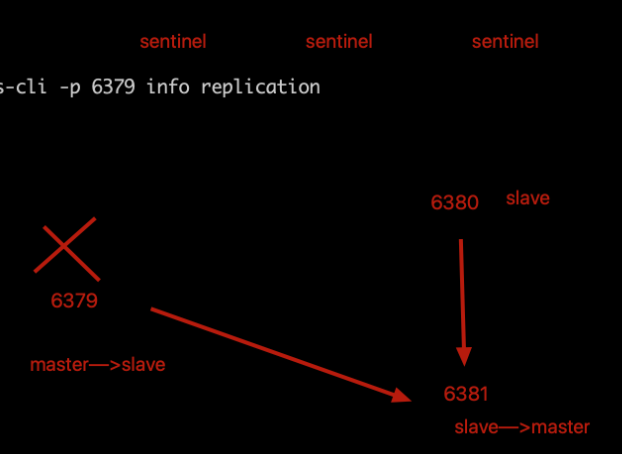
配置好redis的哨兵进程,一般都是使用3个哨兵(保安)
哨兵的作用是盯着redis主库,不断询问它是否存活,如果超过30s(设置的时间阈值)都没有回应,3个哨兵会判断主库宕机,谈话进行投票机制,因为3个哨兵,要自动的去选择从库为新的主库,每个哨兵的意见可能不一样
因此引出投票机制,少数服从多数
当多个哨兵达成一致,选择某一个从库阶段,自动的修改他们的配置文件,切换新的主库
此时如果宕机的主库,恢复后,哨兵也会自动将其加入集群,且自动分配为新的从库
这一切都是自动化,无需人为干预
# redis支持多实例        -------基于多个配置文件,运行处多个redis相互独立的进程
# s25-redis-6379.conf   -----主
[root@localhost ~]# pkill -9 redis
[root@localhost ~]# mkdir /s25sentinel
[root@localhost ~]# cd /s25sentinel/
[root@localhost s25sentinel]# mkdir -p /var/redis/data/
[root@localhost s25sentinel]# vim s25-redis-6379.conf
port 6379
daemonize yes
logfile "6379.log"
dbfilename "dump-6379.rdb"
dir "/var/redis/data/"
# s25-redis-6380.conf  ------从1
[root@localhost s25sentinel]# vim s25-redis-6380.conf
port 6380
daemonize yes
logfile "6380.log"
dbfilename "dump-6380.rdb"
dir "/var/redis/data/"
slaveof 127.0.0.1 6379
# s25-redis-6381.conf  -----从2
[root@localhost s25sentinel]# vim s25-redis-6381.conf
port 6381
daemonize yes
logfile "6381.log"
dbfilename "dump-6381.rdb"
dir "/var/redis/data/"
slaveof 127.0.0.1 6379
# 查看3个配置文件,准备分别启动该进程
[root@localhost s25sentinel]# ls
s25-redis-6379.conf  s25-redis-6380.conf  s25-redis-6381.conf

# 分别启动3个进程后,检查进程情况
[root@localhost s25sentinel]# redis-server s25-redis-6379.conf
[root@localhost s25sentinel]# redis-server s25-redis-6380.conf
[root@localhost s25sentinel]# redis-server s25-redis-6381.conf
[root@localhost s25sentinel]# ps -ef | grep redis
root       6763      1  0 12:36 ?        00:00:00 redis-server *:6379
root       6767      1  0 12:36 ?        00:00:00 redis-server *:6380
root       6772      1  0 12:36 ?        00:00:00 redis-server *:6381
root       6777   3186  0 12:36 pts/0    00:00:00 grep --color=auto redis

# 确认3个库的主从关系
[root@localhost s25sentinel]# redis-cli -p 6379 info replication
# Replication
role:master
connected_slaves:2
slave0:ip=127.0.0.1,port=6380,state=online,offset=71,lag=1
slave1:ip=127.0.0.1,port=6381,state=online,offset=71,lag=1
master_repl_offset:71
repl_backlog_active:1
repl_backlog_size:1048576
repl_backlog_first_byte_offset:2
repl_backlog_histlen:70
三个哨兵的配置文件,仅仅是端口号的不同
[root@localhost s25sentinel]# vim s25-sentinel-26379.conf
注释版
port 26379
dir /var/redis/data/
logfile "26379.log"

// 当前Sentinel节点监控 192.168.119.10:6379 这个主节点
// 2代表判断主节点失败至少需要2个Sentinel节点节点同意
// mymaster是主节点的别名
sentinel monitor s25msredis 127.0.0.1 6379 2

// 每个Sentinel节点都要定期PING命令来判断Redis数据节点和其余Sentinel节点是否可达,如果超过30000毫秒30s且没有回复,则判定不可达
sentinel down-after-milliseconds s25msredis 30000

// 当Sentinel节点集合对主节点故障判定达成一致时,Sentinel领导者节点会做故障转移操作,选出新的主节点,
// 原来的从节点会向新的主节点发起复制操作,限制每次向新的主节点发起复制操作的从节点个数为1
sentinel parallel-syncs s25msredis 1

// 故障转移超时时间为180000毫秒
sentinel failover-timeout s25msredis 180000
daemonize yes
无注释版
port 26379
dir /var/redis/data/
logfile "26379.log"
sentinel monitor s25msredis 127.0.0.1 6379 2
sentinel down-after-milliseconds s25msredis 30000
sentinel parallel-syncs s25msredis 1
sentinel failover-timeout s25msredis 180000
daemonize yes
[root@localhost s25sentinel]# vim s25-sentinel-26380.conf
port 26380
dir /var/redis/data/
logfile "26380.log"
sentinel monitor s25msredis 127.0.0.1 6379 2
sentinel down-after-milliseconds s25msredis 30000

sentinel parallel-syncs s25msredis 1

sentinel failover-timeout s25msredis 180000
daemonize yes
[root@localhost s25sentinel]# vim s25-sentinel-26381.conf
port 26381
dir /var/redis/data/
logfile "26381.log"
sentinel monitor s25msredis 127.0.0.1 6379 2
sentinel down-after-milliseconds s25msredis 30000

sentinel parallel-syncs s25msredis 1

sentinel failover-timeout s25msredis 180000
daemonize yes
# 分别启动3个哨兵进程,以及查看进程信息
[root@localhost s25sentinel]# redis-sentinel s25-sentinel-26379.conf
[root@localhost s25sentinel]# redis-sentinel s25-sentinel-26380.conf
[root@localhost s25sentinel]# redis-sentinel s25-sentinel-26381.conf
[root@localhost s25sentinel]# ps -ef | grep redis
root       6763      1  0 12:36 ?        00:00:00 redis-server *:6379
root       6767      1  0 12:36 ?        00:00:00 redis-server *:6380
root       6772      1  0 12:36 ?        00:00:00 redis-server *:6381
root       6910      1  0 12:46 ?        00:00:00 redis-sentinel *:26379 [sentinel]
root       6914      1  0 12:46 ?        00:00:00 redis-sentinel *:26380 [sentinel]
root       6918      1  0 12:46 ?        00:00:00 redis-sentinel *:26381 [sentinel]
root       6922   3186  0 12:46 pts/0    00:00:00 grep --color=auto redis

# 检查redis哨兵的配置文件,以及哨兵的状态
[root@localhost s25sentinel]# redis-cli -p 26379 info sentinel
# Sentinel
sentinel_masters:1
sentinel_tilt:0
sentinel_running_scripts:0
sentinel_scripts_queue_length:0
sentinel_simulate_failure_flags:0
master0:name=s25msredis,status=ok,address=127.0.0.1:6379,slaves=2,sentinels=3
# 1.检查6379的进程,杀死后,哨兵能够自动的,进行投票选举,剩下来的一个slave为新的master,然后重新分配主从关系
[root@localhost s25sentinel]#  ps -ef | grep redis
root       6763      1  0 12:36 ?        00:00:01 redis-server *:6379
root       6767      1  0 12:36 ?        00:00:01 redis-server *:6380
root       6772      1  0 12:36 ?        00:00:01 redis-server *:6381
root       6910      1  0 12:46 ?        00:00:01 redis-sentinel *:26379 [sentinel]
root       6914      1  0 12:46 ?        00:00:01 redis-sentinel *:26380 [sentinel]
root       6918      1  0 12:46 ?        00:00:01 redis-sentinel *:26381 [sentinel]
root       7163   3186  0 13:02 pts/0    00:00:00 grep --color=auto redis
[root@localhost s25sentinel]# redis-cli -p 6379 info replication
# Replication
role:master
connected_slaves:2
slave0:ip=127.0.0.1,port=6380,state=online,offset=249366,lag=0
slave1:ip=127.0.0.1,port=6381,state=online,offset=249366,lag=0
master_repl_offset:249366
repl_backlog_active:1
repl_backlog_size:1048576
repl_backlog_first_byte_offset:2
repl_backlog_histlen:249365
[root@localhost s25sentinel]# kill 6763
[root@localhost s25sentinel]# redis-cli -p 6380 info replication
# Replication
role:slave
master_host:127.0.0.1
master_port:6379
master_link_status:down
master_last_io_seconds_ago:-1
master_sync_in_progress:0
slave_repl_offset:272470
master_link_down_since_seconds:27
slave_priority:100
slave_read_only:1
connected_slaves:0
master_repl_offset:0
repl_backlog_active:0
repl_backlog_size:1048576
repl_backlog_first_byte_offset:0
repl_backlog_histlen:0
[root@localhost s25sentinel]# redis-cli -p 6381 info replication
# Replication
role:slave
master_host:127.0.0.1
master_port:6379
master_link_status:down
master_last_io_seconds_ago:-1
master_sync_in_progress:0
slave_repl_offset:272470
master_link_down_since_seconds:29
slave_priority:100
slave_read_only:1
connected_slaves:0
master_repl_offset:0
repl_backlog_active:0
repl_backlog_size:1048576
repl_backlog_first_byte_offset:0
repl_backlog_histlen:0
[root@localhost s25sentinel]# redis-cli -p 6380 info replication
# Replication
role:master
connected_slaves:0
master_repl_offset:0
repl_backlog_active:0
repl_backlog_size:1048576
repl_backlog_first_byte_offset:0
repl_backlog_histlen:0
[root@localhost s25sentinel]# redis-cli -p 6381 info replication
# Replication
role:slave
master_host:127.0.0.1
master_port:6380
master_link_status:up
master_last_io_seconds_ago:1
master_sync_in_progress:0
slave_repl_offset:834
slave_priority:100
slave_read_only:1
connected_slaves:0
master_repl_offset:0
repl_backlog_active:0
repl_backlog_size:1048576
repl_backlog_first_byte_offset:0
repl_backlog_histlen:0

# 2.故障的修复,修复6379这个redis数据库,且检查它的一个复制关系
# 6379数据库会重新假如到主从复制,且变为一个新的从库

# 3.如果想恢复他们的主从关系,全部kill掉,重新启动,默认就会以配置文件分配主从关系了


这6个配置文件,仅仅是端口号的不同而已
[root@localhost s25sentinel]# mkdir /s25rediscluster
[root@localhost s25sentinel]# cd /s25rediscluster/
[root@localhost s25rediscluster]# vim s25-redis-7000.conf
port 7000
daemonize yes
dir "/opt/redis/data"
logfile "7000.log"
dbfilename "dump-7000.rdb"
cluster-enabled yes   #开启集群模式
cluster-config-file nodes-7000.conf  #集群内部的配置文件
cluster-require-full-coverage no  #redis cluster需要16384个slot都正常的时候才能对外提供服务,换句话说,只要任何一个slot异常那么整个cluster不对外提供服务。 因此生产环境一般为no
[root@localhost s25rediscluster]# vim s25-redis-7001.conf
port 7001
daemonize yes
dir "/opt/redis/data"
logfile "7001.log"
dbfilename "dump-7001.rdb"
cluster-enabled yes
cluster-config-file nodes-7001.conf
cluster-require-full-coverage no
[root@localhost s25rediscluster]# vim s25-redis-7002.conf
port 7002
daemonize yes
dir "/opt/redis/data"
logfile "7002.log"
dbfilename "dump-7002.rdb"
cluster-enabled yes
cluster-config-file nodes-7002.conf
cluster-require-full-coverage no
[root@localhost s25rediscluster]# vim s25-redis-7003.conf
port 7003
daemonize yes
dir "/opt/redis/data"
logfile "7003.log"
dbfilename "dump-7003.rdb"
cluster-enabled yes
cluster-config-file nodes-7003.conf
cluster-require-full-coverage no
[root@localhost s25rediscluster]# vim s25-redis-7004.conf
port 7004
daemonize yes
dir "/opt/redis/data"
logfile "7004.log"
dbfilename "dump-7004.rdb"
cluster-enabled yes
cluster-config-file nodes-7004.conf
cluster-require-full-coverage no
[root@localhost s25rediscluster]# vim s25-redis-7005.conf
port 7005
daemonize yes
dir "/opt/redis/data"
logfile "7005.log"
dbfilename "dump-7005.rdb"
cluster-enabled yes
cluster-config-file nodes-7005.conf
cluster-require-full-coverage no
# 生成数据文件夹
[root@localhost s25rediscluster]# mkdir -p /opt/redis/data
# 分别启动6个redis节点,且检查进程
[root@s25linux s25rediscluster]# redis-server s25-redis-7000.conf
[root@s25linux s25rediscluster]# redis-server s25-redis-7001.conf
[root@s25linux s25rediscluster]# redis-server s25-redis-7002.conf
[root@s25linux s25rediscluster]# redis-server s25-redis-7003.conf
[root@s25linux s25rediscluster]# redis-server s25-redis-7004.conf
[root@s25linux s25rediscluster]# redis-server s25-redis-7005.conf
[root@localhost s25rediscluster]# ps -ef | grep redis
root       6767      1  0 12:36 ?        00:00:05 redis-server *:6380
root       6772      1  0 12:36 ?        00:00:05 redis-server *:6381
root       6910      1  0 12:46 ?        00:00:08 redis-sentinel *:26379 [sentinel]
root       6914      1  0 12:46 ?        00:00:08 redis-sentinel *:26380 [sentinel]
root       6918      1  0 12:46 ?        00:00:08 redis-sentinel *:26381 [sentinel]
root       8137      1  0 14:15 ?        00:00:00 redis-server *:7000 [cluster]
root       8141      1  0 14:15 ?        00:00:00 redis-server *:7001 [cluster]
root       8146      1  0 14:15 ?        00:00:00 redis-server *:7002 [cluster]
root       8150      1  0 14:15 ?        00:00:00 redis-server *:7003 [cluster]
root       8154      1  0 14:15 ?        00:00:00 redis-server *:7004 [cluster]
root       8166      1  0 14:15 ?        00:00:00 redis-server *:7005 [cluster]
root       8170   3186  0 14:15 pts/0    00:00:00 grep --color=auto redis
# 此时尝试写入数据,发现不能写入数据
# 因为现在仅仅是启动了6个redis节点,准备好了6匹马儿,马儿身上的框还没分配
[root@localhost s25rediscluster]# redis-cli -p 7000
127.0.0.1:7000> keys *
(empty list or set)
127.0.0.1:7000> set name hahahahahaha
(error) CLUSTERDOWN Hash slot not served
127.0.0.1:7000>
# ruby=====python    gem====pip3   gem是ruby的包管理工具
[root@localhost s25rediscluster]# yum install ruby -y
[root@localhost s25rediscluster]# ruby -v
ruby 2.0.0p648 (2015-12-16) [x86_64-linux]

[root@localhost s25rediscluster]# gem -v
2.0.14.1
[root@localhost s25rediscluster]# wget http://rubygems.org/downloads/redis-3.3.0.gem
[root@localhost s25rediscluster]# gem install -l redis-3.3.0.gem # 就如同python的 pip3 install xxxx
# redis-trib.rb 如何知道它的绝对路径?
# which 是搜索PATH环境变量中的命令的绝对路径
# find  才是搜索系统上的文件路径
[root@localhost s25rediscluster]# find / -name "redis-trib.rb"  # 默认会在redis数据库的编译安装路径下
redis-trib.rb create --replicas 1 127.0.0.1:7000 127.0.0.1:7001 127.0.0.1:7002 127.0.0.1:7003 127.0.0.1:7004 127.0.0.1:7005