windows 安装mysql 非常之详细

windows,mysql · 浏览次数 : 0

小编点评

在安装MySQL数据库时,请按照以下步骤操作: 1. 下载安装包:前往MySQL官方网站(https://dev.mysql.com/downloads/mysql/)下载适用于您操作系统的安装包。 2. 解压包:将下载的安装包解压到一个合适的文件夹,例如D:\MySQL\mysql1。 3. 创建my.ini配置文件:在解压后的文件夹中创建一个名为my.ini的文件。使用文本编辑器打开该文件,并添加以下内容: ``` [mysqld] # Remove leading # and set to the amount of RAM for the most important data # cache in MySQL. Start at 70% of total RAM for dedicated server, else 10%. innodb_buffer_pool_size = 128M # Remove leading # to turn on a very important data integrity option: logging # changes to the binary log between backups. log_bin # These are commonly set, remove the # and set as required. basedir = D:\MySQL\mysql1 datadir = D:\MySQL\mysql1\data port = 3306 server_id = ... # Remove leading # to set options mainly useful for reporting servers. # The server defaults are faster for transactions and fast SELECTs. # Adjust sizes as needed, experiment to find the optimal values. join_buffer_size = 128M sort_buffer_size = 2M read_rnd_buffer_size = 2M sql_mode = NO_ENGINE_SUBSTITUTION,STRICT_TRANS_TABLES # Allow maximum connection number max_connections = 200 # Allow connection failures, to prevent attacks on the database system max_connect_errors = 10 # Service default character set character-set-server = utf8mb4 # Create new tables use the default storage engine default-storage_engine = INNODB [mysql] # Set the default client character set default-character-set = utf8mb4 [client] # Set the default client connection port port = 3306 default-character-set = utf8mb4 ``` 4. 使用管理员模式运行MySQL:在命令提示符(cmd)中,导航到解压后的MySQL文件夹的bin目录,例如`D:\MySQL\mysql1\bin`。 5. 初始化MySQL数据库:运行命令`mysqld --initialize --console @localhost:密码`。请记住此密码,稍后将用于登录MySQL。 6. 安装MySQL服务:运行命令`mysqld.exe -install`。如果要更改服务名称,请使用`mysqld.exe -install MySQL2`。 7. 启动MySQL服务:运行命令`net start mysql`。此时,您应该能够通过MySQL命令行工具连接到MySQL服务器。 8. 修改用户表中的主机设置:登录到MySQL后,选择数据库`mysql`,然后更新`user`表中的`host`字段,将其更改为`%`。刷新权限并退出MySQL。 9. 修改MySQL登录密码:使用新密码登录MySQL(`mysql -u root -p`),然后运行命令`alter user 'root'@'localhost' identified with mysql_native_password by '你的密码';`。再次退出MySQL。 完成以上步骤后,您应该已经成功安装并配置了MySQL数据库。可以使用新密码登录并开始使用MySQL了。

正文

安装

1.下载安装包

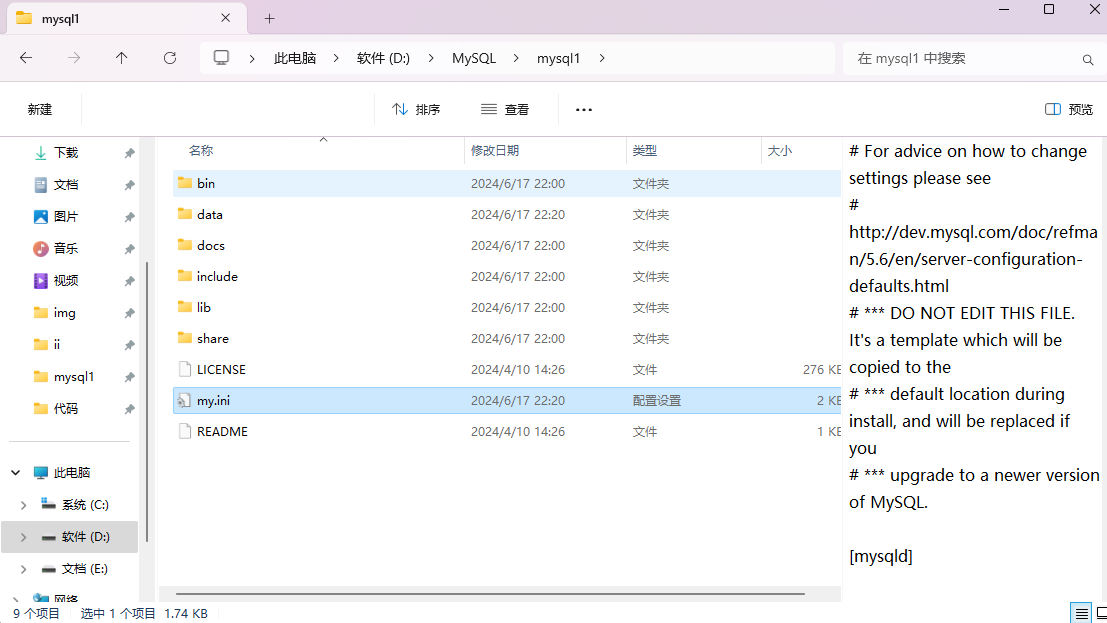
2.解压包


 3.文件夹内创建my.ini配置文件,并添加内容

# For advice on how to change settings please see
# http://dev.mysql.com/doc/refman/5.6/en/server-configuration-defaults.html
# *** DO NOT EDIT THIS FILE. It's a template which will be copied to the
# *** default location during install, and will be replaced if you
# *** upgrade to a newer version of MySQL.

[mysqld]

# Remove leading # and set to the amount of RAM for the most important data
# cache in MySQL. Start at 70% of total RAM for dedicated server, else 10%.
# innodb_buffer_pool_size = 128M

# Remove leading # to turn on a very important data integrity option: logging
# changes to the binary log between backups.
# log_bin

# These are commonly set, remove the # and set as required.
# 设置mysql的安装目录
basedir = D:\\MySQL\\mysql1
# 设置mysql数据库的数据的存放目录
datadir = D:\\MySQL\\mysql1\\data
# 设置3306端口
port = 3306
# server_id = .....

# Remove leading # to set options mainly useful for reporting servers.
# The server defaults are faster for transactions and fast SELECTs.
# Adjust sizes as needed, experiment to find the optimal values.
# join_buffer_size = 128M
# sort_buffer_size = 2M
# read_rnd_buffer_size = 2M 

sql_mode = NO_ENGINE_SUBSTITUTION,STRICT_TRANS_TABLES 

# 允许最大连接数
max_connections = 200
# 允许连接失败的次数。这是为了防止有人从该主机试图攻击数据库系统
max_connect_errors = 10
# 服务端使用的字符集默认为UTF8
character-set-server = utf8mb4
# 创建新表时将使用的默认存储引擎
default-storage-engine = INNODB
[mysql]
# 设置mysql客户端默认字符集
default-character-set = utf8mb4
[client]
# 设置mysql客户端连接服务端时默认使用的端口
port=3306
default-character-set = utf8mb4

 4.使用cmd管理员模式进入mysql的bin目录下

cd D:\MySQL\mysql1\bin

 5.执行数据库初始化

mysqld --initialize --console

 @localhost:密码

这个密码一定要记住

6.运行安装服务

mysqld.exe -install

如果需要改服务名的话
mysqld.exe -install MySQL2


7.运行

net start mysql


但是目前只能通过localhost也就是本机登录

继续cmd管理员模式进入安装目录的bin文件下

登录mysql

mysql -u root -p

输入刚刚保存的密码(这里只能手打不能粘贴)
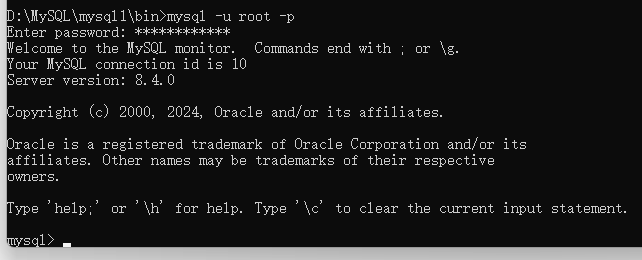
 

此时已进入到mysql里面

选择数据库

use mysql

更改user表中的host,把localhost改为%

update user set host='%' where user='root';

 刷新权限

flush privileges;


 修改mysql登录密码(需要先登录)

alter user'root'@'localhost' identified with mysql_native_password by '你的密码';


mysql -u root -p

与windows 安装mysql 非常之详细相似的内容:

windows 安装mysql 非常之详细

安装 1.下载安装包 2.解压包 3.文件夹内创建my.ini配置文件,并添加内容 # For advice on how to change settings please see # http://dev.mysql.com/doc/refman/5.6/en/server-configurat

windows安装mysql

1、官网下载:https://dev.mysql.com/downloads/mysql/ 2、解压 3、配置环境变量 添加mysql安装的bin文件目录的路径 4、配置初始化的my.ini文件的文件 解压后的目录并没有的my.ini文件,没关系可以自行创建在安装根目录下添加的my.ini(新建文本

Django+DRF+Vue 网页开发环境安装(windows/Linux)

博客地址:https://www.cnblogs.com/zylyehuo/ 总览 一、安装 Django pip install django==3.2 二、安装 MySQL 驱动程序 pip install pymysql 三、安装 DRF pip install djangorestframe

Windows设置一键安装Mysql数据库的方法

Windows设置一键安装Mysql数据库的方法 前言 因为MySQL数据库的8126 65536 以及3072最大索引长度等问题 研发这边提交的补丁总是出现稀奇古怪的问题. mysql数据库又因为DBO比较慢.研发总是懒的进行修改. 又因为linux大部分人都不熟. 没办法的情况下,我这边验证了下

windows 安装postgresql 14

开源数据库 PostgreSQL 是 1980 年以加利福尼亚大学为中心开发出来的 DBMS,与 MySQL 一样,都是世界上广泛应用的开源数据库(DB)。本文将会介绍使用 64 位版的 Windows 安装程序(Win x86-64)在 Windows Server 2019(64 位)系统中安装

MySQL in Windows安装以及异名恢复的简单过程

下载相关 建议获取最新版本的Mysql数据库 可以获取 zip 格式的安装文件 https://dev.mysql.com/downloads/mysql/ 或者获取 msi 格式的安装文件 https://dev.mysql.com/downloads/installer/ 需要注意的事 inst

【冷启动#1】实用的MySQL基础

简单安装一下MySQL Windows下(5.7.x) 本体安装 1、首先先下载安装包,名字如下: mysql-5.7.19-winx64.zip 2、配置环境变量,将解压之后的bin目录添加一下 3、在解压目录下创建my.ini文件,内容如下: [ client ] port=3306 defau

Windows 2016 安装 Docker

打开 PowerShell Windows PowerShell 版权所有 (C) 2016 Microsoft Corporation。保留所有权利。 PS C:\Users\Administrator> [Net.ServicePointManager]::SecurityProtocol =

Windows 2016 安装 Jenkins

[Docker Jenkins 安装配置](https://www.cnblogs.com/vipsoft/p/16813455.html) [Windows 2016 安装 Jenkins](https://www.cnblogs.com/vipsoft/p/16825894.html) [Jen

[转帖]Rust在windows下安装以后cargo build Error: linker `link.exe` not found

D:\rust\runoob-greeting\greeting>cargo build error: linker `link.exe` not found | = note: 系统找不到指定的文件。 (os error 2) note: the msvc targets depend on th