1:为啥要使用拦截器 httpClient 请求响应处理,其作用我们主要是:
目前我的Angular版本是Angular 17.3,版本中实现请求和响应的拦截处理了。这种机制非常适合添加如身份验证头、错误统一处理、日志记录等功能。
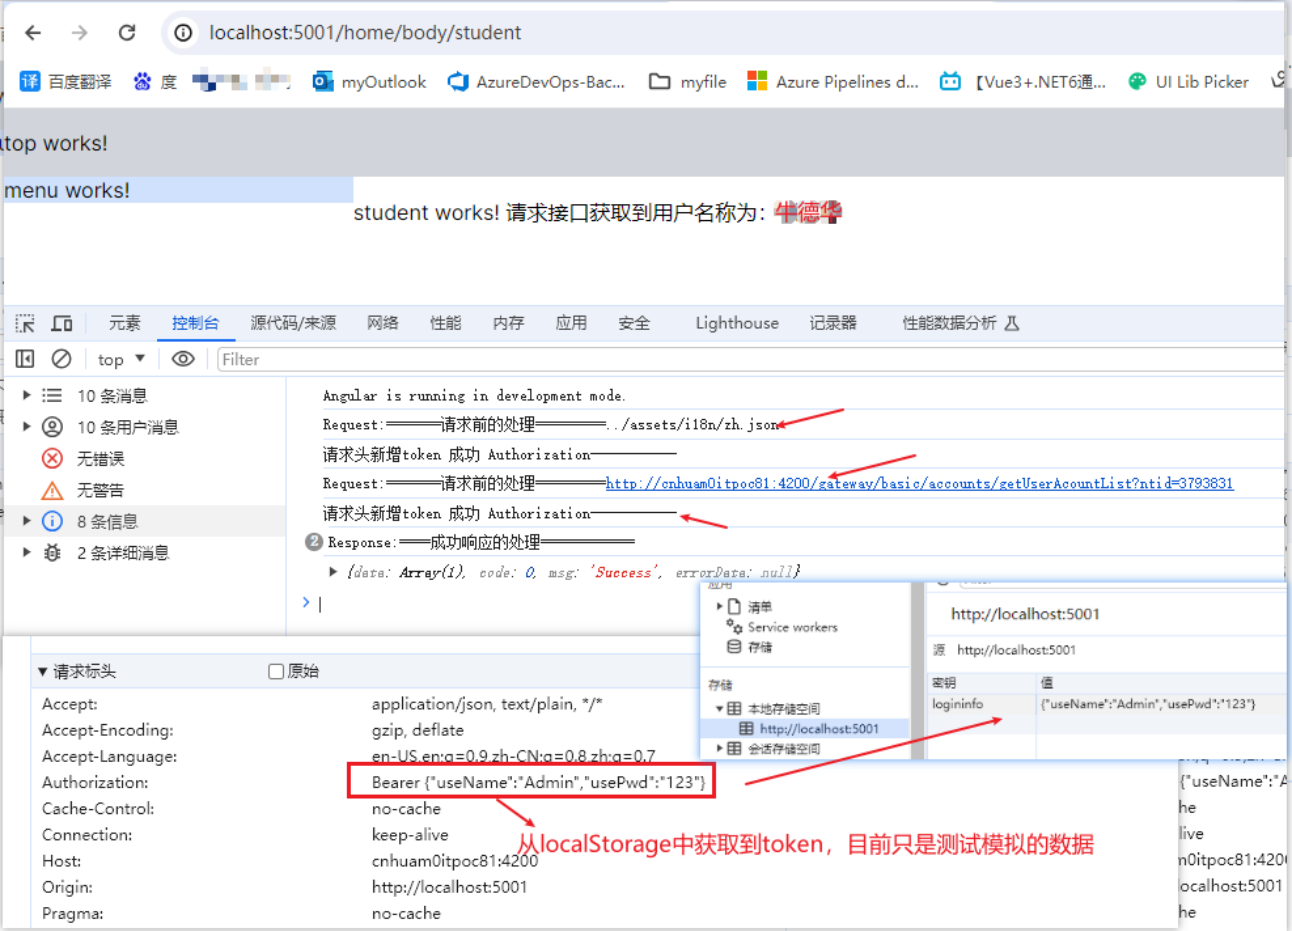
======具体的操作步骤=======
2:注入服务:ng g s services/myhttp-interceptorService
 1 import { Injectable } from '@angular/core';
 2 import { HttpResponse, HttpRequest, HttpInterceptor, HttpHandler, HttpEvent } from '@angular/common/http';
 3 import { Observable, tap } from 'rxjs';
 4
 5 @Injectable({
 6   providedIn: 'root'
 7 })
 8 // 用作http 请求响应的拦截器
 9 export class MyhttpInterceptorServiceService implements HttpInterceptor {
11   constructor() { }
12   intercept(req: HttpRequest<any>, next: HttpHandler): Observable<HttpEvent<any>> {
13     // 请求前处理,可以加上 head 的token 如果需要
14     //console.log('Request:', req.url);
15     console.log('Request:=======请求前的处理=========' + req.url);
16     if (!req.headers.has('Authorization')) {
17       req = req.clone({
18         setHeaders: {
19           Authorization: 'Bearer ' + localStorage.getItem('logininfo')
20         }
21       });
22       console.log("请求头新增token 成功 Authorization-----------");
23     } else {
24       console.log("已经存在token,不需要新增");
25     }
26     // 发送请求,并且在响应上做文章
27     return next.handle(req).pipe(
28       tap(
29         event => {
30           if (event instanceof HttpResponse) {
31             // 成功响应时的处理
32             //console.log('Response:', event.status);
33             console.log('Response:====成功响应的处理============');
34           }
35         },
36         error => {
37           // 错误响应时的处理
38           //console.error('Error:', error.message);
39           console.error('Error', '=======error msg=========');
40         }
41       )
42     );
43   }
44 }复制
3:配置到根模块中 app.module.ts
 1 import { NgModule } from '@angular/core';
 2 import { BrowserModule } from '@angular/platform-browser';
 3
 4 import { AppRoutingModule } from './app-routing.module';
 5 import { AppComponent } from './app.component';
 6 import { HomeComponent } from './components/home/home.component';
 7 import { TopComponent } from './components/top/top.component';
 8 import { MenuComponent } from './components/menu/menu.component';
 9 import { ProductComponent } from './components/product/product.component';
10
11
12 //primeng
13 import {ButtonModule} from 'primeng/button';
14 import { FormsModule } from '@angular/forms';
15 import {CalendarModule} from 'primeng/calendar';
16 import {BrowserAnimationsModule} from '@angular/platform-browser/animations';
17
18 import {PanelMenuModule} from 'primeng/panelmenu';
19 import { BodyComponent } from './components/body/body.component';
20
21 import {TableModule} from 'primeng/table'
22 import {InputTextModule} from 'primeng/inputtext';
23 import {MessageModule} from 'primeng/message';
24 import {ToastModule} from 'primeng/toast';
25
26 import { TranslateModule,TranslateLoader } from '@ngx-translate/core';
27 import { HttpClient, HttpClientModule } from '@angular/common/http';
28 import { TranslateHttpLoader } from '@ngx-translate/http-loader';
29 import { MydialogComponent } from './components/mydialog/mydialog.component';
30 import { MybooksComponent } from './components/mybooks/mybooks.component';
31 import { StudentComponent } from './components/student/student.component';
32 import { TeacherComponent } from './components/teacher/teacher.component';
33 import { WelcomeComponent } from './components/welcome/welcome.component';
34 import { LoginComponent } from './components/login/login.component';
35
36 //HttpClientModule, HTTP_INTERCEPTORS -----拦截器的导入
37 import { HTTP_INTERCEPTORS } from '@angular/common/http';
38 import { MyhttpInterceptorServiceService } from './services/myhttp-interceptor-service.service';
39
40 export function HttpLoaderFactory(http: HttpClient) {
41   return new TranslateHttpLoader(http,'../assets/i18n/',".json");
42 }
43 @NgModule({
44   declarations: [
45     AppComponent,
46     HomeComponent,
47     TopComponent,
48     MenuComponent,
49     ProductComponent,
50     BodyComponent,
51     MydialogComponent,
52     MybooksComponent,
53     StudentComponent,
54     TeacherComponent,
55     WelcomeComponent,
56     LoginComponent
57   ],
58   imports: [
59     BrowserModule,
60     AppRoutingModule,
62     BrowserAnimationsModule,
64     ButtonModule,
65     FormsModule,
66     CalendarModule,
68     PanelMenuModule,
70     TableModule,
71     InputTextModule,
72     MessageModule,
73     ToastModule,
74
75 HttpClientModule,TranslateModule.forRoot({
76   loader: {
77     provide: TranslateLoader,
78     useFactory: HttpLoaderFactory,
79     deps: [HttpClient]
80   }
81 })
84   ],
85   providers: [{
86     provide: HTTP_INTERCEPTORS,   //---------------
87     useClass: MyhttpInterceptorServiceService,
88     multi: true   // 注意这里设置为true,因为可以有多个拦截器
89   }],
90   bootstrap: [AppComponent]
91 })
92 export class AppModule { }复制
//重点如下配置:HttpClientModule, HTTP_INTERCEPTORS 拦截器的导入
import { HTTP_INTERCEPTORS } from '@angular/common/http';
import { MyhttpInterceptorServiceService } from './services/myhttp-interceptor-service.service';

  providers: [{
    provide: HTTP_INTERCEPTORS,
    useClass: MyhttpInterceptorServiceService,
    multi: true   // 注意这里设置为true,因为可以有多个拦截器
  }],复制
4:在组件中测试使用
 1 <p>student works! 请求接口获取到用户名称为:{{userName}}</p>
 2
 3 import { Component, OnInit } from '@angular/core';
 4 import { HttpClient } from '@angular/common/http';
 5 import { Injectable } from '@angular/core';
 6 @Component({
 7   selector: 'app-student',
 8   templateUrl: './student.component.html',
 9   styleUrl: './student.component.scss'
10 })
11 export class StudentComponent implements OnInit {
12   userName: string;
13   constructor(private http: HttpClient) {
14     this.userName = "";
15   }
16   ngOnInit(): void {
17     this.http.get('http://www.baidu.com:4200/gateway/basic/accounts/getUserAcountList?ntid=3793831').pipe().subscribe((data?: any) => {
18       console.log(data);
19       this.userName = data.data[0].name;
20     })
21   }
22 }复制
5:测试效果