@
读书,它可以在我生活顺遂的时候,看见更大的世界, 在生活不顺的时候,依然可以有心态去仰望星空。 无论如果都不要将爱,转为成了某种恨 就是我过的不好,也希望你过的好,就算我过的不好,我也依旧会帮你过的好 不管你一天,经历了什么,天黑了,我带你回家。 生命是有光的,在我熄灭已前,能够照亮你一点便是,我所有能做的了。复制
既然我们要学习:”Spring IoC注解式开发“,自然就是要是用上注解 的,为了方便后面的学习,这里我们简单回顾一下注解的内容。更多关于注解方面的内容大家可以移步至:✏️✏️✏️ Java “框架 = 注解 + 反射 + 设计模式” 之 注解详解-CSDN博客 。
import java.lang.annotation.ElementType;
import java.lang.annotation.Retention;
import java.lang.annotation.RetentionPolicy;
import java.lang.annotation.Target;

@Target(value = {ElementType.TYPE})
@Retention(value = RetentionPolicy.RUNTIME)
public @interface Component {
    String value();
}
复制
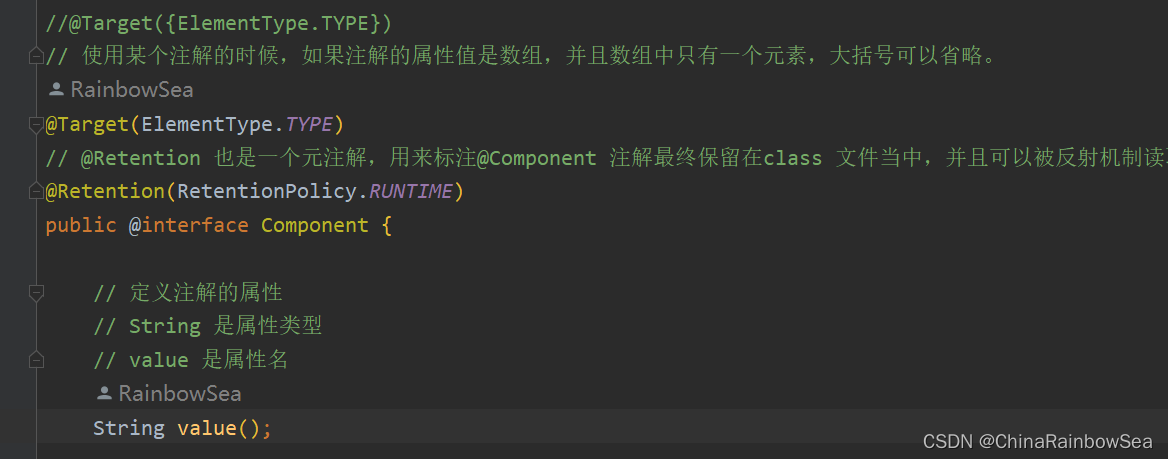
以上是自定义了一个注解:Component
该注解上面修饰的注解包括:Target注解和Retention注解,这两个注解被称为元注解。
Target注解用来设置Component注解可以出现的位置,以上代表表示Component注解只能用在类和接口上。
Retention注解用来设置Component注解的保持性策略,以上代表Component注解可以被反射机制读取。
String value(); 是Component注解中的一个属性。该属性类型String,属性名是value。
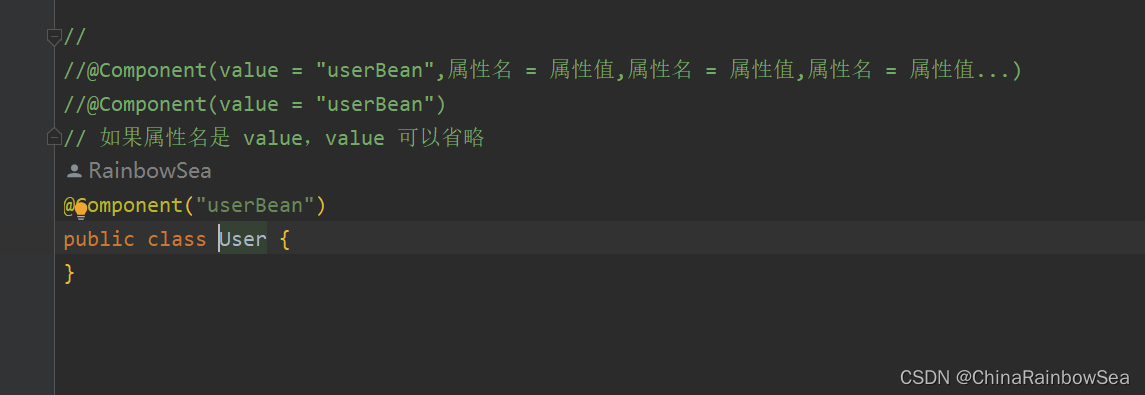
注解赋值 ——》语法格式:@注解类型名(属性名=属性值, 属性名=属性值, 属性名=属性值......)
userBean为什么使用双引号括起来,因为value属性是String类型,字符串。
另外如果属性名是value,则在使用的时候可以省略属性名。
为了进一步,运用注解,这里我们看看下面这个需求。
目前只知道一个包
com.rianbowsea的名字,扫描这个包下所有的类,当这个类上有@Compoent 注解的时候,实例化该对象,然后放到Map集合中。
package com.rainbowsea;


import java.lang.annotation.ElementType;
import java.lang.annotation.Retention;
import java.lang.annotation.RetentionPolicy;
import java.lang.annotation.Target;

// 使用某个注解的时候,如果注解的属性值是数组,并且数组中只有一个元素,大括号可以省略。
@Target(ElementType.TYPE)
// @Retention 也是一个元注解,用来标注@Component 注解最终保留在class 文件当中,并且可以被反射机制读取
@Retention(RetentionPolicy.RUNTIME)
public @interface Component {

    // 定义注解的属性
    // String 是属性类型
    // value 是属性名
    String value();

}

复制
package com.rainbowsea;
//
//@Component(value = "userBean",属性名 = 属性值,属性名 = 属性值,属性名 = 属性值...)
//@Component(value = "userBean")
// 如果属性名是 value,value 可以省略
@Component("userBean")
public class User {
}
复制package com.rainbowsea;
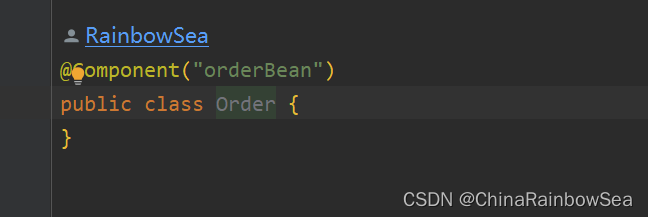
@Component("orderBean")
public class Order {
}
复制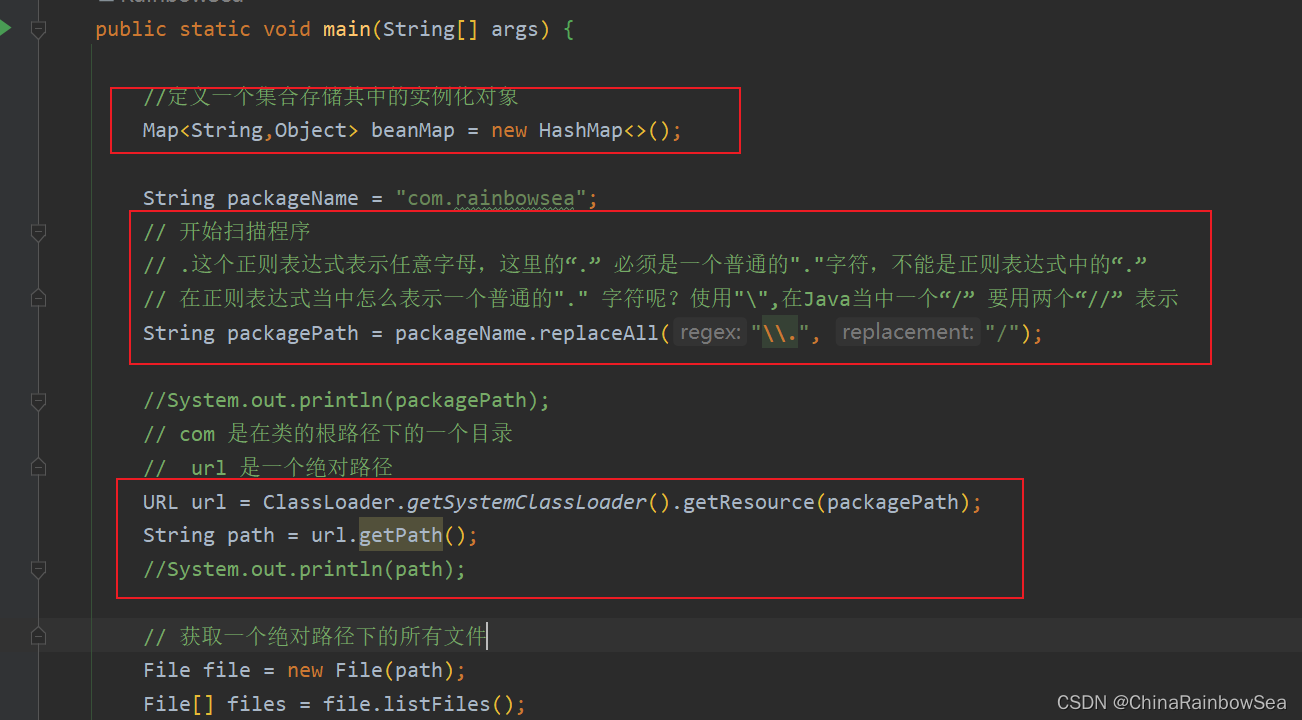
package com.rainbowsea;

import java.io.File;
import java.lang.reflect.Constructor;
import java.lang.reflect.InvocationTargetException;
import java.net.URL;
import java.util.Arrays;
import java.util.HashMap;
import java.util.Map;

public class ComponentScan {

    /*
    目前只知道一个包的名字,扫描这个包下所有的类,当这个类上有@Compoent 注解的时候,
    实例化该对象,然后放到Map集合中
     */
    public static void main(String[] args) {

        //定义一个集合存储其中的实例化对象
        Map<String,Object> beanMap = new HashMap<>();

        String packageName = "com.rainbowsea";
        // 开始扫描程序
        // .这个正则表达式表示任意字母,这里的“.” 必须是一个普通的"."字符,不能是正则表达式中的“.”
        // 在正则表达式当中怎么表示一个普通的"." 字符呢?使用"\",在Java当中一个“/” 要用两个“//” 表示
        String packagePath = packageName.replaceAll("\\.", "/");

        //System.out.println(packagePath);
        // com 是在类的根路径下的一个目录
        //  url 是一个绝对路径
        URL url = ClassLoader.getSystemClassLoader().getResource(packagePath);
        String path = url.getPath();
        //System.out.println(path);

        // 获取一个绝对路径下的所有文件
        File file = new File(path);
        File[] files = file.listFiles();

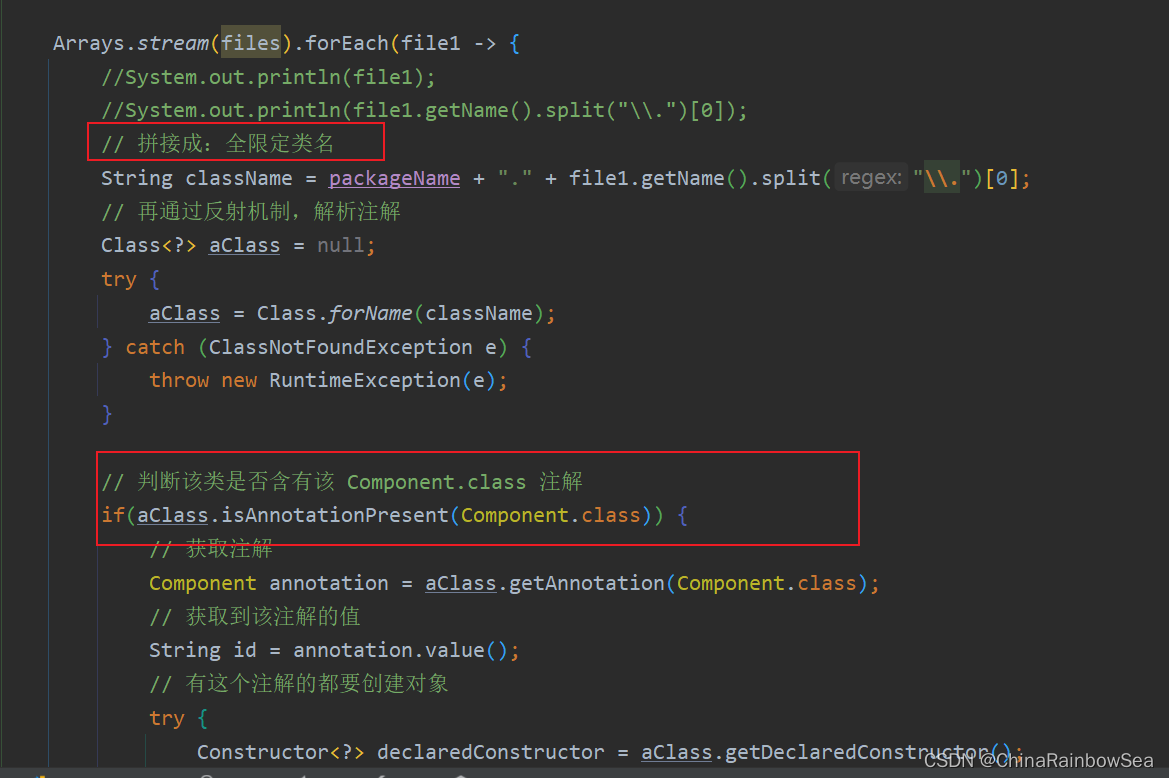
        Arrays.stream(files).forEach(file1 -> {
            //System.out.println(file1);
            //System.out.println(file1.getName().split("\\.")[0]);
            // 拼接成:全限定类名
            String className = packageName + "." + file1.getName().split("\\.")[0];
            // 再通过反射机制,解析注解
            Class<?> aClass = null;
            try {
                aClass = Class.forName(className);
            } catch (ClassNotFoundException e) {
                throw new RuntimeException(e);
            }

            // 判断该类是否含有该 Component.class 注解
            if(aClass.isAnnotationPresent(Component.class)) {
                // 获取注解
                Component annotation = aClass.getAnnotation(Component.class);
                // 获取到该注解的值
                String id = annotation.value();
                // 有这个注解的都要创建对象
                try {
                    Constructor<?> declaredConstructor = aClass.getDeclaredConstructor();
                    Object obj  = declaredConstructor.newInstance();
                    // 将创建好的实例化对象存储到 Map 当前去。
                    beanMap.put(id,obj);
                } catch (Exception e) {
                    e.printStackTrace();
                    throw new RuntimeException(e);
                }
            }

        });


        System.out.println(beanMap);
    }
}

复制
运行结果:
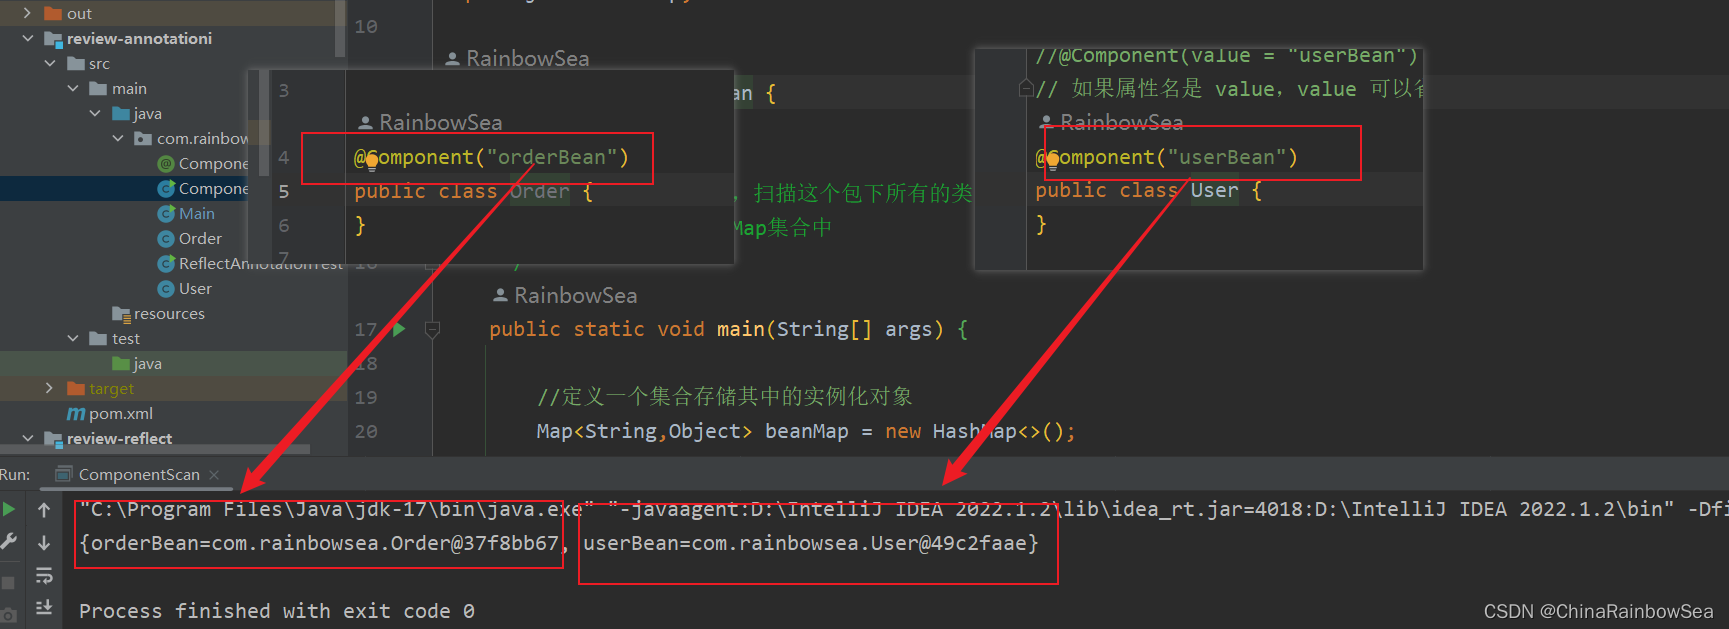
注解的存在主要是为了简化XML的配置。Spring6倡导全注解开发。
在Spring 当中,负责声明 Bean 的注解的,常见的有如下四个:
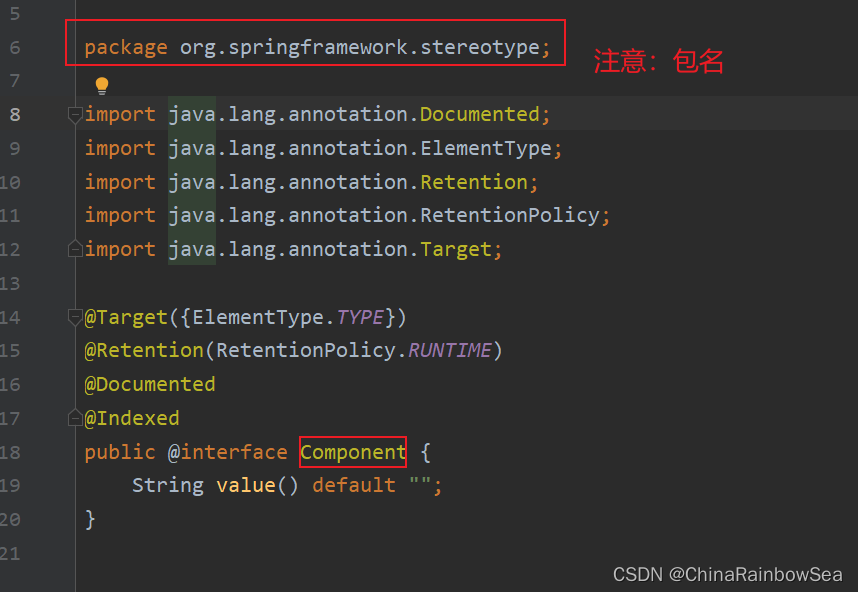
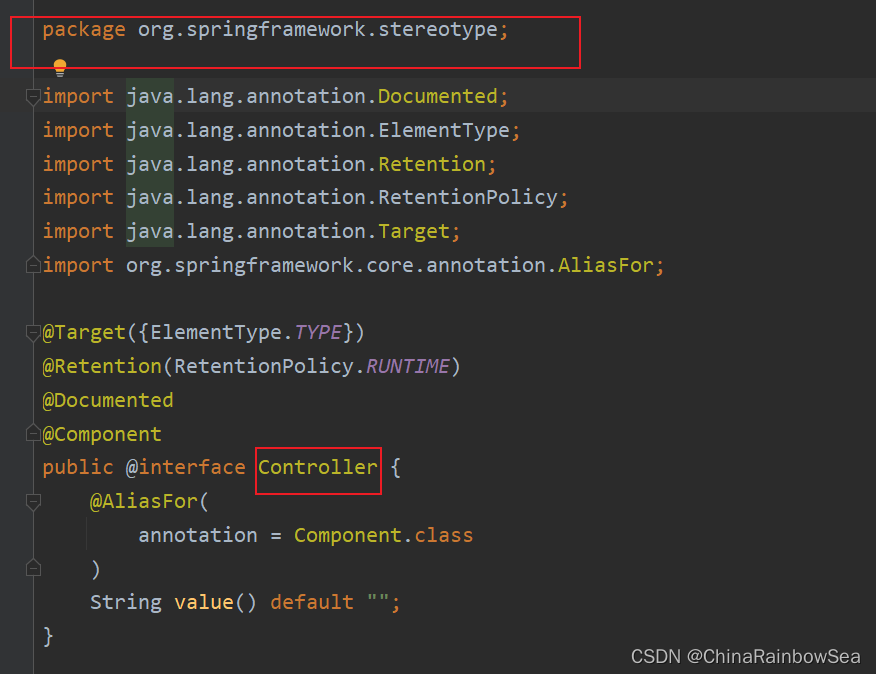
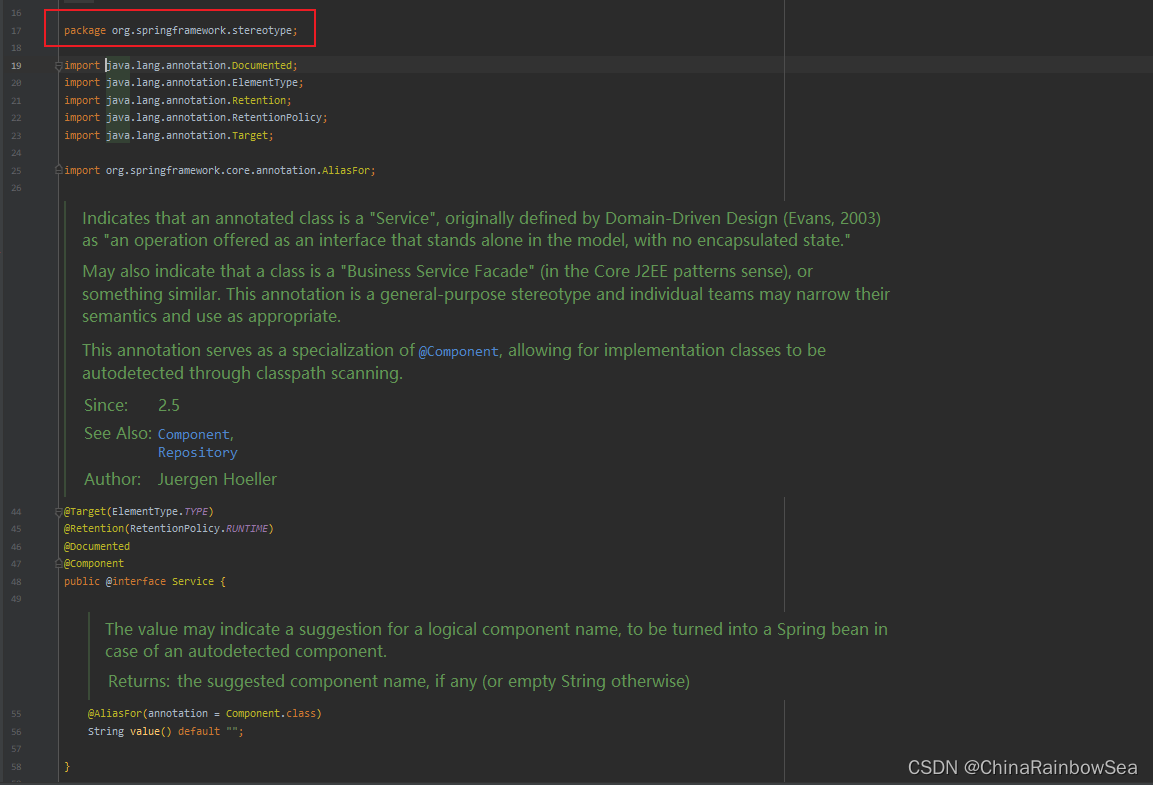
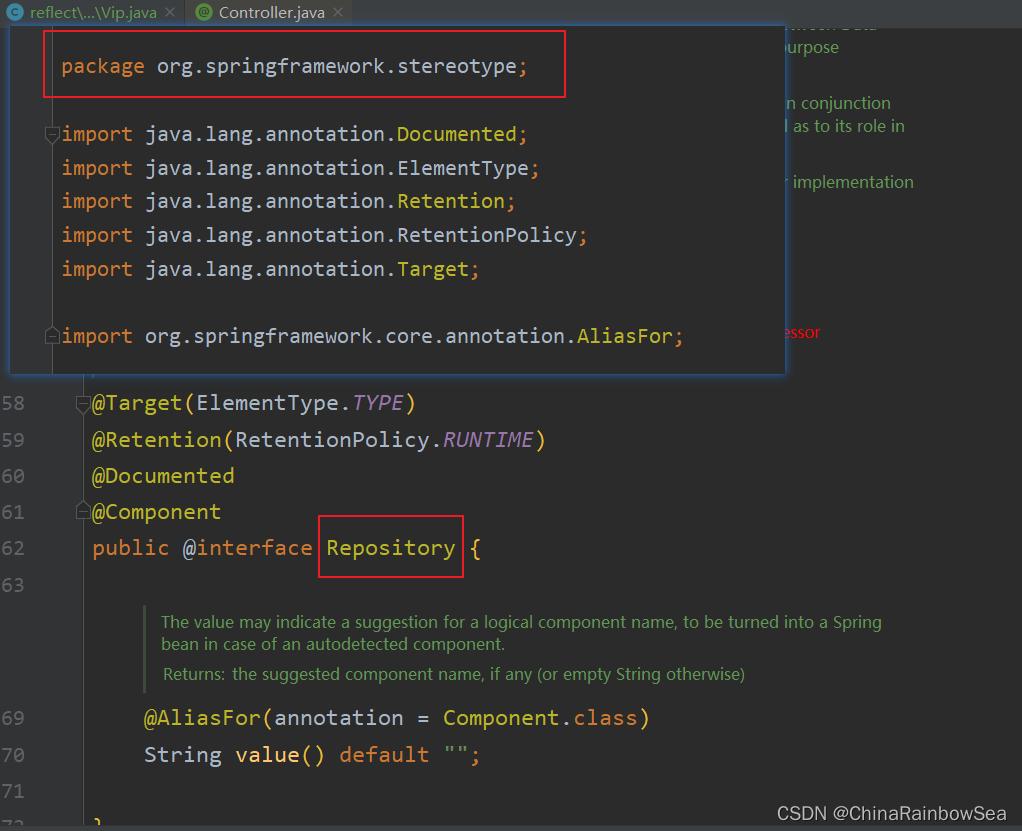
通过源码可以看到,@Controller、@Service、@Repository 这三个注解都是@Component注解的别名。换句话说:这四个注解的功能都一样。用哪个都可以。
只是为了增强程序的可读性,建议:
控制器类上使用:Controller
service类上使用:Service
dao类上使用:Repository
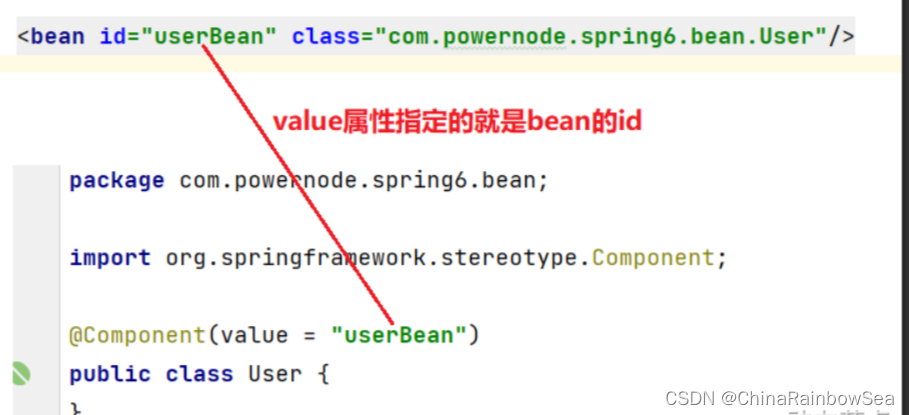
他们都是只有一个value属性。value属性用来指定bean的id,也就是bean的名字
如何使用以上的注解呢?
- 第一步:加入aop的依赖
- 第二步:在配置文件中添加context命名空间
- 第三步:在配置文件中指定扫描的包
- 第四步:在Bean类上使用注解
第一步:加入aop的依赖
还是第一步,通过Maven 导入相关的 jar 包,在 pom.xml 文件当中。
<?xml version="1.0" encoding="UTF-8"?>
<project xmlns="http://maven.apache.org/POM/4.0.0"
         xmlns:xsi="http://www.w3.org/2001/XMLSchema-instance"
         xsi:schemaLocation="http://maven.apache.org/POM/4.0.0 http://maven.apache.org/xsd/maven-4.0.0.xsd">
    <modelVersion>4.0.0</modelVersion>

    <groupId>com.rainbowsea.reflect</groupId>
    <artifactId>spring6-oo8-anotation-blog</artifactId>
    <version>1.0-SNAPSHOT</version>

    <properties>
        <maven.compiler.source>17</maven.compiler.source>
        <maven.compiler.target>17</maven.compiler.target>
    </properties>


    <dependencies>
        <dependency>
            <groupId>org.springframework</groupId>
            <artifactId>spring-context</artifactId>
            <version>6.0.11</version>
        </dependency>


        <!-- junit4 -->
        <dependency>
            <groupId>junit</groupId>
            <artifactId>junit</artifactId>
            <version>4.13.2</version>
            <scope>test</scope>
        </dependency>

        <dependency>
            <groupId>jakarta.annotation</groupId>
            <artifactId>jakarta.annotation-api</artifactId>
            <version>2.1.1</version>
        </dependency>
    </dependencies>
</project>
复制
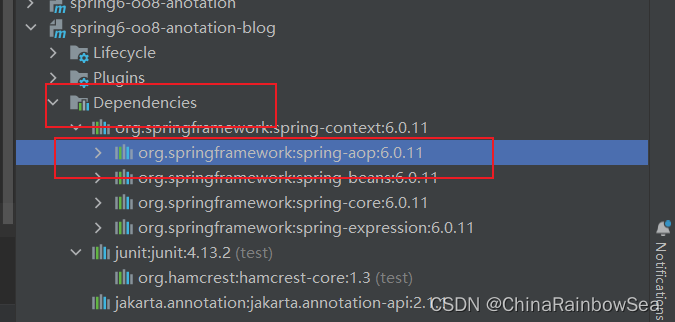
我们可以看到当加入spring-context依赖之后,会关联加入aop的依赖。所以这一步不用做。
第二步:在配置文件中添加context命名空间
注意:这里所说的配置文件是指,我们配置 bean 对象的那个配置.xml 的配置文件信息。如下:
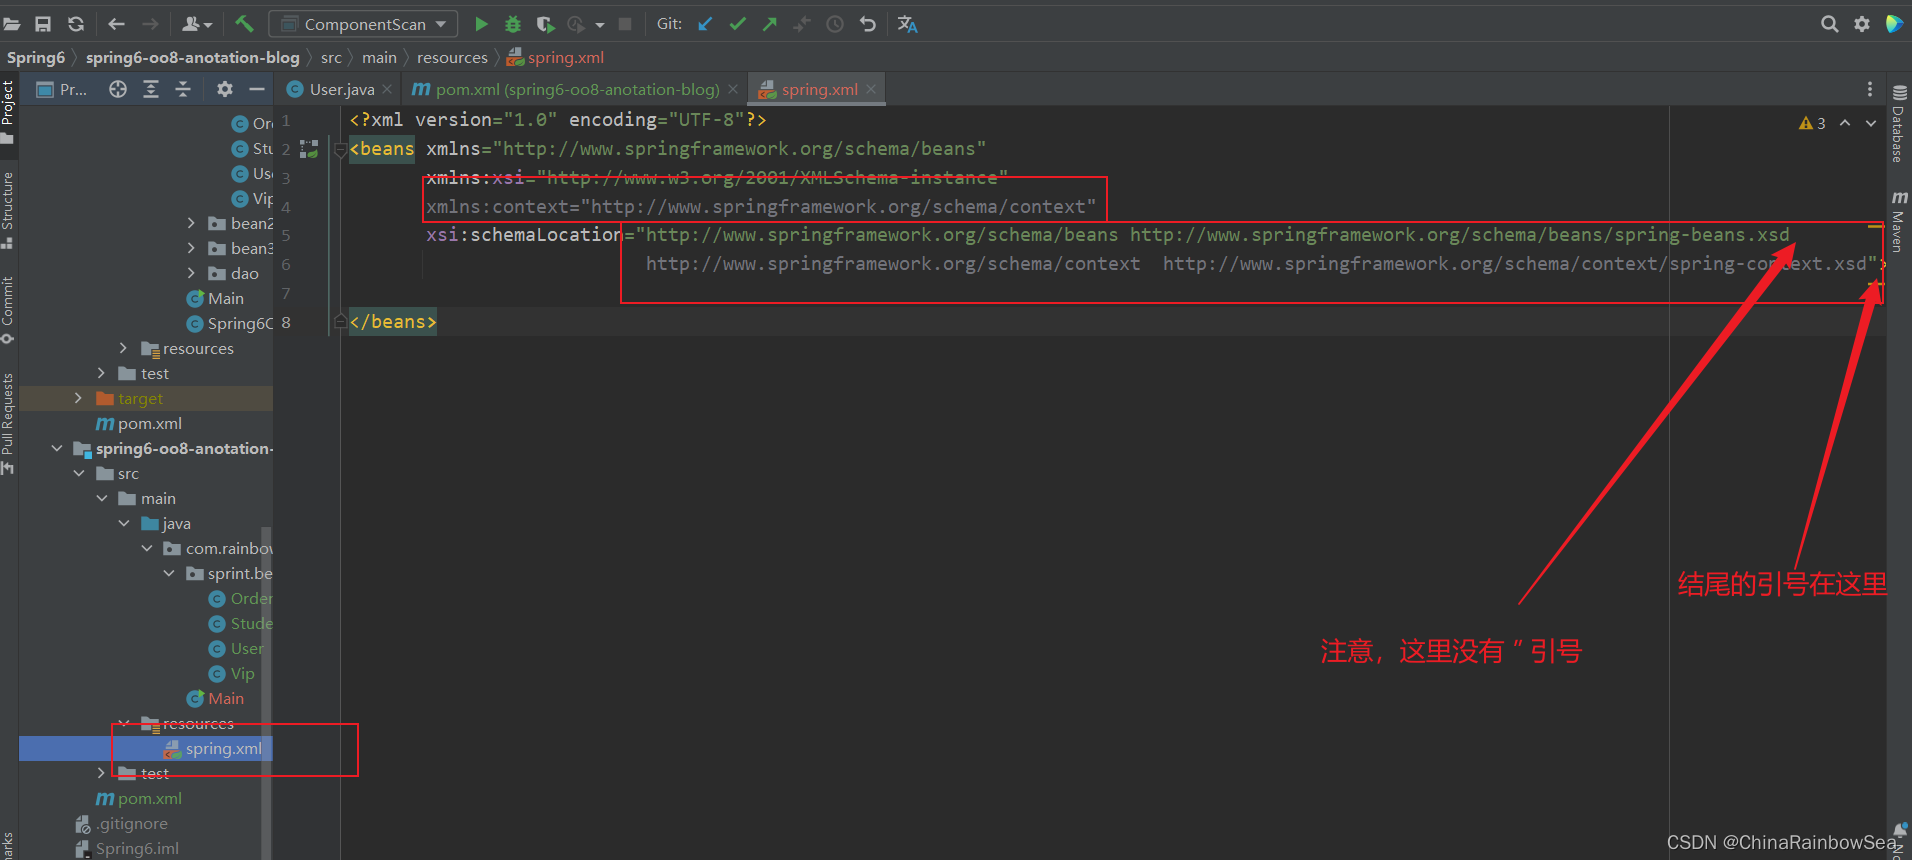
<?xml version="1.0" encoding="UTF-8"?>
<beans xmlns="http://www.springframework.org/schema/beans"
       xmlns:xsi="http://www.w3.org/2001/XMLSchema-instance"
       xmlns:context="http://www.springframework.org/schema/context"
       xsi:schemaLocation="http://www.springframework.org/schema/beans http://www.springframework.org/schema/beans/spring-beans.xsd
                           http://www.springframework.org/schema/context http://www.springframework.org/schema/context/spring-context.xsd">

</beans>
复制
第三步:在配置文件中指定扫描的包
注意:这里所说的配置文件是指,我们配置 bean 对象的那个配置.xml 的配置文件信息。如下:
指定扫描的包: 是指明Spring 在那个包路径下,可以找到要实例化的 Bean 对象。
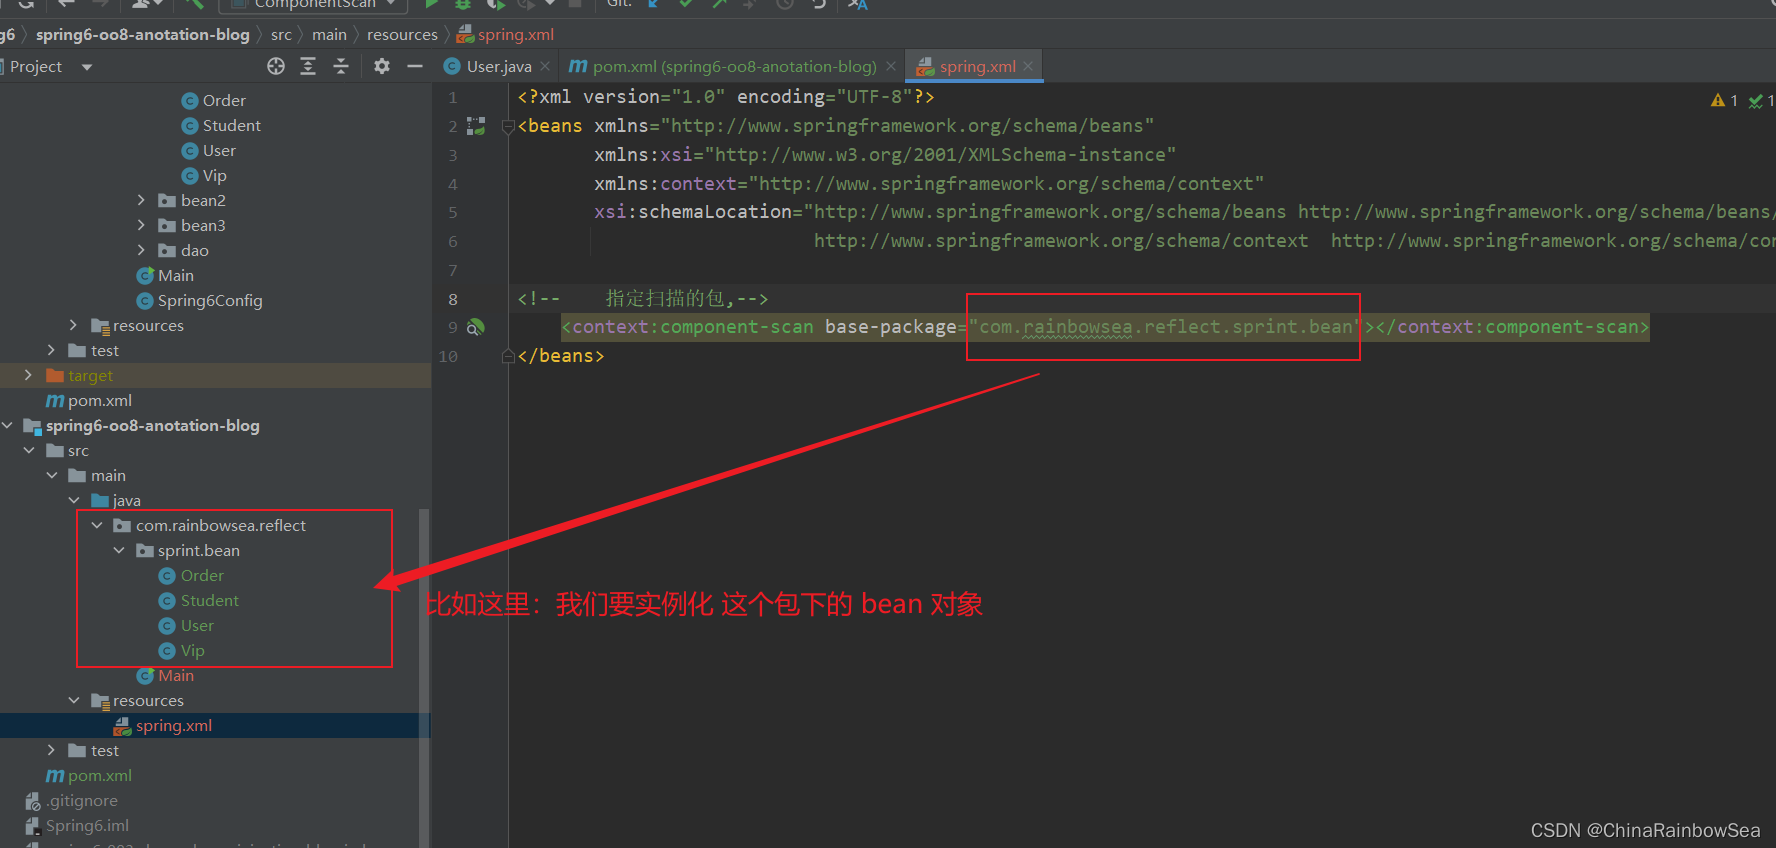

<!--    指定扫描的包,-->
    <context:component-scan base-package="com.rainbowsea.reflect.sprint.bean"></context:component-scan>
复制
<?xml version="1.0" encoding="UTF-8"?>
<beans xmlns="http://www.springframework.org/schema/beans"
xmlns:xsi="http://www.w3.org/2001/XMLSchema-instance"
xmlns:context="http://www.springframework.org/schema/context"
xsi:schemaLocation="http://www.springframework.org/schema/beans http://www.springframework.org/schema/beans/spring-beans.xsd
http://www.springframework.org/schema/context http://www.springframework.org/schema/context/spring-context.xsd">
<!-- 指定扫描的包,-->
<context:component-scan base-package="com.rainbowsea.reflect.sprint.bean"></context:component-scan>
</beans>
复制第四步:在Bean类上使用注解
如下:上面四个注解(@Controller、@Service、@Repository @Component),我们都使用测试上,看看能否实例化成功。
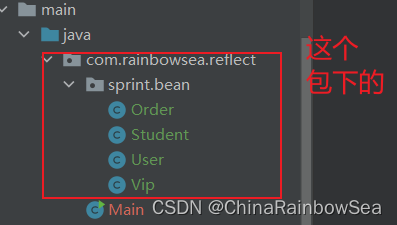
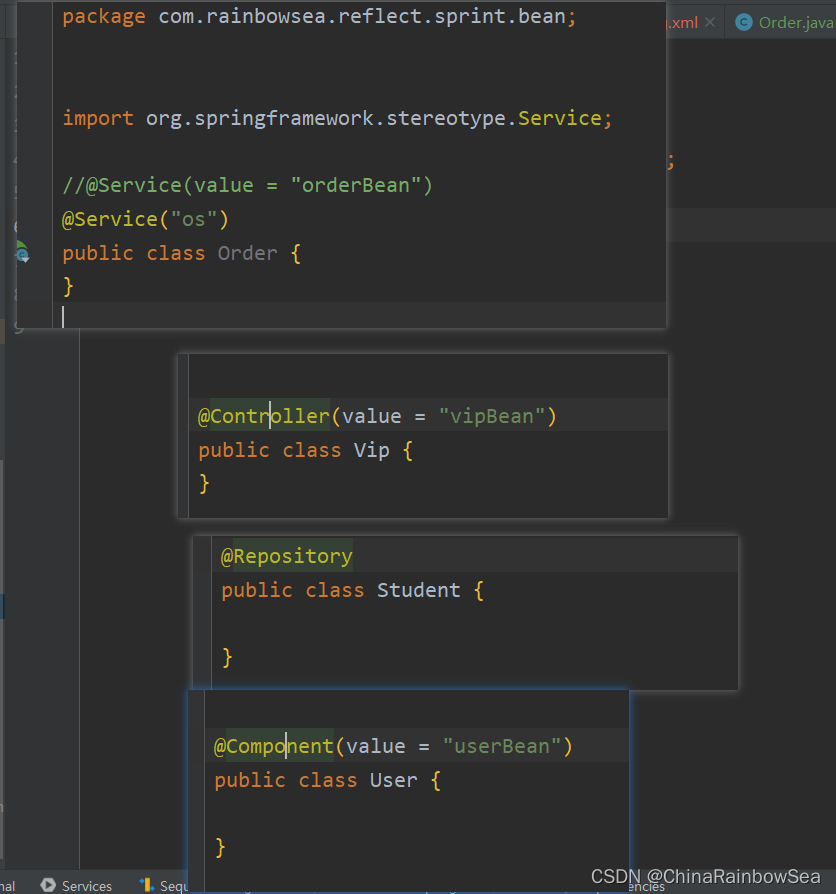
package com.rainbowsea.reflect.sprint.bean;


import org.springframework.stereotype.Service;

//@Service(value = "orderBean")
@Service("os")
public class Order {
}

复制
package com.rainbowsea.reflect.sprint.bean;
import org.springframework.stereotype.Repository;
@Repository("studentBean")
public class Student {
}
/**
* 以上的 @Repository就相当域以下的配置信息
* <bean id ="student" class="com.ranbowsea.spring.bean.Student"></bean>
*/
复制package com.rainbowsea.reflect.sprint.bean;
import org.springframework.stereotype.Component;
@Component(value = "userBean")
public class User {
}
复制package com.rainbowsea.reflect.sprint.bean;
import org.springframework.stereotype.Controller;
@Controller(value = "vipBean")
public class Vip {
}
复制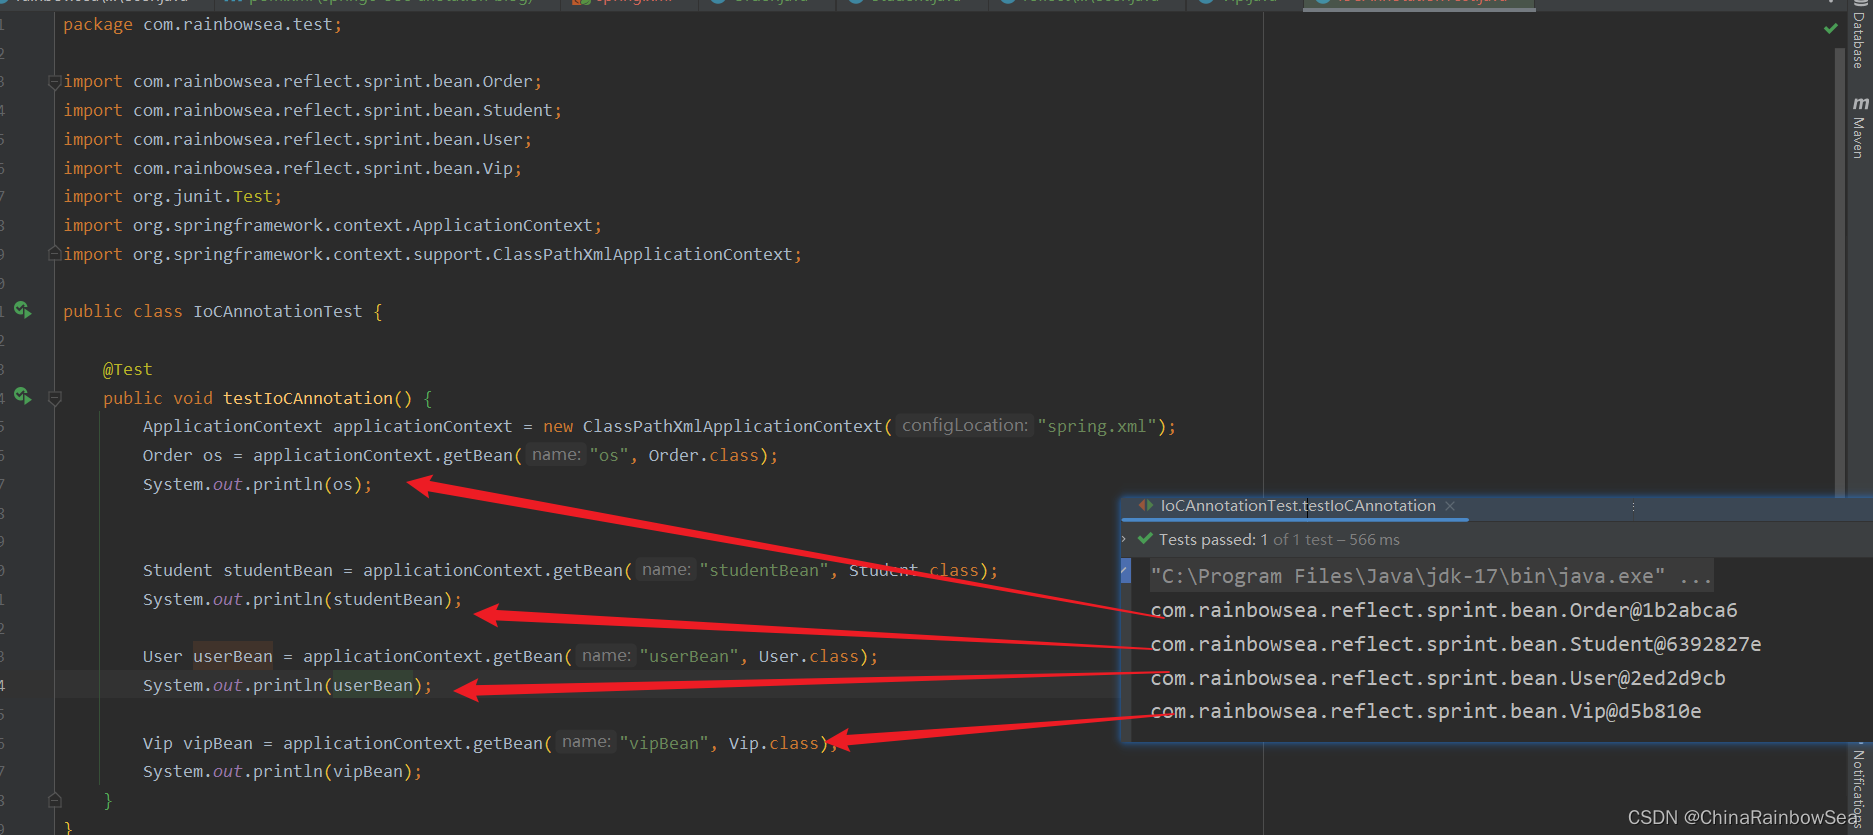
package com.rainbowsea.test;

import com.rainbowsea.reflect.sprint.bean.Order;
import com.rainbowsea.reflect.sprint.bean.Student;
import com.rainbowsea.reflect.sprint.bean.User;
import com.rainbowsea.reflect.sprint.bean.Vip;
import org.junit.Test;
import org.springframework.context.ApplicationContext;
import org.springframework.context.support.ClassPathXmlApplicationContext;

public class IoCAnnotationTest {

    @Test
    public void testIoCAnnotation() {
        ApplicationContext applicationContext = new ClassPathXmlApplicationContext("spring.xml");
        Order os = applicationContext.getBean("os", Order.class);
        System.out.println(os);


        Student studentBean = applicationContext.getBean("studentBean", Student.class);
        System.out.println(studentBean);

        User userBean = applicationContext.getBean("userBean", User.class);
        System.out.println(userBean);

        Vip vipBean = applicationContext.getBean("vipBean", Vip.class);
        System.out.println(vipBean);
    }
}

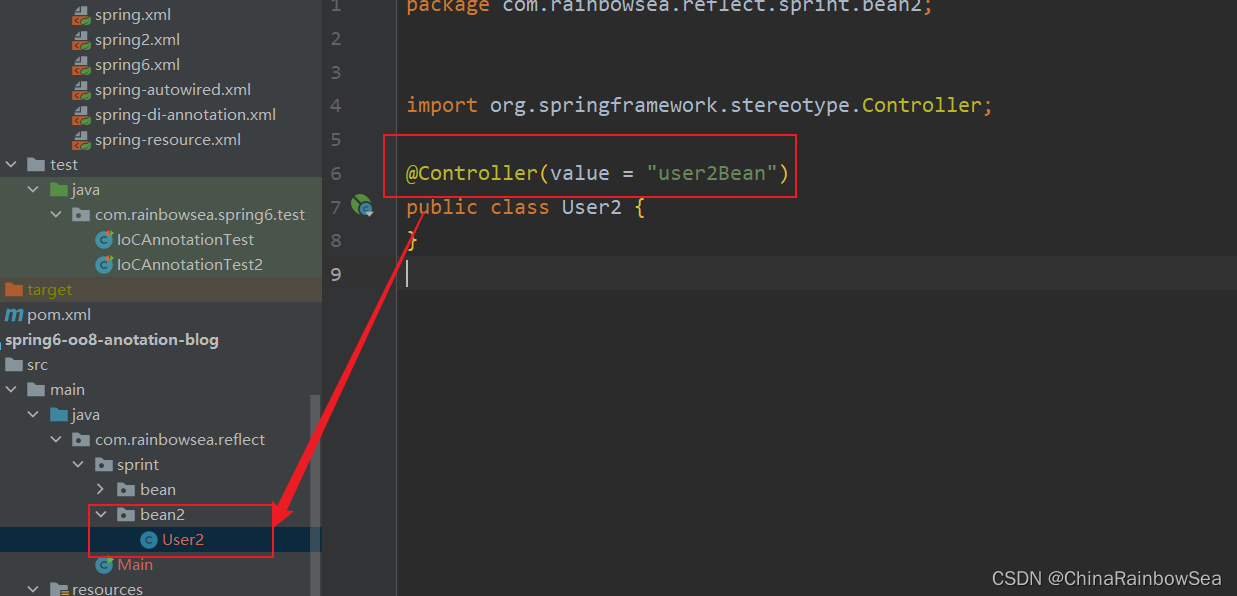
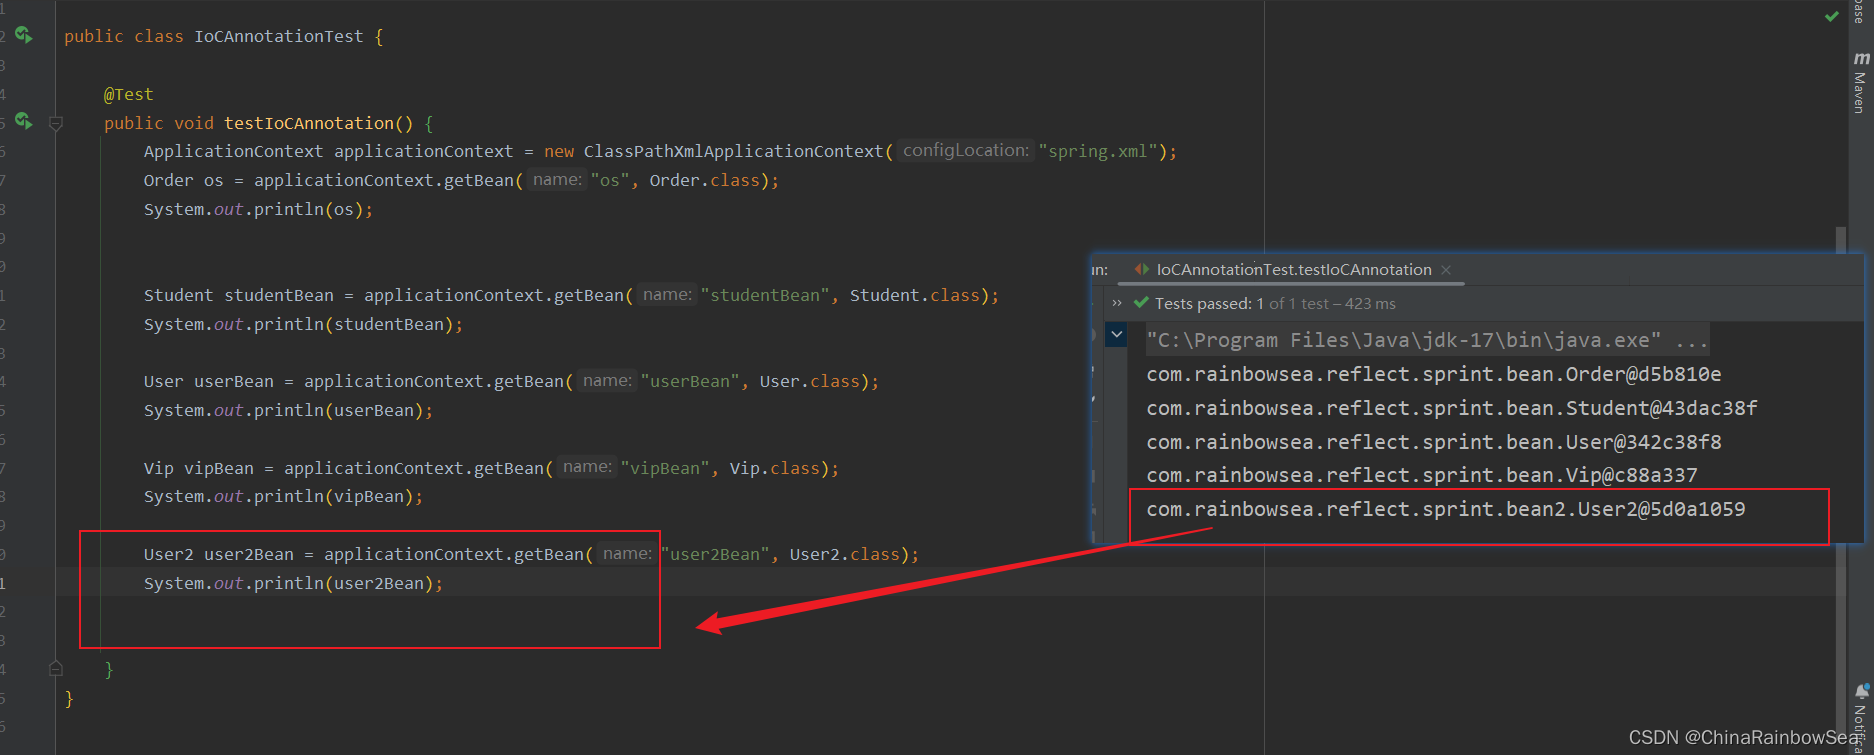
复制特别的: 如果要扫描的是多个包

<!--    如果要扫描的是多个包,使用逗号隔开-->
    <context:component-scan base-package="com.rainbowsea.reflect.sprint.bean,
                                          com.rainbowsea.reflect.sprint.bean2"></context:component-scan>
复制
<?xml version="1.0" encoding="UTF-8"?>
<beans xmlns="http://www.springframework.org/schema/beans"
xmlns:xsi="http://www.w3.org/2001/XMLSchema-instance"
xmlns:context="http://www.springframework.org/schema/context"
xsi:schemaLocation="http://www.springframework.org/schema/beans http://www.springframework.org/schema/beans/spring-beans.xsd
http://www.springframework.org/schema/context http://www.springframework.org/schema/context/spring-context.xsd">
<!-- 如果要扫描的是多个包,使用逗号隔开-->
<context:component-scan base-package="com.rainbowsea.reflect.sprint.bean,
com.rainbowsea.reflect.sprint.bean2"></context:component-scan>
</beans>
复制测试:
或者是上一级一些,不过,可能会牺牲一点效率,查找的时间上多一些。如下:
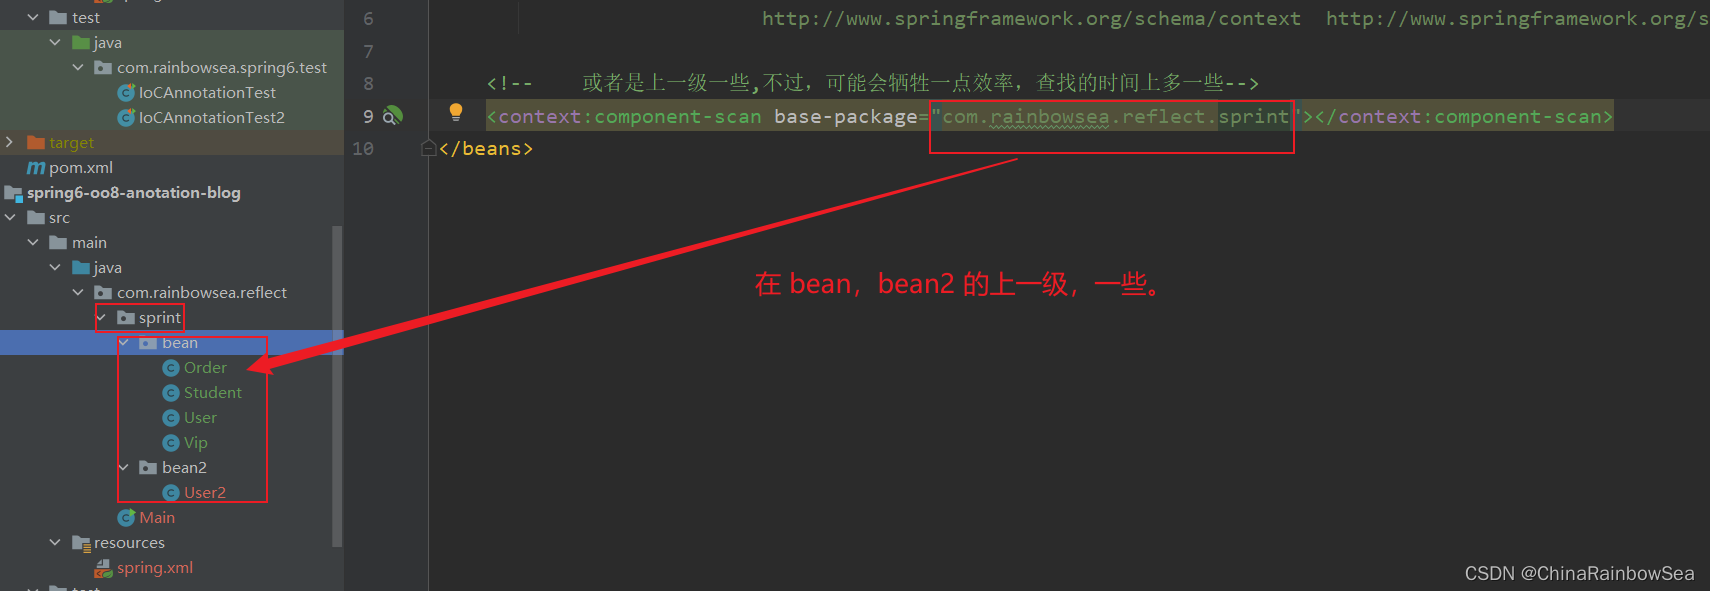
    <!--    或者是上一级一些,不过,可能会牺牲一点效率,查找的时间上多一些-->
    <context:component-scan base-package="com.rainbowsea.reflect.sprint"></context:component-scan>
复制
<?xml version="1.0" encoding="UTF-8"?>
<beans xmlns="http://www.springframework.org/schema/beans"
xmlns:xsi="http://www.w3.org/2001/XMLSchema-instance"
xmlns:context="http://www.springframework.org/schema/context"
xsi:schemaLocation="http://www.springframework.org/schema/beans http://www.springframework.org/schema/beans/spring-beans.xsd
http://www.springframework.org/schema/context http://www.springframework.org/schema/context/spring-context.xsd">
<!-- 或者是上一级一些,不过,可能会牺牲一点效率,查找的时间上多一些-->
<context:component-scan base-package="com.rainbowsea.reflect.sprint"></context:component-scan>
</beans>
复制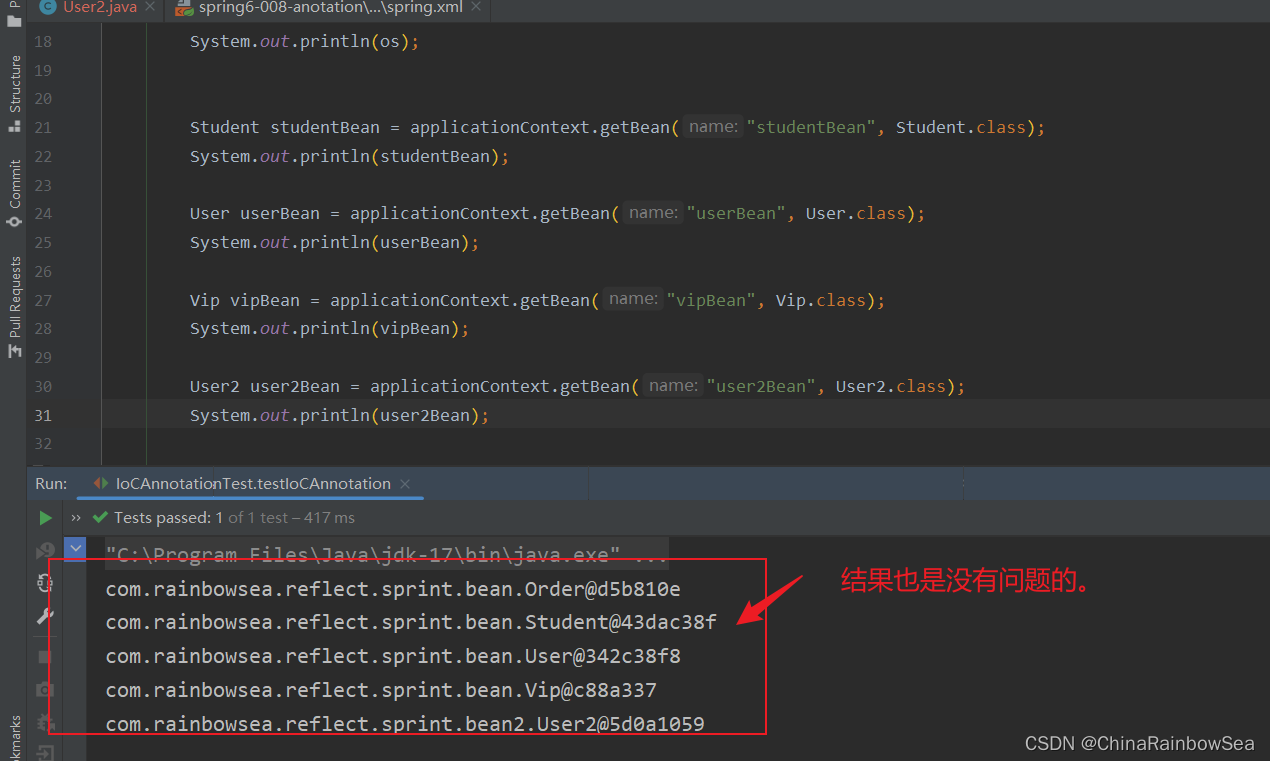
假设在某个包下有很多Bean,有的Bean上标注了@Component,有的标注了@Controller,有的标注了@Service,有的标注了@Repository,现在由于某种特殊业务的需要,只允许其中所有的Controller参与Bean管理,其他的都不实例化。这应该怎么办呢?
我们可以有一下两种方案:
第一种方案:
在扫描文件的:
<context:component-scan>的标签当中添加上:use-default-filters="属性,并该属性指为 false 。表示该表明的包下的所有带有声明Bean (@Component,@Controller,@Service,@Repository)的注解全部失效。不会实例化该包下的 bean 对象。
而只有在
<context:component-scan>的标签下的,指明的:<context:include-filter>说明的注解才会生效,才会实例化该包下的 Bean 对象。注意其中的值是:include-filter,type="annotation",expression="org.springframework.stereotype.Controller" 注意:这个包名路径不要错了。org.springframework.stereotype.Controller
<?xml version="1.0" encoding="UTF-8"?> <beans xmlns="http://www.springframework.org/schema/beans" xmlns:xsi="http://www.w3.org/2001/XMLSchema-instance" xmlns:context="http://www.springframework.org/schema/context" xsi:schemaLocation="http://www.springframework.org/schema/beans http://www.springframework.org/schema/beans/spring-beans.xsd http://www.springframework.org/schema/context http://www.springframework.org/schema/context/spring-context.xsd"> <!-- <context:component-scan base-package="com.rainbowsea.sprint.bean2" use-default-filters="false">--> <!-- 只有@Repository获取其他的注解被包含进来了,才生效 注意是:include-filter --> <context:component-scan base-package="com.rainbowsea.reflect.sprint.bean" use-default-filters="false"> <context:include-filter type="annotation" expression="org.springframework.stereotype.Controller"/> </context:component-scan> </beans>复制
测试:这里我们让注解是:@Service,@Controller 的这个两个有效,实例化Bean 对象,其他的注解失效,不实例化Bean 对象。
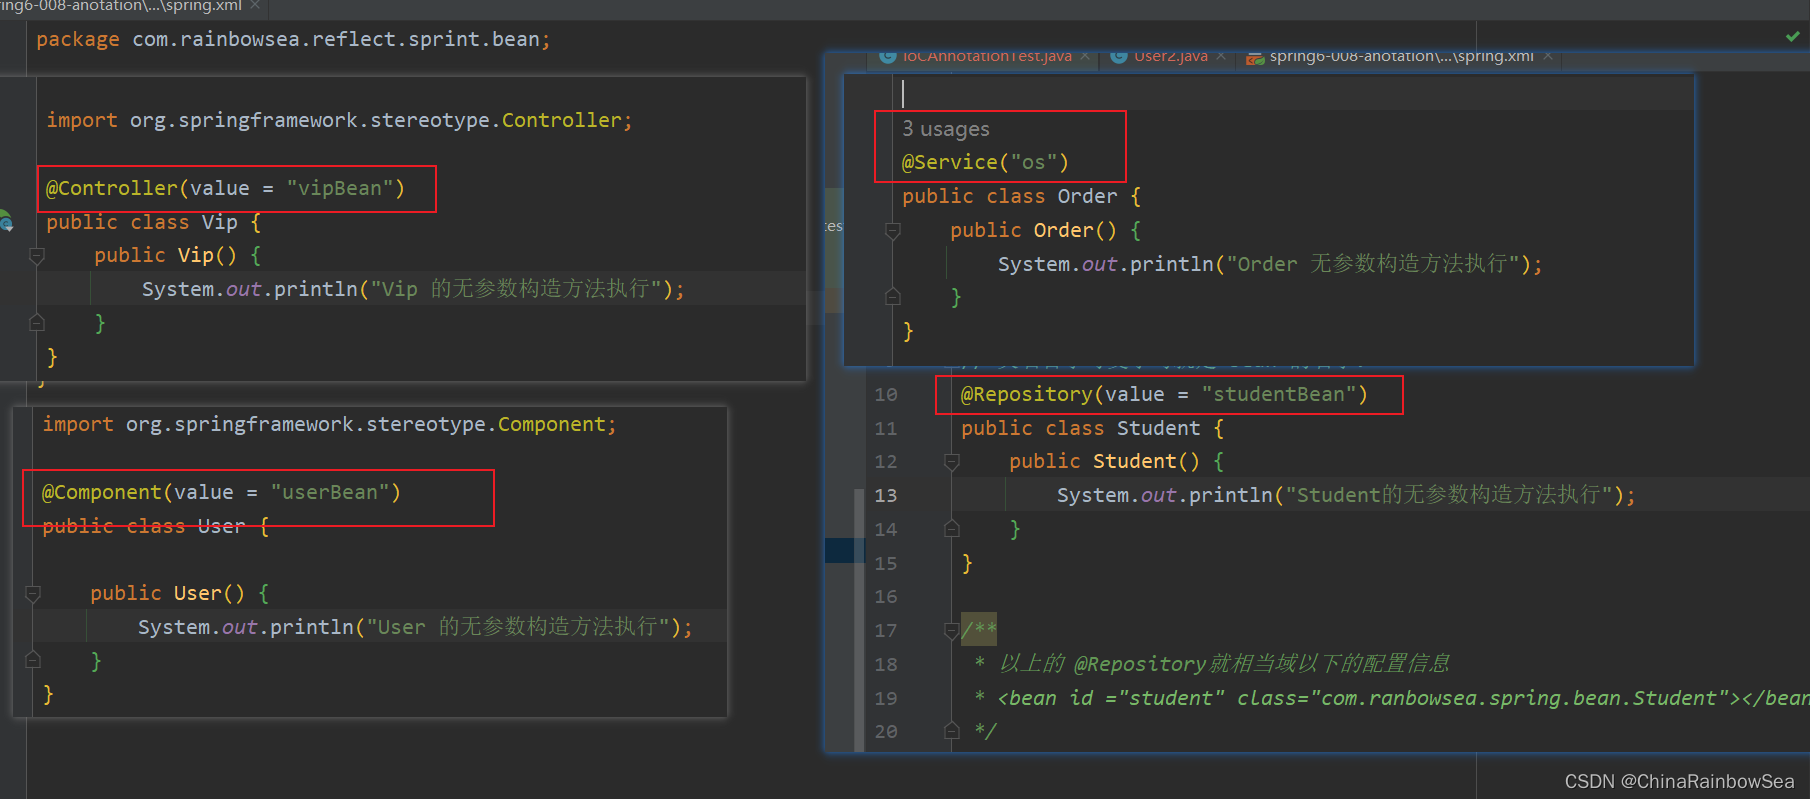
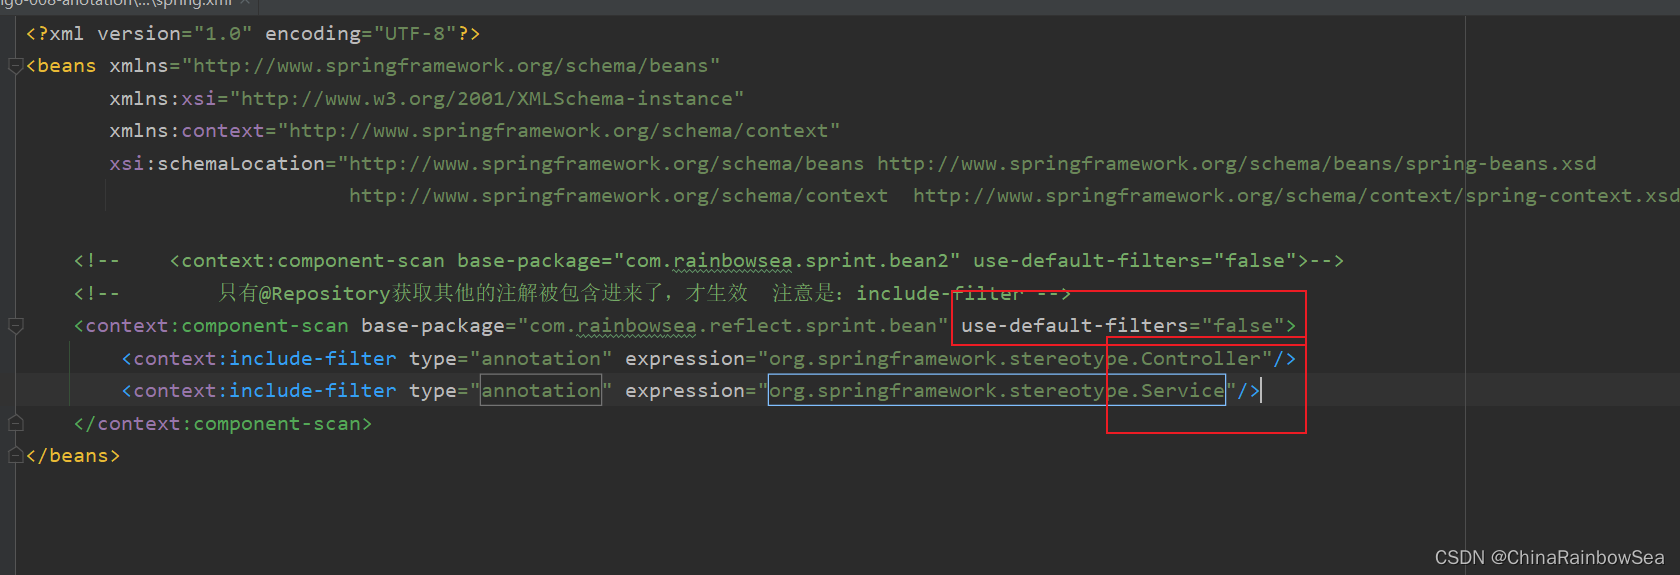
    <context:component-scan base-package="com.rainbowsea.reflect.sprint.bean" use-default-filters="false" >
        <context:include-filter type="annotation" expression="org.springframework.stereotype.Controller"/>
        <context:include-filter type="annotation" expression="org.springframework.stereotype.Service"/>
    </context:component-scan>
复制
<?xml version="1.0" encoding="UTF-8"?>
<beans xmlns="http://www.springframework.org/schema/beans"
xmlns:xsi="http://www.w3.org/2001/XMLSchema-instance"
xmlns:context="http://www.springframework.org/schema/context"
xsi:schemaLocation="http://www.springframework.org/schema/beans http://www.springframework.org/schema/beans/spring-beans.xsd
http://www.springframework.org/schema/context http://www.springframework.org/schema/context/spring-context.xsd">
<!-- <context:component-scan base-package="com.rainbowsea.sprint.bean2" use-default-filters="false">-->
<!-- 只有@Repository获取其他的注解被包含进来了,才生效 注意是:include-filter -->
<context:component-scan base-package="com.rainbowsea.reflect.sprint.bean" use-default-filters="false">
<context:include-filter type="annotation" expression="org.springframework.stereotype.Controller"/>
<context:include-filter type="annotation" expression="org.springframework.stereotype.Service"/>
</context:component-scan>
</beans>
复制运行测试:
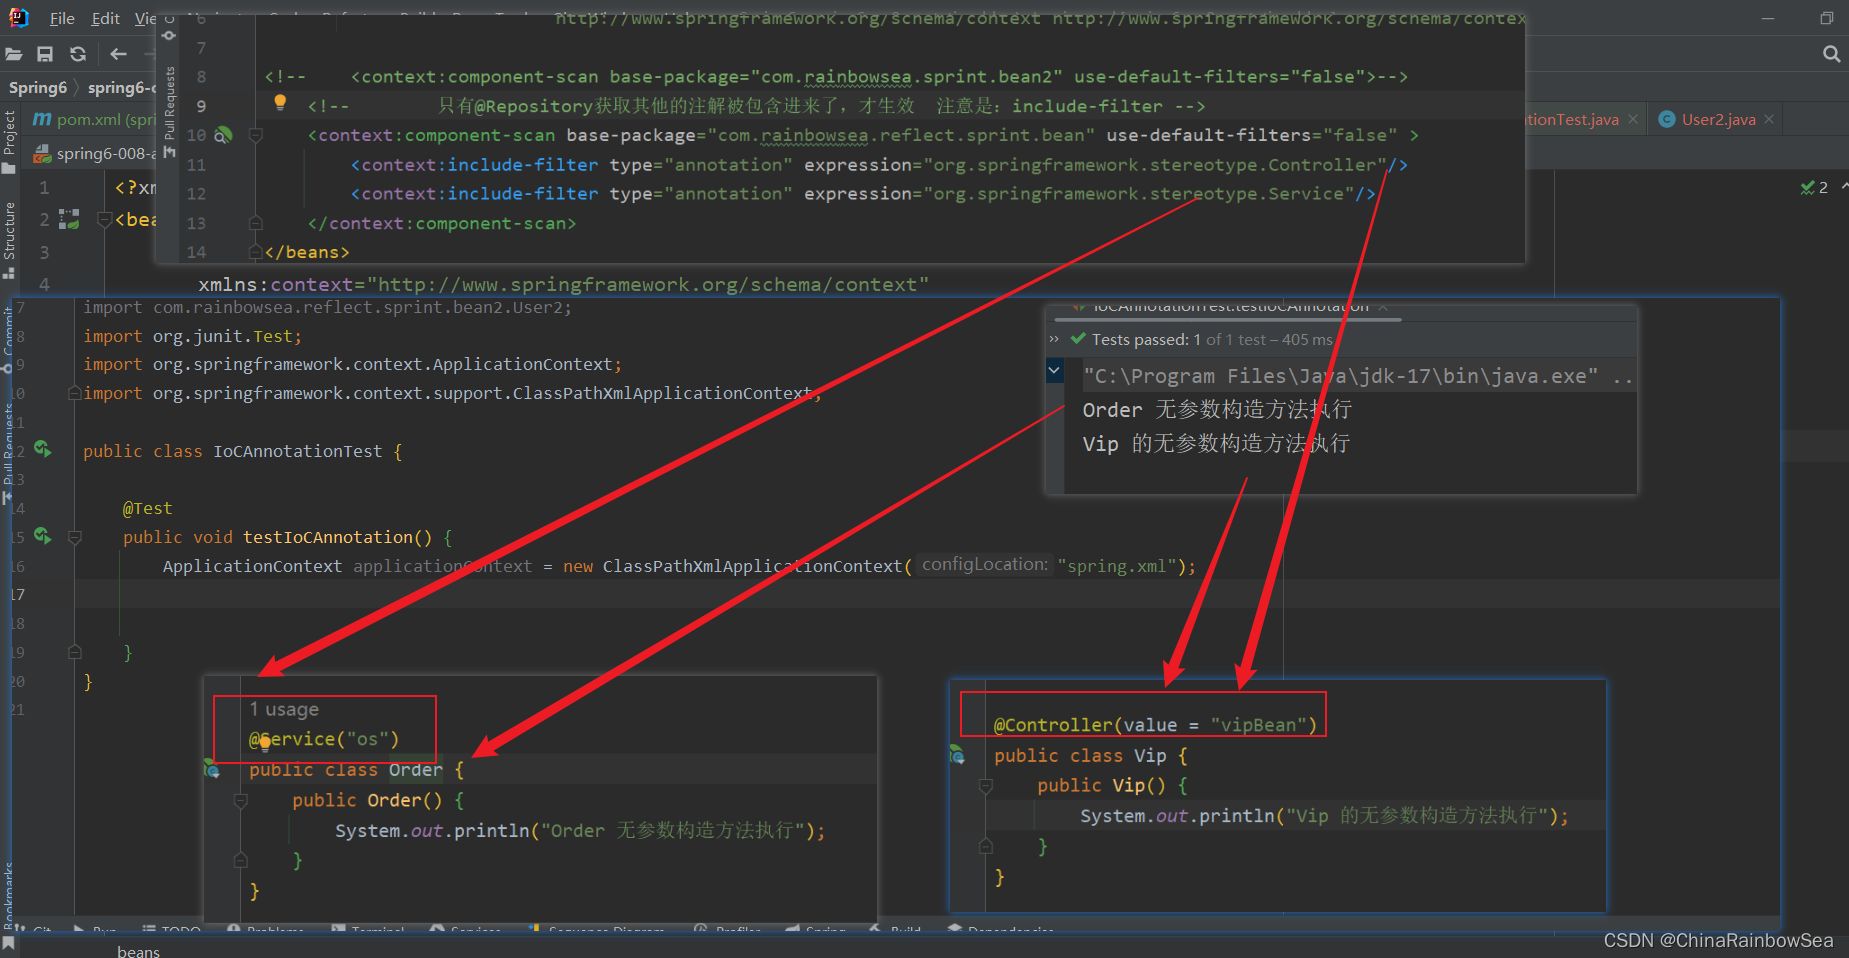
第二种方案:
use-default-filters="属性,并该属性指为 true (为true 值是默认的,可以省略不写)。表示该表明的包下的所有带有声明Bean (@Component,@Controller,@Service,@Repository)的注解全部生效。会实例化该包下的 bean 对象。
而在
<context:component-scan>的标签下的,指明的:<context:exclude-filter说明的注解会失效,不会实例 化 Bean 对象,注意其中的值是:exclude-filter type="annotation" expression="org.springframework.stereotype.Component" 注意:这个包名路径不要错了。org.springframework.stereotype.Controller,同时注意:这里是 exclude-filter 了。
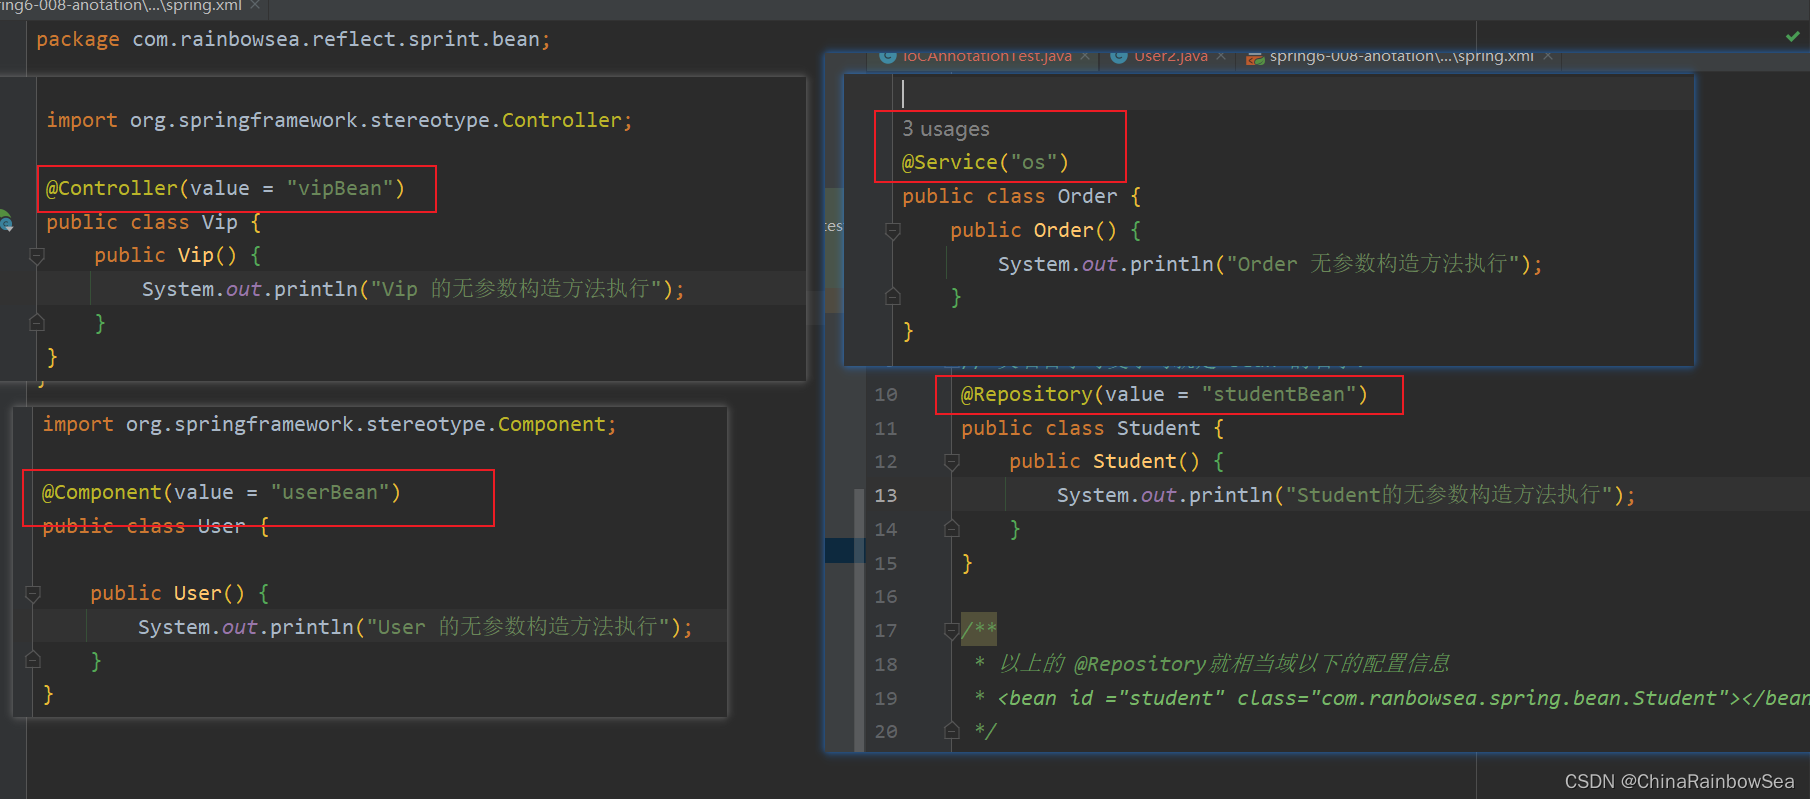
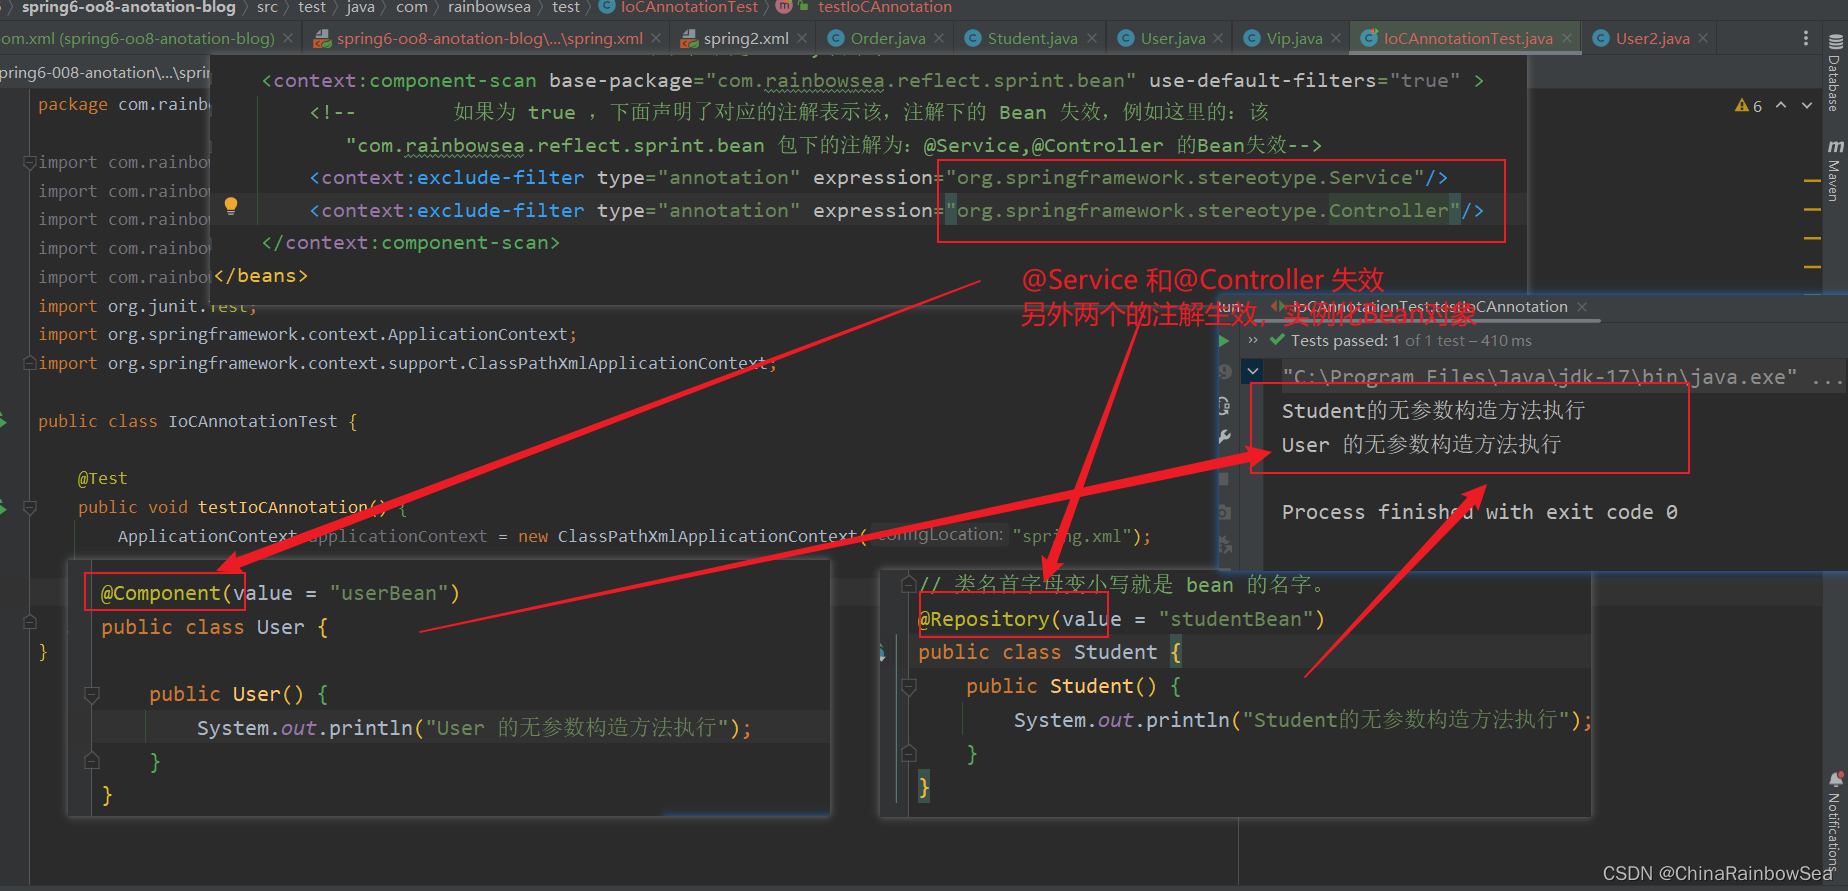
测试:这里我们让注解是:@Service,@Controller 的这个两个失效 ,不能 实例化Bean 对象,其他的注解可以实例化Bean 对象。

<!--    use-default-filters="true" 如果这个属性值是true,表示 com.rainbowsea.sprint.bean2-->
<!--    下的所有带有声明Bean (@Component,@Controller,@Service,@Repository)的注解全部生效-->
<!--    use-default-filters="true"  默认值就是 true,不用写-->
    <context:component-scan base-package="com.rainbowsea.reflect.sprint.bean" use-default-filters="true" >
        <!--        如果为 true ,下面声明了对应的注解表示该,注解下的 Bean 失效,例如这里的:该
           "com.rainbowsea.reflect.sprint.bean 包下的注解为:@Service,@Controller 的Bean失效-->
        <context:exclude-filter type="annotation" expression="org.springframework.stereotype.Service"/>
        <context:exclude-filter type="annotation" expression="org.springframework.stereotype.Controller "/>
    </context:component-scan>
复制
<?xml version="1.0" encoding="UTF-8"?>
<beans xmlns="http://www.springframework.org/schema/beans"
xmlns:xsi="http://www.w3.org/2001/XMLSchema-instance"
xmlns:context="http://www.springframework.org/schema/context"
xsi:schemaLocation="http://www.springframework.org/schema/beans http://www.springframework.org/schema/beans/spring-beans.xsd
http://www.springframework.org/schema/context http://www.springframework.org/schema/context/spring-context.xsd">
<!-- use-default-filters="true" 如果这个属性值是true,表示 com.rainbowsea.sprint.bean2-->
<!-- 下的所有带有声明Bean (@Component,@Controller,@Service,@Repository)的注解全部生效-->
<!-- use-default-filters="true" 默认值就是 true,不用写-->
<context:component-scan base-package="com.rainbowsea.reflect.sprint.bean" use-default-filters="true" >
<!-- 如果为 true ,下面声明了对应的注解表示该,注解下的 Bean 失效,例如这里的:该
"com.rainbowsea.reflect.sprint.bean 包下的注解为:@Service,@Controller 的Bean失效-->
<context:exclude-filter type="annotation" expression="org.springframework.stereotype.Service"/>
<context:exclude-filter type="annotation" expression="org.springframework.stereotype.Controller "/>
</context:component-scan>
</beans>
复制运行测试:
@Controller、@Service、@Repository @Component注解的 声明后这些Bean将被实例化。接下来我们就需要对这些已经实例化的 Bean 对象进行属性上的赋值操作了。如何给Bean的属性赋值。给Bean属性赋值需要用到这些注解:
@Value
@Autowired
@Qualifier
@Resource
当属性的类型是简单类型时,可以使用@Value注解进行注入。
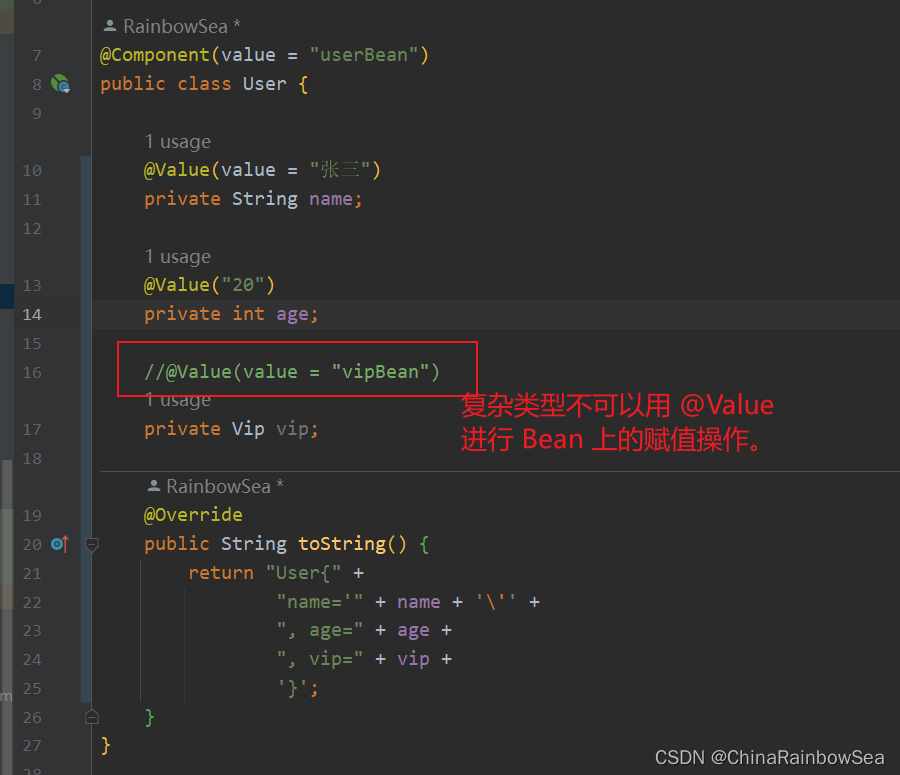
注意:是Spring 认为的简单类型才可以用 @Value 注解实现 bean 赋值,复杂类型(ref) 是不可以用 @Value 进行bean的赋值操作的,会出错。

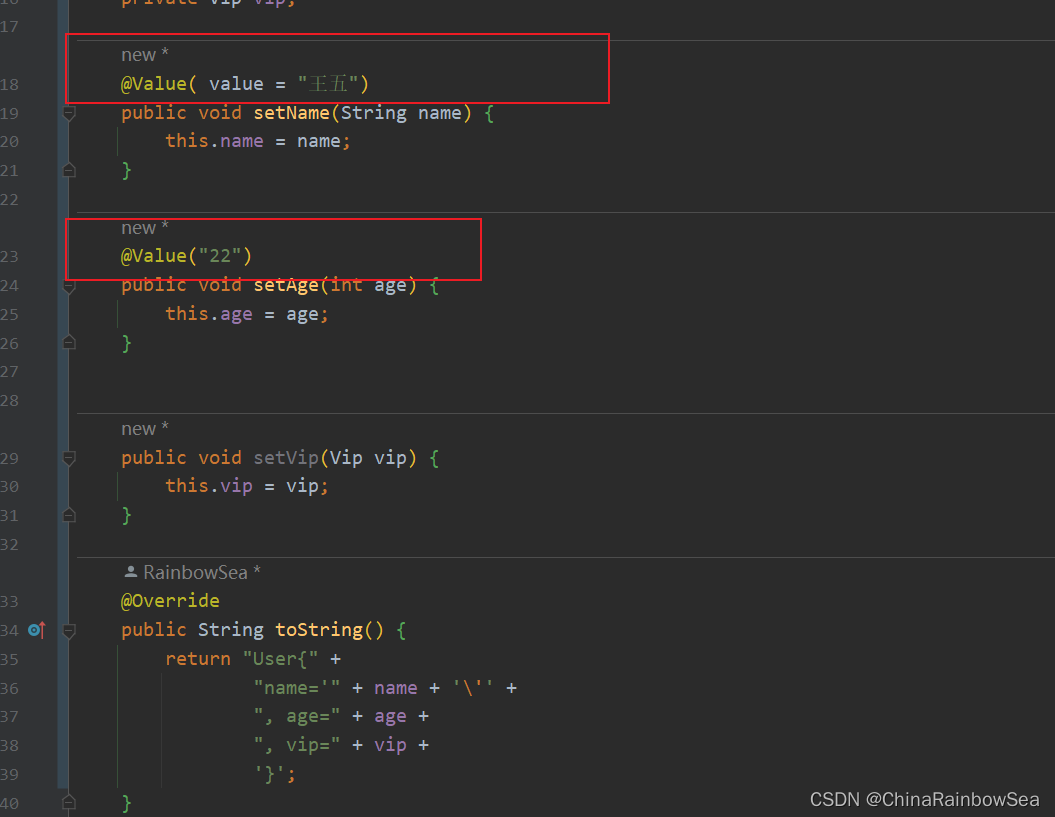
@Value注解可以出现在属性上、setter方法上、以及构造方法的形参上。可见Spring给我们提供了多样化的注入。
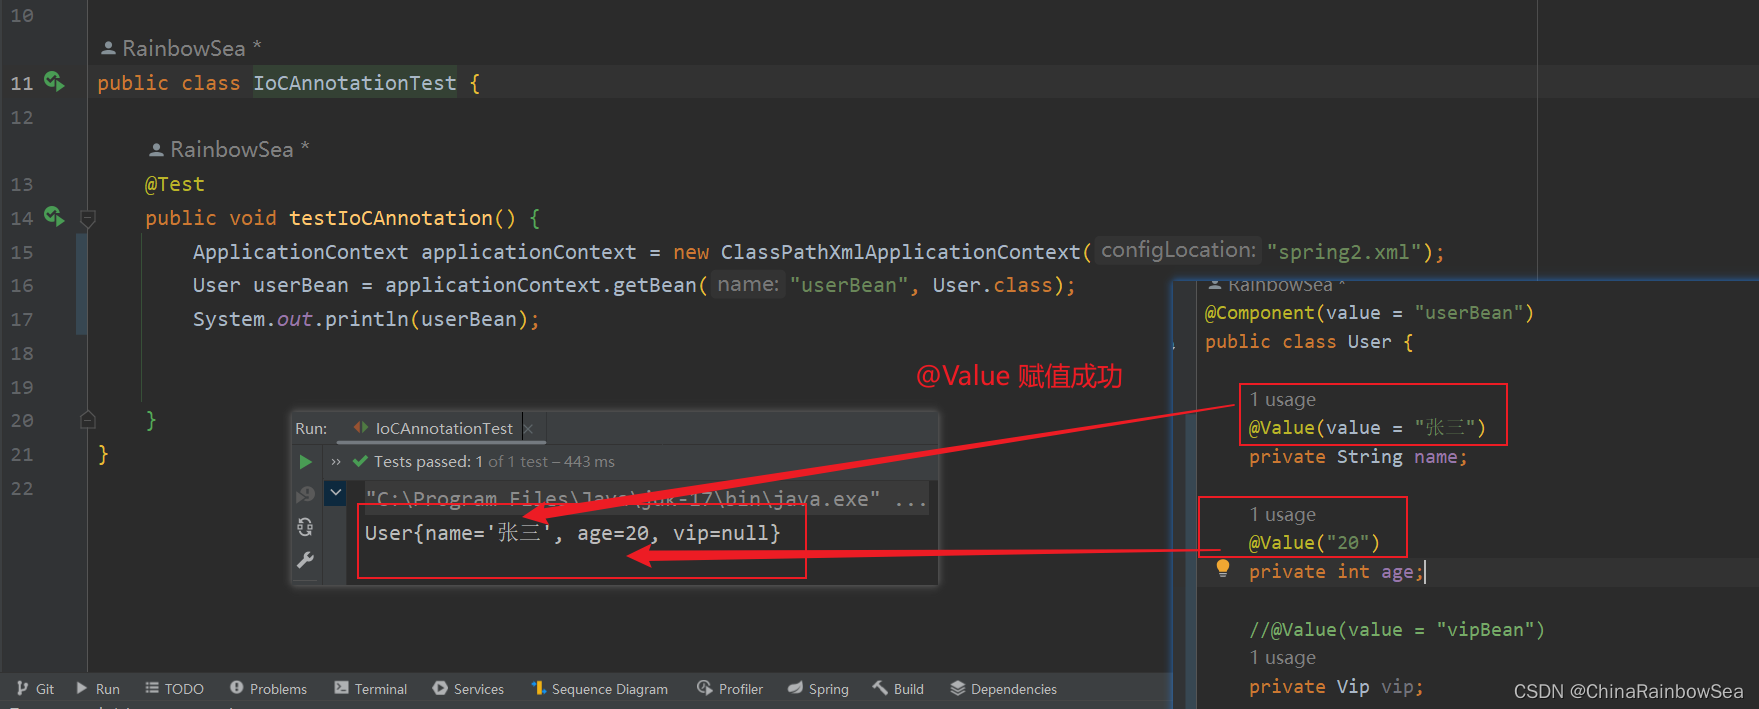
使用上: 就是注解上的简单使用,格式即可。如下:测试
@Value 出现在属性上,完成赋值操作 :
定义一个 Bean 对象,用于测试;
在相关的 spring.xml 文件上,配置好扫描的包,路径

<?xml version="1.0" encoding="UTF-8"?>
<beans xmlns="http://www.springframework.org/schema/beans"
       xmlns:xsi="http://www.w3.org/2001/XMLSchema-instance"
       xmlns:context="http://www.springframework.org/schema/context"
       xsi:schemaLocation="http://www.springframework.org/schema/beans http://www.springframework.org/schema/beans/spring-beans.xsd
                           http://www.springframework.org/schema/context http://www.springframework.org/schema/context/spring-context.xsd">

<!--    配置扫描文件包-->
    <context:component-scan base-package="com.rainbowsea.reflect.sprint.bean"></context:component-scan>
</beans>
复制
运行测试:
package com.rainbowsea.test;

import com.rainbowsea.reflect.sprint.bean.Order;
import com.rainbowsea.reflect.sprint.bean.Student;
import com.rainbowsea.reflect.sprint.bean.User;
import com.rainbowsea.reflect.sprint.bean.Vip;
import org.junit.Test;
import org.springframework.context.ApplicationContext;
import org.springframework.context.support.ClassPathXmlApplicationContext;

public class IoCAnnotationTest {

    @Test
    public void testIoCAnnotation() {
        ApplicationContext applicationContext = new ClassPathXmlApplicationContext("spring2.xml");
        User userBean = applicationContext.getBean("userBean", User.class);
        System.out.println(userBean);


    }
}

复制
@Value 出现在构造方法的形参上,完成赋值操作
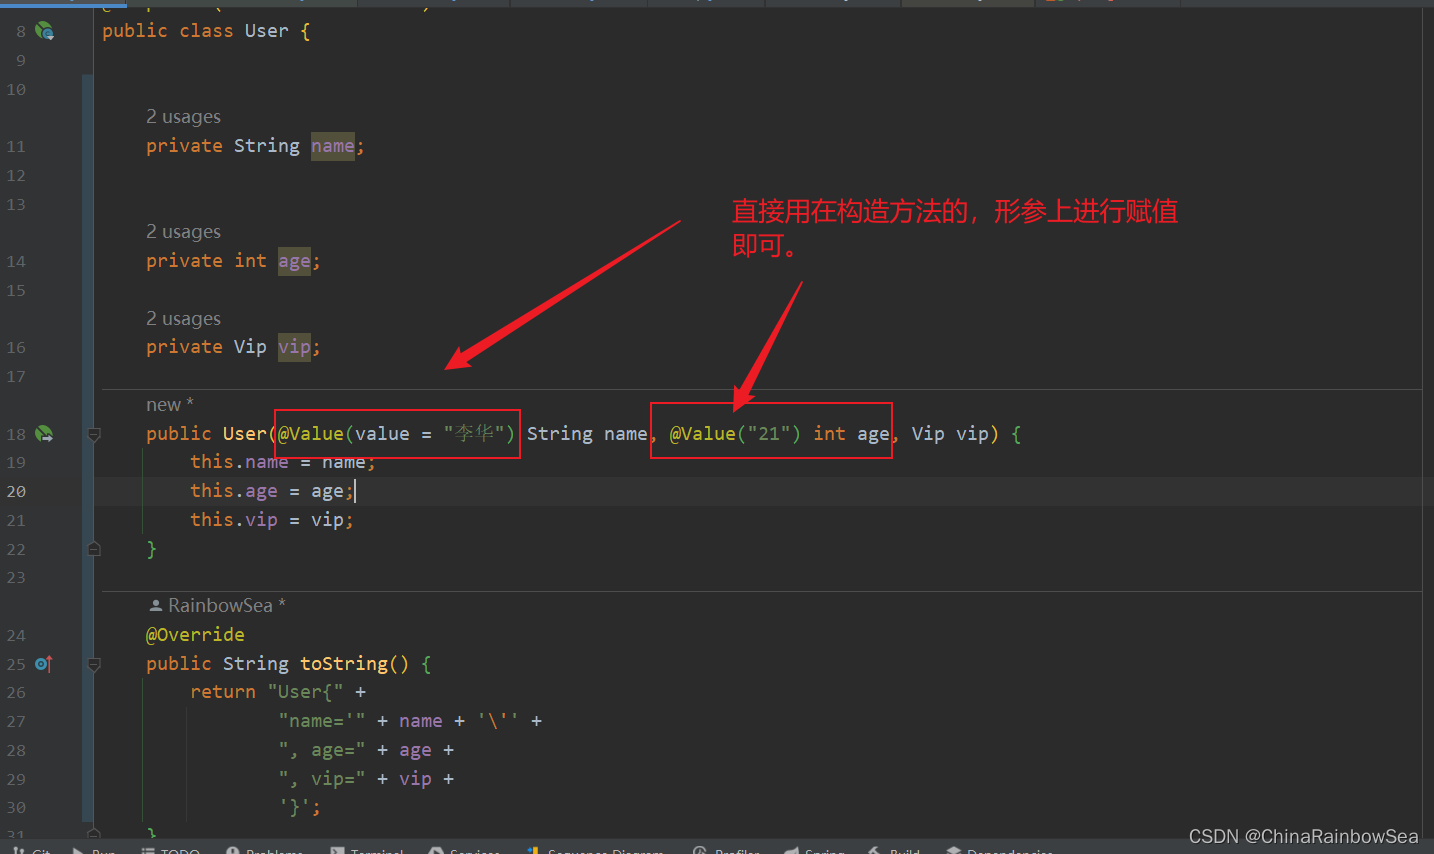
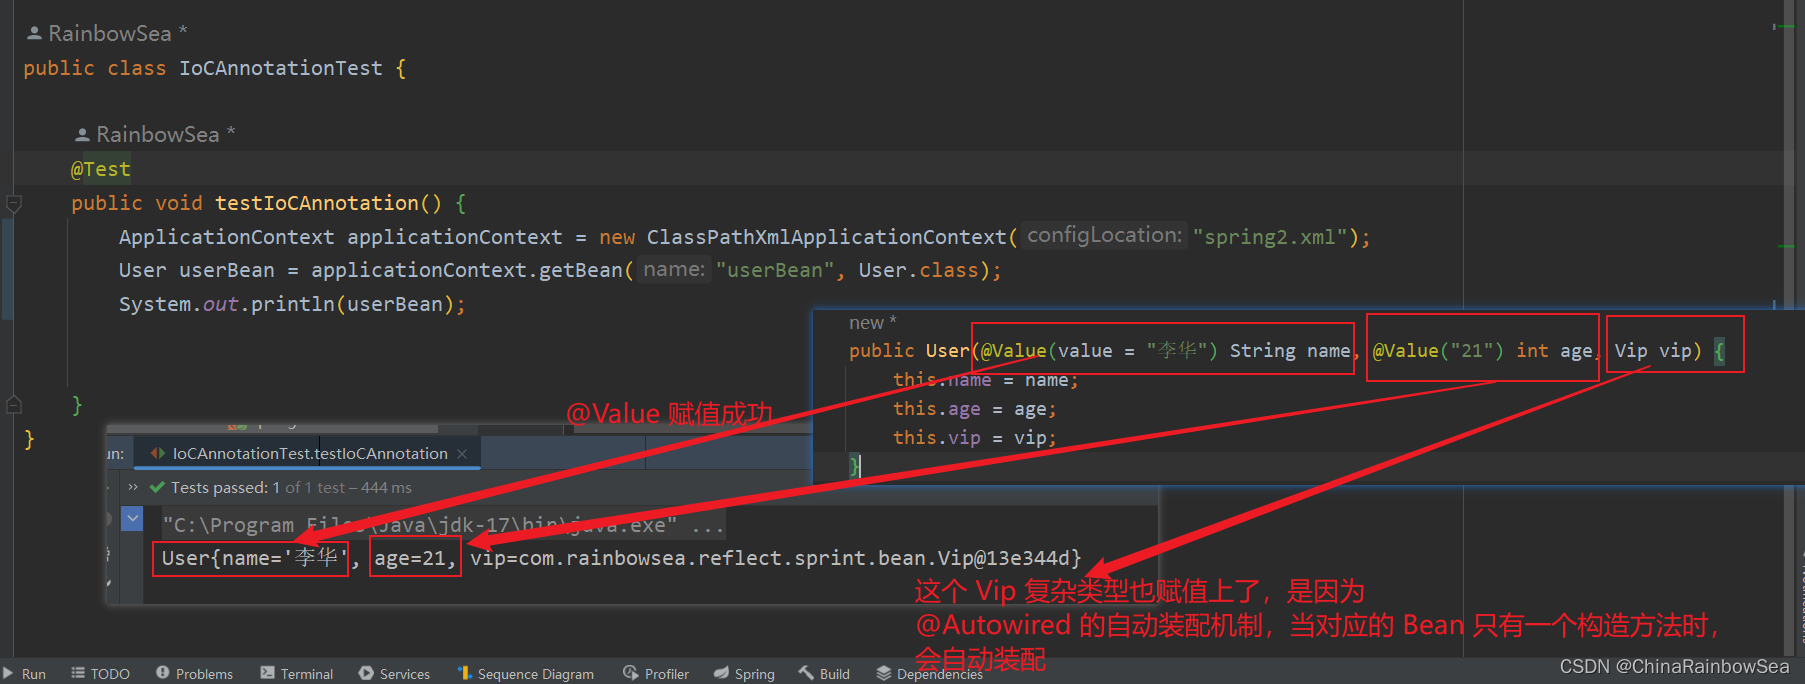
    public User(@Value(value = "李华") String name, @Value("21") int age, Vip vip) {
        this.name = name;
        this.age = age;
        this.vip = vip;
    }
复制
运行测试:
说明:这个 Vip 复杂类型也赋值上了,是因为@Autowired 的自动装配机制,当对应的 Bean 只有一个构造方法时,会自动装配。后面会说明的。
@Value 出现在set() 方法上,完成赋值操作 :
运行测试: 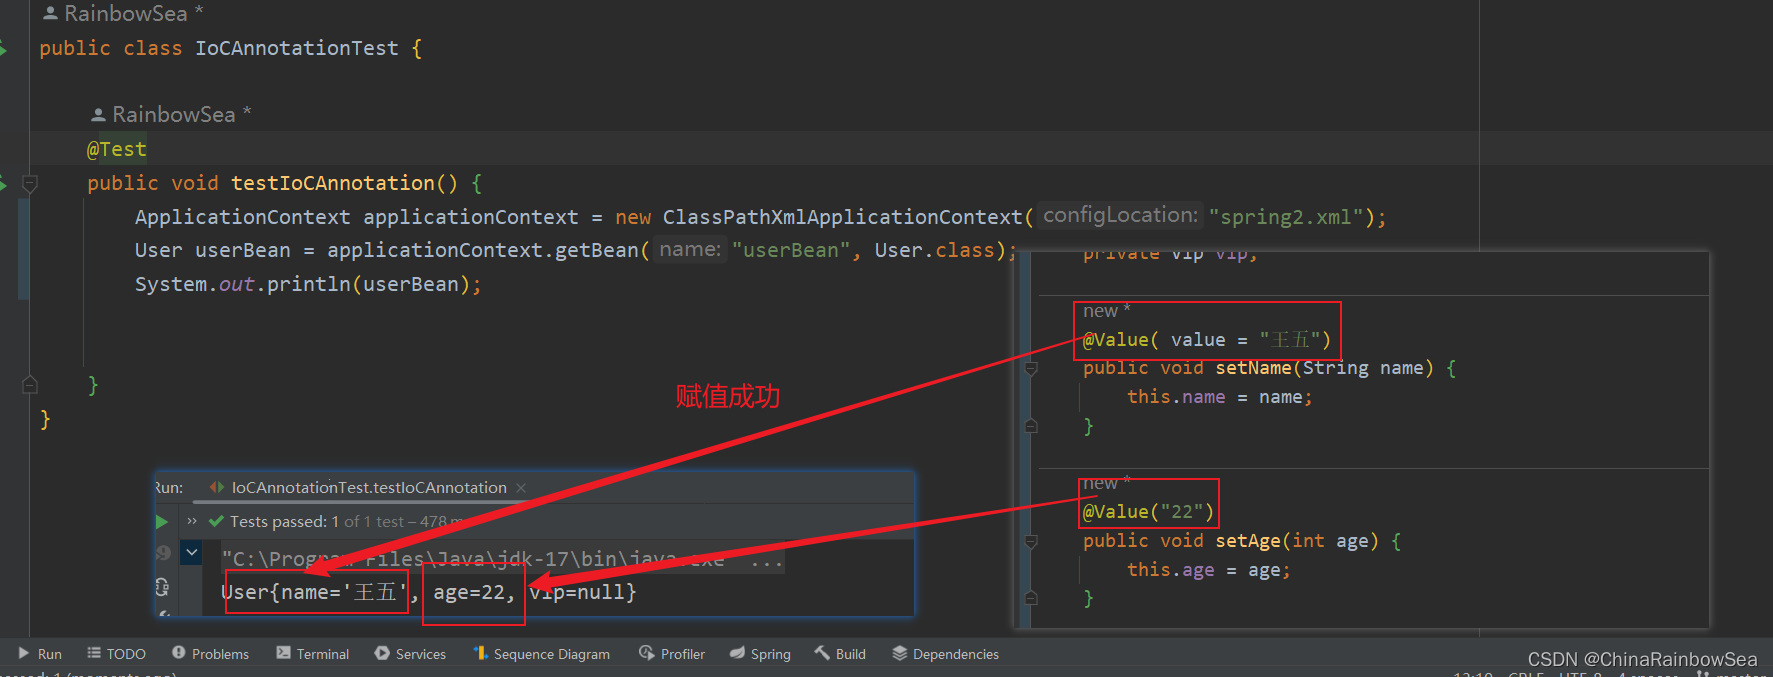
注意:是Spring 认为的简单类型才可以用 @Value 注解实现 bean 赋值,复杂类型(ref) 是不可以用 @Value 进行bean的赋值操作的,会出错。


@Autowired注解可以用来注入非简单类型。被翻译为:自动连线的,或者自动装配。注意是非简单类型的,赋值操作。
单独使用@Autowired注解,默认根据类型装配。【默认是byType】
看一下它的源码:

源码中有两处需要注意:
第一处:该注解可以标注在哪里?
构造方法上;方法上;形参上;属性上;注解上复制第二处:该注解有一个required属性,默认值是true,表示在注入的时候要求被注入的Bean必须是存在的,如果不存在则报错。如果required属性设置为false,表示注入的Bean存在或者不存在都没关系,存在的话就注入,不存在的话,也不报错。
测试:准备工作: 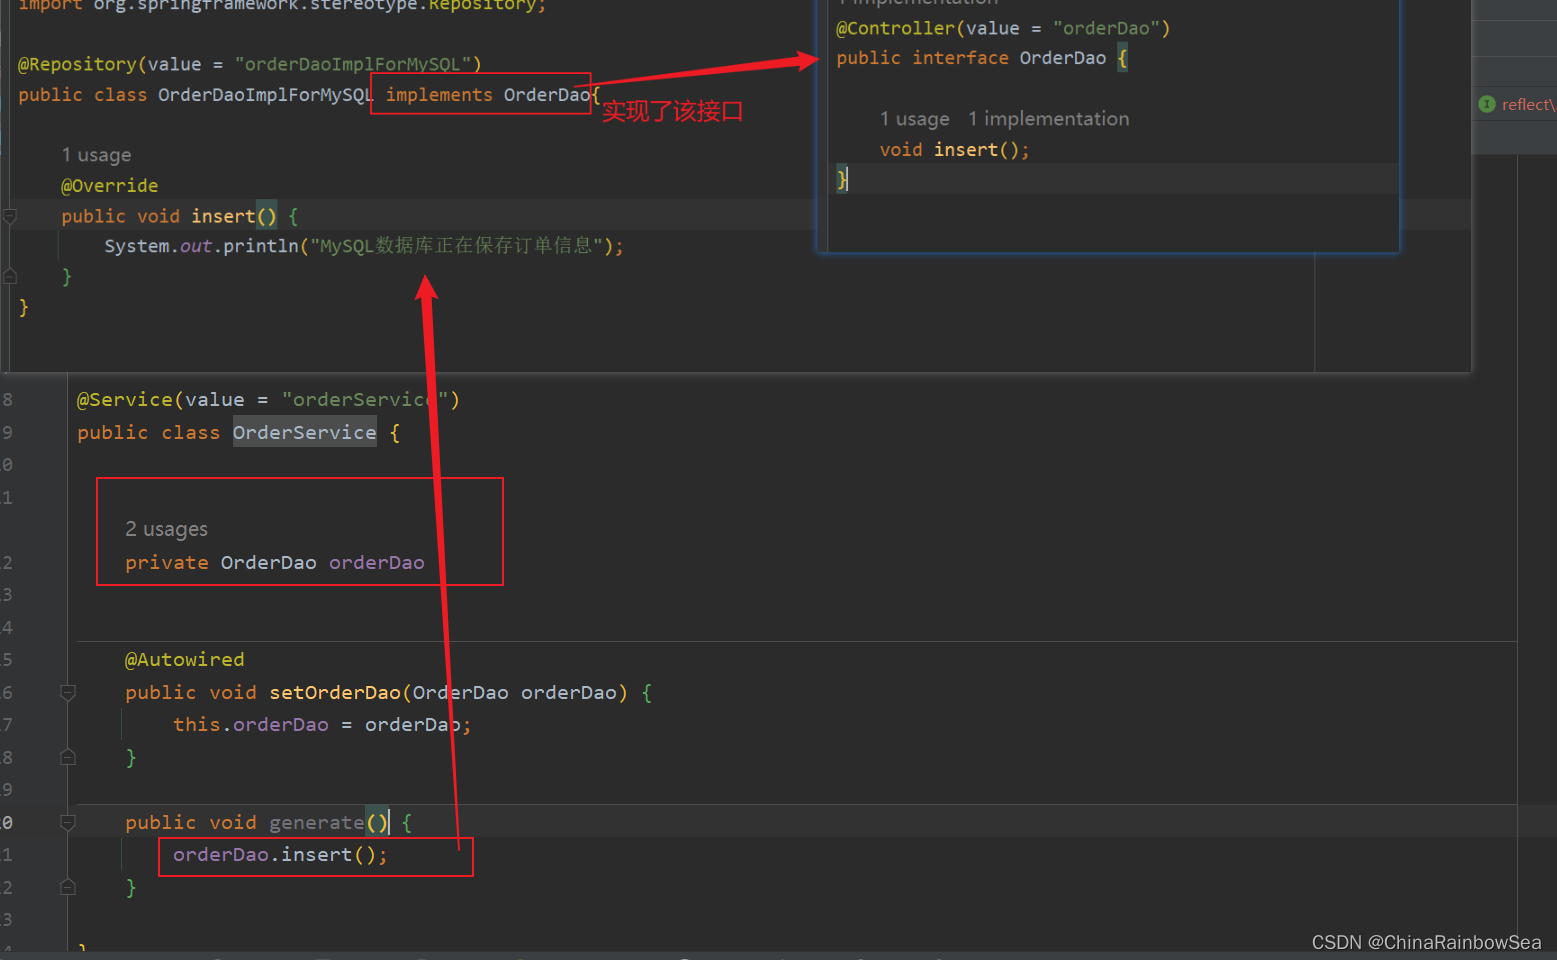
package com.rainbowsea.reflect.sprint.dao;


import org.springframework.stereotype.Controller;

@Controller(value = "orderDao")
public interface OrderDao {

    void insert();
}

复制
package com.rainbowsea.reflect.sprint.dao;
import org.springframework.stereotype.Repository;
@Repository(value = "orderDaoImplForMySQL")
public class OrderDaoImplForMySQL implements OrderDao{
@Override
public void insert() {
System.out.println("MySQL数据库正在保存订单信息");
}
}
复制package com.rainbowsea.reflect.sprint.dao;
import org.springframework.beans.factory.annotation.Autowired;
import org.springframework.stereotype.Service;
@Service(value = "orderService")
public class OrderService {
private OrderDao orderDao ;
@Autowired
public void setOrderDao(OrderDao orderDao) {
this.orderDao = orderDao;
}
public void generate() {
orderDao.insert();
}
}
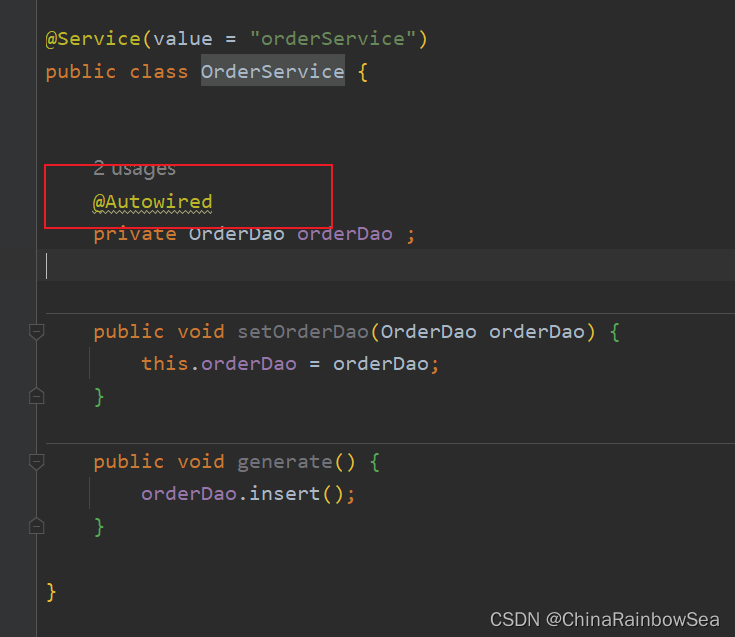
复制在属性上使用@Autowired注解:
先配置一下,配置的扫描包,因为这里,我们上面的测试 Bean 是在一个新的包下,创建的。

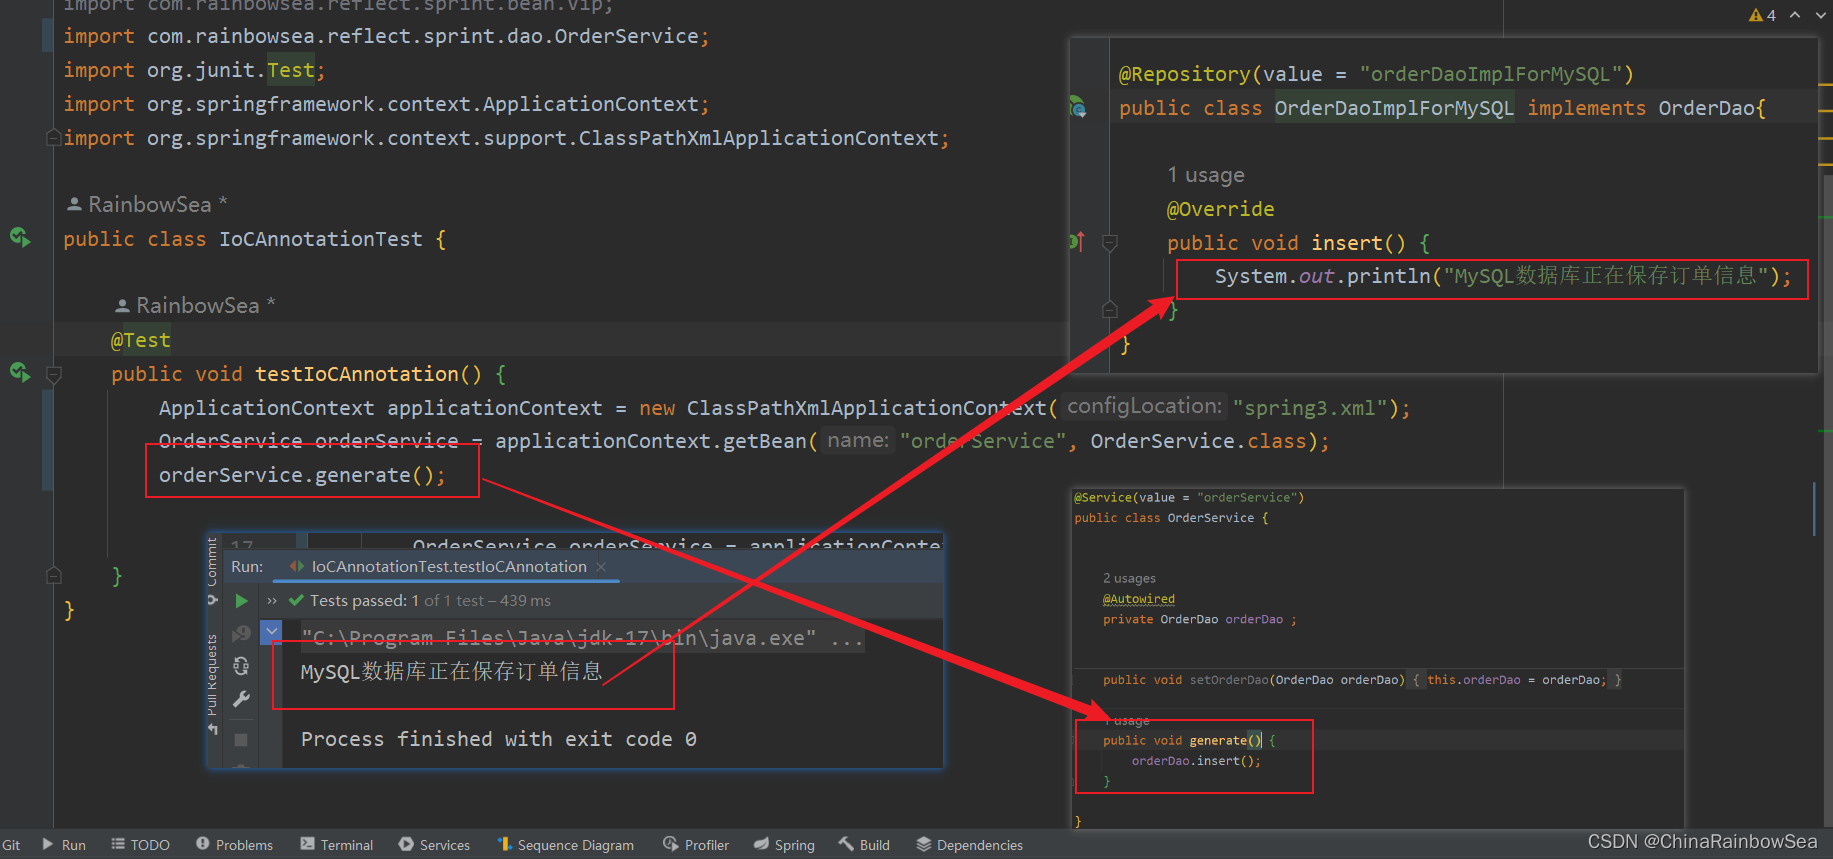
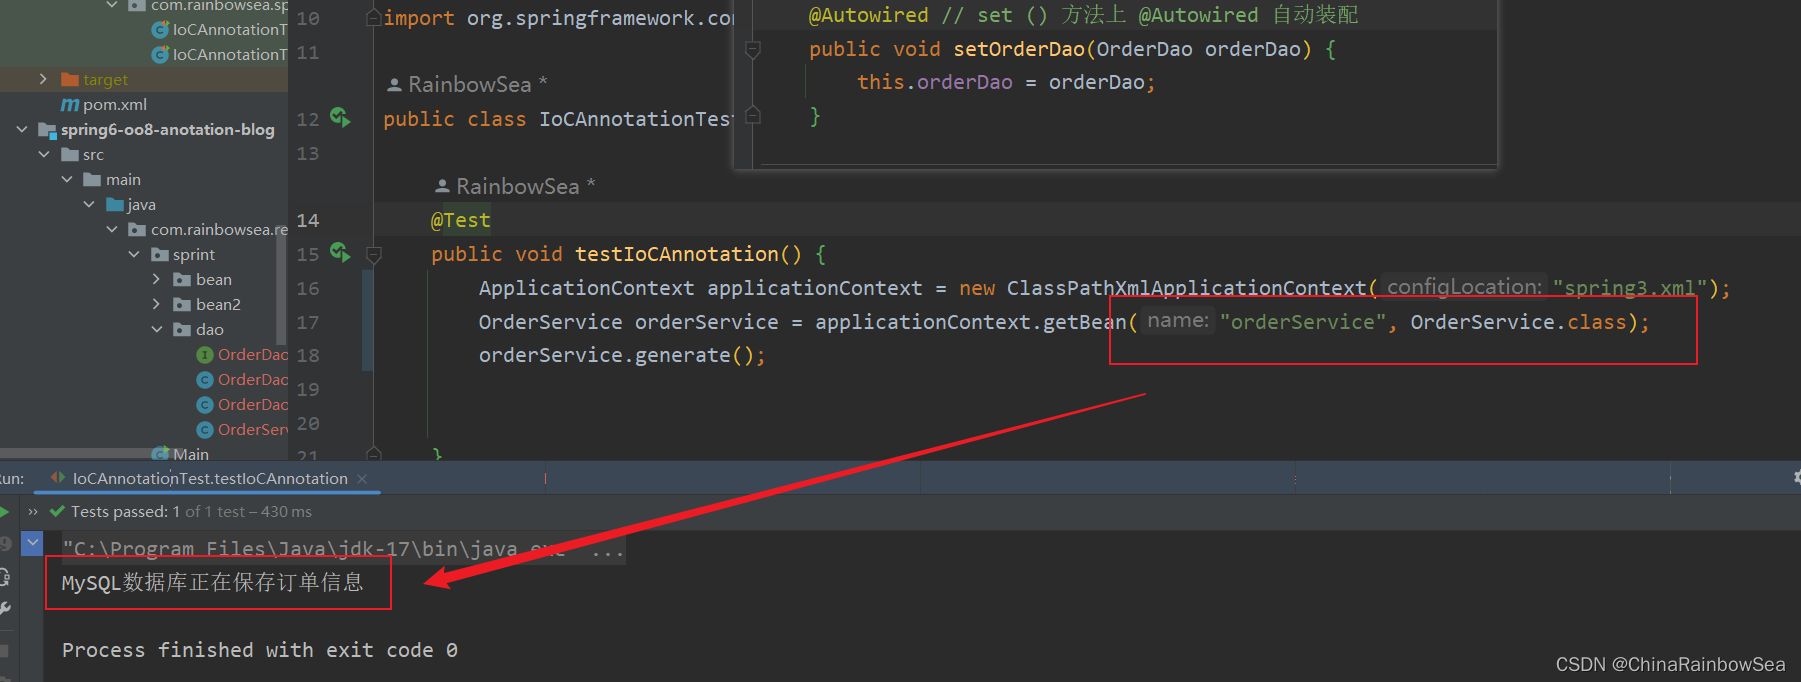
在set() 方法上使用@Autowired注解自动装配:
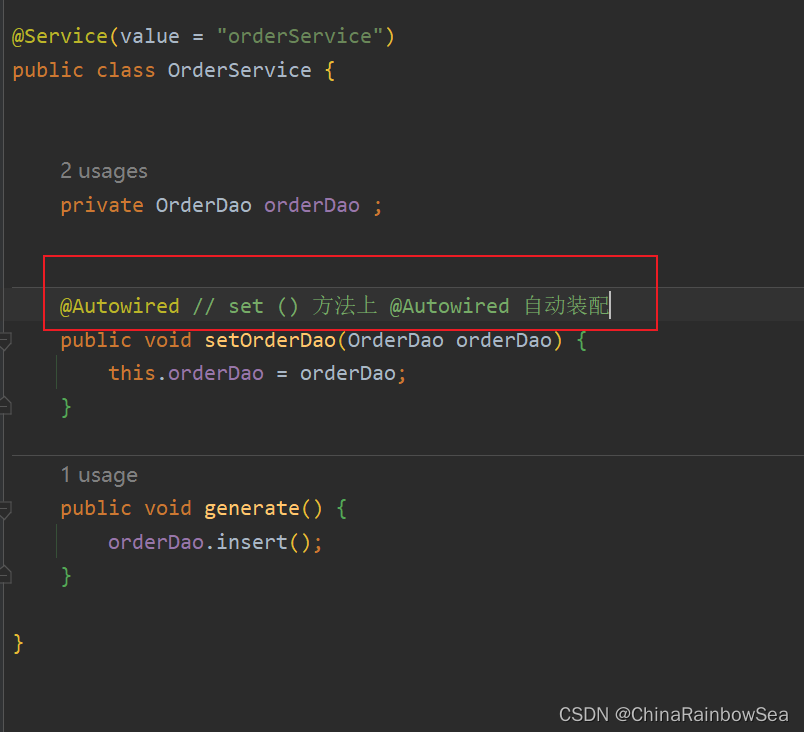
    @Autowired // set () 方法上 @Autowired 自动装配
    public void setOrderDao(OrderDao orderDao) {
        this.orderDao = orderDao;
    }

复制
同样也没有问题
在无参数构造方法上的参数上,使用@Autowired注解自动装配:
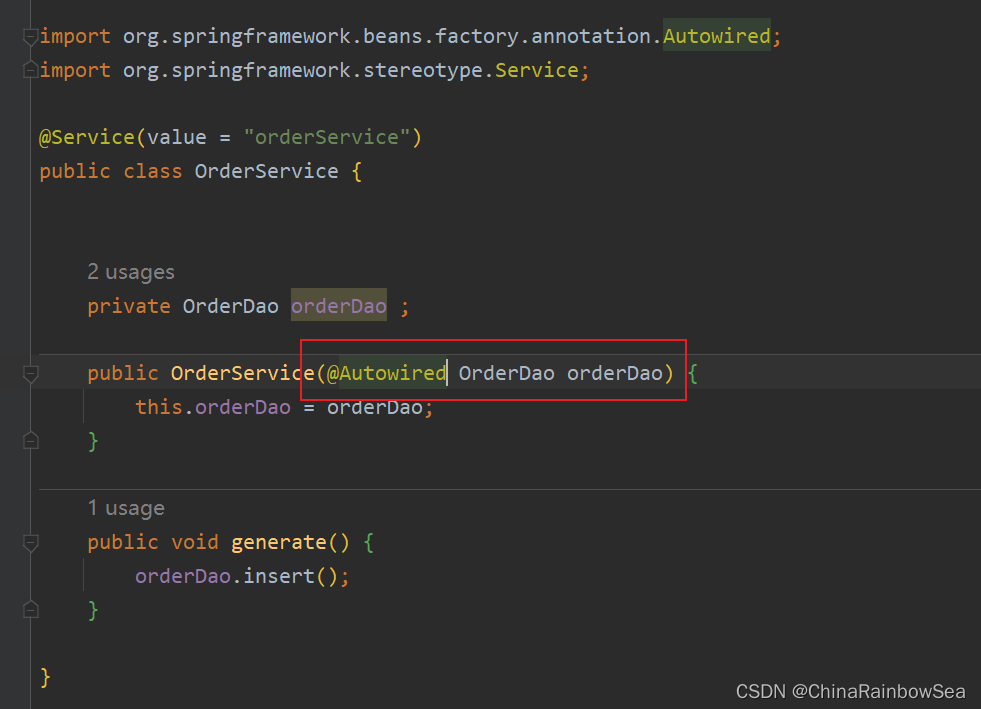
    public OrderService(@Autowired OrderDao orderDao) {
        this.orderDao = orderDao;
    }
复制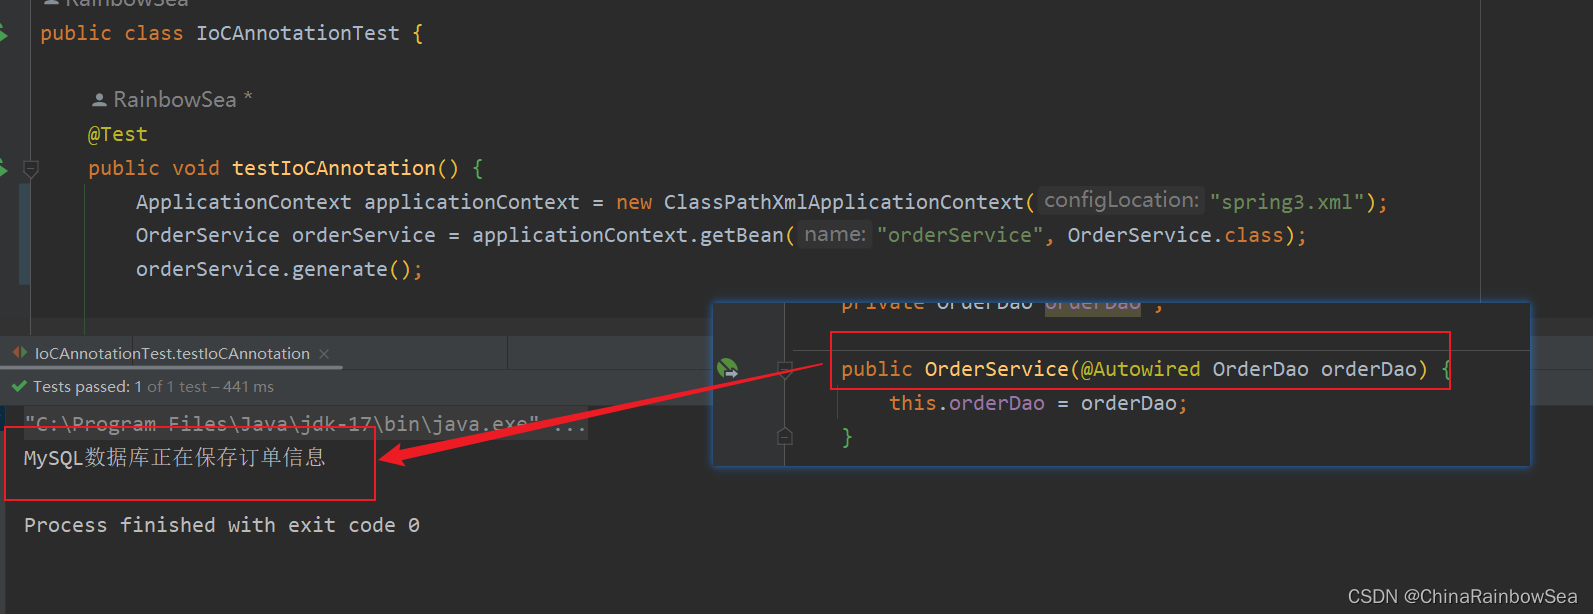
当有参数的构造方法只有一个时,@Autowired注解可以省略,建议不要用这种方式
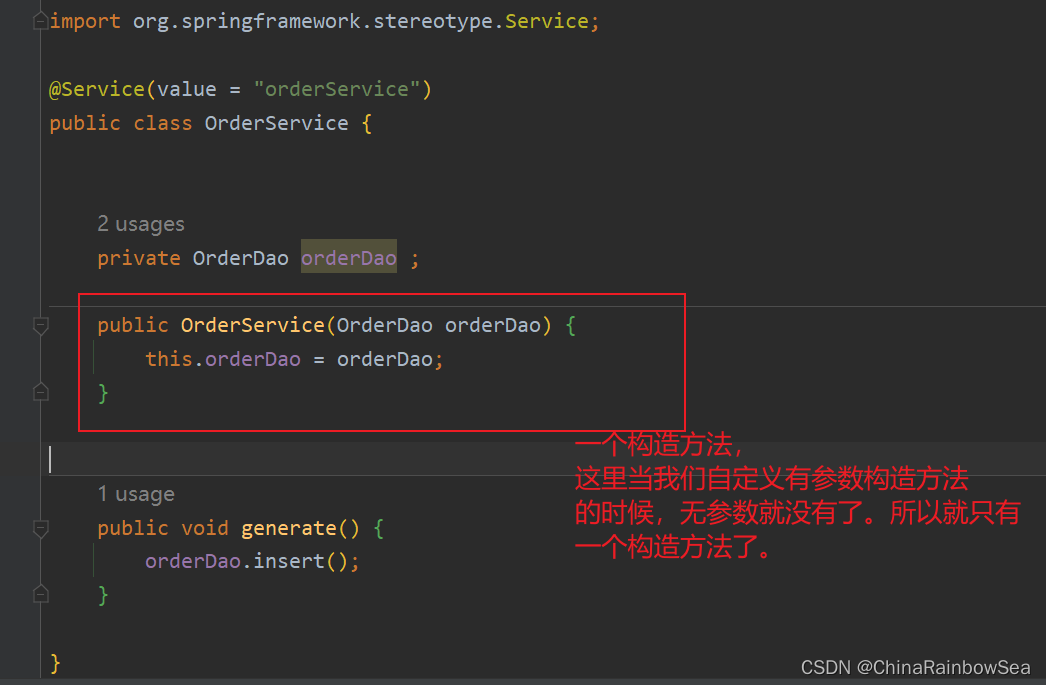
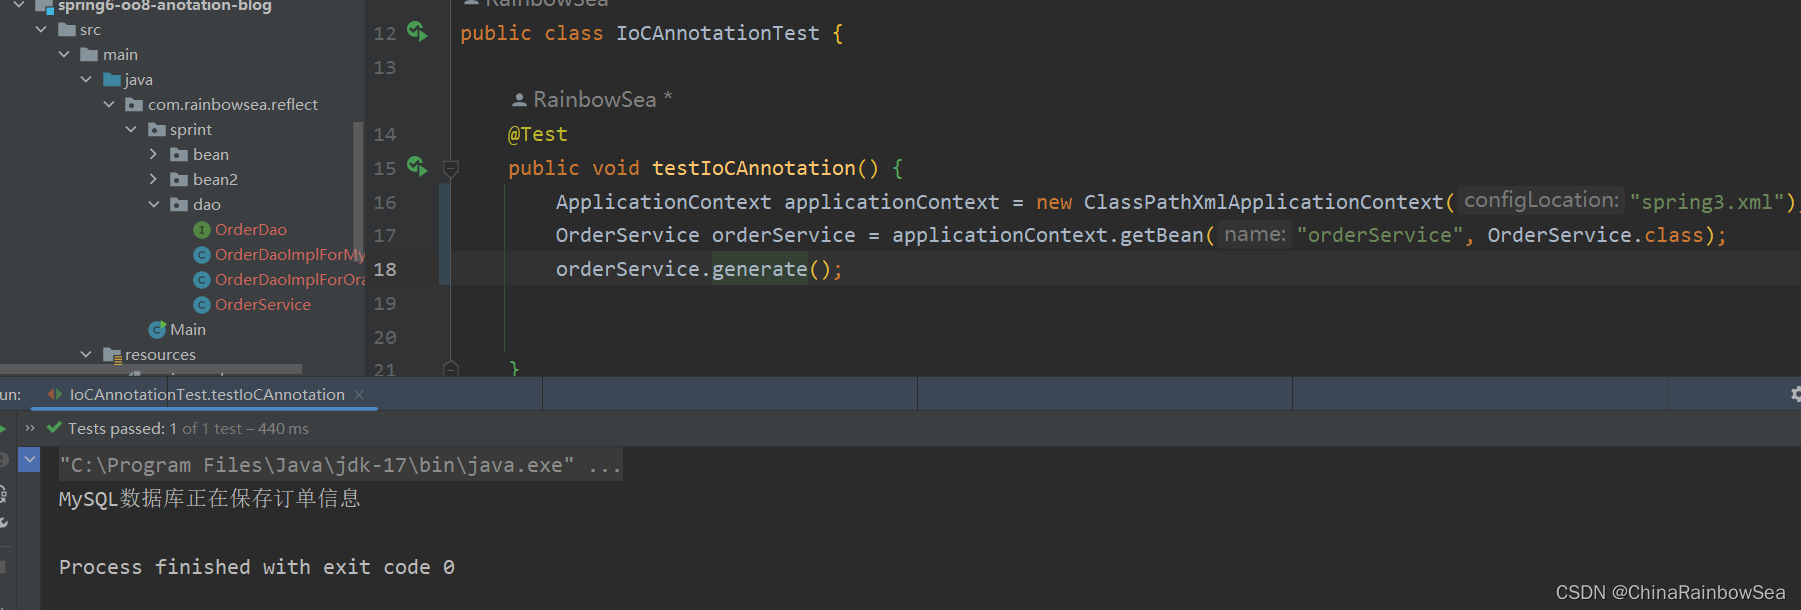
当然,如果有多个构造方法,@Autowired肯定是不能省略的,会报错。
比如:这里我们多添加上一个无参数构造方法 。这样就有两个构造方法了。所以是会报错的。
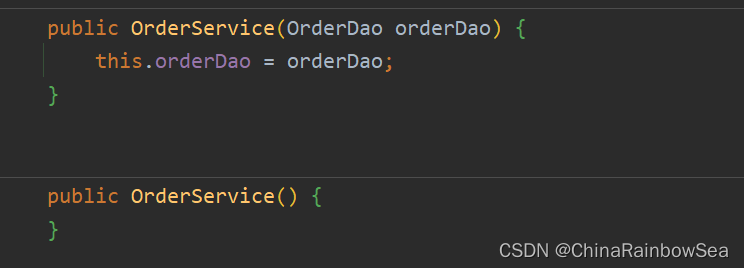
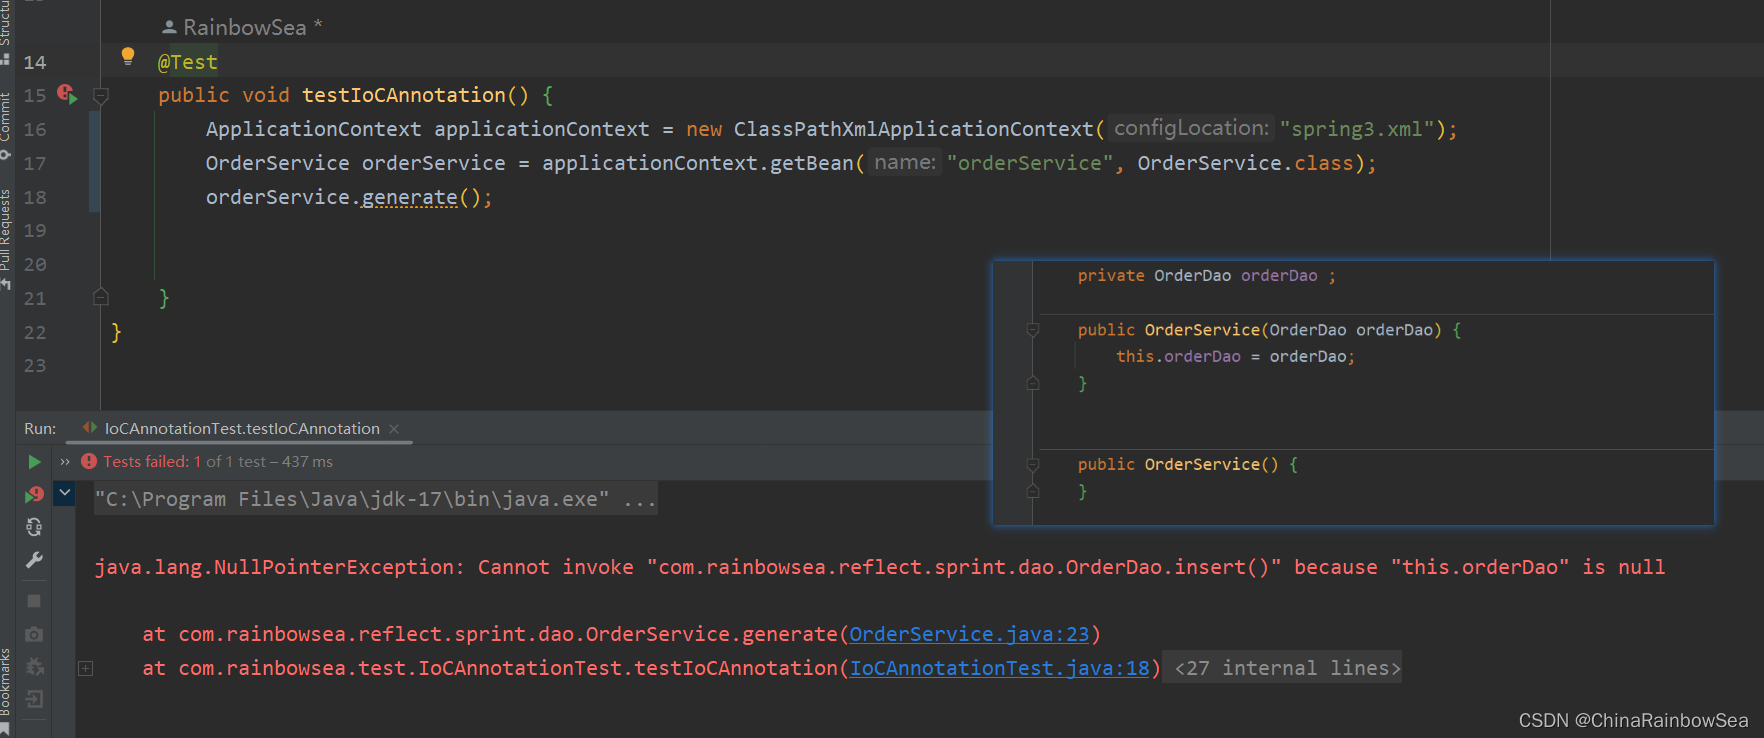
到此为止,我们已经清楚@Autowired注解可以出现在哪些位置了。
@Autowired注解默认是byType进行注入的,也就是说根据类型注入的,如果以上程序中,UserDao接口还有另外一个实现类,会出现问题吗?会的,
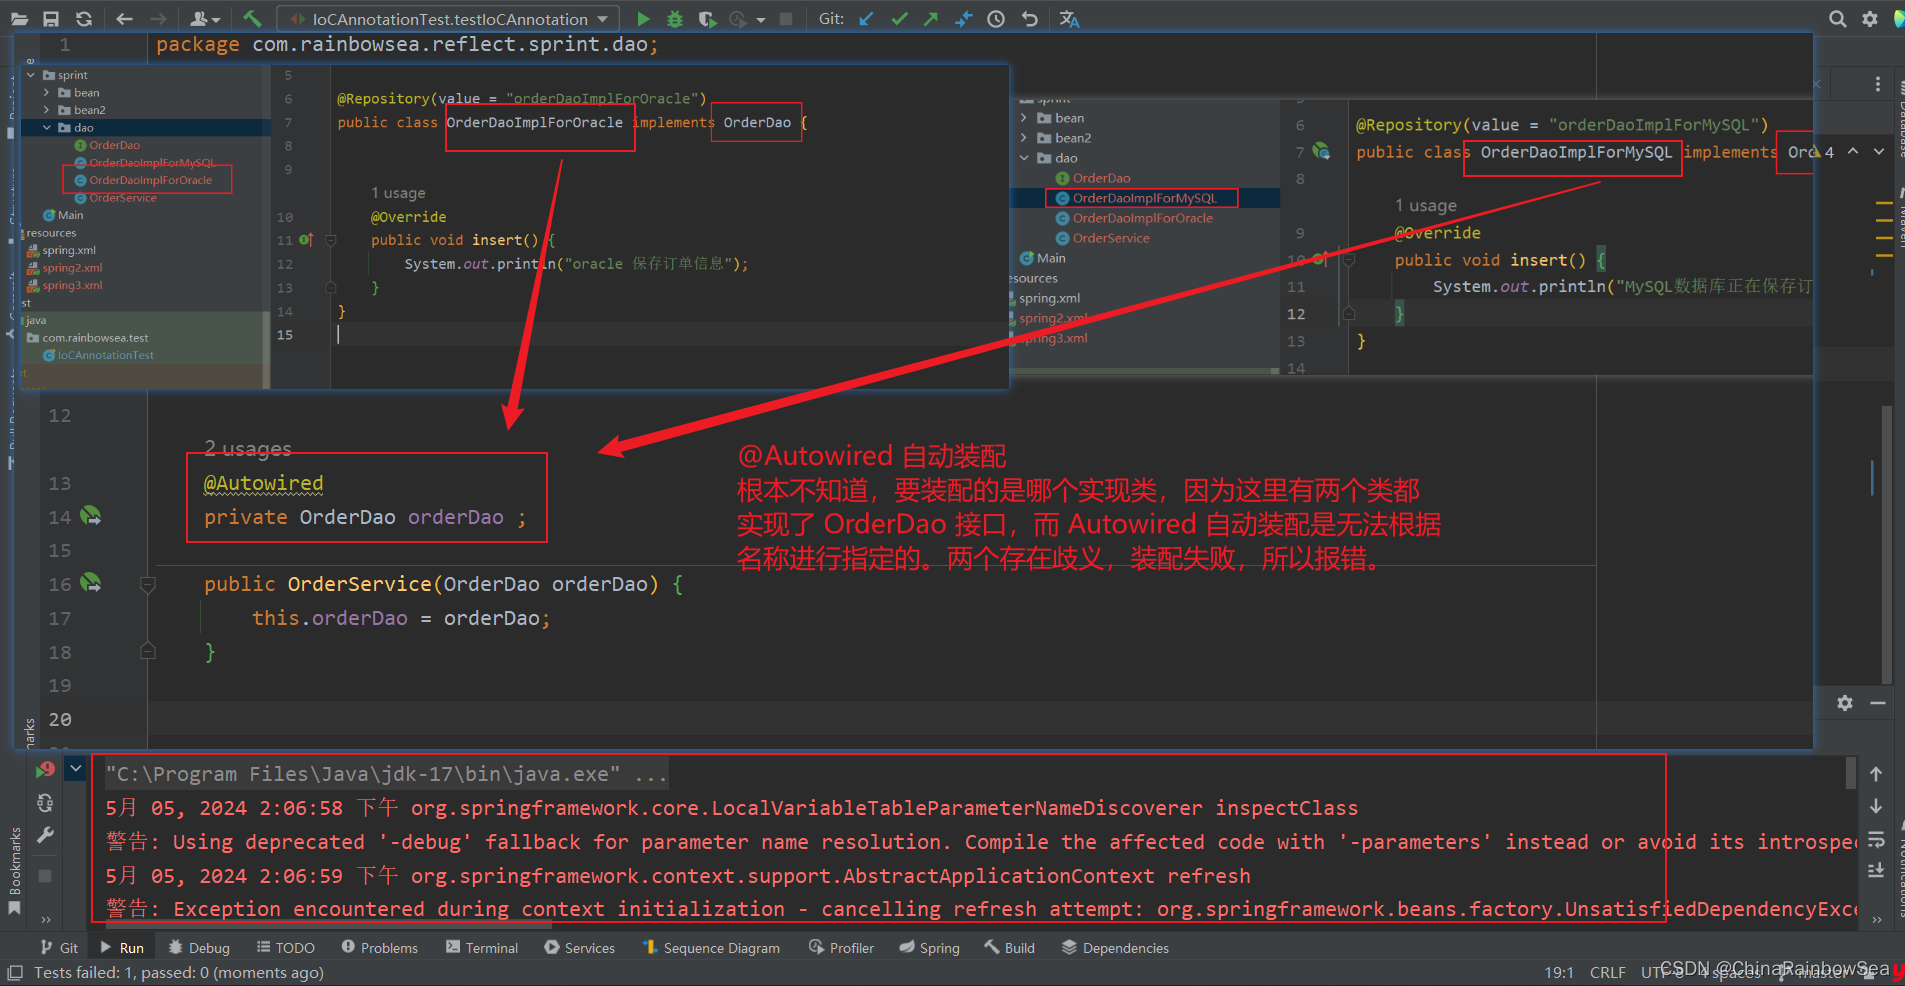
@Autowired 自动装配
根本不知道,要装配的是哪个实现类,因为这里有两个类都
实现了 OrderDao 接口,而 Autowired 自动装配是无法根据
名称进行指定的。所以报错。
错误信息中说:不能装配,UserDao这个Bean的数量大于1.
怎么解决这个问题呢?当然要byName,根据名称进行装配了。
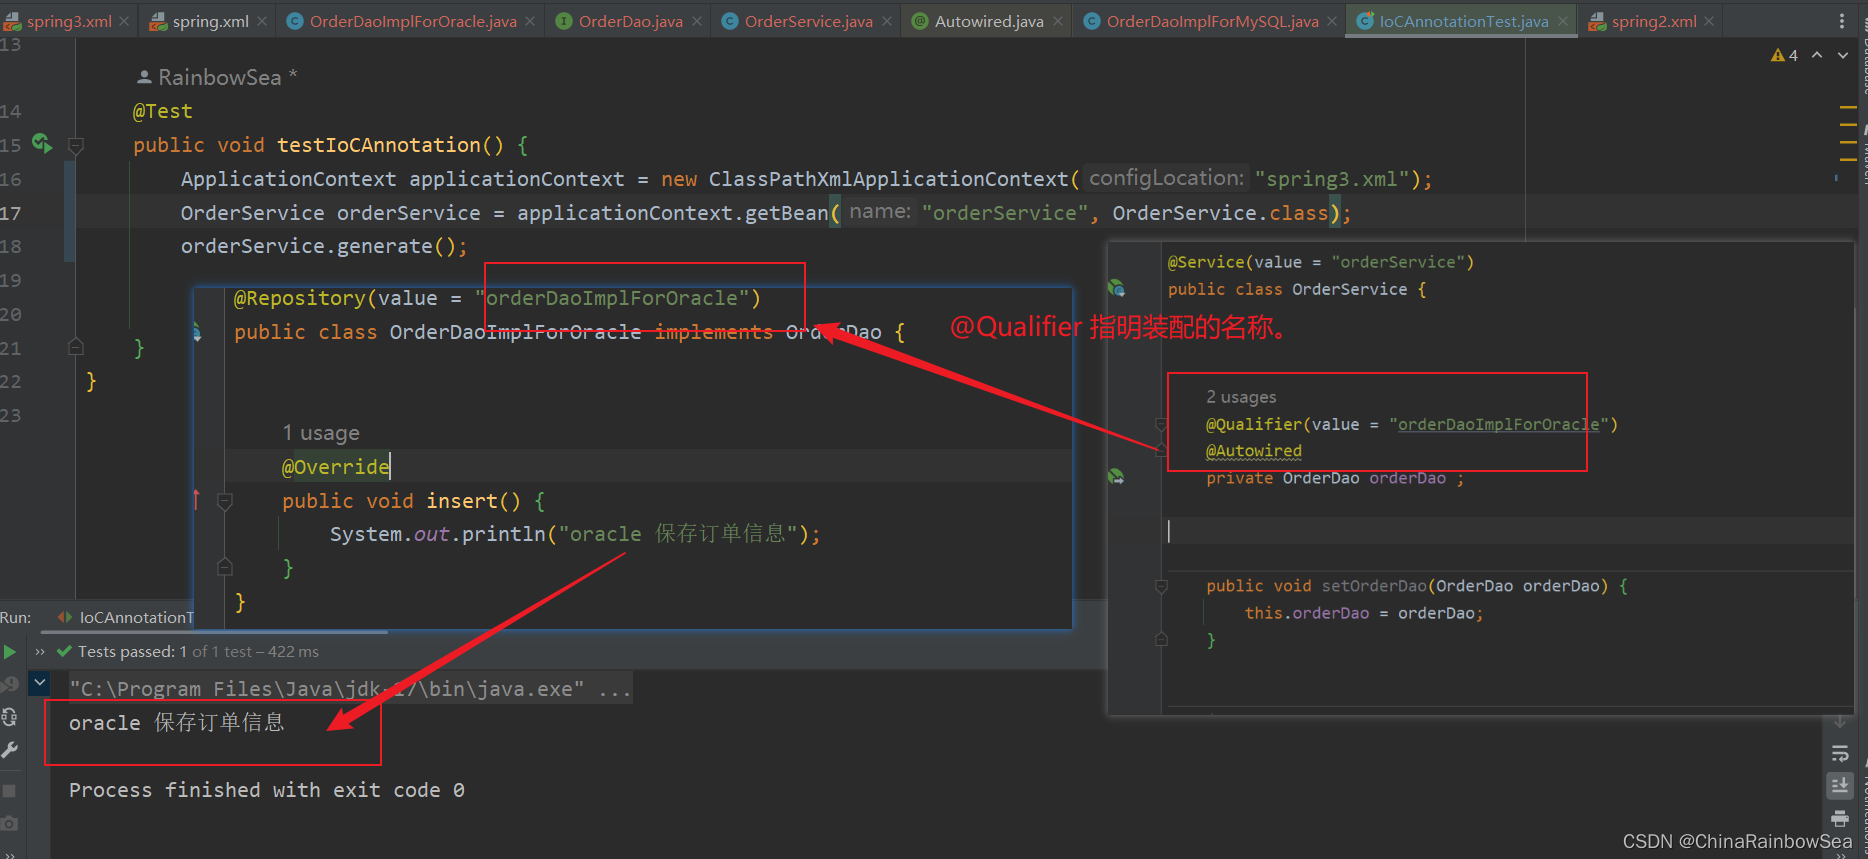
@Autowired注解和@Qualifier注解联合起来才可以根据名称进行装配,通过在@Qualifier注解中指定Bean名称。 如下:

@Autowired注解和@Qualifier注解联合起来在属性上实现名称装配 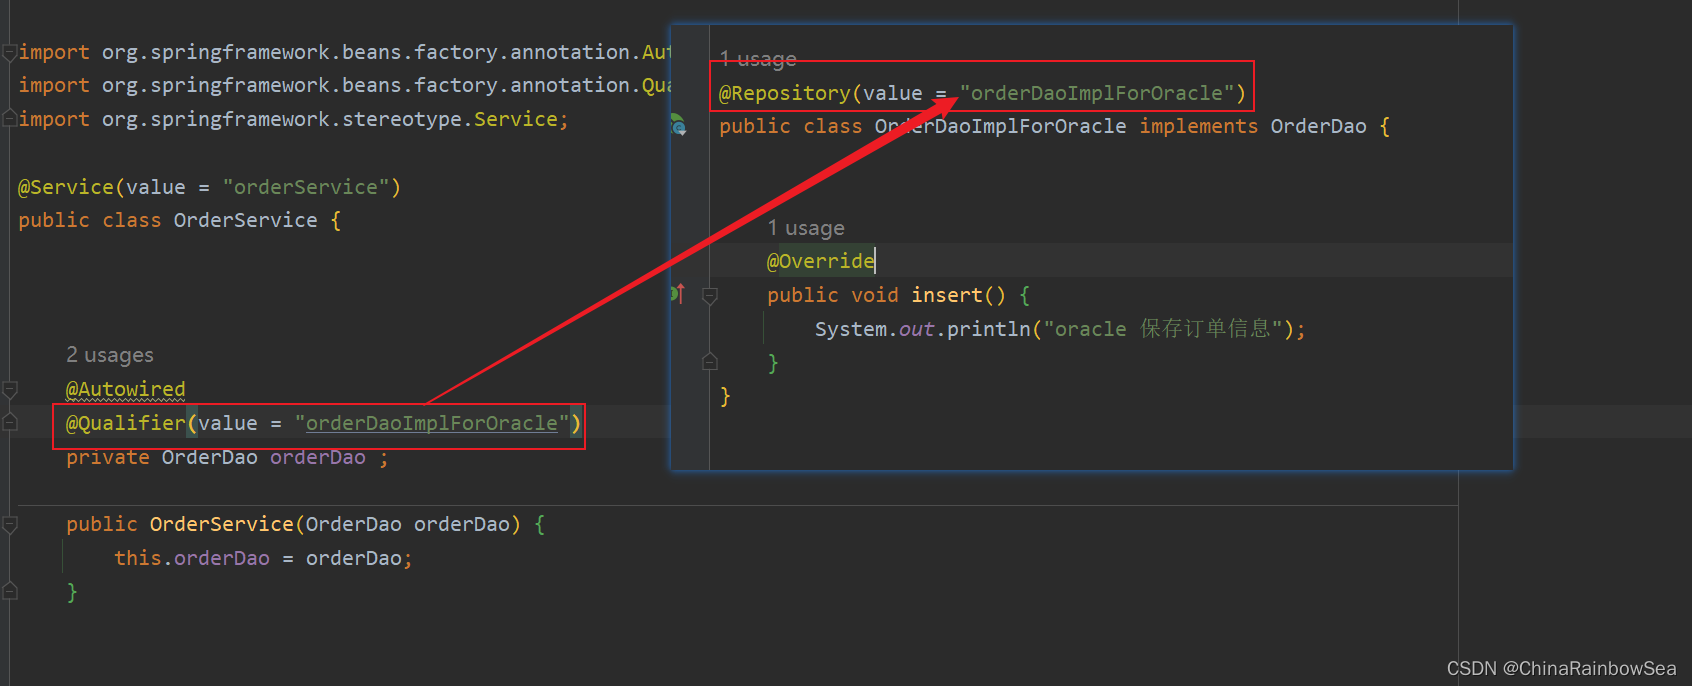
    @Qualifier(value = "orderDaoImplForOracle")
    @Autowired
    private OrderDao orderDao ;

复制
运行测试:
@Autowired注解和@Qualifier注解联合起来在 set()方法上实现名称装配
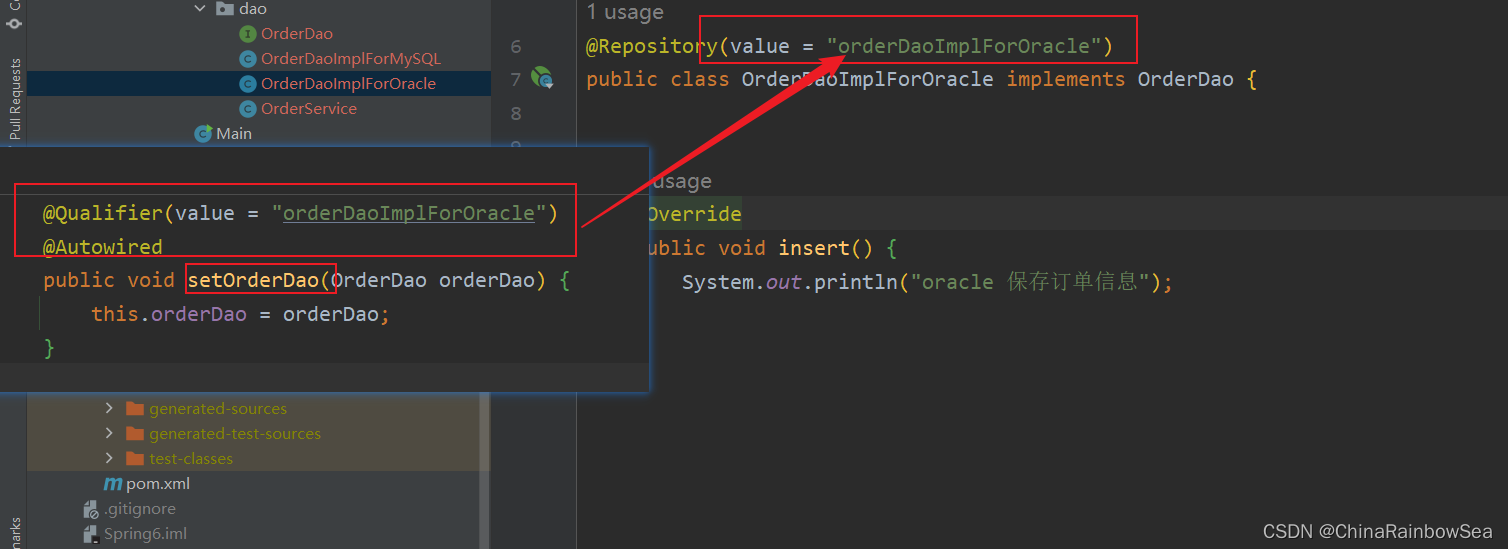
@Qualifier(value = "orderDaoImplForOracle")
    @Autowired
    public void setOrderDao(OrderDao orderDao) {
        this.orderDao = orderDao;
    }
复制
运行测试: 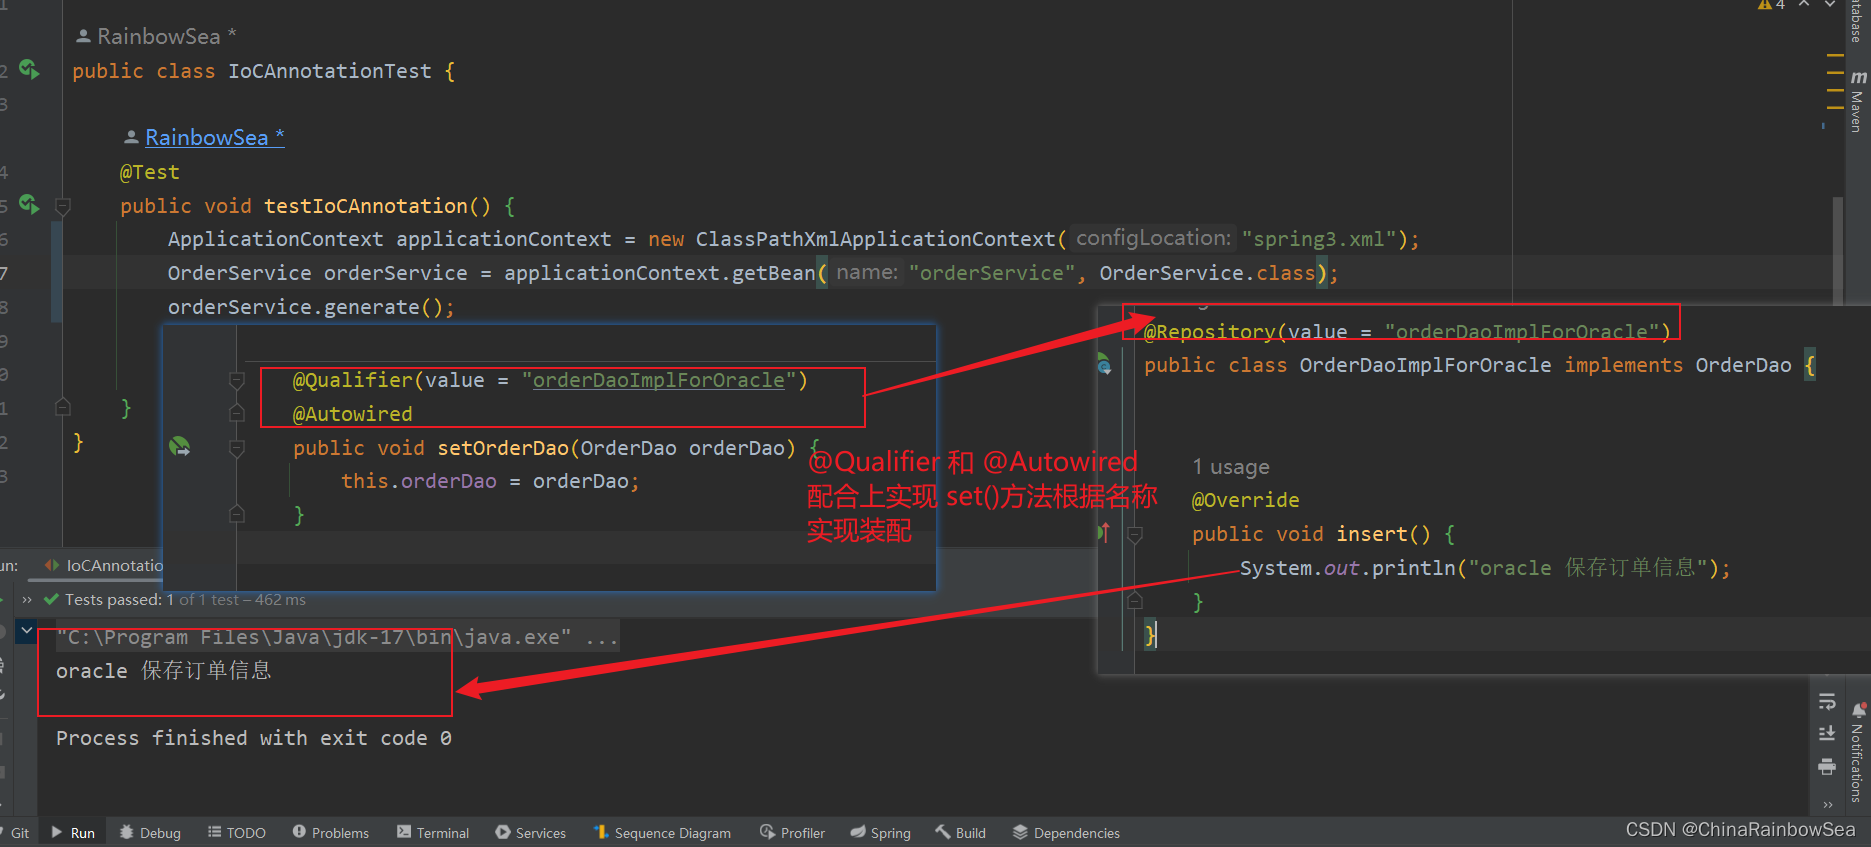
@Resource 注解也可以完成非简单类型 注入。那它和@Autowired 注解有什么区别?
- @Resource 注解是JDK扩展包中的,换句话说属于JDK的一部分。所以该注解是标准注解,更加具有通用性。(JSR-250标准中制定的注解类型,JSR是Java规范。)
- @Autowired 注解是Spring 框架自己的
- @Resource 注解默认根据名称装配byName,未指定name时,使用属性名作为 name,通过name 找不到的话会自动启动通过类型byType装配。
- @Autowired 注解默认根据类型装配byType,如果想根据名称装配,需要配合@Qualifier 注解一起用。
- @Resource 注解用在属性上,setter 方法上。
- @Autowired 注解用在属性上,setter 方法上,构造方法上,构造方法参数上。
@Resource 注解属性JDK扩展包,所以不再JDK当中,需要额外引入以下依赖:如果是JDK8的话,不需要额外引入依赖,高于
JDK11或低于JDK8需要引入以下依赖 。这里,因为要学习Spring6,因为Spring6最低支持的是JDK17,所以我这边的是 JDK17,需要引入这个jar包。
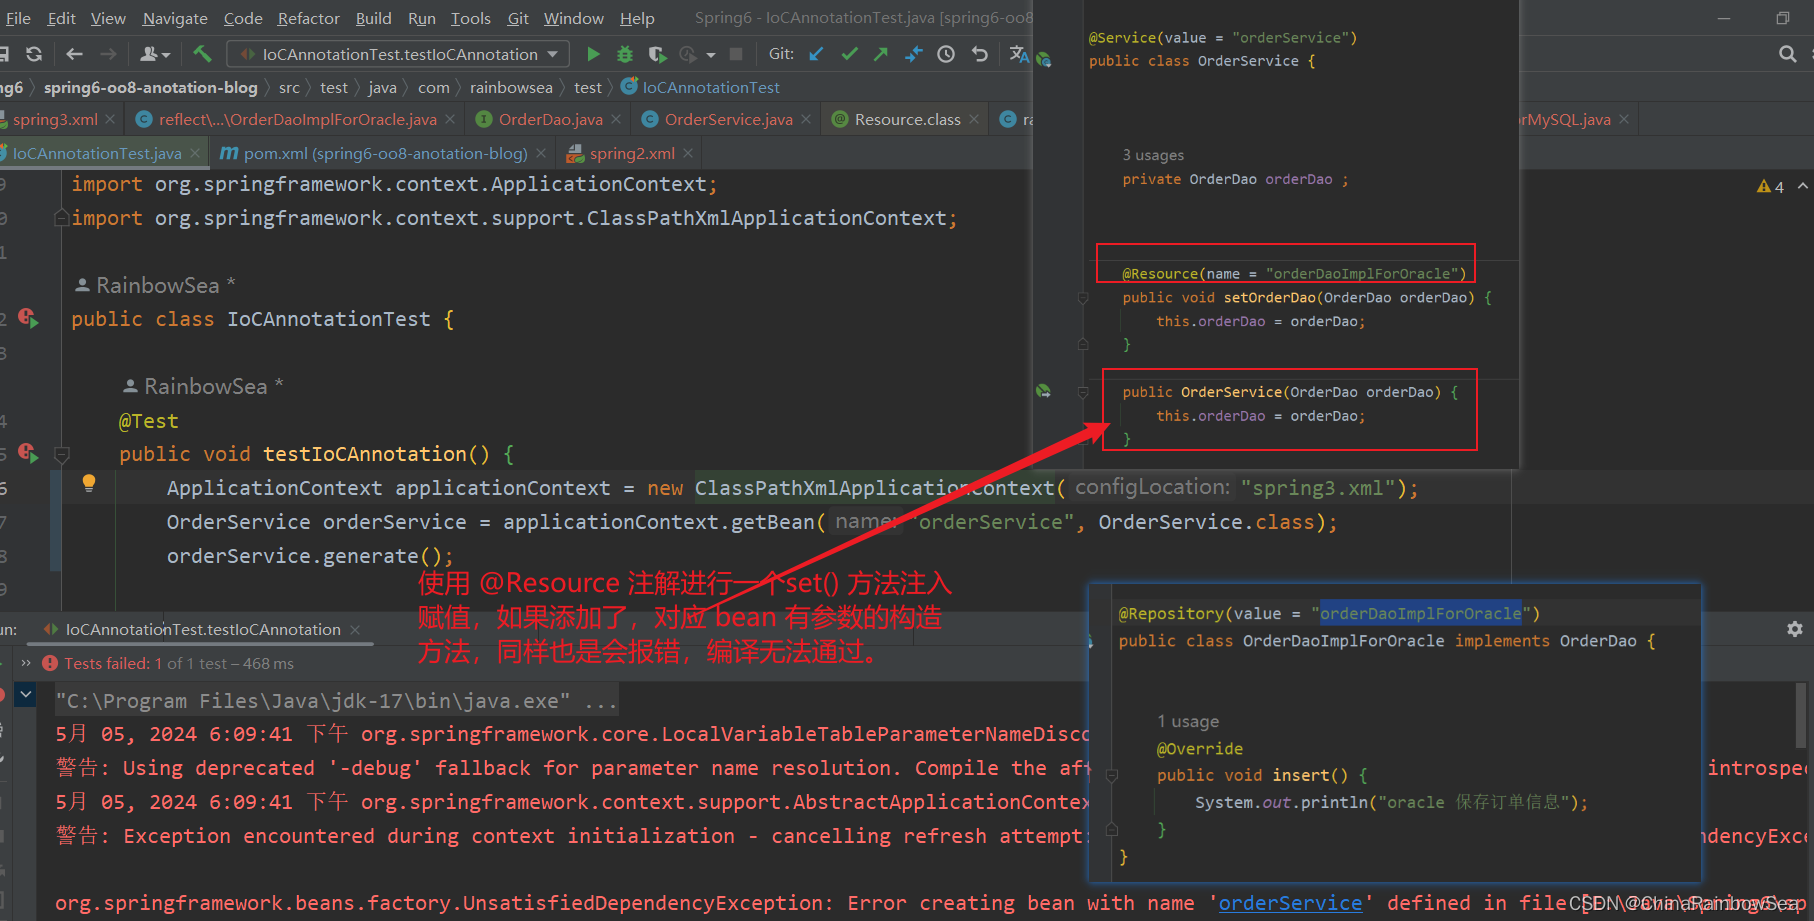
如何上述的,@Autowried,@Qualifier,@Resource 注解,都不能额外添加有非简单类型参数的构造方法,不然,编译无法通过,具体原因是什么,我目前正在探索中。如有知道的盆友,评论留言,非常非常感谢
<dependency> <groupId>jakarta.annotation</groupId> <artifactId>jakarta.annotation-api</artifactId> <version>2.1.1</version> </dependency>复制
说明点:一定要注意:如果你用Spring6,要知道Spring6不再支持JavaEE,它支持的是JakartaEE9。(Oracle把JavaEE贡献给Apache了,Apache把JavaEE的名字改成JakartaEE了,大家之前所接触的所有的 javax. 包名统一修改为 jakarta.包名了。),想要了解更多的话,可以移步至:✏️✏️✏️ javaEE Web(Tomcat)深度理解 和 Servlet的本质_eelwxb-CSDN博客 。如果大家用的是Spring6,就用上面按上面的那个 xml 配置就可以了,而JDK8不需要额外引入依赖。
@Resource注解的源码如下:
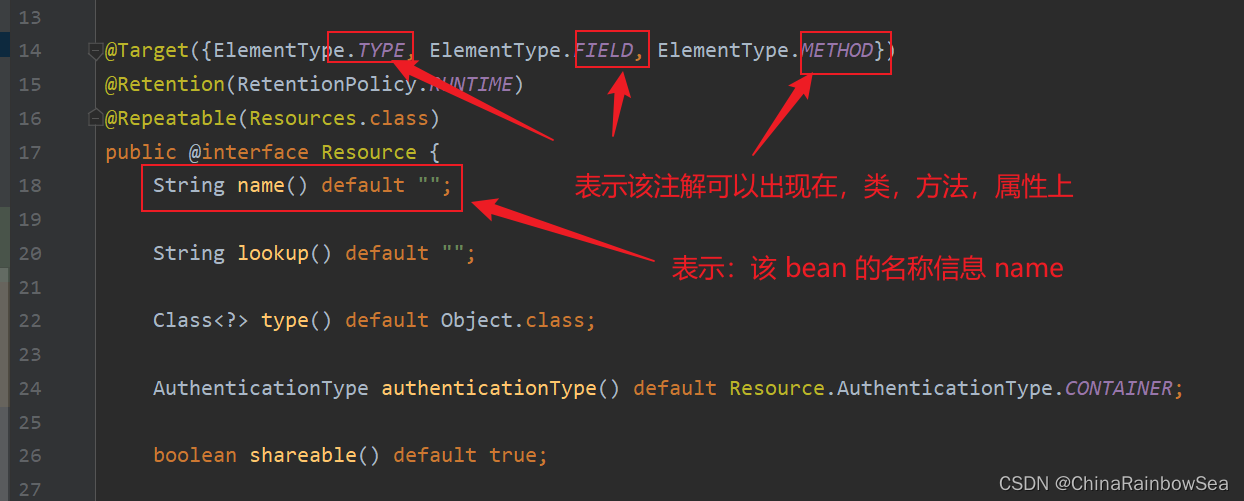
将 @Resource 运用在类的属性上进行赋值操作:

 	@Resource(name = "orderDaoImplForMySQL")
    private OrderDao orderDao ;
复制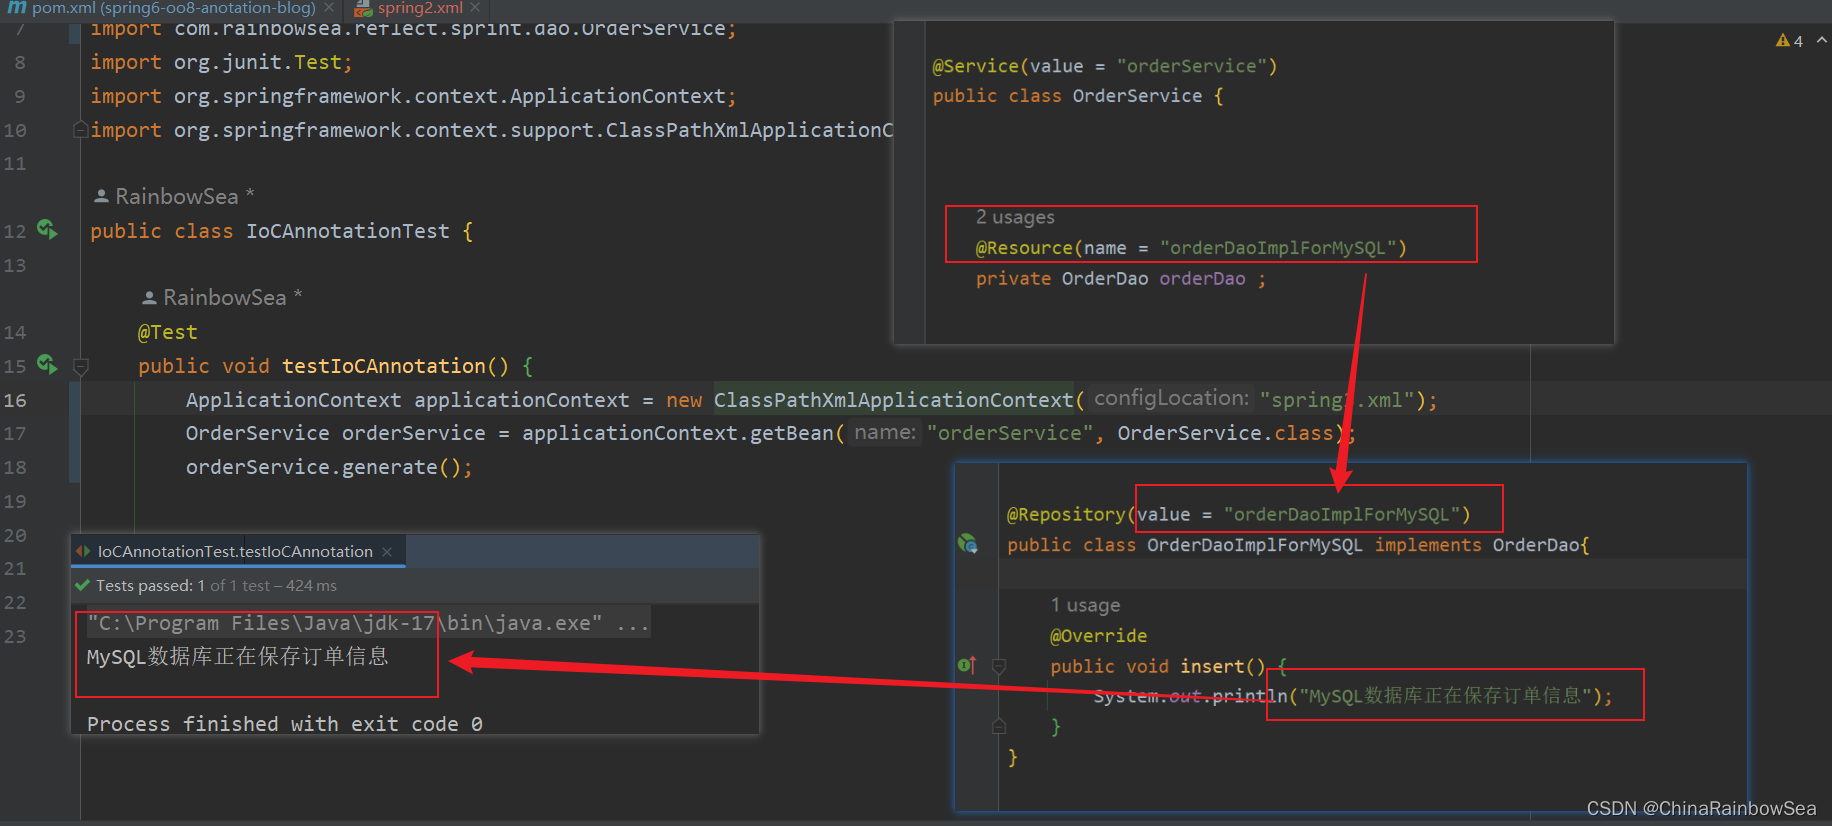
将 @Resource 运用在类的方法set ()上进行赋值操作:

@Resource(name = "orderDaoImplForOracle")
    public void setOrderDao(OrderDao orderDao) {
        this.orderDao = orderDao;
    }
复制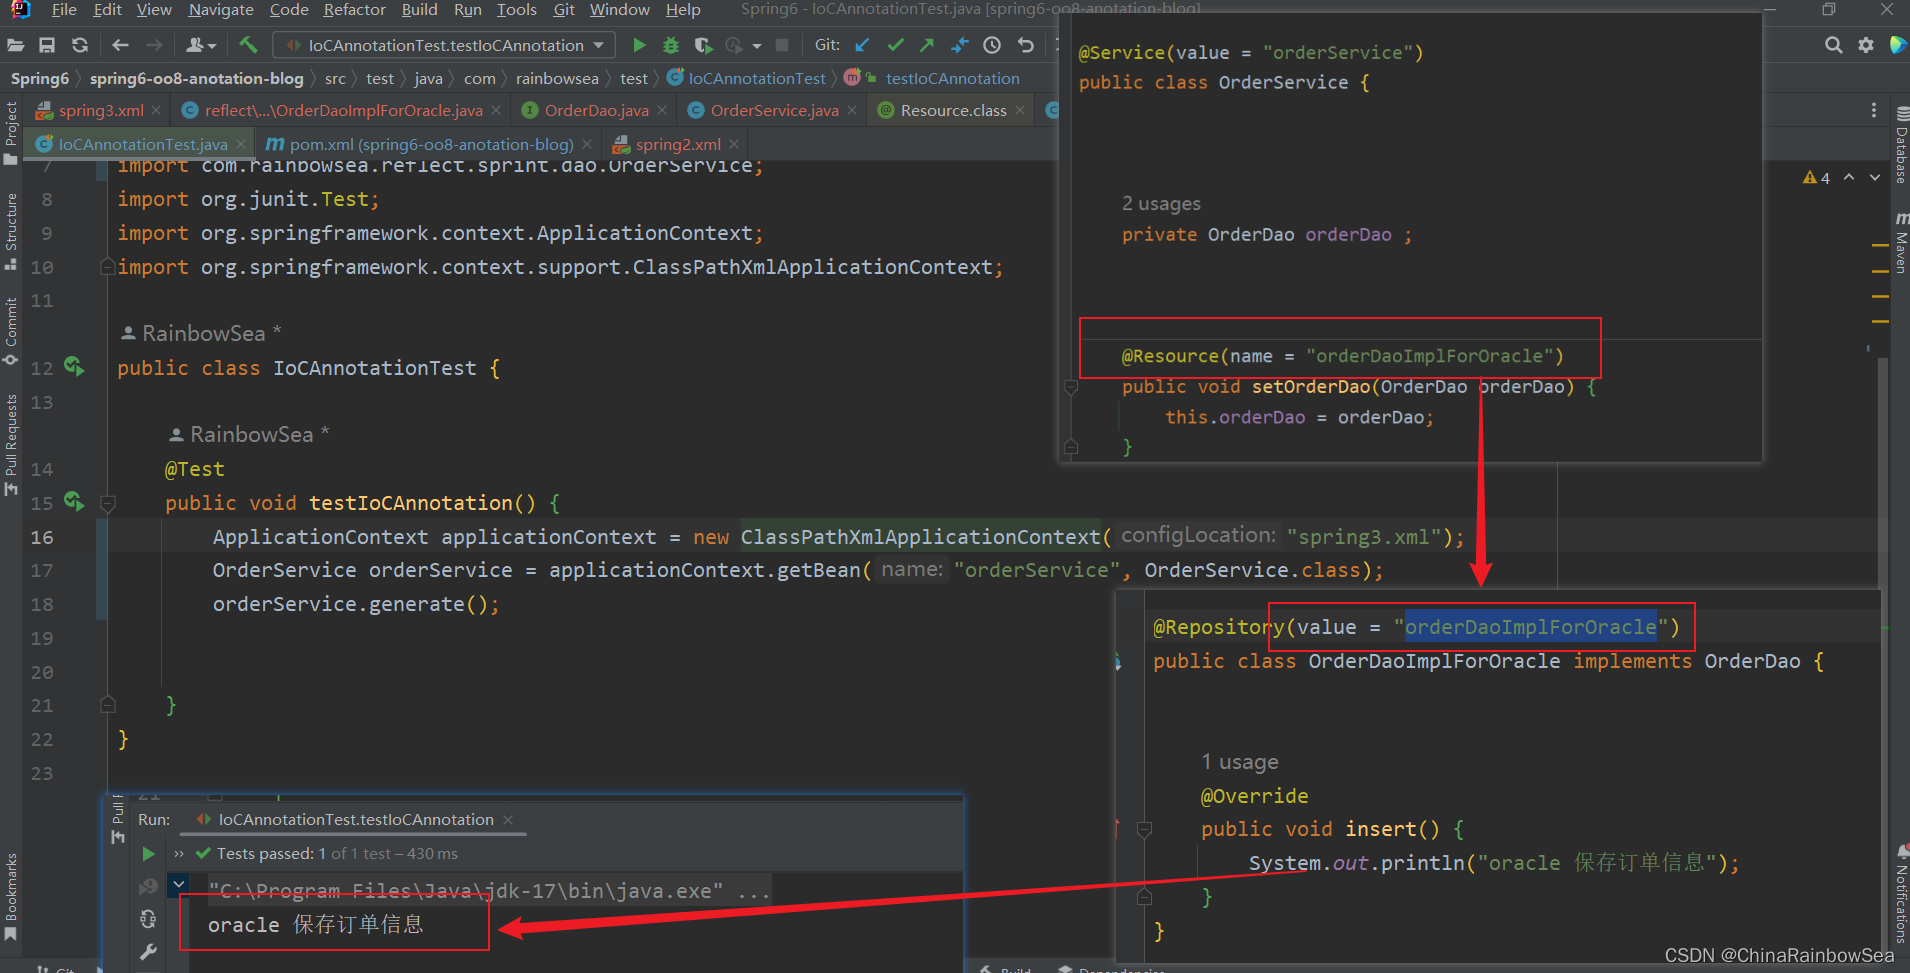
注意:
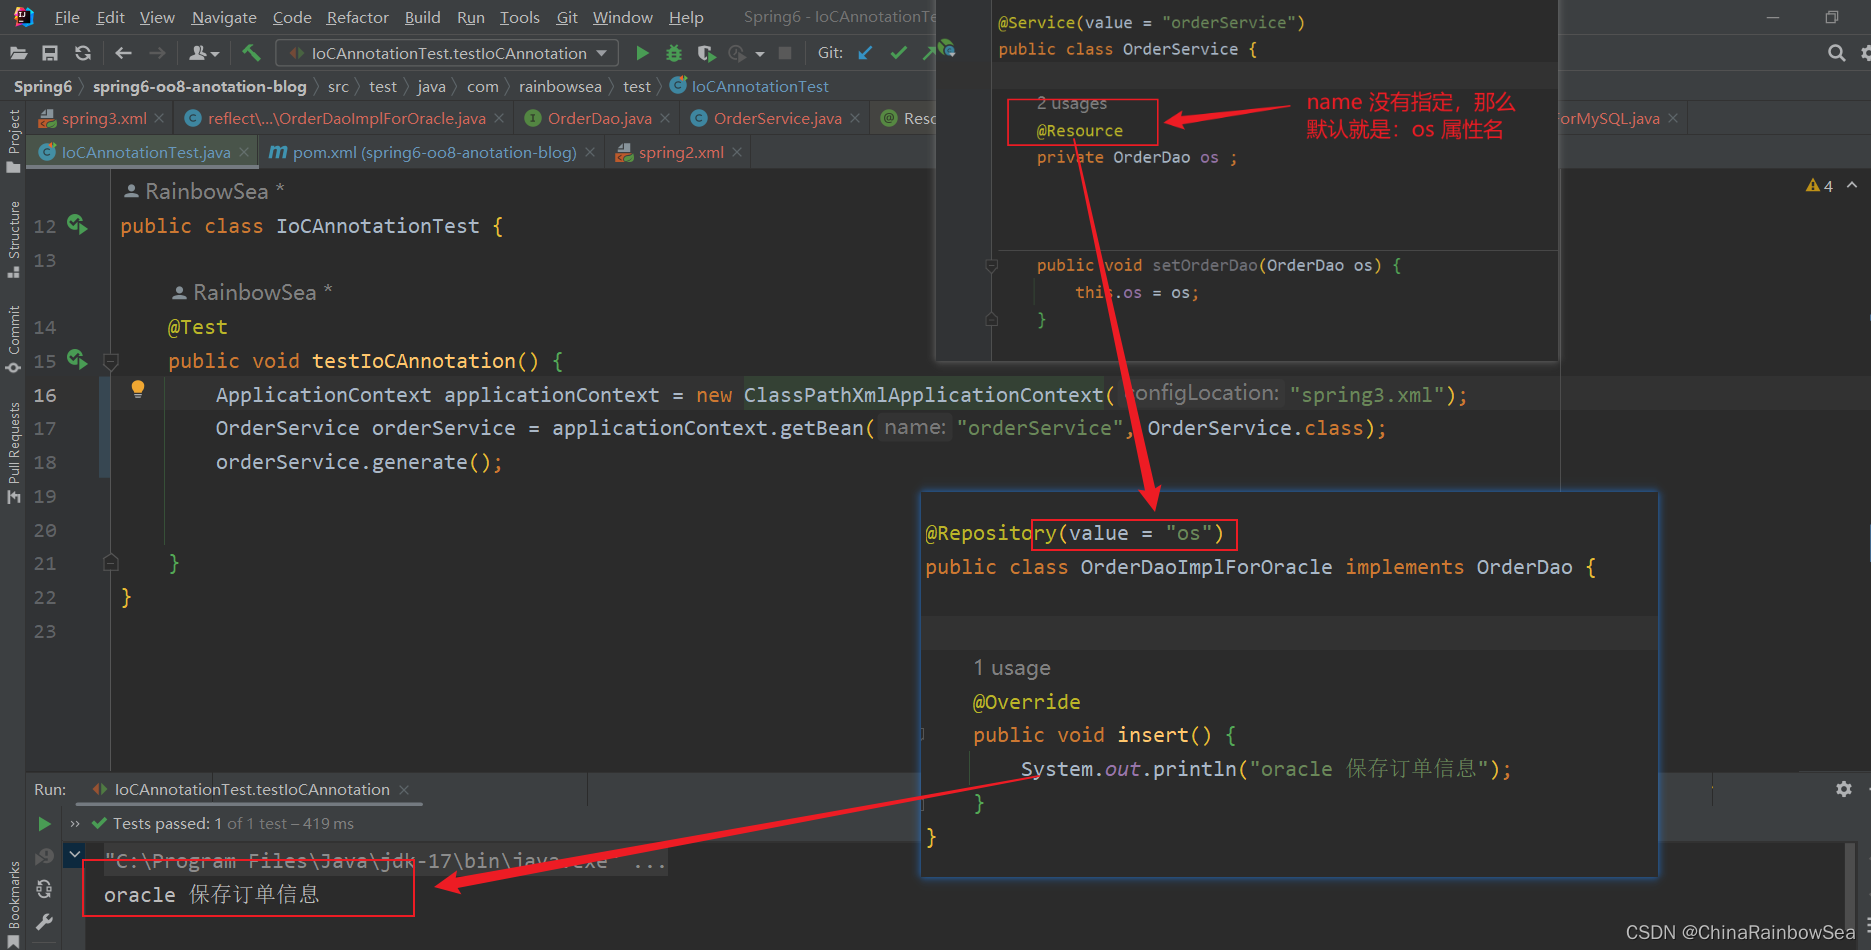
小总结:
- 通过注解实现“Spring的注入” @Value 注解是简单类型上 实现对属性上的赋值
- @Autowired自动装配(不可根据名称装配配合@Qualifier 可以实现根据名称装配)是对非简单类型上的赋值操作。
- @Resource 注解也是对非简单类型 上的属性赋值操作,需要导入特定的jar包,注意不同版本 JDK上的导入的包的不同。@Resource 注解属性JDK扩展包,所以不再JDK当中,需要额外引入以下依赖:如果是JDK8的话,不需要额外引入依赖,高于
JDK11或低于JDK8需要引入以下依赖 。这里,因为要学习Spring6,因为Spring6最低支持的是JDK17,所以我这边的是 JDK17,需要引入这个jar包。- @Resource注解是JDK扩展包中的,也就是说属于JDK的一部分。所以该注解是标准注解,更加具有通用性。所以非简单类型 的赋值使用,@Resource 注解。
<dependency> <groupId>jakarta.annotation</groupId> <artifactId>jakarta.annotation-api</artifactId> <version>2.1.1</version> </dependency>复制
所谓的全注解开发就是不再使用spring.xml配置文件了。通过写一个配置类来代替配置文件。
通过,下面两个注解信息的配置,来代替配置文件。
spring.xml配置文件指明上面我们的扫描包上的内容。)
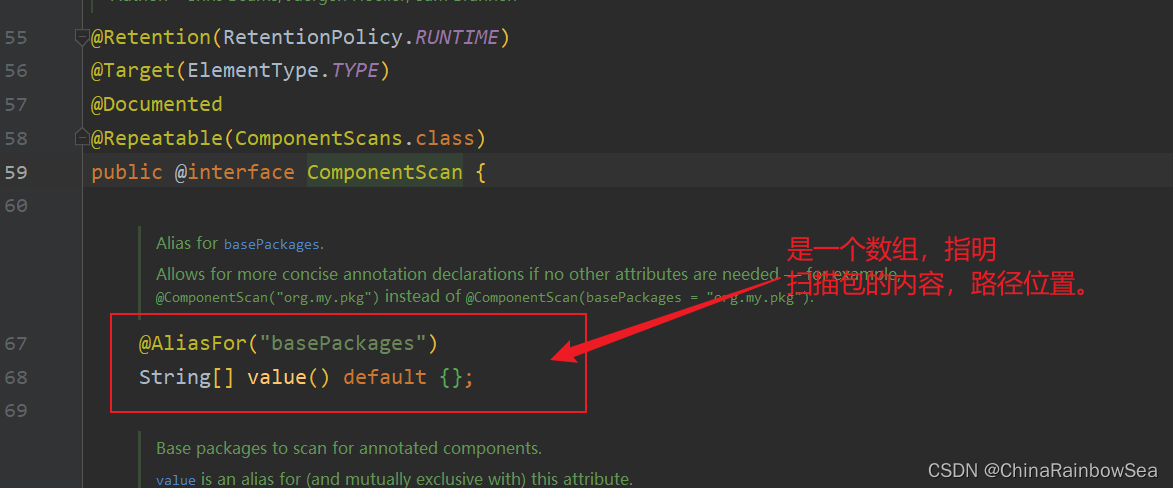
使用上:@Configuration,@ComponentScan() 注解编写配置类,来代替代替配置文件

package com.rainbowsea.reflect;


import org.springframework.context.annotation.ComponentScan;
import org.springframework.context.annotation.Configuration;

@Configuration
@ComponentScan(value = {"com.rainbowsea.reflect.sprint.bean","com.rainbowsea.reflect.sprint.dao"})
public class Spring6Configuration {
}

复制
编写测试程序:因为,这里我们已经通过:@Configuration,@ComponentScan() 注解编写配置类,来代替代替配置文件所以就不能再使用,new ClassPathXmlApplicationContext()对象的方式了。
要用 new AnnotationConfigApplicationContext(配置类.class) 这个来获取配置类上的信息。同样的该类也是实现了。ApplicationContext 接口的。

编写测试程序:
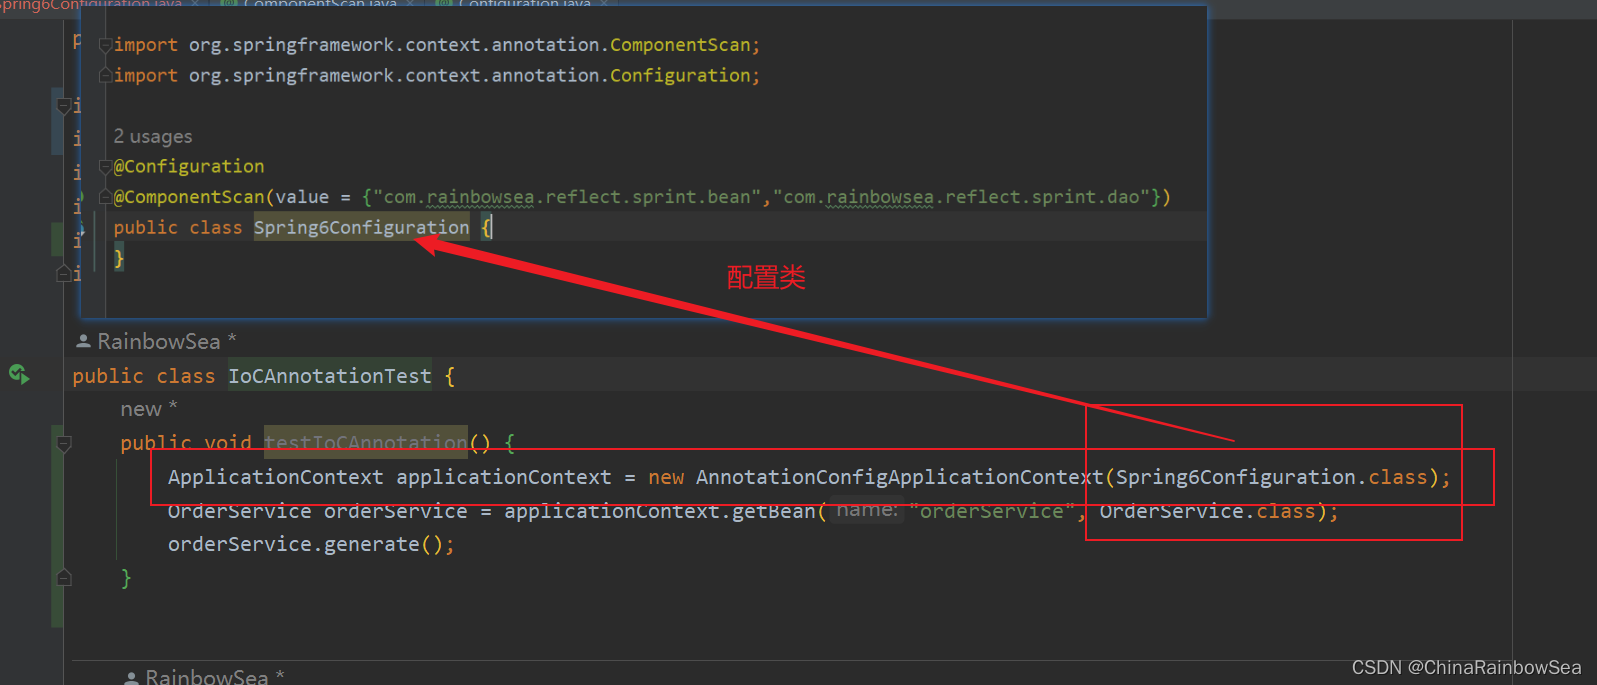
 ApplicationContext applicationContext = new AnnotationConfigApplicationContext(Spring6Configuration.class);
复制
package com.rainbowsea.test;
import com.rainbowsea.reflect.Spring6Configuration;
import com.rainbowsea.reflect.sprint.dao.OrderService;
import org.junit.Test;
import org.springframework.context.ApplicationContext;
import org.springframework.context.annotation.AnnotationConfigApplicationContext;
import org.springframework.context.support.ClassPathXmlApplicationContext;
public class IoCAnnotationTest {
public void testIoCAnnotation() {
ApplicationContext applicationContext = new AnnotationConfigApplicationContext(Spring6Configuration.class);
OrderService orderService = applicationContext.getBean("orderService", OrderService.class);
orderService.generate();
}
}
复制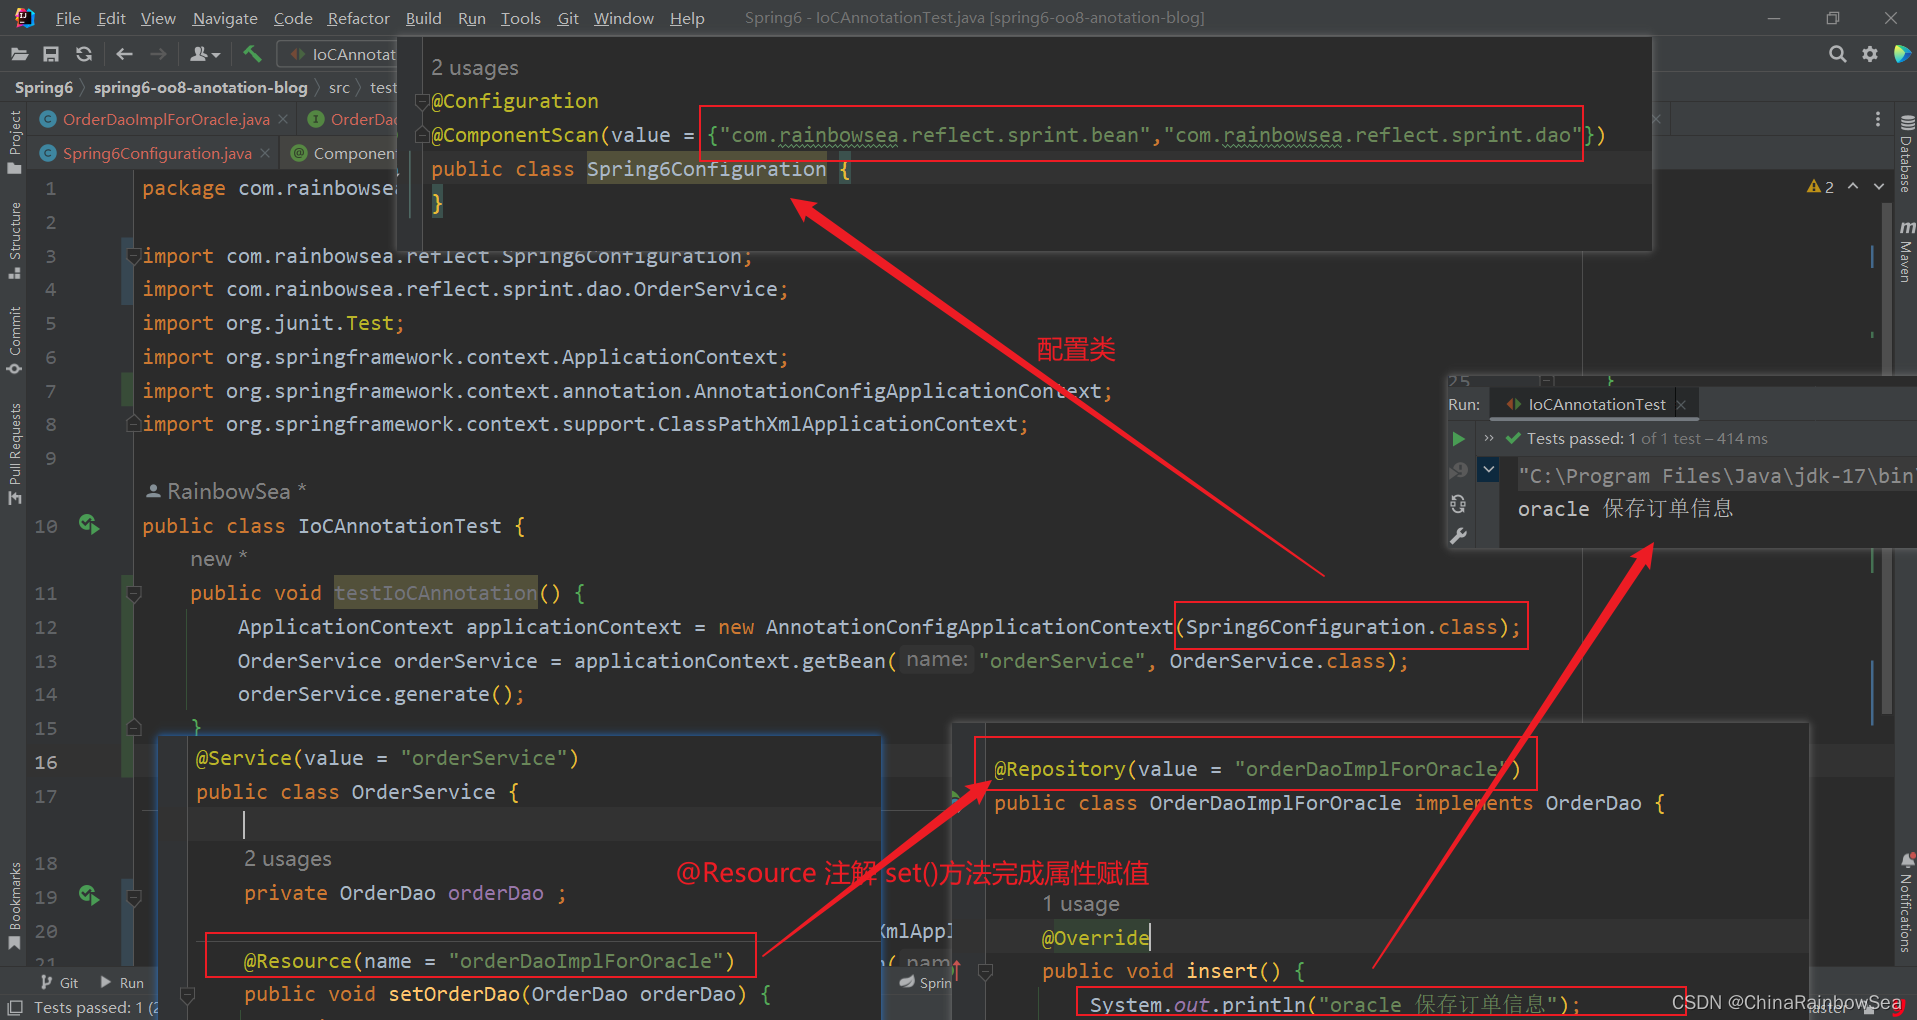
注解回顾:Target注解和Retention注解,这两个注解被称为元注解。
Target注解用来设置Component注解可以出现的位置,以上代表表示Component注解只能用在类和接口上。Retention注解用来设置Component注解的保持性策略,以上代表Component注解可以被反射机制读取。String value(); 是Component注解中的一个属性。该属性类型String,属性名是value。注解的存在主要是为了简化XML的配置。Spring6倡导全注解开发。
Spring 声明注解的使用:
- 第一步:加入aop的依赖
- 第二步:在配置文件中添加context命名空间
- 第三步:在配置文件中指定扫描的包(如果要扫描的是多个包,使用逗号隔开,或者是上一级的父级(查找效率上,会慢一些))
第四步:在Bean类上使用注解
@Controller、@Service、@Repository 这三个注解都是@Component注解的别名。换句话说:这四个注解的功能都一样。用哪个都可以。
只是为了增强程序的可读性,建议:
控制器类上使用:Controller
service类上使用:Service
dao类上使用:Repository
他们都是只有一个value属性。value属性用来指定bean的id,也就是bean的名字
Spring 选择性实例化Bean对象。两个相反的方案可以实现。
通过注解实现“Spring的注入” @Value 注解是简单类型上 实现对属性上的赋值,@Autowired自动装配(不可根据名称装配配合@Qualifier 可以实现根据名称装配)是对非简单类型上的赋值操作。@Resource 注解也是对非简单类型 上的属性赋值操作,需要导入特定的jar包,注意不同版本 JDK上的导入的包的不同。@Resource注解是JDK扩展包中的,也就是说属于JDK的一部分。所以该注解是标准注解,更加具有通用性。
@Autowried,@Qualifier,@Resource 注解,都不能额外添加有非简单类型参数的构造方法,不然,编译无法通过,具体原因是什么,我目前正在探索中。
Spring 全注解式开发:所谓的全注解开发就是不再使用
spring.xml配置文件了。通过写一个配置类来代替配置文件。通过,下面两个注解信息的配置,来代替配置文件。
- @Configuration
- @ComponentScan()(用
spring.xml配置文件指明上面我们的扫描包上的内容。)
在学习Spring 注解开发的过程中,我发现了一个问题,我目前并没有搞清楚其中的由于:希望广大朋友可以,帮我解我的疑惑,非常感谢。
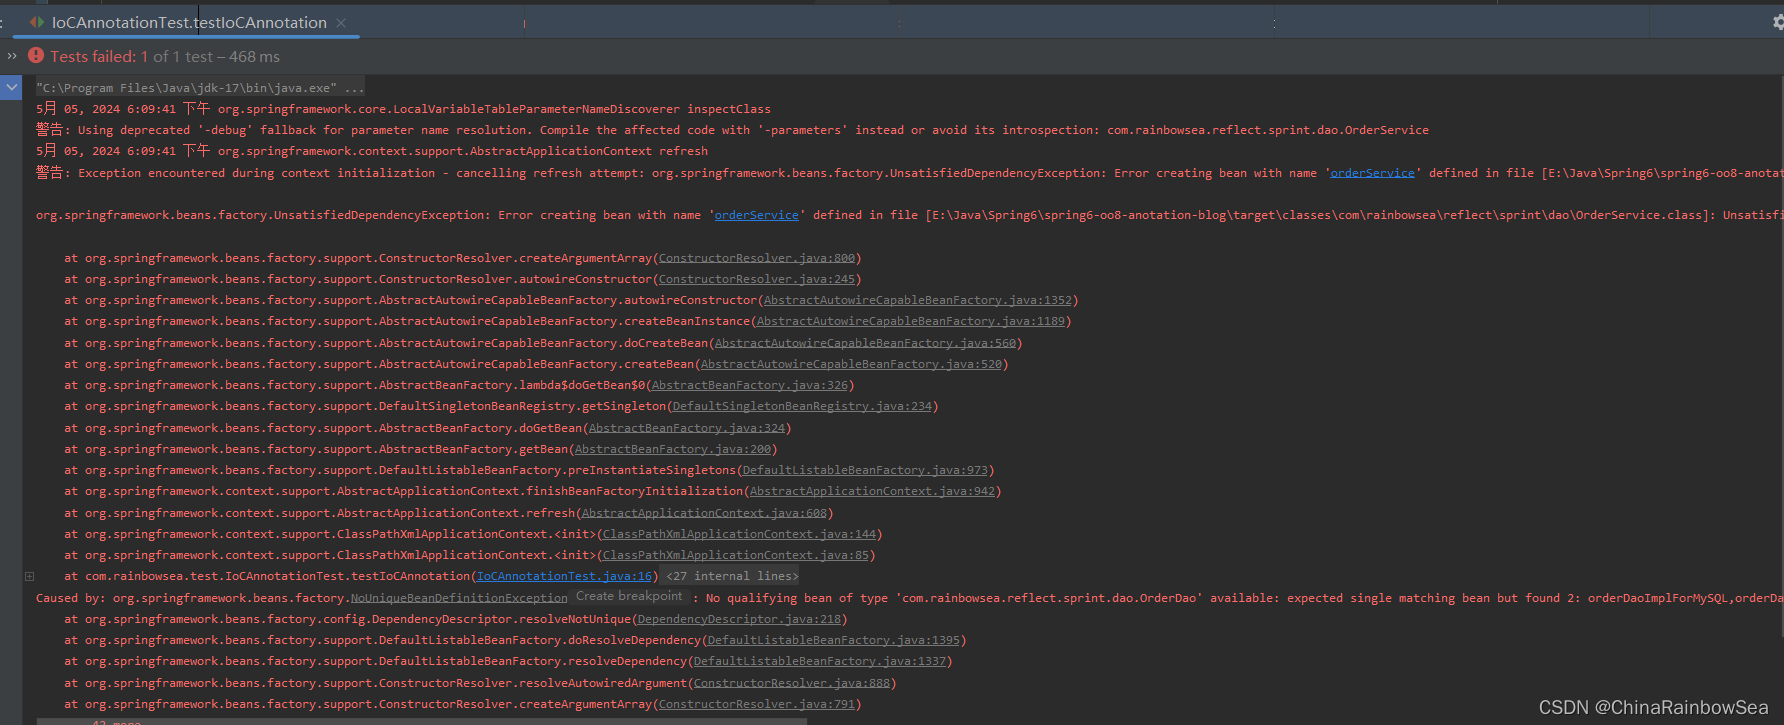
疑问:就是为什么如下,我想要用@Autowired注解和@Qualifier注解联合起来在 set()方法上实现名称装配 。但是我在该装配的类当中,添加了一个构造方法后,运行时,发现无法编译通过,而去了,这个构造方法,就可以编译通过了。
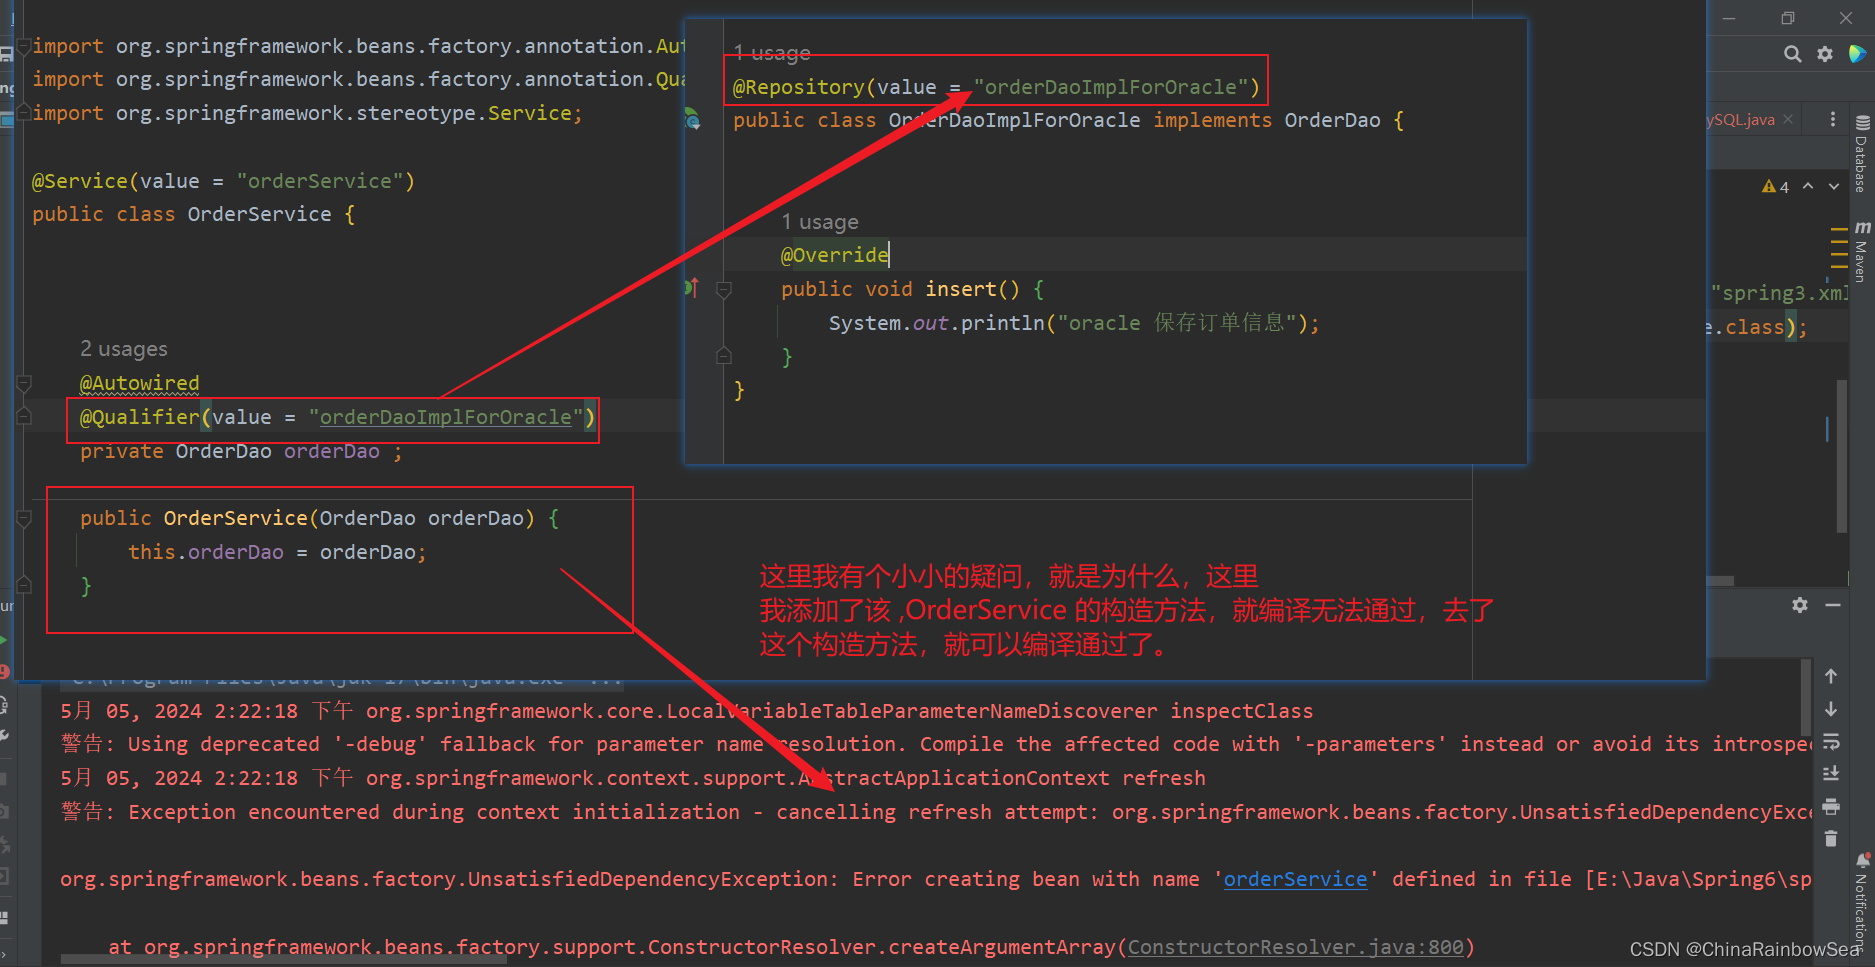
如下是完整的报错信息:
5月 05, 2024 2:36:49 下午 org.springframework.core.LocalVariableTableParameterNameDiscoverer inspectClass 警告: Using deprecated '-debug' fallback for parameter name resolution. Compile the affected code with '-parameters' instead or avoid its introspection: com.rainbowsea.reflect.sprint.dao.OrderService 5月 05, 2024 2:36:49 下午 org.springframework.context.support.AbstractApplicationContext refresh 警告: Exception encountered during context initialization - cancelling refresh attempt: org.springframework.beans.factory.UnsatisfiedDependencyException: Error creating bean with name 'orderService' defined in file [E:\Java\Spring6\spring6-oo8-anotation-blog\target\classes\com\rainbowsea\reflect\sprint\dao\OrderService.class]: Unsatisfied dependency expressed through constructor parameter 0: No qualifying bean of type 'com.rainbowsea.reflect.sprint.dao.OrderDao' available: expected single matching bean but found 2: orderDaoImplForMySQL,orderDaoImplForOracle org.springframework.beans.factory.UnsatisfiedDependencyException: Error creating bean with name 'orderService' defined in file [E:\Java\Spring6\spring6-oo8-anotation-blog\target\classes\com\rainbowsea\reflect\sprint\dao\OrderService.class]: Unsatisfied dependency expressed through constructor parameter 0: No qualifying bean of type 'com.rainbowsea.reflect.sprint.dao.OrderDao' available: expected single matching bean but found 2: orderDaoImplForMySQL,orderDaoImplForOracle Caused by: org.springframework.beans.factory.NoUniqueBeanDefinitionException: No qualifying bean of type 'com.rainbowsea.reflect.sprint.dao.OrderDao' available: expected single matching bean but found 2: orderDaoImplForMySQL,orderDaoImplForOracle at org.springframework.beans.factory.config.DependencyDescriptor.resolveNotUnique(DependencyDescriptor.java:218)复制
同样,使用 @Resource 注解进行一个set() 方法注入
赋值,如果添加了,对应 bean 有参数的构造
方法,同样也是会报错,编译无法通过。
“在这个最后的篇章中,我要表达我对每一位读者的感激之情。你们的关注和回复是我创作的动力源泉,我从你们身上吸取了无尽的灵感与勇气。我会将你们的鼓励留在心底,继续在其他的领域奋斗。感谢你们,我们总会在某个时刻再次相遇。”