https://switch-router.gitee.io/blog/flanenl/复制
Flannel是CoreOS团队针对Kubernates设计的跨主机容器网络解决方案, 它可以使集群中不同节点上运行的docker容器都具有全集群唯一的虚拟IP地址。
举个例子,在一个由3台主机节点组成系统中,用户希望每个节点上容器的IP地址在各自设定的子网范围内:
Host1: 10.0.1.0/24 Host2: 10.0.2.0/24 Host3: 10.0.3.0/24
但是在 docker 的默认配置中,容器的IP地址是由节点上的 docker 服务自身决定的。以容器默认使用的 bridge 网络为例,其分配到的 IP 地址与 docker0 桥处于同一个网段。而如果没有手动配置,多台主机上的 docker0 的 IP 地址很有可能重复,那么,主机上运行的容器也就有可能被分配到相同的 IP 地址。虽然可以通过手工配置 docker 服务的启动参数(-bip)来使得各个主机的 docker0 桥 IP 地址各异,但这样的手动方式大大增加运维难度。并且除了IP地址,容器间的网络互通还需要配置主机间的 route table,neigh table 等等。而 Flannel 可以使这些工作变得简单。

etcd 是一个分布式数据库,它运行在另一台 host 上(实际上,它也可以运行在某台运行 Flannel 的 host 上),它存储着 Flannel 当前的 IP 资源池以及当前的已分配状况,这是不同 host上 的容器 IP 不同的关键。当某台 host 上的 Flannel 启动时,它会访问 etcd 去得到一个空闲的 IP 网段,并将自己已占用该网段的信息写入 etcd ,这样其他 host 就不能分配到同样的网段了。 每台运行 Flanne l服务的 host 之间通过 backend 转发跨主机容器之间的网络流量。可选择的 backend 有 host-gw udp vxlan ipip gce alivpc awsvpc等模式,下面将通过实例演示host-gw udp vxlan三种模式。
Host1: ubuntu16.04 docker18.06.0ce etcd-3.2.4 对外网卡ens33: 172.16.112.128 Host2: ubuntu16.04 docker18.06.0ce flanneld-0.10 对外网卡ens33: 172.16.112.133 Host3: ubuntu16.04 docker18.06.0ce flanneld-0.10 对外网卡ens33: 172.16.112.130
1 下载二进制安装包 etcd-v3.2.4-linux-amd64.tar.gz 解压后复制etcd 和 etcdctl到 /usr/local/bin/ 目录 2 创建文件/etc/etcd/etcd.conf
ETCD_DATA_DIR="/var/run/etcd"
ETCD_ADVERTISE_CLIENT_URLS="http://172.16.112.128:2379,http://127.0.0.1:2379"
ETCD_NAME="node-1"
ETCD_LISTEN_CLIENT_URLS="http://172.16.112.128:2379,http://127.0.0.1:2379"
复制
3 创建 Service 文件/lib/system/system/etcd.service
[Unit]
Description=Etcd Server
Documentation=https://github.com/coreos/etcd
After=network.target
After=network-online.target
Wants=network-online.target
[Service]
User=root
Type=notify
EnvironmentFile=-/etc/etcd/etcd.conf
ExecStart=/usr/local/bin/etcd
LimitNOFILE=40000
[Install]
WantedBy=multi-user.target
复制
4 启动Service,可以看到其运行状态正常
root@node-1:~# systemctl start etcd
systemctl status etcd
● etcd.service - Etcd Server
   Loaded: loaded (/lib/systemd/system/etcd.service; disabled; vendor preset: enabled)
   Active: active (running) since Fri 2018-09-07 03:23:49 PDT; 2 days ago
     Docs: https://github.com/coreos/etcd
 Main PID: 20497 (etcd)
    Tasks: 7
   Memory: 81.9M
      CPU: 8min 46.959s
   CGroup: /system.slice/etcd.service
           └─20497 /usr/local/bin/etcd
复制
5 创建/etc/flannel-config.json如下 (以host-gw为例)
root@node-1:~# cat /etc/flannel-config.json
{
  "Network":"10.2.0.0/16",
  "SubnetLen":24,
  "Backend":{
      "Type":"host-gw"
  }
}
复制
6 将之后flannel网络的分配信息存入etcd
root@node-1:~# etcdctl set /docker-subnet/network/config < /etc/flannel-config.json
{
  "Network":"10.100.0.0/16",
  "SubnetLen":24,
  "Backend":{
      "Type":"host-gw"
  }
}
复制[Unit]
Description=Flanneld
After=network.target
Before=docker.service
[Service]
User=root
ExecStart=/usr/local/bin/flanneld --etcd-endpoints=http://172.16.112.128:2379 --iface=ens33 -etcd-prefix=/docker-subnet/network
Type=notify
LimitNOFILE=65536
复制3 启动flannel服务
root@node-2:~# systemctl start flanneld.service
root@node-2:~# systemctl status flanneld.service
● flanneld.service - Flanneld
Loaded: loaded (/lib/systemd/system/flanneld.service; static; vendor preset: enabled)
Active: active (running) since Mon 2018-09-10 01:32:26 PDT; 5s ago
 Main PID: 26076 (flanneld)
 Tasks: 7
Memory: 10.1M
   CPU: 146ms
CGroup: /system.slice/flanneld.service
        └─26076 /usr/local/bin/flanneld --etcd-endpoints=http://172.16.112.128:2379 --iface=ens33 -etcd-prefix=/docker-subnet/network
复制
可以从subnet.env看到从hode-1上获得的子网信息
root@node-2:~# cat /run/flannel/subnet.env
FLANNEL_NETWORK=10.100.0.0/16
FLANNEL_SUBNET=10.100.50.1/24
FLANNEL_MTU=1500
FLANNEL_IPMASQ=false
复制
4 执行 mk-docker-opts脚本,得到docker启动参数
root@node-2:~# mk-docker-opts.sh
root@node-2:~# cat /run/docker_opts.env
DOCKER_OPT_BIP="--bip=10.100.50.1/24"
DOCKER_OPT_IPMASQ="--ip-masq=true"
DOCKER_OPT_MTU="--mtu=1500"
DOCKER_OPTS=" --bip=10.100.50.1/24 --ip-masq=true --mtu=1500"
复制
5 修改docker服务参数 /lib/system/system/docker.service
EnvironmentFile=/run/docker_opts.env
ExecStart=/usr/bin/dockerd -H fd:// $DOCKER_OPTS
复制
重新启动docker, 可以看到启动参数中已经有 bip为我们从etcd中获得的网段信息(10.100.50.1/24)了
root@node-2:~# systemctl daemon-reload
root@node-2:~# systemctl restart docker
root@node-2:~# systemctl status docker
● docker.service - Docker Application Container Engine
Loaded: loaded (/lib/systemd/system/docker.service; enabled; vendor preset: enabled)
Active: active (running) since Mon 2018-09-10 01:39:56 PDT; 21s ago
  Docs: https://docs.docker.com
 Main PID: 26664 (dockerd)
 Tasks: 18
Memory: 53.9M
   CPU: 769ms
CGroup: /system.slice/docker.service
        ├─26664 /usr/bin/dockerd -H fd:// --bip=10.100.50.1/24 --ip-masq=true --mtu=1500
        └─26673 docker-containerd --config /var/run/docker/containerd/containerd.toml
复制
docker0 分配的IP地址也符合预期
root@node-2:~# ifconfig docker0
docker0   Link encap:Ethernet  HWaddr 02:42:d0:bc:0a:1f
       inet addr:10.100.50.1  Bcast:10.100.50.255  Mask:255.255.255.0
       inet6 addr: fe80::42:d0ff:febc:a1f/64 Scope:Link
       UP BROADCAST MULTICAST  MTU:1500  Metric:1
       RX packets:93 errors:0 dropped:0 overruns:0 frame:0
       TX packets:289 errors:0 dropped:0 overruns:0 carrier:0
       collisions:0 txqueuelen:0
       RX bytes:5628 (5.6 KB)  TX bytes:27078 (27.0 KB)
复制
在Host3 上重复此过程,得到的网段地址为10.100.83.0/24
root@node-3:~# ifconfig docker0
docker0   Link encap:Ethernet  HWaddr 02:42:fa:91:74:a1
       inet addr:10.100.83.1  Bcast:10.100.83.255  Mask:255.255.255.0
       inet6 addr: fe80::42:faff:fe91:74a1/64 Scope:Link
       UP BROADCAST MULTICAST  MTU:1500  Metric:1
       RX packets:114 errors:0 dropped:0 overruns:0 frame:0
       TX packets:275 errors:0 dropped:0 overruns:0 carrier:0
       collisions:0 txqueuelen:0
       RX bytes:7112 (7.1 KB)  TX bytes:25875 (25.8 KB)
复制前面准备环境时, 正是按照host-gw方式分配I的
在host2和host3上各运行一个busybox容器来测试其连通性
root@node-2:~# docker run --name bbox2 -tid busybox
759fb9b67f0b21901da1ab6870d3e592bc2923eb0b753d5c009630d5e2c228d5
root@node-2:~# docker exec bbox2 ifconfig
eth0      Link encap:Ethernet  HWaddr 02:42:0A:64:32:02
          inet addr:10.100.50.2  Bcast:10.100.50.255  Mask:255.255.255.0
          UP BROADCAST RUNNING MULTICAST  MTU:1500  Metric:1
          RX packets:18 errors:0 dropped:0 overruns:0 frame:0
          TX packets:0 errors:0 dropped:0 overruns:0 carrier:0
          collisions:0 txqueuelen:0
          RX bytes:2335 (2.2 KiB)  TX bytes:0 (0.0 B)

lo        Link encap:Local Loopback
          inet addr:127.0.0.1  Mask:255.0.0.0
          UP LOOPBACK RUNNING  MTU:65536  Metric:1
          RX packets:0 errors:0 dropped:0 overruns:0 frame:0
          TX packets:0 errors:0 dropped:0 overruns:0 carrier:0
          collisions:0 txqueuelen:1
          RX bytes:0 (0.0 B)  TX bytes:0 (0.0 B)
复制root@node-3:~# docker run --name bbox3 -tid busybox
60da1aefb40d9e96984888554cfbc3e927974a6cb1422f679f6a4e2381184385
root@node-3:~# docker exec bbox3 ifconfig
eth0 Link encap:Ethernet HWaddr 02:42:0A:64:53:02
inet addr:10.100.83.2 Bcast:10.100.83.255 Mask:255.255.255.0
UP BROADCAST RUNNING MULTICAST MTU:1500 Metric:1
RX packets:18 errors:0 dropped:0 overruns:0 frame:0
TX packets:0 errors:0 dropped:0 overruns:0 carrier:0
collisions:0 txqueuelen:0
RX bytes:2335 (2.2 KiB) TX bytes:0 (0.0 B)
lo Link encap:Local Loopback
inet addr:127.0.0.1 Mask:255.0.0.0
UP LOOPBACK RUNNING MTU:65536 Metric:1
RX packets:0 errors:0 dropped:0 overruns:0 frame:0
TX packets:0 errors:0 dropped:0 overruns:0 carrier:0
collisions:0 txqueuelen:1
RX bytes:0 (0.0 B) TX bytes:0 (0.0 B)
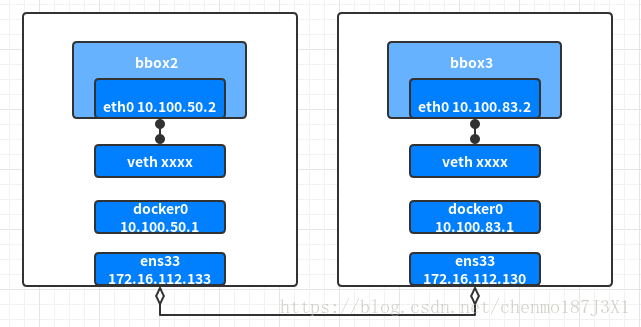
复制此时的组网环境为
我们使用ICMP报文来验证其连通性 (同时,使用tcpdump监视host2上的docker0和ens33网卡)
root@node-2:~# docker exec bbox2 ping -c 4 10.100.83.2
PING 10.100.83.2 (10.100.83.2): 56 data bytes
64 bytes from 10.100.83.2: seq=0 ttl=62 time=0.441 ms
64 bytes from 10.100.83.2: seq=1 ttl=62 time=0.384 ms
64 bytes from 10.100.83.2: seq=2 ttl=62 time=0.361 ms
64 bytes from 10.100.83.2: seq=3 ttl=62 time=0.414 ms
复制
可以看出两个容器之间是可以ping通的。
root@node-2:~# tcpdump -i docker0 -vv
tcpdump: listening on docker0, link-type EN10MB (Ethernet), capture size 262144 bytes
02:03:50.054787 ARP, Ethernet (len 6), IPv4 (len 4), Request who-has 10.100.50.1 tell 10.100.50.2, length 28
02:03:50.054807 ARP, Ethernet (len 6), IPv4 (len 4), Reply 10.100.50.1 is-at 02:42:d0:bc:0a:1f (oui Unknown), length 28
02:03:50.054811 IP (tos 0x0, ttl 64, id 52386, offset 0, flags [DF], proto ICMP (1), length 84)
    10.100.50.2 > 10.100.83.2: ICMP echo request, id 3072, seq 0, length 64
02:03:50.055149 IP (tos 0x0, ttl 62, id 59405, offset 0, flags [none], proto ICMP (1), length 84)
    10.100.83.2 > 10.100.50.2: ICMP echo reply, id 3072, seq 0, length 64
02:03:51.055498 IP (tos 0x0, ttl 64, id 52420, offset 0, flags [DF], proto ICMP (1), length 84)
    10.100.50.2 > 10.100.83.2: ICMP echo request, id 3072, seq 1, length 64
02:03:51.055792 IP (tos 0x0, ttl 62, id 59524, offset 0, flags [none], proto ICMP (1), length 84)
    10.100.83.2 > 10.100.50.2: ICMP echo reply, id 3072, seq 1, length 64
02:03:52.056381 IP (tos 0x0, ttl 64, id 52433, offset 0, flags [DF], proto ICMP (1), length 84)
复制root@node-2:~# tcpdump -i ens33 -n icmp -vv
tcpdump: listening on ens33, link-type EN10MB (Ethernet), capture size 262144 bytes
02:04:57.146397 IP (tos 0x0, ttl 63, id 59135, offset 0, flags [DF], proto ICMP (1), length 84)
172.16.112.133 > 10.100.83.2: ICMP echo request, id 5888, seq 0, length 64
02:04:57.146785 IP (tos 0x0, ttl 63, id 8507, offset 0, flags [none], proto ICMP (1), length 84)
10.100.83.2 > 172.16.112.133: ICMP echo reply, id 5888, seq 0, length 64
02:04:58.148039 IP (tos 0x0, ttl 63, id 59199, offset 0, flags [DF], proto ICMP (1), length 84)
172.16.112.133 > 10.100.83.2: ICMP echo request, id 5888, seq 1, length 64
02:04:58.148295 IP (tos 0x0, ttl 63, id 8744, offset 0, flags [none], proto ICMP (1), length 84)
10.100.83.2 > 172.16.112.133: ICMP echo reply, id 5888, seq 1, length 64
02:04:59.148941 IP (tos 0x0, ttl 63, id 59359, offset 0, flags [DF], proto ICMP (1), length 84)
复制对比 docker0 和 ens33 上的抓包情况可以看出,原始的 ICMP 报文在从 host2 上,经过了一次SNAT,源IP从容器IP替换成了主机IP
root@node-2:~# iptables -t nat -S
...
-A POSTROUTING -s 10.100.50.0/24 ! -o docker0 -j MASQUERADE
...
复制在 host-gw 模式中,host3 上 Flannel 启动后,Flannel 会在 host2 上增加一条路由如下,即为 host3 上分配的网段设置下一条网关172.16.112.130.这样,所有在 host2 上,所有目的地址是 host3 上容器IP的报文的下一条都为 host3,且从本地的ens33网卡发出。
root@node-2:~# ip route
...
10.100.83.0/24 via 172.16.112.130 dev ens33
...
复制
同理,在 host3 上也有相应的路由设置,为目的地址为 host2 所分网段的报文设置下一跳网关
root@node-3:~# ip route
...
10.100.50.0/24 via 172.16.112.133 dev ens33
...
复制在 host1 上,编辑 flannel 的网络配置文件,并将配置重新写入 etcd,为了区别,将IP资源池换成 10.101.0.0/16
root@node-1:~# etcdctl set /docker-subnet/network/config < /etc/flannel-config.json
{
  "Network":"10.101.0.0/16",
  "SubnetLen":24,
  "Backend":{
      "Type":"udp"
  }
}
复制
在 host2 和 host3 上重启flannel服务,执行mk-docker-opts.sh脚本,重启 docker 服务
root@node-2:~# systemctl restart flanneld.service
root@node-2:~# cat /run/flannel/subnet.env
FLANNEL_NETWORK=10.101.0.0/16
FLANNEL_SUBNET=10.101.83.1/24
FLANNEL_MTU=1472
FLANNEL_IPMASQ=false
root@node-2:~# mk-docker-opts.sh
root@node-2:~# systemctl restart docker
复制
host2 分配到 10.101.83.1/24 网段, bbox2 上eth0分配的IP地址为 10.101.83.2/24 host3 分配到 10.101.12.1/24 网段, bbox3 上eth0分配的IP地址为 10.101.12.2/24
查看host2上的路由表
root@node-2:~# ip route
default via 172.16.112.2 dev ens33  proto static  metric 100
10.101.0.0/16 dev flannel0  proto kernel  scope link  src 10.101.83.0
10.101.83.0/24 dev docker0  proto kernel  scope link  src 10.101.83.1
......
复制
注意其中第2条,它表示目的地址是 10.101.0.0/16网段 (排除10.101.83.0/24网段) 的报文都要经过 flannel0 设备转发,那么flannel0 是什么?
root@node-2:~# ip -d link show dev flannel0
27: flannel0: <POINTOPOINT,MULTICAST,NOARP,UP,LOWER_UP> mtu 1472 qdisc pfifo_fast state UNKNOWN mode DEFAULT group default qlen 500
    link/none  promiscuity 0
    tun
root@node-2:~# ifconfig flannel0
flannel0  Link encap:UNSPEC  HWaddr 00-00-00-00-00-00-00-00-00-00-00-00-00-00-00-00
          inet addr:10.101.83.0  P-t-P:10.101.83.0  Mask:255.255.0.0
          inet6 addr: fe80::f837:978c:898b:55ee/64 Scope:Link
          UP POINTOPOINT RUNNING NOARP MULTICAST  MTU:1472  Metric:1
          RX packets:0 errors:0 dropped:0 overruns:0 frame:0
          TX packets:3 errors:0 dropped:0 overruns:0 carrier:0
          collisions:0 txqueuelen:500
          RX bytes:0 (0.0 B)  TX bytes:144 (144.0 B)
复制
可以看出flannel0是一个tun设备,此时的组网环境为
同样使用ICMP报文验证容器之间的连通性 (同时监控docker0 flannel0 ens33上报文)
root@node-2:~# docker exec bbox2 ping -c 4 10.101.12.2
PING 10.101.12.2 (10.101.12.2): 56 data bytes
64 bytes from 10.101.12.2: seq=0 ttl=60 time=3.440 ms
64 bytes from 10.101.12.2: seq=1 ttl=60 time=1.004 ms
64 bytes from 10.101.12.2: seq=2 ttl=60 time=0.898 ms
64 bytes from 10.101.12.2: seq=3 ttl=60 time=0.776 ms
复制
可以发现,也是可以ping通的。
docker0上的ICMP报文
root@node-2:~# tcpdump -i docker0 -vv
tcpdump: listening on docker0, link-type EN10MB (Ethernet), capture size 262144 bytes
02:54:12.868669 IP (tos 0x0, ttl 64, id 42742, offset 0, flags [DF], proto ICMP (1), length 84)
    10.101.83.2 > 10.101.12.2: ICMP echo request, id 2816, seq 0, length 64
02:54:12.870702 IP (tos 0x0, ttl 60, id 21839, offset 0, flags [none], proto ICMP (1), length 84)
    10.101.12.2 > 10.101.83.2: ICMP echo reply, id 2816, seq 0, length 64
02:54:13.870698 IP (tos 0x0, ttl 64, id 42882, offset 0, flags [DF], proto ICMP (1), length 84)
    10.101.83.2 > 10.101.12.2: ICMP echo request, id 2816, seq 1, length 64
02:54:13.871515 IP (tos 0x0, ttl 60, id 22088, offset 0, flags [none], proto ICMP (1), length 84)
    10.101.12.2 > 10.101.83.2: ICMP echo reply, id 2816, seq 1, length 64
复制
flannel0上的ICMP报文
root@node-2:~# tcpdump -i flannel0 -vv
tcpdump: listening on flannel0, link-type RAW (Raw IP), capture size 262144 bytes
02:54:12.868749 IP (tos 0x0, ttl 63, id 42742, offset 0, flags [DF], proto ICMP (1), length 84)
    10.101.83.0 > 10.101.12.2: ICMP echo request, id 2816, seq 0, length 64
02:54:12.870659 IP (tos 0x0, ttl 61, id 21839, offset 0, flags [none], proto ICMP (1), length 84)
    10.101.12.2 > 10.101.83.0: ICMP echo reply, id 2816, seq 0, length 64
02:54:13.870725 IP (tos 0x0, ttl 63, id 42882, offset 0, flags [DF], proto ICMP (1), length 84)
    10.101.83.0 > 10.101.12.2: ICMP echo request, id 2816, seq 1, length 64
02:54:13.871504 IP (tos 0x0, ttl 61, id 22088, offset 0, flags [none], proto ICMP (1), length 84)
    10.101.12.2 > 10.101.83.0: ICMP echo reply, id 2816, seq 1, length 64
复制
ens33 上的UDP报文 (ens33上已经抓不到ICMP报文了)
root@node-2:~# tcpdump udp -i ens33 -v
02:57:09.349575 IP (tos 0x0, ttl 64, id 23956, offset 0, flags [DF], proto UDP (17), length 112)
    172.16.112.133.8285 > node-3.8285: UDP, length 84
02:57:09.349874 IP (tos 0x0, ttl 64, id 31417, offset 0, flags [DF], proto UDP (17), length 112)
    node-3.8285 > 172.16.112.133.8285: UDP, length 84
02:57:10.350543 IP (tos 0x0, ttl 64, id 24046, offset 0, flags [DF], proto UDP (17), length 112)
    172.16.112.133.8285 > node-3.8285: UDP, length 84
02:57:10.350868 IP (tos 0x0, ttl 64, id 31597, offset 0, flags [DF], proto UDP (17), length 112)
    node-3.8285 > 172.16.112.133.8285: UDP, length 84
复制
ICMP报文在传输过程中经过了几次变化:
udp模式中,Flannel会创建 tun 设备 flannel0,所有跨主机流量在内核会通过 flannel0转发,会被 Flannel 用户态读取(第一次报文变化),而在 Flanne l用户态读取后,Flannel会将报文进行隧道封装,将 ICMP 报文外层包裹为 UDP 报文(第二次报文变化)
与之前 udp 模式的修改方式类似,在 host1 上,将backend类型修改为 vxlan,资源池替换为 10.102.0.0/16
root@node-1:~# etcdctl set /docker-subnet/network/config < /etc/flannel-config.json
{
  "Network":"10.102.0.0/16",
  "SubnetLen":24,
  "Backend":{
      "Type":"vxlan"
  }
}
复制
然后重启flannel和docker
host2 分配到 10.102.20.1/24 网段, bbox2 上eth0分配的IP地址为 10.101.20.2/24 host3 分配到 10.102.19.1/24 网段, bbox3 上eth0分配的IP地址为 10.101.19.2/24
查看网卡,可知Flannel为host2创建了一个vxlan设备flannel.1 IP:10.102.20.0/32 MAC: 72:45:d3:56:86:48
root@node-2:~# ip -d link show dev flannel.1
3: flannel.1: <BROADCAST,MULTICAST,UP,LOWER_UP> mtu 1450 qdisc noqueue state UNKNOWN mode DEFAULT group default
    link/ether 72:45:d3:56:86:48 brd ff:ff:ff:ff:ff:ff promiscuity 0
    vxlan id 1 local 172.16.112.133 dev ens33 srcport 0 0 dstport 8472
root@node-2:~# ip addr show dev flannel.1
3: flannel.1: <BROADCAST,MULTICAST,UP,LOWER_UP> mtu 1450 qdisc noqueue state UNKNOWN group default
    link/ether 72:45:d3:56:86:48 brd ff:ff:ff:ff:ff:ff
    inet 10.102.20.0/32 scope global flannel.1
       valid_lft forever preferred_lft forever
复制
同理, 在host3上 Flannel.1 IP: 10.102.19.0/32 MAC:d6:1a:65:fc:48:77
root@node-3:~# ip -d link show dev flannel.1
3: flannel.1: <BROADCAST,MULTICAST,UP,LOWER_UP> mtu 1450 qdisc noqueue state UNKNOWN mode DEFAULT group default
    link/ether d6:1a:65:fc:48:77 brd ff:ff:ff:ff:ff:ff promiscuity 0
    vxlan id 1 local 172.16.112.130 dev ens33 srcport 0 0 dstport 8472 nolearning ageing 300 udpcsum addrgenmode none
root@node-3:~# ip addr show dev flannel.1
3: flannel.1: <BROADCAST,MULTICAST,UP,LOWER_UP> mtu 1450 qdisc noqueue state UNKNOWN group default
    link/ether d6:1a:65:fc:48:77 brd ff:ff:ff:ff:ff:ff
    inet 10.102.19.0/32 scope global flannel.1
       valid_lft forever preferred_lft forever
复制
在host2上 查看其路由表,可以看到Flannel为主机增加了一条跨主机流量的路由
root@node-2:~# ip route
default via 172.16.112.2 dev ens33  proto static  metric 100
10.102.19.0/24 via 10.102.19.0 dev flannel.1 onlink
...
复制
再查看其邻居表,可以看到其增加了一条针对 host3 上的 flannel.1 的设置 (d6:1a:65:fc:48:77为 host3 上 flannel.1 的MAC地址,10.102.19.0为IP地址)
root@node-2:~# ip neigh
10.102.19.0 dev flannel.1 lladdr d6:1a:65:fc:48:77 PERMANENT
复制
查看其fdb,可以看到一条设置 (其中172.16.112.130为 host3 上的 ens33 的IP地址)
root@node-2:~# bridge fdb
d6:1a:65:fc:48:77 dev flannel.1 dst 172.16.112.130 self permanent
......
复制
同理 Flannel也为 Host3上进行了相同的配置
此时的组网图为
依然使用 busybox 进行 ICMP 通信实验 (同时监控docker0 flanne.1 ens33上的报文情况)
root@node-2:~# docker exec bbox2 ping 10.102.19.2
PING 10.102.19.2 (10.102.19.2): 56 data bytes
64 bytes from 10.102.19.2: seq=0 ttl=62 time=1.287 ms
64 bytes from 10.102.19.2: seq=1 ttl=62 time=1.326 ms
64 bytes from 10.102.19.2: seq=2 ttl=62 time=1.792 ms
64 bytes from 10.102.19.2: seq=3 ttl=62 time=1.653 ms
复制
依然可以ping通
docker0上的报文如下
root@node-2:~# tcpdump -i docker0 -vv
tcpdump: listening on docker0, link-type EN10MB (Ethernet), capture size 262144 bytes
12:21:15.194354 ARP, Ethernet (len 6), IPv4 (len 4), Request who-has 10.102.20.1 tell 10.102.20.2, length 28
12:21:15.194372 ARP, Ethernet (len 6), IPv4 (len 4), Reply 10.102.20.1 is-at 02:42:1a:0c:ec:3e (oui Unknown), length 28
12:21:15.194375 IP (tos 0x0, ttl 64, id 37449, offset 0, flags [DF], proto ICMP (1), length 84)
    10.102.20.2 > 10.102.19.2: ICMP echo request, id 2816, seq 0, length 64
12:21:15.195431 IP (tos 0x0, ttl 62, id 23004, offset 0, flags [none], proto ICMP (1), length 84)
    10.102.19.2 > 10.102.20.2: ICMP echo reply, id 2816, seq 0, length 64
复制
flanne.1上的报文如下
root@node-2:~# tcpdump -i flannel.1 -vv
tcpdump: listening on flannel.1, link-type EN10MB (Ethernet), capture size 262144 bytes
12:21:15.194390 IP (tos 0x0, ttl 63, id 37449, offset 0, flags [DF], proto ICMP (1), length 84)
    10.102.20.0 > 10.102.19.2: ICMP echo request, id 2816, seq 0, length 64
12:21:15.195425 IP (tos 0x0, ttl 63, id 23004, offset 0, flags [none], proto ICMP (1), length 84)
    10.102.19.2 > 10.102.20.0: ICMP echo reply, id 2816, seq 0, length 64
12:21:16.197793 IP (tos 0x0, ttl 63, id 37695, offset 0, flags [DF], proto ICMP (1), length 84)
    10.102.20.0 > 10.102.19.2: ICMP echo request, id 2816, seq 1, length 64
12:21:16.198588 IP (tos 0x0, ttl 63, id 23066, offset 0, flags [none], proto ICMP (1), length 84)
    10.102.19.2 > 10.102.20.0: ICMP echo reply, id 2816, seq 1, length 64
复制
ens33上的udp报文如下:
root@node-2:~# tcpdump udp -i ens33 -vv
tcpdump: listening on ens33, link-type EN10MB (Ethernet), capture size 262144 bytes
12:21:15.194972 IP (tos 0x0, ttl 64, id 28096, offset 0, flags [none], proto UDP (17), length 134)
    172.16.112.133.38092 > node-3.8472: [bad udp cksum 0x39ac -> 0xae89!] OTV, flags [I] (0x08), overlay 0, instance 1
IP (tos 0x0, ttl 63, id 37449, offset 0, flags [DF], proto ICMP (1), length 84)
    10.102.20.0 > 10.102.19.2: ICMP echo request, id 2816, seq 0, length 64
12:21:15.195415 IP (tos 0x0, ttl 64, id 64197, offset 0, flags [none], proto UDP (17), length 134)
    node-3.45840 > 172.16.112.133.8472: [udp sum ok] OTV, flags [I] (0x08), overlay 0, instance 1
IP (tos 0x0, ttl 63, id 23004, offset 0, flags [none], proto ICMP (1), length 84)
    10.102.19.2 > 10.102.20.0: ICMP echo reply, id 2816, seq 0, length 64
复制
可以看出,与UDP模式相似, vxlan模式也是利用了隧道封装完成跨主机报文的传递
与UDP模式不同, vxlan模式的报文封装都是在内核完成的, 它是标准的vxlan封装过程,在此过程中,查询了route table, neigh table, fdb table,这也正是 Flannel 为主机内核写入的信息
ICMP request 发送过程: