[转帖]Etcd+Confd实现Nginx配置文件自动管理

etcd,confd,实现,nginx,配置文件,自动,管理 · 浏览次数 : 0

小编点评

# 资源模板,包含Nginx配置文件模板模板 ```toml template: src: "app01.conf.tmpl" dest: "/usr/local/nginx/conf/vhost/app01.conf" key: "app01_key" update: interval: 1h depends_on: - keys - restart_nginx ``` # 资源模板其他参数 ```toml # 默认模板参数 key: "app01_key" update: interval: 1h depends_on: - keys - restart_nginx # 配置文件更新时执行的任务 restart_nginx: command: "nginx -s -g" # k/v存储的key更新策略 keys: - name: "app01" value: "789" ttl: 10 update: interval: 1h # k/v存储的key删除策略 remove_key: name: "app01" value: "789" ttl: 60 update: interval: 1h # 获取leader的策略 leader: read_only: true ttl: 10 update: interval: 1h ```

正文

https://www.cnblogs.com/zhengchunyuan/p/9681954.html


一、需求

我们使用Nginx做七层负载均衡,后端是Tomcat。项目采用灰度发布方式,每次项目升级,都要手动先从Nginx下摘掉一组,然后再升级这组,当项目快速迭代时,手动做这些操作显然会增加部署时间,于是就想通过脚本实现自动化管理Nginx配置文件。

当时考虑自己写Shell脚本对Nginx配置文件操作,需要用到sed流编辑器,sed本身没有条件判断语句,并不能灵活判断配置文件中要添加/删除位置,因此会增加配置错误风险。

在查资料无意间发现confd能自动管理配置文件,通过模板渲染生成配置文件,避免了配置错误风险,觉得挺好,就实验了下,于是就有了本章博文。

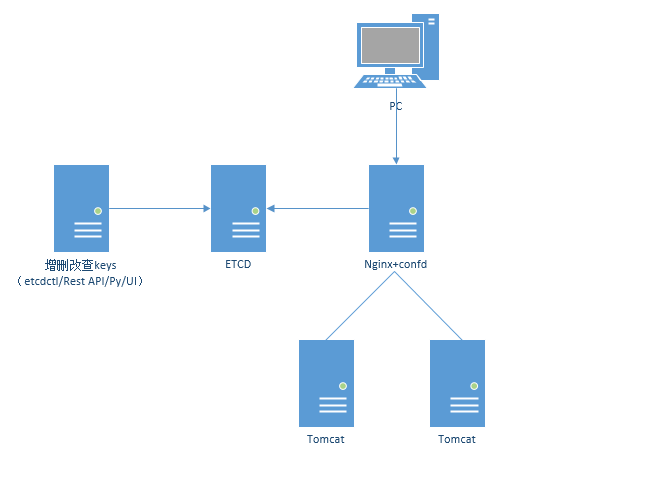
二、架构图

wKioL1jVALqCnB_lAAAjryMdfJ0274.png

三、涉及软件

etcd:分布式KV存储系统,一般用于共享配置和服务注册与发现。是CoreOS公司发起的一个开源项目。 ETCD存储格式类似于文件系统,以根"/"开始下面一级级目录,最后一个是Key,一个key对应一个Value。

etcd集群:使用Raft协议保证每个节点数据一致,由多个节点对外提供服务。这里只用单台。

confd:管理本地应用配置文件,使用etcd或consul存储的数据渲染模板,还支持redis、zookeeper等。

confd有一个watch功能,通过HTTP API定期监测对应的etcd中目录变化,获取最新的Value,然后渲染模板,更新配置文件。

四、部署

环境说明:CentOS7,IP 192.168.1.99 # 为了试验服务都安装这台上。

4.1 下载软件包

https://github.com/coreos/etcd/releases/download/v3.1.4/etcd-v3.1.4-linux-amd64.tar.gz

https://github.com/kelseyhightower/confd/releases/download/v0.11.0/confd-0.11.0-linux-amd64

如果没FQ可能下载不了,这个是我下载好的:http://pan.baidu.com/s/1c1M9kBm

4.2 安装Nginx并启动

1
2
3
4
5
6
7
8
9
10
11
12
13
14
# yum install -y gcc gcc-c++ make openssl-devel pcre-devel
# useradd nginx -s/sbin/nologin
# wget http://nginx.org/download/nginx-1.10.3.tar.gz
# tar zxvf nginx-1.10.3.tar.gz
# cd nginx-1.10.3
# ./configure--prefix=/usr/local/nginx --user=nginx --group=nginx --with-http_ssl_module--with-http_gzip_static_module --with-http_realip_module--with-http_stub_status_module
# make && make install
独立出来虚拟主机:
# mkdir /usr/local/nginx/conf/vhost
# vi /usr/local/nginx/conf/nginx.conf # 在http{}段中末尾添加包含虚拟主机配置文件
http {
    includevhost/*.conf;
# /usr/local/nginx/sbin/nginx  # 启动Nginx
 

4.3 安装etcd并启动

1
2
3
# tar zxvf etcd-v3.1.4-linux-amd64.tar.gz
# mv etcd etcdctl /usr/bin/  # etcd提供封装好的包,直接使用即可
# nohup etcd--data-dir /var/lib/data.etcd --listen-client-urls http://192.168.1.99:2379--advertise-client-urls http://192.168.1.99:2379 &>/var/log/etcd.log &
 

4.4 安装confd


confd也是一个封装好的包,直接使用即可。

1
# mv confd-0.11.0-linux-amd64 /usr/bin/confd
 

key规划:


key

value

/nginx/www/server_name

域名

/nginx/www/upstream/server01

节点01

/nginx/www/upstream/server02

节点02

/nginx/www/upstream/server03

节点03

创建配置目录

1
2
3
# mkdir -p /etc/confd/{conf.d,templates}
conf.d    # 资源模板,下面文件必须以toml后缀
templates # 配置文件模板,下面文件必须以tmpl后缀
 

创建资源模板

1
2
3
4
5
6
7
8
# vi /etc/confd/conf.d/app01.conf.toml
[template]
src = "app01.conf.tmpl"    # 默认在/etc/confd/templates目录下
dest = "/usr/local/nginx/conf/vhost/app01.conf"  # 要更新的配置文件
keys = [
   "/nginx",            # 监测的key
]
reload_cmd ="/usr/local/nginx/sbin/nginx -s reload"   # 最后执行的命令
 

创建Nginx配置文件模板

1
2
3
4
5
6
7
8
9
10
11
12
13
14
15
16
17
# vi /etc/confd/templates/app01.conf.tmpl
upstream www.{{getv "/nginx/www/server_name"}} {
{{range getvs "/nginx/www/upstream/*"}}
     server ``.``;
`end`
}
  
server {
   server_name  www.{{getv "/nginx/www/server_name"}};
   location / {
       proxy_pass       http://www.{{getv  "/nginx/www/server_name"}};
       proxy_redirect off;
       proxy_set_header Host $host;
       proxy_set_header X-Real-IP $remote_addr;
       proxy_set_header X-Forwarded-For $proxy_add_x_forwarded_for;
    }
}


博客地址:http://lizhenliang.blog.51cto.com

QQ群:323779636(Shell/Python运维开发群)


五、测试

使用etcdctl客户端操作etcd,常用的几个选项如下:

1
2
3
4
5
6
7
8
9
USAGE:
   etcdctl [global options] command [command options] [arguments...]
COMMANDS:
   ls          retrieve a directory
   get         retrieve the value of a key
   set         set the value of a key
   rm          remove a key or a directory
GLOBAL OPTIONS:
   --peers, -C     a comma-delimited list of machine addresses in the cluster (default: "http://127.0.0.1:2379,http://127.0.0.1:2379")
 

5.1 向etcd添加k/v

1
2
3
4
5
6
# etcdctl -C http://192.168.1.99:2379 set domain.com
domain.com
# etcdctl -C http://192.168.1.99:2379 set /nginx/www/upstream/server01 "192.168.1.10:80"
192.168.1.10:80
# etcdctl -C http://192.168.1.99:2379 set /nginx/www/upstream/server02 "192.168.1.11:80"
192.168.1.11:80
 

5.2 启动confd监测etcd中的keys

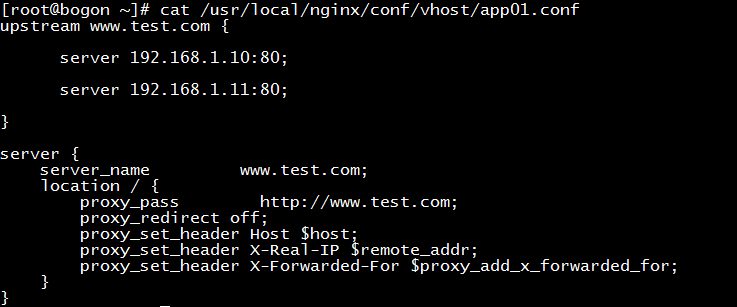
wKioL1jVAlWiwSyLAABoVBic6F4650.png

当你启动后,confd就会从etcd获取key的值并填充到Nginx配置文件模板,并更新到/usr/local/nginx/conf/vhost/app01.conf,并nginx reload。 

wKioL1jU7QThn83gAABBShL2aLM452.png

5.3 近一步测试

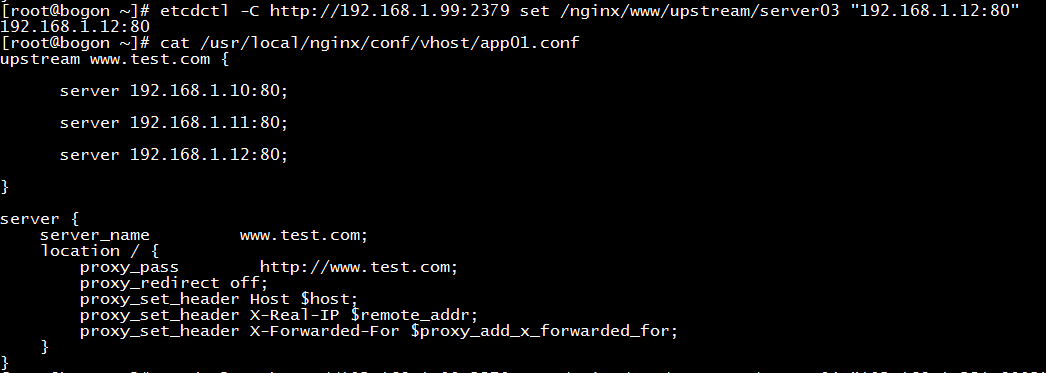
向etcd中/nginx/www/upstream/再添加一个节点:

wKiom1jU-dKxao77AABeGfFMF3w737.png

OK!这样就实现了自动管理Nginx配置文件,无感知加入后端节点。

六、etcd Rest API使用

1
2
3
4
5
6
7
8
9
10
11
curl -X PUT http://192.168.1.99:2379/v2/keys/test/a_key -d value="789"  # 增改key
curl -X DELETE http://192.168.1.99:2379/v2/keys/test/a_key     # 删除key
curl http://192.168.1.99:2379/v2/keys/test/a_key                 # 查询key的值
curl -X PUT http://192.168.1.99:2379/v2/keys/dir -d dir=true   # 创建目录
curl http://192.168.1.99:2379/v2/keys             # 查看所有keys
curl -X PUT http://192.168.1.99:2379/v2/keys/ttlvar -d value="ttl_value" -d ttl=10 # 创建过期时间的key,单位秒
curl http://192.168.1.99:2379/version             # 查看etcd版本
curl http://192.168.1.99:2379/v2/members            # 列出所有集群成员
curl http://192.168.1.99:2379/v2/stats/leader         # 查看leader
curl http://192.168.1.99:2379/v2/stats/self           # 节点自身信息
curl http://192.168.1.99:2379/v2/stats/store          # 查看集群运行状态
 

七、总结

总体来说,etcd+confd要比自己写脚本管理Nginx配置文件更方便!当然,增加一套组件也会增加一点运维成本。

当初始化一台Web节点,可以增加一步操作去把自己信息注册到etcd,从而实现自动加入节点。

如果应用在生产环境,有些功能需要更加完善些,比如向etcd添加数据用Rest API或者用Python封装接口,confd写一个后台进程脚本运行等。

如果线上已经有redis或者zookeeper的话,那么就可以直接作为k/v存储信息,而不需要再搭建一套etcd集群!

由于keys的每次更新confd都会Nginx reload,在高并发访问量会有一点影响,比较好的解决方案就是写lua去动态加载Nginx参数。但应付中小规模还是可以的!

由此看来,confd不但局限管理Nginx配置文件,对于其他应用软件也是可以的,比如Haproxy,LVS等。


confd使用文档:

https://github.com/kelseyhightower/confd/blob/master/docs/quick-start-guide.md

资源模板其他参数:

https://github.com/kelseyhightower/confd/blob/master/docs/template-resources.md

与[转帖]Etcd+Confd实现Nginx配置文件自动管理相似的内容:

[转帖]Etcd+Confd实现Nginx配置文件自动管理

https://www.cnblogs.com/zhengchunyuan/p/9681954.html 一、需求 我们使用Nginx做七层负载均衡,后端是Tomcat。项目采用灰度发布方式,每次项目升级,都要手动先从Nginx下摘掉一组,然后再升级这组,当项目快速迭代时,手动做这些操作显然会增加部

[转帖]

Linux ubuntu20.04 网络配置(图文教程) 因为我是刚装好的最小系统,所以很多东西都没有,在开始配置之前需要做下准备 环境准备 系统:ubuntu20.04网卡:双网卡 网卡一:供连接互联网使用网卡二:供连接内网使用(看情况,如果一张网卡足够,没必要做第二张网卡) 工具: net-to

[转帖]

https://cloud.tencent.com/developer/article/2168105?areaSource=104001.13&traceId=zcVNsKTUApF9rNJSkcCbB 前言 Redis作为高性能的内存数据库,在大数据量的情况下也会遇到性能瓶颈,日常开发中只有时刻

[转帖]ISV 、OSV、 SIG 概念

ISV 、OSV、 SIG 概念 2022-10-14 12:29530原创大杂烩 本文链接:https://www.cndba.cn/dave/article/108699 1. ISV: Independent Software Vendors “独立软件开发商”,特指专门从事软件的开发、生产、

[转帖]Redis 7 参数 修改 说明

2022-06-16 14:491800原创Redis 本文链接:https://www.cndba.cn/dave/article/108066 在之前的博客我们介绍了Redis 7 的安装和配置,如下: Linux 7.8 平台 Redis 7 安装并配置开机自启动 操作手册https://ww

[转帖]HTTPS中间人攻击原理

https://www.zhihu.com/people/bei-ji-85/posts 背景 前一段时间,公司北京地区上线了一个HTTPS防火墙,用来监听HTTPS流量。防火墙上线之前,邮件通知给管理层,我从我老大那里听说这个事情的时候,说这个有风险,然后意外地发现,很多人原来都不知道HTTPS防

[转帖]关于字节序(大小端)的一点想法

https://www.zhihu.com/people/bei-ji-85/posts 今天在一个技术群里有人问起来了,当时有一些讨论(不完全都是我个人的观点),整理一下: 为什么网络字节序(多数情况下)是大端? 早年设备的缓存很小,先接收高字节能快速的判断报文信息:包长度(需要准备多大缓存)、地

[转帖]awk提取某一行某一列的数据

https://www.jianshu.com/p/dbcb7fe2da56 1、提取文件中第1列数据 awk '{print $1}' filename > out.txt 2、提取前2列的文件 awk `{print $1,$2}' filename > out.txt 3、打印完第一列,然后打

[转帖]awk 中 FS的用法

https://www.cnblogs.com/rohens-hbg/p/5510890.html 在openwrt文件 ar71xx.sh中 查询设备类型时,有这么一句, machine=$(awk 'BEGIN{FS="[ \t]+:[ \t]"} /machine/ {print $2}' /

[转帖]Windows Server 2022 简体中文版、英文版下载 (updated Oct 2022)

https://sysin.org/blog/windows-server-2022/ Windows Server 2022 正式版,2022 年 10 月更新,VLSC Posted by sysin on 2022-10-27 Estimated Reading Time 8 Minutes