https://www.cnblogs.com/cjnlll/p/16849620.html复制
VMware、Xshell、Xftp
openeuler操作系统
openEuler-20.03-LTS-x86_64
安装教程:https://www.cnblogs.com/cjnlll/p/16831589.html
区别
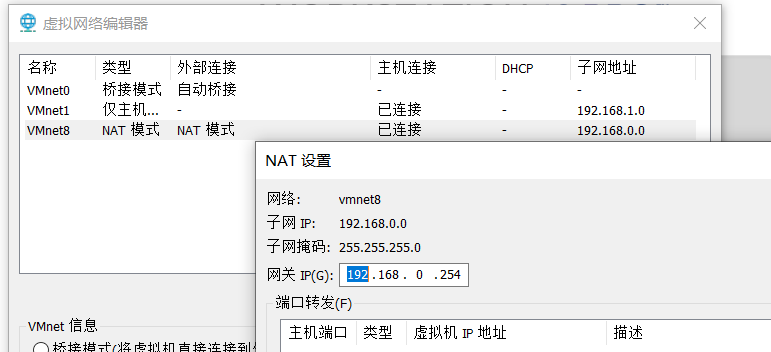
  >>!这里选择NAT,配置静态IP
复制
openguass下载地址
本次安转包为openGauss-3.1.0-openEuler-64bit-all.tar.gz

然后去虚拟机填编辑网卡
vim /etc/sysconfig/network-scripts/ifcfg-ens33
重启ping www.baidu.com
cd /etc/yum.repos.d/vim openEuler_x86_64.repo
粘贴以下内容:
[osrepo]
name=osrepo
baseurl=https://repo.openeuler.org/openEuler-20.03-LTS-SP2/OS/x86_64/
enabled=1
gpgcheck=1
gpgkey=https://repo.openeuler.org/openEuler-20.03-LTS-SP2/OS/x86_64/RPM-GPG-KEY-openEuler
[everything]
name=everything
baseurl=https://repo.openeuler.org/openEuler-20.03-LTS-SP2/everything/x86_64/
gpgcheck=1
enabled=1
gpgkey=https://repo.openeuler.org/openEuler-20.03-LTS-SP2/everything/x86_64/RPM-GPG-KEY-openEuler
yum clean all
yum makecache
yum repolist all
systemctl stop firewalld.service
#禁止firewall开机启动
systemctl disable firewalld.service
#检查防火墙是否关闭。
systemctl status firewalld
getenforce
sed -i 's/^SELINUX=.*/SELINUX=disabled/' /etc/selinux/config
setenforce 0
getenforce
cat /etc/selinux/config|grep SELINUX
cat>> /etc/profile<<EOF
export LD_LIBRARY_PATH=/opt/software/openGauss/script/gspylib/clib:$LD_LIBRARY_PATH
EOF
swapoff -a
free
临时关闭透明页方法
echo never > /sys/kernel/mm/transparent_hugepage/enabled
echo never > /sys/kernel/mm/transparent_hugepage/defrag
sed -i "s/#Banner none/Banner none/g" /etc/ssh/sshd_config
cat >>/etc/ssh/sshd_config<<EOF
PermitRootLogin yes
EOF
systemctl restart sshd
cat /etc/ssh/sshd_config | grep PermitRootLogin
cat /etc/ssh/sshd_config | grep Banner
echo "* soft nofile 1000000" >>/etc/security/limits.conf
echo "* hard nofile 1000000" >>/etc/security/limits.conf
echo "* soft nproc unlimited" >>/etc/security/limits.conf
echo "* hard nproc unlimited" >>/etc/security/limits.conf
yum install openssl* -y
yum install python3* -y
查看python3 -V
yum install libaio-devel flex bison ncurses-devel glibc-devel patch readline-devel openeuler-lsb-5.0-1.oe1.x86_64
查看安装
rpm -qa libaio-devel flex bison ncurses-devel glibc-devel patch readline-devel
lsb_release -a
mkdir -p /opt/software/openGauss
chmod 755 -R /opt/software
tar -zxvf openGauss-3.1.0-openEuler-64bit-all.tar.gz
!!!解压om包tar -zxvf openGauss-3.1.0-openEuler-64bit-om.tar.gz
cat > clusterconfig.xml<<EOF
<?xml version="1.0" encoding="UTF-8"?>
<ROOT>
<!-- openGauss 整体信息 -->
<CLUSTER>
<!-- 数据库名称 -->
<PARAM name="clusterName" value="dbCluster" />
<!-- 数据库节点名称(hostname) -->
<PARAM name="nodeNames" value="euler01" />
<!-- 数据库安装目录-->
<PARAM name="gaussdbAppPath" value="/opt/huawei/install/app" />
<!-- 日志目录-->
<PARAM name="gaussdbLogPath" value="/var/log/omm" />
<!-- 临时文件目录-->
<PARAM name="tmpMppdbPath" value="/opt/huawei/tmp" />
<!-- 数据库工具目录-->
<PARAM name="gaussdbToolPath" value="/opt/huawei/install/om" />
<!-- 数据库 core 文件目录-->
<PARAM name="corePath" value="/opt/huawei/corefile" />
<!-- 节点 IP,与数据库节点名称列表一一对应 -->
<PARAM name="backIp1s" value="192.168.0.14"/>
</CLUSTER>
<!-- 每台服务器上的节点部署信息 -->
<DEVICELIST>
<!-- 节点 1 上的部署信息 -->
<DEVICE sn="node1">
<!-- 节点 1 的主机名称 -->
<PARAM name="name" value="euler01"/>
<!-- 节点 1 所在的 AZ 及 AZ 优先级 -->
<PARAM name="azName" value="AZ1"/>
<PARAM name="azPriority" value="1"/>
<!-- 节点 1 的 IP,如果服务器只有一个网卡可用,将 backIP1 和 sshIP1 配置
成同一个 IP -->
<PARAM name="backIp1" value="192.168.0.14"/>
<PARAM name="sshIp1" value="192.168.0.14"/>
<!--dbnode-->
<PARAM name="dataNum" value="1"/>
<PARAM name="dataPortBase" value="26000"/>
<PARAM name="dataNode1" value="/opt/huawei/install/data/dn"/>
<PARAM name="dataNode1_syncNum" value="0"/>
</DEVICE>
</DEVICELIST>
</ROOT>
EOF
复制
三个IP跟两个euler01都要改成自己的,IP为前面配置的静态IP,用hostname可以查看自己用户名
查看具体检查信息
/opt/software/openGauss/script/gs_checkos -i A -h euler01 --detail
重启一下刷新前面配置的环境变量
查看环境变量echo $LD_LIBRARY_PATH
cd script
./gs_preinstall -U omm -G dbgrp -X /opt/software/openGauss/clusterconfig.xml
提示是否创建用户omm:yes,设置用户密码例如好记:omm123
/opt/software/openGauss/script/gs_checkos -i A -h euler01 --detail
* 使用root用户
> cd /opt/software/openGauss/script
复制
chmod -R 755 /opt/software/openGauss/script
chown -R omm:dbgrp /opt/software/openGauss/script
* 切换omm用户su - ommcd /opt/software/openGauss/scriptcp ../clusterconfig.xml .gs_install -X /opt/software/openGauss/script/clusterconfig.xml
启动服务gs_om -t start
登录opengauss:gsql -d postgres -p 26000 -r
关闭服务gs_om -t stop