Anolis 龙蜥社区![]() https://openanolis.cn/轻豚主站
https://openanolis.cn/轻豚主站![]() http://keentune.io/home
http://keentune.io/home
注意:使用keentune 前您应当对服务器硬件、Linux核心参数、网络通讯等知识领域有所了解
警告: 错误的使用调试工具,可能会使服务中断,请谨慎使用!
简介:
性能调优,是一个将硬件、软件、操作系统融会贯通,将性能发挥到极致的过程。通常调校的目标是以用户的期望为依据,因此,调校的目标往往是符合用户的期盼即可。
1.安装:
最低硬件要求:2核4G 10G可用磁盘空间
这里使用dnf的方式,单机部署,有能力的同学可以使用源代码(git)编译的方式安装。
#1.添加软件源curl -o /etc/yum.repos.d/anolisos-experimental.repo https://gitcode.net/-/snippets/1745/raw/master/anolisos-experimental.repo #2.安装Keentune 相关软件dnf install -y keentuned keentune-brain keentune-bench keentune-target #3.安装依赖软件dnf install -y python36 python36-devel go #4.pip切换国内源(可选)mkdir ~/.pipcurl -o ~/.pip/pip.conf https://gitcode.net/-/snippets/1749/raw/master/pip.conf #4.安装python3相关软件,注意:至少需要2G以上硬盘空间!!!pip3 install --upgrade pippip3 install numpy==1.19.5 POAP==0.1.26 tornado==6.1 hyperopt==0.2.5 ultraopt==0.1.1 bokeh==2.3.2 requests==2.25.1 pySOT==0.3.3 scikit_learn==0.24.2 paramiko==2.7.2 PyYAML==5.4.1 pynginxconfig #5.设置go 环境go env -w GO111MODULE=ongo env -w GOPROXY=https://goproxy.cn,direct复制二、启动
#1. 启动keentune相关服务systemctl start keentuned keentune-brain keentune-target keentune-bench #1. 查看服务状态systemctl status keentuned keentune-brain keentune-target keentune-bench #2.设置开机自动启动(可选)systemctl enable keentuned keentune-brain keentune-target keentune-bench复制使用 netstat -an | grep 98 确认从 9870-9874 的端口都已经开启
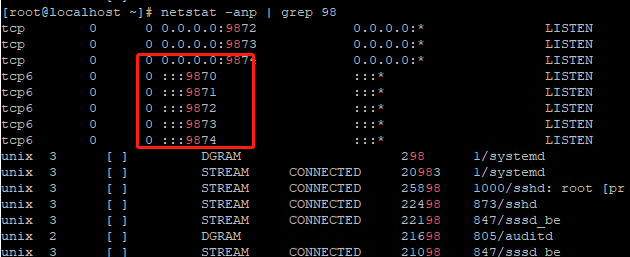
注:如果有端口没有成功启动,请逐一对服务进行排查
三、简单使用
keentune 拥有两种性能调优模式,基于AI 的动态调优和基于预设场景的静态调优,这里我们选择静态调优继续:
通过 keentune profile list 可以看到,已经预设了5种使用场景
- cpu_high_load 高CPU负载
- io_high_throughput 高IO吞吐量
- mysql_tpcc MYSQL 的TPCC优化
- net_high_throuput 高网络吞吐量
- net_low_latency 网络低延迟
#查看帮助keentune -h #查看静态配置keentune profile list复制
#查看指定配置的参数keentune profile info --name cpu_high_load.conf复制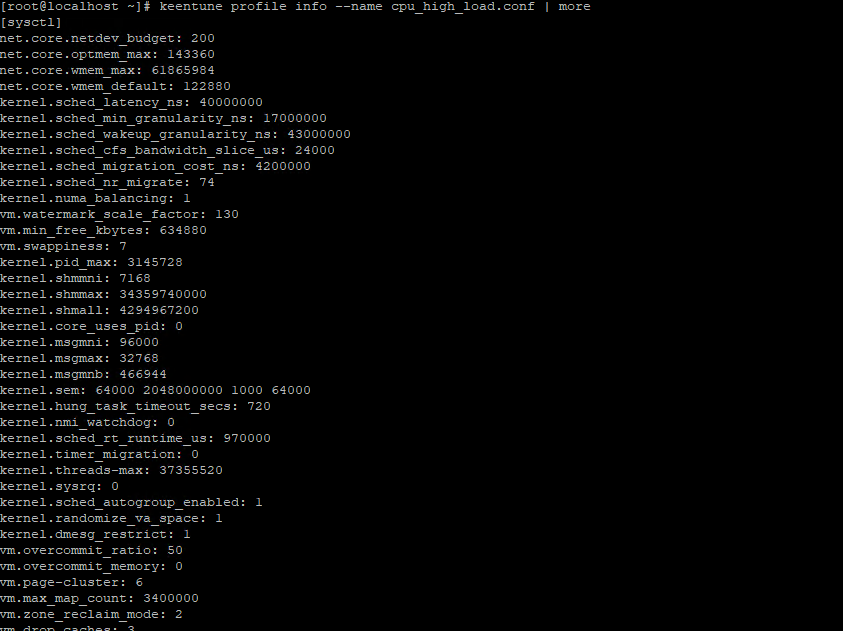
#使 cpu_high_load 配置生效keentune profile set --name cpu_high_load.conf复制![]()
设置成功后可以看到 [ok]状态,共有多少参数设置成功
使用sysctl -a 查看设置成功后的参数(此处以swappiness为例)

注意:keentune 只是调整了运行值,重启后会恢复原值
恢复初始状态:
# 恢复初始状态keentune profile rollback复制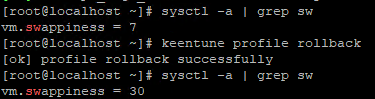
四、其他
1)手动调整预置场景参数
#目录下存放着所有预置场景的配置文件/etc/keentune/profile 复制上述目录存放着所有预置场景的配置文件,可以根据自己的经验、服务器配置对预设场景的参数进行手动调整

2)使用网络预设场景时可能会遇到的问题
- #应用 网络高负载或者 低延时场景时
- #会遇到如下错误:
-
- keentune profile set --name net_low_latency.conf
- [ERROR] profile.Set failed, msg: Prepare before Set err:exec backup failed, err:response suc is false, msg is map[sysctl:sysctl: cannot stat /proc/sys/net/generic-receive-offload: No such file or directory]
是因为配置文件中的如下参数造成的:
net.mtu: 1500net.generic-receive-offload: offnet.generic-segmentation-offload: offnet.tcp-segmentation-offload: off复制
由于在新的Linux 内核中 网卡的gro、gso、tso 设置已经交由 ethtool 工具来设置,解决方法如下:
使用vi 等文本编辑工具,将 上述4条内容从 net_low_latency.conf 中删除,再执行如下命令:
- #ethtool 关闭 gro gso tso,注:重启后会恢复默认值
- #ethtool -K 网卡名称 命令
- ethtool -K eth0 gro off
- ethtool -K eth0 gso off
- ethtool -K eth0 tso off
-
- #设置mtu 1500
- echo "1500" > /sys/class/net/eth0/mtu
-
- #启用策略
- keentune profile set --name net_low_latency.conf
五、最后
所谓前人种树后人白嫖,本文志在抛砖引玉,从官方文档可以看出基于AI的动态参数调整才是keentune 的核心价值所在。
参考文献:
https://openanolis.cn/sig/KeenTune
https://gitee.com/anolis/keentuned
https://gitee.com/anolis/keentune_bench
https://gitee.com/anolis/keentune_target
https://gitee.com/anolis/keentune_brain
</article>复制