[转帖]centos7离线安装postgresql13

centos7,离线,安装,postgresql13 · 浏览次数 : 0

小编点评

**安装 PostgreSQL 源码包** **步骤 1:下载源代码包** 使用 yumdownloader 下载 PostgreSQL 的源代码包: ```bash # 下载 libicu 库 yumdownloader --resolve libicu-rw-r--r-- 1 root root 7250656 Mar 25 2020 libicu-50.2-4.el7_7.i686.rpm-rw-r--r-- 1 root root 7202728 Mar 25 2020 libicu-50.2-4.el7_7.x86_64.rpm-rw-r--r-- 1 root root 1490812 Aug 12 18:07 postgresql13-13.4-1PGDG.rhel7.x86_64.rpm-rw-r--r-- 1 root root 390420 Aug 12 18:07 postgresql13-libs-13.4-1PGDG.rhel7.x86_64.rpm-rw-r--r-- 1 root root 5654980 Aug 12 18:07 postgresql13-server-13.4-1PGDG.rhel7.x86_64.rpm # 下载 PostgreSQL 数据库 yumdownloader --resolve postgresql13-server-13.4-1PGDG.rhel7.x86_64 postgresql13-13.4-1PGDG.rhel7.x86_64.rpm ``` **步骤 2:安装 PostgreSQL** 将下载的源代码包解压缩到 `/tmp` 中: ```bash tar -xf postgresql13-13.4-1PGDG.rhel7.x86_64.rpm cd postgresql13-13.4-1PGDG ``` **步骤 3:设置环境变量** 设置 `POSTGRES_ROOT` 和 `POSTGRES_USER` 变量,以便 PostgreSQL 能够找到安装目录: ```bash export POSTGRES_ROOT=/tmp/postgresql13-13.4-1PGDG export POSTGRES_USER=postgres ``` **步骤 4:启动 PostgreSQL 数据库** 启动 PostgreSQL 数据库: ```bash sudo systemctl start postgresql-13 ``` **步骤 5:初始化数据库** 使用 `initdb` 命令初始化数据库: ```bash sudo initdb ``` **步骤 6:创建用户和数据库** 使用 `psql` 命令创建用户和数据库: ```bash psql -U postgres -d sonarqube -c "CREATE USER ycloans WITH PASSWORD 'ycloans';" psql -U postgres -d sonarqube -c "GRANT ALL PRIVILEGES ON DATABASE sonarqube TO ycloans;" ``` **步骤 7:设置远程访问** 修改 `postgresql.conf` 文件,取消 `listen_addresses` 的注释,并将参数值改为 `*`: ``` listen_addresses = * ``` 重启 PostgreSQL 服务: ```bash sudo systemctl restart postgresql-13 ``` **步骤 8:完成安装** 按照说明中的一步一步完成安装。

正文

https://www.cnblogs.com/summer-88/p/15341918.html


  1. 在一台可以联网的centos上安装postgresql源
yum install -y https://download.postgresql.org/pub/repos/yum/reporpms/EL-7-x86_64/pgdg-redhat-repo-latest.noarch.rpm
  1. 使用yumdownloader下载安装包
yumdownloader --resolve postgresql13-server
  1. 上传rpm包到安装的centos服务器上
-rw-rw-rw- 1 root root 1490812 Sep 27 09:45 postgresql13-13.4-1PGDG.rhel7.x86_64.rpm
-rw-rw-rw- 1 root root  390420 Sep 27 09:45 postgresql13-libs-13.4-1PGDG.rhel7.x86_64.rpm
-rw-rw-rw- 1 root root 5654980 Sep 27 09:45 postgresql13-server-13.4-1PGDG.rhel7.x86_64.rpm
  1. 批量安装rpm包
rpm -ivh postgresql13-13.4-1PGDG.rhel7.x86_64.rpm postgresql13-libs-13.4-1PGDG.rhel7.x86_64.rpm postgresql13-server-13.4-1PGDG.rhel7.x86_64.rpm

报错了,缺少依赖libicu

warning: postgresql13-13.4-1PGDG.rhel7.x86_64.rpm: Header V4 DSA/SHA1 Signature, key ID 442df0f8: NOKEY
error: Failed dependencies:
        libicu is needed by postgresql13-13.4-1PGDG.rhel7.x86_64
        libicui18n.so.50()(64bit) is needed by postgresql13-server-13.4-1PGDG.rhel7.x86_64
        libicuuc.so.50()(64bit) is needed by postgresql13-server-13.4-1PGDG.rhel7.x86_64
  1. 使用yumdownloader下载libicu
yumdownloader --resolve libicu
-rw-r--r-- 1 root root 7250656 Mar 25  2020 libicu-50.2-4.el7_7.i686.rpm
-rw-r--r-- 1 root root 7202728 Mar 25  2020 libicu-50.2-4.el7_7.x86_64.rpm
-rw-r--r-- 1 root root 1490812 Aug 12 18:07 postgresql13-13.4-1PGDG.rhel7.x86_64.rpm
-rw-r--r-- 1 root root  390420 Aug 12 18:07 postgresql13-libs-13.4-1PGDG.rhel7.x86_64.rpm
-rw-r--r-- 1 root root 5654980 Aug 12 18:07 postgresql13-server-13.4-1PGDG.rhel7.x86_64.rpm

删除libicu-50.2-4.el7_7.i686.rpm(32位安装包)
6. 重新上传到需要安装的服务器,执行安装命令

rpm -ivh libicu-50.2-4.el7_7.x86_64.rpm postgresql13-13.4-1PGDG.rhel7.x86_64.rpm postgresql13-libs-13.4-1PGDG.rhel7.x86_64.rpm postgresql13-server-13.4-1PGDG.rhel7.x86_64.rpm
  1. 安装成功后初始化数据库
/usr/pgsql-13/bin/postgresql-13-setup initdb
  1. 开机启动postgresql数据库
systemctl enable postgresql-13
  1. 启动postgresql数据库服务
systemctl start postgresql-13
  1. 创建用户和数据库,使用postgres用户登录(PostgresSQL安装后会自动创建postgres用户,无密码)
su postgres
  1. 登录postgresql数据库
psql
  1. 创建用户和数据库并授权
create user ycloans with password 'ycloans';            // 创建用户
create database sonarqube owner ycloans;                 // 创建数据库
grant all privileges on database sonarqube to ycloans;   // 授权

\q 退出命令模式
13. 开启远程访问,修改/var/lib/pgsql/13/data/postgresql.conf文件,取消 listen_addresses 的注释,将参数值改为“*”

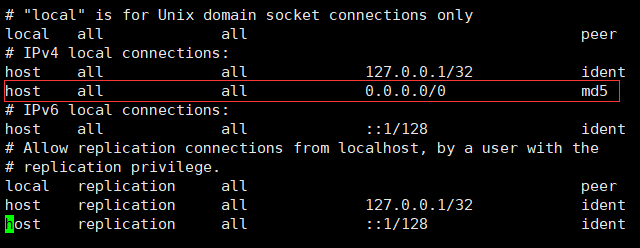
  1. 修改/var/lib/pgsql/13/data/pg_hba.conf文件,增加下图红框部分内容
  2. 切换到root用户,重启postgresql服务
systemctl restart postgresql-13

与[转帖]centos7离线安装postgresql13相似的内容:

[转帖]centos7离线安装postgresql13

https://www.cnblogs.com/summer-88/p/15341918.html 在一台可以联网的centos上安装postgresql源 yum install -y https://download.postgresql.org/pub/repos/yum/reporpms/E

[转帖]yum 下载全量依赖 rpm 包及离线安装(终极解决方案)

简介 通常生产环境由于安全原因都无法访问互联网。此时就需要进行离线安装,主要有两种方式:源码编译、rpm包安装。源码编译耗费时间长且缺乏编译环境,所以一般都选择使用离线 rpm 包安装。 验证环境 Centos 7.2 查看依赖包 可以使用“yum deplist”命令来查找 rpm 包的依赖列表。

[转帖]按需制作最小的本地yum源

https://www.cnblogs.com/liufarui/p/11311557.html 【需求背景】 有时候客户的环境里面只能离线安装文件,此时可以使用CentOS的ISO光盘作为本地源进行安装,或者是制作一个包含了YUM源服务的虚拟机。 无论上面的哪一种方式都不够轻量,我们自己的组件可能

[转帖]centos7.6编写自己的启动服务,运行systemctl后卡住了的解决方案

https://www.cnblogs.com/niway/p/15346572.html 问题:centos7.6编写自己的启动服务,运行systemctl后卡住了,表现为当我执行systemctl命令后shell阻塞在那里,没有像平时执行命令那样自动结束(只能自己按Ctrl+C强制结束),情况如

[转帖]Centos7升级glibc导致系统异常(无法开机)解决方法

https://www.jb51.net/article/230473.htm 目录 我使用的是centos7(理论上这个方法仅仅对centos7以及Redhat7都可以使用该方法解决问题) 注意:此方法仅针对Redhat7/Centos7以上。 出现问题原因: 在调优hbase的时候,查资料发现可

[转帖]CentOS7搭建时间服务器-chrony

操作系统:CentOS7防火墙: 关闭防火墙和selinux时间软件:chronyCentOS7我们一直用的ntp时间服务器,虽然到CentOS7上也可以装ntp。chrony与ntp都是时间同步软件,两个软件不能够同时开启,会出现时间冲突.但是由于各种问题,所以建议CentOS7使用chrony同

[转帖]CentOS7/完美升级gcc版本方法

https://zhuanlan.zhihu.com/p/535657060 在某些应用场景中,需要特定的gcc版本支持,但是轻易不要去编译gcc、不要去编译gcc、不要去编译gcc,我这里推荐使用红帽提供的开发工具包来管理gcc版本,这样做的好处是随时切换版本,并且可以并存多个版本,不破坏原有gc

[转帖]CentOS7 ab压力测试安装与解释

#背景 Apache Benchmark(简称ab) 是Apache安装包中自带的压力测试工具 ,简单易用在此提供 ab 在 centOS7 下的安装和使用方法注:个人发现,之前安装的centos6.5 默认已安装了ab,具体原因不明 ①.ab(apache benchmark)安装 命令:# yu

[转帖]CentOS7完美升级gcc版本方法

https://blog.whsir.com/post-4975.html 在某些应用场景中,需要特定的gcc版本支持,但是轻易不要去编译gcc、不要去编译gcc、不要去编译gcc,我这里推荐使用红帽提供的开发工具包来管理gcc版本,这样做的好处是随时切换版本,并且可以并存多个版本,不破坏原有gcc

[转帖]centos7 firewall-cmd主机之间端口转发

目录 1. firewalld1.1 firewalld守护进程1.2 控制端口/服务1.3 伪装IP1.4 端口转发 2. 案例2.1 配置ServerA2.2 安装nginx测试 (可选)2.3 开启端口2.4 伪装IP2.5 端口转发2.6 配置ServerB2.7 修改nginx页面显示内容