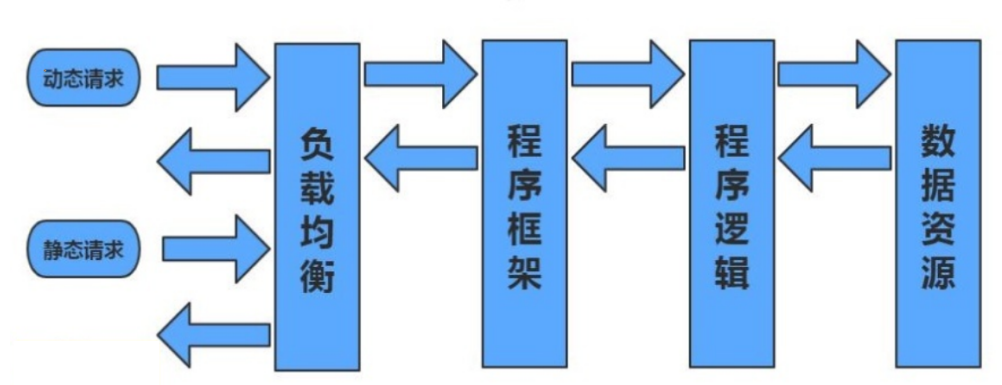
一、动静分离
动静分离,通过中间件将动静请求和静态请求进行分离; 通过中间件将动态请求和静态请求分离,可以减少不必要的请求消耗,同时能减少请求的延时。 通过中间件将动态请求和静态请求分离,逻辑图如下:复制
二、配置动静分离
1.单台机器的动静分离
[root@web01 ~]# vim /etc/nginx/conf.d/dj.conf
server {
    listen 80;
    server_name dj.com;

    location / {
        root /code/wordpress;
        index index.php;
    }

	#如果请求的是以 .jpg或者png结尾的静态文件 就去/code/images 目录下访问
    location ~* \.(jpg|png)$ {
        root /code/images;
    }

    location ~* \.php$ {
        root /code/wordpress;
        fastcgi_pass 127.0.0.1:9000;
        fastcgi_param SCRIPT_FILENAME $document_root$fastcgi_script_name;
        include fastcgi_params;
    }
}

#创建目录
[root@web01 conf.d]# mkdir /code/images/

#实现动静分离
方式一:把文件挪到/code/images/
	cp -r /code/wordpress/wp-content /code/images/
方式二:做软连接
	cd /code
	ln -s wordpress images
复制
2.多台机器动静分离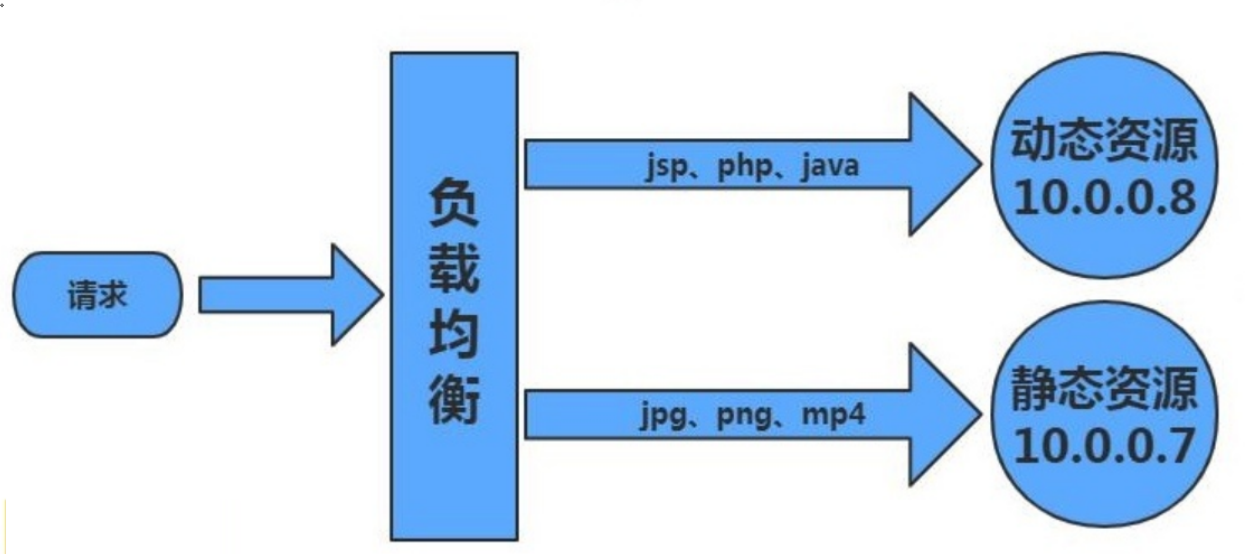
1)环境准备
| 主机 | 作用 | 服务 | 地址 |
|---|---|---|---|
| lb01 | 负载均衡 | nginx proxy | 192.168.15.5 |
| web01 | 静态资源 | nginx static | 192.168.15.7 |
| web02 | 动态资源 | tomcat server | 192.168.15.8 |
2)配置web01的静态内容
#配置nginx
[root@web01 ~]# vim /etc/nginx/conf.d/dj.com.conf
server {
    listen 80;
    server_name dj.com;

    location ~* \.(jpg|png|gif)${
        root /code/picture;
    }
}

#重启nginx
[root@web01 ~]# systemctl restart nginx

#上传图片
[root@web01 ~]# mkdir /code/picture
[root@web01 ~]# cd /code/picture/
[root@web01 picture]# rz 1.jpg

#配置hosts ,访问图片
复制
3)在web02上配置动态资源
#安装tomcat    #测试时才会用yum安装,因为需要有jave环境
[root@web02 ~]# yum install -y tomcat

#配置动态内容
[root@web02 ~]# cd /usr/share/tomcat/webapps/
[root@web02 webapps]# mkdir ROOT
[root@web02 webapps]# vim ROOT/java_test.jsp
<%@ page language="java" import="java.util.*" pageEncoding="utf-8"%>
<HTML>
    <HEAD>
        <TITLE>JSP Page</TITLE>
    </HEAD>
    <BODY>
        <%
            Random rand = new Random();
            out.println("<h1>随机数:<h1>");
            out.println(rand.nextInt(99)+100);
        %>
    </BODY>
</HTML>

#启动tomcat
[root@web02 webapps]# systemctl start tomcat

#访问页面
http://192.168.15.8:8080/java_test.jsp
复制
4)在负载均衡上配置页面
#配置负载均衡的nginx
[root@lb01 ~]# vim /etc/nginx/conf.d/dj.com.conf
upstream jt {
	server 172.16.1.7:80;
	server 172.16.1.9:80;
}
upstream dt {
	server 172.16.1.10:8080;
	server 172.16.1.8:8080;
}

server {
    listen 80;
    server_name dj.com;

    location / {
        root /code/dj;
        index index.html;
    }

    location ~* \.(jpg|gif|png)$ {
        proxy_pass http://jt;
        include proxy_params;   或者proxy_set_header HOST $http_host;
    }

    location ~ \.jsp$ {
        proxy_pass http://dt;
        include proxy_params;
    }
}

#重启nginx
[root@lb01 ~]# systemctl restart nginx

#配置host,访问页面
http://dj.com/java_test.jsp
http://dj.com/1.gif
复制
5)整合静态内容和动态内容
1.创建站点目录
[root@lb01 ~]# mkdir /code/dj -p

2.编辑htm文件
[root@lb01 ~]# vim /code/dj/index.html
<html lang="en">
<head>
        <meta charset="UTF-8" />
        <title>测试ajax和跨域访问</title>
        <script src="http://libs.baidu.com/jquery/2.1.4/jquery.min.js"></script>
</head>
<script type="text/javascript">
$(document).ready(function(){
        $.ajax({
        type: "GET",
        url: "http://dj.com/java_test.jsp",
        success: function(data){
                $("#get_data").html(data)
        },
        error: function() {
                alert("失败了,回去检查你服务去~");
        }
        });
});
</script>
        <body>
                <h1>测试动静分离</h1>
                <img src="http://dj.com/1.gif">
                <div id="get_data"></div>
        </body>
</html>

#授权站点目录
[root@lb01 ~]# chown -R www.www /code/

#访问域名,测试,静态内容和动态内容关闭其一,互不影响
复制
三、Nginx资源分离
1.资源分离
Nginx通过负载均衡实现手机与PC调度至不同的后端节点应用案例 使用pc访问时跳转到pc配置的页面,使用手机访问时可以跳转不同的页面复制
2.配置资源分离场景
1)环境准备
| 主机 | 主机作用 | 外网ip | 内网ip | 端口 |
|---|---|---|---|---|
| Lb01 | 负载均衡 | 192.168.15.4 | 172.16.1.4 | 80 |
| web01 | 提供Android手机页面 | 192.168.15.7 | 172.16.1.7 | 80 |
| web02 | 提供Iphone手机页面 | 192.168.15.8 | 172.16.1.8 | 80 |
| web03 | 提供电脑访问 | 192.168.15.9 | 172.16.1.9 | 80 |
2)配置服务器
[root@web01 ~]# vim /etc/nginx/conf.d/sj.com.conf
server {
    listen 8081;
    server_name sj.com;

    location / {
        root /code/android;
        index index.html;
    }
}

server {
    listen 8082;
    server_name sj.com;

    location / {
        root /code/iphone;
        index index.html;
    }
}

server {
    listen 8083;
    server_name sj.com;

    location / {
        root /code/pc;
        index index.html;
    }
}

#重启nginx
复制
3)配置站点
[root@web01 ~]# mkdir /code/{android,pc,iphone}
[root@web01 ~]# echo "我是Android" > /code/android/index.html
[root@web01 ~]# echo "我是Iphone" > /code/iphone/index.html
[root@web01 ~]# echo "我是computer" > /code/pc/index.html
复制
4)配置负载均衡
[root@lb01 ~]#  vim /etc/nginx/conf.d/sj.com.conf
upstream android {
	server 172.16.1.7:8081;
}
upstream iphone {
	server 172.16.1.7:8082;
}
upstream pc {
	server 172.16.1.7:8083;
}
server {
    listen 80;
    server_name sj.com;

    location / {
        if ($http_user_agent ~* "Android") {   #判断如果是安卓端
            proxy_pass http://android;        #代理到android虚拟主机池
        }

        if ($http_user_agent ~* "iPhone") {     #判断如果是苹果端
            proxy_pass http://iphone;          #代理到iphone虚拟主机池
        }

	   if ($http_user_agent ~* "Chrome") {   #判断如果是IE浏览器
            return 403;     			#直接返回403

        proxy_pass http://pc;   #如果没有匹配到以上内容,默认都代理到pc虚拟 主机池
        include proxy_params;
    }
}

#重启nginx
[root@lb01 conf.d]# systemctl restart nginx
复制
5)配置hosts访问页面测试

四、Nginx的Rewrite重写
1.rewrite概述
Rewrite主要实现url地址重写,以及重定向,就是把传入web的请求重定向到其他url的过程。复制
2.rewrite使用场景
1、地址跳转,用户访问www.dan.com这个URL时,将其定向至一个新的域名mobile.dan.com 2、协议跳转,用户通过http协议请求网站时,将其重新跳转至https协议方式 3、伪静态,将动态页面显示为静态页面方式的一种技术,便于搜索引擎的录入,同时建上动态URL地址对外暴露过多的参数,提升更高的安全性。 4、搜索引擎,SEO优化依赖于url路径,好记的url便于智齿搜索引擎录入复制
3.rewrite配置语法
Syntax:	rewrite regex replacement [flag];
Default:	—
Context:	server, location, if

rewrite			 #模块命令
regex 			 #请求的链接(支持正则表达式)
replacement 	 #跳转的链接
[flag];			 #标签

#一般用于切换维护场景
rewrite ^(.*)$ /page/404.html last;
复制
4.rewrite标记 flag
rewrite指令根据表达式来重定向URL,或者修改字符串,可以应用于server,location,if环境下,每行rewrite指令最 后跟一个flag标记,支持的flag标记有如下表格所示:
| flag | 作用 |
|---|---|
| last | 本条规则匹配完成后,停止匹配,不再匹配后面的规则 |
| break | 本条规则匹配完成后,停止匹配,不再匹配后面的规则 |
| redirect | 返回302临时重定向,地址栏会显示跳转后的地址 |
| permanent | 返回301永久重定向,地址栏会显示跳转后的地址 |
5.last和break的区别
1)配置nginx测试
#配置nginx
[root@web01 ~]# vim/etc/nginx/conf.d/rewrite.com.conf
server {
        listen 80;
        server_name rewrite.com;
        root /code/rewrite;

        location ~ ^/break {
                rewrite ^/break /test/ break;
        }
        location ~ ^/last {
                rewrite ^/last /test/ last;
        }
        location /test/ {
                default_type application/json;
                return 200 "ok";
        }
}

#重启nginx
[root@web01 conf.d]# systemctl restart nginx

#访问页面测试
复制
2)测试后结论
break 只要匹配到规则,就回去本地路径目录中寻找请求的文件;
last  匹配到规则,跳转后没有内容,则带着跳转后的请求,重新的向server发起一次请求

break请求:
	1.请求rewrite.com/break;
	2.首先,会去查找本地的/code/rewrite/test/index.html;
	3.如果找到了,则返回/code/rewrite/test/index.html内容;
	4.如果没有找到则返回404,找到目录却没有主页,则返回403;

last请求:
	1.请求rewrite.com/last;
	2.首先,会去查找本地的/code/rewrite/test/index.html;
	3.如果找到了,则返回/code/rewrite/test/index.html内容;
	4.如果没找到,会带着新跳转的URI再向server发起一次请求,请求rewrite.com/test;
	5.如果匹配到新的location,则返回该location匹配的内容;
	6.如果没有匹配到新的,则再返回404或403;
复制
6.redirect和permanent的区别
1)配置nginx测试
[root@web01 ~]## vim /etc/nginx/conf.d/rewrite.com.conf
server {
        listen 80;
        server_name rewrite.com;
        root /code/rewrite;

        location /test {
                rewrite ^(.*)$ http://www.mumusir.com redirect;
                #rewrite ^(.*)$ http://www.mumusir.com permanent;
        }
}
#配置两种跳转,关闭nginx测试,查看结果
复制
2)结论
redirect: 每次请求都会询问服务器,是否跳转,如果服务器不可用,则跳转失败 permanent: 请求一次后,会记录跳转的地址,以后不再询问,直接跳转,通过浏览器缓存记录复制
7.rewrite规则匹配实例
- 用户访问/abc/1.html实际上真实访问的是/ccc/bbb/2.html
[root@web01 ~]# vim /etc/nginx/conf.d/rw.conf
server {
    listen 80;
    server_name rw.com;
    root /code;

    location ~ /abc {
        rewrite ^(.*)$ /ccc/bbb/2.html redirect;
    }
}
复制
- 将http请求跳转到https
server {
	listen 80;
	server_name www.mumusir.com;
	#rewrite (.*) https://www.mumusir.com redirect;  或者
	return 302 https://www.mumusir.com;
}

server {
	listen 443;
	server_name www.mumusir.com;
	ssl on;
	ssl...... *.key;
	ssl..... *.crt;
}
复制
五、rewrite伪静态实例
1.搭建discuz论坛
#创建站点目录
[root@web01 ~]# mkdir /code/discuz
[root@web01 ~]# rz Discuz_X3.3_SC_GBK.zip
[root@web01 ~]# unzip Discuz_X3.3_SC_GBK.zip -d /code/discuz/

#授权站点目录
[root@web01 ~]# chown -R www.www /code/discuz/

#配置discuz论坛的配置文件
[root@web01 ~]# vim /etc/nginx/conf.d/discuz.com.conf
server {
    listen 80;
    server_name discuz.com;

    location / {
        root /code/discuz/upload;
        index index.php;
    }

    location ~* \.php$ {
        root /code/discuz/upload;
        fastcgi_pass 127.0.0.1:9000;
        fastcgi_param SCRIPT_FILENAME $document_root$fastcgi_script_name;
        include fastcgi_params;
    }
}

#重启
[root@web01 ~]# nginx -t
[root@web01 ~]# systemctl restart nginx

#配置hosts访问
192.168.15.7 discuz.com

#创建数据库
[root@db02 ~]# mysql -uroot -p123456
... ...

MariaDB [(none)]> create database discuz charset utf8;
Query OK, 1 row affected (0.00 sec)

MariaDB [(none)]> grant all on discuz.* to discuz@'172.16.1.%' identified by '123456';
Query OK, 0 rows affected (0.04 sec)
复制
2.配置hosts,访问论坛,发表帖子
#查看帖子地址http://discuz.com/forum.php?mod=viewthread&tid=1&extra=
复制
3.配置rewrite伪静态
[root@web01 ~]# vim /etc/nginx/conf.d/discuz.com.conf
server {
    listen 80;
    server_name discuz.com;

    location / {
        root /code/discuz/upload;
        index index.php;
        rewrite ^([^\.]*)/topic-(.+)\.html$ $1/portal.php?mod=topic&topic=$2 last;
        rewrite ^([^\.]*)/article-([0-9]+)-([0-9]+)\.html$ $1/portal.php?mod=view&aid=$2&page=$3 last;
        rewrite ^([^\.]*)/forum-(\w+)-([0-9]+)\.html$ $1/forum.php?mod=forumdisplay&fid=$2&page=$3 last;
        rewrite ^([^\.]*)/thread-([0-9]+)-([0-9]+)-([0-9]+)\.html$ $1/forum.php?mod=viewthread&tid=$2&extra=page%3D$4&page=$3 last;
        rewrite ^([^\.]*)/group-([0-9]+)-([0-9]+)\.html$ $1/forum.php?mod=group&fid=$2&page=$3 last;
        rewrite ^([^\.]*)/space-(username|uid)-(.+)\.html$ $1/home.php?mod=space&$2=$3 last;
        rewrite ^([^\.]*)/blog-([0-9]+)-([0-9]+)\.html$ $1/home.php?mod=space&uid=$2&do=blog&id=$3 last;
        rewrite ^([^\.]*)/(fid|tid)-([0-9]+)\.html$ $1/archiver/index.php?action=$2&value=$3 last;
        rewrite ^([^\.]*)/([a-z]+[a-z0-9_]*)-([a-z0-9_\-]+)\.html$ $1/plugin.php?id=$2:$3 last;
        if (!-e $request_filename) {
            return 404;
        }
    }

    location ~* \.php$ {
        root /code/discuz/upload;
        fastcgi_pass 127.0.0.1:9000;
        fastcgi_param SCRIPT_FILENAME $document_root$fastcgi_script_name;
        include fastcgi_params;
    }
}

[root@web01 ~]# systemctl restart nginx
复制
六、rewrite规则补充
1.rewrite匹配优先级
1) 优先级
1.先执行server块的rewrite指令
2.其次执行location匹配规则
3.最后执行location中的rewrite
复制
3) 配置
server {
    listen 80;
    server_name youxianxji.com;

    rewrite (.*) http://www.baidu.com;

    location / {
    	rewrite (.*) http://www.jd.com;
    }

    location =/ {
        rewrite (.*) http://www.taobao.com;
    }
}
复制
2.rewrite的环境变量
1)$server_name
$server_name    #当前用户请求的域名

server {
        listen 80;
        server_name linux.test.com;
        rewrite ^(.*)$ https://$server_name$1;
}
复制
2)请求变量
$request_filename 请求的文件路径名(带网站的主目录/code/images/test.jpg)

$request_uri 当前请求的文件路径(不带网站的主目录/images/test.jpg)

#大多数用于http协议转gttps协议
server {
        listen 80;
        server_name linux.test.com;
        return 302 https://$server_name$request_uri;
}
复制
3)$http_host
#很古董的配置方法
server {
        listen 80;
        server_name www.baidu.com baidu.com www.baidu.cn;
        if ($http_host = baidu.com){
            rewrite (.*) http://www.baidu.com$1;
        }
}

#推荐书写格式
server {
        listen 80;
        server_name baidu.com;
        rewrite (.*) http://www.baidu.com$1;
}
server {
        listen 80;
        server_name www.baidu.com;
        location / {...}
}
复制
3.rewrite开启日志
[root@web01 ~]# vim /etc/nginx/nginx.conf
... ...
error_log  /var/log/nginx/error.log notice;
... ...
http {
    ... ...
    rewrite_log on;
    ... ...
}复制