摘要:针对疫情期间存在的排查实时性差、排查效率低、无法追踪密接者等问题,可以使用基于YOLOv4的行人检测、行人距离估计、多目标跟踪的方案进行解决。
本文分享自华为云社区《基于ModelArts进行流感患者密接排查》,作者:HWCloudAI。
目前流感病毒患者密接难以排查,尤其是在人流量大的区域,进行排查需要消耗大量人力且需要等待。针对疫情期间存在的排查实时性差、排查效率低、无法追踪密接者等问题,可以使用基于YOLOv4的行人检测、行人距离估计、多目标跟踪的方案进行解决。
1)利用行人重识别技术实现流感病毒患者及密接者识别功能;
2)结合Stereo-vision以及YOLO算法实现患者的真实密切接触鉴别;
3)利用SORT多目标跟踪算法绘制出患者及密接者的行动轨迹;
该系统可以有效提高防疫效率,减轻经济与防疫压力,提高安全性。
今天将带大家了解 通过华为云ModelArts的 DeepSocial-COVID-19社会距离监测案例实现AI排查新冠密接。
👉 点击链接进入到AI Gallery的“DeepSocial-COVID-19社会距离监测”案例页面,点击Run in ModelArts,即可进入ModelArts Jupyter运行环境,此处需要选用GPU的规格。
注:以下步骤所涉及的代码都已经写好,直接点击代码前面的箭头,让其自动运行即可。
# 下载代码和数据
import moxing as mox
mox.file.copy_parallel('obs://obs-aigallery-zc/clf/code/DeepSocial','DeepSocial')
# 引入依赖
from IPython.display import display, Javascript, Image
from base64 import b64decode, b64encode
import os
import cv2
import numpy as np
import PIL
import io
import html
import time
import matplotlib.pyplot as plt
%matplotlib inline复制
需要根据运行环境修改Makefile 如是否有GPU等
如果编译报错:/bin/sh:nvcc not found
解决方式(参考):
1)查看nvcc可执行文件的路径
which nvcc
2)修改Makefile文件中的NVCC=nvcc,把nvcc替换为上面查询到的nvcc可执行文件的路径,如:/usr/local/cuda/bin/nvcc
NVCC=/usr/local/cuda/bin/nvcc
%cd DeepSocial
!make复制
# import darknet functions to perform object detections
from darknet2 import *
# load in our YOLOv4 architecture network
network, class_names, class_colors = load_network("cfg/yolov4.cfg", "cfg/coco.data", "DeepSocial.weights")
width = network_width(network)
height = network_height(network)
# darknet helper function to run detection on image
def darknet_helper(img, width, height):
 darknet_image = make_image(width, height, 3)
 img_rgb = cv2.cvtColor(img, cv2.COLOR_BGR2RGB)
 img_resized = cv2.resize(img_rgb, (width, height),
                              interpolation=cv2.INTER_LINEAR)
  # get image ratios to convert bounding boxes to proper size
 img_height, img_width, _ = img.shape
 width_ratio = img_width/width
 height_ratio = img_height/height
  # run model on darknet style image to get detections
 copy_image_from_bytes(darknet_image, img_resized.tobytes())
  detections = detect_image(network, class_names, darknet_image)
 free_image(darknet_image)
 return detections, width_ratio, height_ratio复制
!pip install filterpy
from sort import *
mot_tracker = Sort(max_age=25, min_hits=4, iou_threshold=0.3)复制
Input            = "OxfordTownCentreDataset.avi" # 需要检测的适配
ReductionFactor = 2   # 采样因子
calibration      = [[180,162],[618,0],[552,540],[682,464]] # 相机标定的参数复制
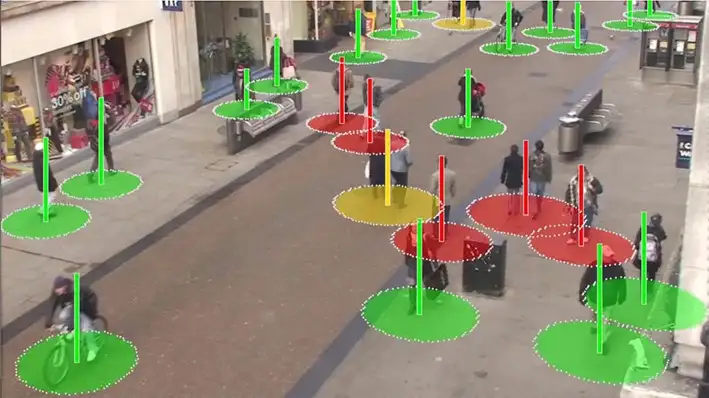
from deepsocial import *
######################## Frame number
StartFrom = 0
EndAt = 500                       #-1 for the end of the video
######################## (0:OFF/ 1:ON) Outputs
CouplesDetection = 1                # Enable Couple Detection
DTC = 1                # Detection, Tracking and Couples
SocialDistance = 1
CrowdMap = 1
# MoveMap = 0
# ViolationMap = 0
# RiskMap = 0
######################## Units are Pixel
ViolationDistForIndivisuals = 28
ViolationDistForCouples = 31
####
CircleradiusForIndivsual = 14
CircleradiusForCouples = 17
########################
MembershipDistForCouples = (16 , 10) # (Forward, Behind) per Pixel
MembershipTimeForCouples = 35        # Time for considering as a couple (per Frame)
######################## (0:OFF/ 1:ON)
CorrectionShift = 1                    # Ignore people in the margins of the video
HumanHeightLimit = 200                  # Ignore people with unusual heights
########################
Transparency        = 0.7
######################## Output Video's path
Path_For_DTC = os.getcwd() + "/DeepSOCIAL DTC.mp4"
Path_For_SocialDistance = os.getcwd() + "/DeepSOCIAL Social Distancing.mp4"
Path_For_CrowdMap = os.getcwd() + "/DeepSOCIAL Crowd Map.mp4"
def extract_humans(detections):
 detetcted = []
 if len(detections) > 0: # At least 1 detection in the image and check detection presence in a frame
 idList = []
        id = 0
 for label, confidence, bbox in detections:
 if label == 'person':
 xmin, ymin, xmax, ymax = bbox2points(bbox)
                id +=1
 if id not in idList: idList.append(id)
 detetcted.append([int(xmin), int(ymin), int(xmax), int(ymax), idList[-1]])
 return np.array(detetcted)
def centroid(detections, image, calibration, _centroid_dict, CorrectionShift, HumanHeightLimit):
    e = birds_eye(image.copy(), calibration)
 centroid_dict = dict()
 now_present = list()
 if len(detections) > 0:
 for d in detections:
            p = int(d[4])
 now_present.append(p)
 xmin, ymin, xmax, ymax = d[0], d[1], d[2], d[3]
            w = xmax - xmin
            h = ymax - ymin
            x = xmin + w/2
            y = ymax - h/2
 if h < HumanHeightLimit:
 overley = e.image
 bird_x, bird_y = e.projection_on_bird((x, ymax))
 if CorrectionShift:
 if checkupArea(overley, 1, 0.25, (x, ymin)):
 continue
 e.setImage(overley)
 center_bird_x, center_bird_y = e.projection_on_bird((x, ymin))
 centroid_dict[p] = (
 int(bird_x), int(bird_y),
 int(x), int(ymax),
 int(xmin), int(ymin), int(xmax), int(ymax),
 int(center_bird_x), int(center_bird_y))
                _centroid_dict[p] = centroid_dict[p]
 return _centroid_dict, centroid_dict, e.image
def ColorGenerator(seed=1, size=10):
 np.random.seed = seed
    color=dict()
 for i in range(size):
        h = int(np.random.uniform() *255)
        color[i]= h
 return color
def VisualiseResult(_Map, e):
    Map = np.uint8(_Map)
 histMap = e.convrt2Image(Map)
 visualBird = cv2.applyColorMap(np.uint8(_Map), cv2.COLORMAP_JET)
 visualMap = e.convrt2Image(visualBird)
 visualShow = cv2.addWeighted(e.original, 0.7, visualMap, 1 - 0.7, 0)
 return visualShow, visualBird, histMap复制
cap = cv2.VideoCapture(Input)
frame_width = int(cap.get(3))
frame_height = int(cap.get(4))
height, width = frame_height // ReductionFactor, frame_width // ReductionFactor
print("Video Reolution: ",(width, height))
if DTC: DTCVid = cv2.VideoWriter(Path_For_DTC, cv2.VideoWriter_fourcc(*'X264'), 30.0, (width, height))
if SocialDistance: SDimageVid = cv2.VideoWriter(Path_For_SocialDistance, cv2.VideoWriter_fourcc(*'X264'), 30.0, (width, height))
if CrowdMap: CrowdVid = cv2.VideoWriter(Path_For_CrowdMap, cv2.VideoWriter_fourcc(*'X264'), 30.0, (width, height))
colorPool = ColorGenerator(size = 3000)
_centroid_dict = dict()
_numberOFpeople = list()
_greenZone = list()
_redZone = list()
_yellowZone = list()
_final_redZone = list()
_relation = dict()
_couples = dict()
_trackMap = np.zeros((height, width, 3), dtype=np.uint8)
_crowdMap = np.zeros((height, width), dtype=np.int)
_allPeople = 0
_counter = 1
frame = 0
while True:
 print('-- Frame : {}'.format(frame))
 prev_time = time.time()
    ret, frame_read = cap.read()
 if not ret: break
    frame += 1
 if frame <= StartFrom: continue
 if frame != -1:
 if frame > EndAt: break
 frame_resized = cv2.resize(frame_read,(width, height), interpolation=cv2.INTER_LINEAR)
    image = frame_resized
    e = birds_eye(image, calibration)
    detections, width_ratio, height_ratio = darknet_helper(image, width, height)
    humans = extract_humans(detections)
 track_bbs_ids = mot_tracker.update(humans) if len(humans) != 0 else humans
    _centroid_dict, centroid_dict, partImage = centroid(track_bbs_ids, image, calibration, _centroid_dict, CorrectionShift, HumanHeightLimit)
 redZone, greenZone = find_zone(centroid_dict, _greenZone, _redZone, criteria=ViolationDistForIndivisuals)
 if CouplesDetection:
        _relation, relation = find_relation(e, centroid_dict, MembershipDistForCouples, redZone, _couples, _relation)
        _couples, couples, coupleZone = find_couples(image, _centroid_dict, relation, MembershipTimeForCouples, _couples)
 yellowZone, final_redZone, redGroups = find_redGroups(image, centroid_dict, calibration, ViolationDistForCouples, redZone, coupleZone, couples , _yellowZone, _final_redZone)
 else:
        couples = []
 coupleZone = []
 yellowZone = []
 redGroups = redZone
 final_redZone = redZone
 if DTC:
 DTC_image = image.copy()
        _trackMap = Apply_trackmap(centroid_dict, _trackMap, colorPool, 3)
 DTC_image = cv2.add(e.convrt2Image(_trackMap), image)
 DTCShow = DTC_image
 for id, box in centroid_dict.items():
 center_bird = box[0], box[1]
 if not id in coupleZone:
                cv2.rectangle(DTCShow,(box[4], box[5]),(box[6], box[7]),(0,255,0),2)
                cv2.rectangle(DTCShow,(box[4], box[5]-13),(box[4]+len(str(id))*10, box[5]),(0,200,255),-1)
                cv2.putText(DTCShow,str(id),(box[4]+2, box[5]-2),cv2.FONT_HERSHEY_SIMPLEX,.4,(0,0,0),1,cv2.LINE_AA)
 for coupled in couples:
            p1 , p2 = coupled
 couplesID = couples[coupled]['id']
 couplesBox = couples[coupled]['box']
            cv2.rectangle(DTCShow, couplesBox[2:4], couplesBox[4:], (0,150,255), 4)
            loc = couplesBox[0] , couplesBox[3]
            offset = len(str(couplesID)*5)
 captionBox = (loc[0] - offset, loc[1]-13), (loc[0] + offset, loc[1])
            cv2.rectangle(DTCShow,captionBox[0],captionBox[1],(0,200,255),-1)
 wc = captionBox[1][0] - captionBox[0][0]
 hc = captionBox[1][1] - captionBox[0][1]
            cx = captionBox[0][0] + wc // 2
            cy = captionBox[0][1] + hc // 2
 textLoc = (cx - offset, cy + 4)
            cv2.putText(DTCShow, str(couplesID) ,(textLoc),cv2.FONT_HERSHEY_SIMPLEX,.4,(0,0,0),1,cv2.LINE_AA)
 DTCVid.write(DTCShow)
 if SocialDistance:
 SDimage, birdSDimage = Apply_ellipticBound(centroid_dict, image, calibration, redZone, greenZone, yellowZone, final_redZone, coupleZone, couples, CircleradiusForIndivsual, CircleradiusForCouples)
 SDimageVid.write(SDimage)
 if CrowdMap:
        _crowdMap, crowdMap = Apply_crowdMap(centroid_dict, image, _crowdMap)
        crowd = (crowdMap - crowdMap.min()) / (crowdMap.max() - crowdMap.min())*255
 crowd_visualShow, crowd_visualBird, crowd_histMap = VisualiseResult(crowd, e)
 CrowdVid.write(crowd_visualShow)
    cv2.waitKey(3)
print('::: Analysis Completed')
cap.release()
if DTC: DTCVid.release(); print("::: Video Write Completed : ", Path_For_DTC)
if SocialDistance: SDimageVid.release() ; print("::: Video Write Completed : ", Path_For_SocialDistance)
if CrowdMap: CrowdVid.release() ; print("::: Video Write Completed : ", Path_For_CrowdMap)复制
from IPython.display import HTML
outpath = "DeepSOCIAL DTC.mp4"
mp4 = open(outpath,'rb').read()
data_url = "data:video/mp4;base64," + b64encode(mp4).decode()
HTML("""
<video width=400 controls>
 <source src="%s" type="video/mp4">
</video>
""" % data_url)复制
<iframe src="https://obs-aigallery-zc.obs.cn-north-4.myhuaweicloud.com/clf/code/DeepSocial/DeepSOCIAL%20DTC.mp4" scrolling="no" border="0" frameborder="no" framespacing="0" allowfullscreen="true" height=450 width=800> </iframe> <iframe src="https://obs-aigallery-zc.obs.cn-north-4.myhuaweicloud.com/clf/code/DeepSocial/DeepSOCIAL%20Social%20Distancing.mp4" scrolling="no" border="0" frameborder="no" framespacing="0" allowfullscreen="true" height=450 width=800> </iframe>
1.使用精确度更高的检测算法YOLOv7,使用追踪效果更好的Deep SORT;
2.使用更多数据进行训练
本次介绍就到这里啦,大家快去Gallery实操一下吧!
借助ModelArts提供的AI开发能力,实现基于LangChain+ChatGLM3的本地知识库问答,通过具体案例让开发者更加清晰的了解大模型AI应用开发过程。