感觉和放到一个 yaml 文件中,用 ---- 分隔,操作繁琐程度上,没有太大区别
# 创建自定义的 chart 名为 mychart
[root@k8smaster ~]# helm create mychart
Creating mychart
[root@k8smaster ~]# cd mychart/
[root@k8smaster mychart]# ls
charts
Chart.yaml  # 当前chart 属性配置信息
templates   # 编写 yaml 文件放到这个目录,是 yaml 的集合
values.yaml # yaml文件可以使用的全局变量
[root@k8smaster mychart]#
在 templates 文件夹中创建两个 yaml 文件
apiVersion: apps/v1
kind: Deployment
metadata:
  creationTimestamp: null
  labels:
    app: web1
  name: web1
spec:
  replicas: 1
  selector:
    matchLabels:
      app: web1
  strategy: {}
  template:
    metadata:
      creationTimestamp: null
      labels:
        app: web1
    spec:
      containers:
      - image: nginx
        name: nginx
        resources: {}
status: {}
apiVersion: v1
kind: Service
metadata:
  creationTimestamp: null
  labels:
    app: web1
  name: web1
spec:
  ports:
  - port: 80
    protocol: TCP
    targetPort: 80
    nodePort: 30390  # 可以指定暴露出去的端口,防止重启 Pod 后发生变化
  selector:
    app: web1
  type: NodePort
status:
  loadBalancer: {}
# 切换到 templates 目录下
[root@k8smaster mychart]# cd templates/
# 创建一个web1应用--内容见上文
[root@k8smaster templates]# vi deployment.yaml
# 暴露端口--内容见上文
[root@k8smaster templates]# vi service.yaml
[root@k8smaster templates]#
[root@k8smaster ~]# helm install web1 mychart/
NAME: web1
LAST DEPLOYED: Mon Nov 28 14:26:34 2022
NAMESPACE: default
STATUS: deployed
REVISION: 1
NOTES:
1. Get the application URL by running these commands:
export POD_NAME=$(kubectl get pods --namespace default -l "app.kubernetes.io/name=mychart,app.kubernetes.io/instance=web1" -o jsonpath="{.items[0].metadata.name}")
echo "Visit http://127.0.0.1:8080 to use your application"
kubectl --namespace default port-forward $POD_NAME 8080:80
[root@k8smaster ~]# helm list
NAME NAMESPACE REVISION UPDATED STATUS CHART APP VERSION
ui default 1 2022-11-28 13:15:05.404335352 +0800 CST deployed weave-scope-1.1.12 1.12.0
web1 default 1 2022-11-28 14:26:34.854631893 +0800 CST deployed mychart-0.1.0 1.16.0
[root@k8smaster ~]# kubectl get pod,svc
NAME READY STATUS RESTARTS AGE
pod/nginx-f89759699-652r4 1/1 Running 0 5d
pod/nginx-nfs-788564fbc8-g58xd 1/1 Running 0 5d
pod/weave-scope-agent-ui-7qqd4 1/1 Running 0 73m
pod/weave-scope-agent-ui-knqwk 1/1 Running 0 73m
pod/weave-scope-agent-ui-r74cm 1/1 Running 0 73m
pod/weave-scope-agent-ui-xnrht 1/1 Running 0 73m
pod/weave-scope-cluster-agent-ui-7498b8d4f4-pmkzh 1/1 Running 0 73m
pod/weave-scope-frontend-ui-649c7dcd5d-jfg72 1/1 Running 0 73m
pod/web1-7f87dfbd56-w7p4d 1/1 Running 0 91s
NAME TYPE CLUSTER-IP EXTERNAL-IP PORT(S) AGE
service/javademo1 NodePort 10.106.43.46 <none> 8111:31452/TCP 40d
service/kubernetes ClusterIP 10.96.0.1 <none> 443/TCP 45d
service/nginx NodePort 10.103.87.81 <none> 80:30339/TCP 45d
service/nginx-nfs NodePort 10.99.84.9 <none> 80:30205/TCP 19d
service/ui-weave-scope NodePort 10.101.4.212 <none> 80:30690/TCP 73m
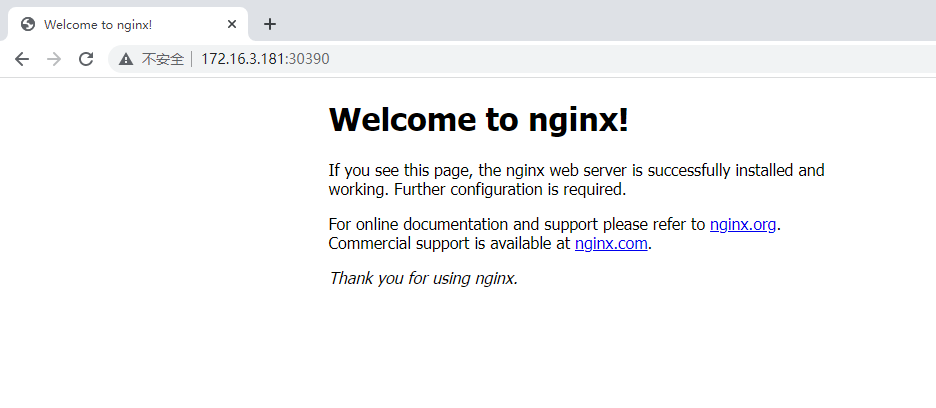
service/web1 NodePort 10.100.238.141 <none> 80:30390/TCP 91s
[root@k8smaster ~]#
[root@k8smaster ~]# helm upgrade web1 mychart/
Release "web1" has been upgraded. Happy Helming!
NAME: web1
LAST DEPLOYED: Mon Nov 28 14:29:39 2022
NAMESPACE: default
STATUS: deployed
REVISION: 2
NOTES:
1. Get the application URL by running these commands:
  export POD_NAME=$(kubectl get pods --namespace default -l "app.kubernetes.io/name=mychart,app.kubernetes.io/instance=web1" -o jsonpath="{.items[0].metadata.name}")
  echo "Visit http://127.0.0.1:8080 to use your application"
  kubectl --namespace default port-forward $POD_NAME 8080:80
[root@k8smaster ~]#
通过传递参数,动态渲染模板 yaml 内容,动态传入参数生成
在 chart values.yaml 文件,定义 yaml 文件全局变量
在 values.yaml 定义变量和值
在具体 yaml文件中,获取定义变量的值
[root@k8smaster ~]# cd mychart/
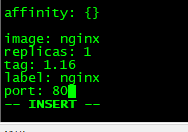
[root@k8smaster mychart]# vi values.yaml
image: nginx
replicas: 1
tag: 1.16
label: nginx
port: 80
方便统一定义
{{ .Values.变量名称}}
{{ .Release.Name}} -> 获取版本名称
apiVersion: apps/v1
kind: Deployment
metadata:
  name: {{ .Release.Name}}-deploy
spec:
  replicas: 1
  selector:
    matchLabels:
      app: {{ .Values.label}}
  strategy: {}
  template:
    metadata:
      creationTimestamp: null
      labels:
        app: {{ .Values.label}}
    spec:
      containers:
      - image: {{ .Values.image}}
        name: nginx
        resources: {}
status: {}
apiVersion: v1
kind: Service
metadata:
  name: {{ .Release.Name}}-deploy
spec:
  ports:
  - port: {{ .Values.port}}
    protocol: TCP
    targetPort: 80
  selector:
    app: {{ .Values.label}}
  type: NodePort
status:
  loadBalancer: {}
[root@k8smaster mychart]# vi templates/deployment.yaml
[root@k8smaster mychart]# vi templates/deployment.yaml
[root@k8smaster mychart]# cd
[root@k8smaster ~]# helm install --dry-run web2 mychart/
# Source: mychart/templates/service.yaml
apiVersion: v1
kind: Service
metadata:
  name: web2-deploy
spec:
  ports:
  - port: 80
    protocol: TCP
    targetPort: 80
  selector:
    app: nginx
  type: NodePort
status:
  loadBalancer: {}
---
# Source: mychart/templates/deployment.yaml
apiVersion: apps/v1
kind: Deployment
metadata:
  name: web2-deploy
spec:
  replicas: 1
  selector:
    matchLabels:
      app: nginx
  strategy: {}
  template:
    metadata:
      creationTimestamp: null
      labels:
        app: nginx
    spec:
      containers:
      - image: nginx
        name: nginx
        resources: {}
status: {}
[root@k8smaster ~]# helm install web2 mychart/
NAME: web2
LAST DEPLOYED: Mon Nov 28 15:13:48 2022
NAMESPACE: default
STATUS: deployed
REVISION: 1
[root@k8smaster ~]# kubectl get pod,svc
NAME                                                READY   STATUS    RESTARTS   AGE
pod/nginx-f89759699-652r4                           1/1     Running   0          5d1h
pod/nginx-nfs-788564fbc8-g58xd                      1/1     Running   0          5d1h
pod/weave-scope-agent-ui-7qqd4                      1/1     Running   0          119m
pod/weave-scope-agent-ui-knqwk                      1/1     Running   0          119m
pod/weave-scope-agent-ui-r74cm                      1/1     Running   0          119m
pod/weave-scope-agent-ui-xnrht                      1/1     Running   0          119m
pod/weave-scope-cluster-agent-ui-7498b8d4f4-pmkzh   1/1     Running   0          119m
pod/weave-scope-frontend-ui-649c7dcd5d-jfg72        1/1     Running   0          119m
pod/web1-7f87dfbd56-w7p4d                           1/1     Running   0          47m
pod/web2-deploy-f89759699-9z5n4                     1/1     Running   0          22s

NAME                     TYPE        CLUSTER-IP       EXTERNAL-IP   PORT(S)          AGE
service/javademo1        NodePort    10.106.43.46     <none>        8111:31452/TCP   40d
service/kubernetes       ClusterIP   10.96.0.1        <none>        443/TCP          45d
service/nginx            NodePort    10.103.87.81     <none>        80:30339/TCP     45d
service/nginx-nfs        NodePort    10.99.84.9       <none>        80:30205/TCP     19d
service/ui-weave-scope   NodePort    10.101.4.212     <none>        80:30690/TCP     119m
service/web1             NodePort    10.100.238.141   <none>        80:30390/TCP     47m
service/web2-deploy      NodePort    10.111.219.124   <none>        80:30277/TCP     22s
[root@k8smaster ~]# helm uninstall web2
release "web2" uninstalled