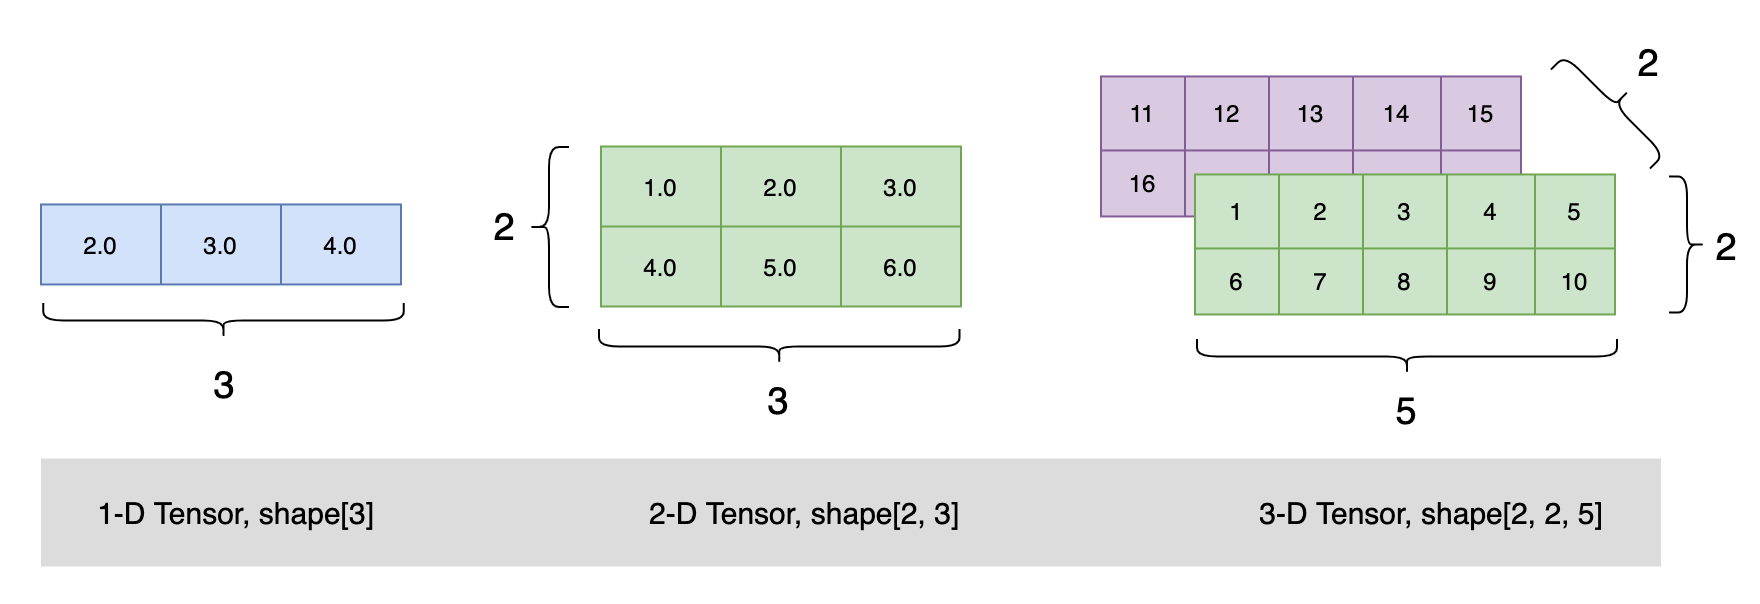
张量(Tensor)、标量(scalar)、向量(vector)、矩阵(matrix)
飞桨 使用张量(Tensor) 来表示神经网络中传递的数据,Tensor 可以理解为多维数组,类似于 Numpy 数组(ndarray) 的概念。与 Numpy 数组相比,Tensor 除了支持运行在 CPU 上,还支持运行在 GPU 及各种 AI 芯片上,以实现计算加速;此外,飞桨基于 Tensor,实现了深度学习所必须的反向传播功能和多种多样的组网算子,从而可更快捷地实现深度学习组网与训练等功能。
Tensor 必须形如矩形,即在任何一个维度上,元素的数量必须相等,否则会抛出异常
import paddle

# 创建类似向量(vector)的 1 维 Tensor:
ndim_1_Tensor = paddle.to_tensor([2.0, 3.0, 4.0])
print(ndim_1_Tensor)

# 创建类似矩阵(matrix)的 2 维 Tensor:
ndim_2_Tensor = paddle.to_tensor([[1.0, 2.0, 3.0],
                                  [4.0, 5.0, 6.0]])
print(ndim_2_Tensor)

# 创建 3 维 Tensor:
ndim_3_Tensor = paddle.to_tensor([[[1, 2, 3, 4, 5],
                                   [6, 7, 8, 9, 10]],
                                  [[11, 12, 13, 14, 15],
                                   [16, 17, 18, 19, 20]]])
print(ndim_3_Tensor)
复制
输出
"D:\Program Files\Python38\python.exe" D:/OpenSource/PaddlePaddle/Tensor.py
Tensor(shape=[3], dtype=float32, place=Place(cpu), stop_gradient=True,
       [2., 3., 4.])
Tensor(shape=[2, 3], dtype=float32, place=Place(cpu), stop_gradient=True,
       [[1., 2., 3.],
        [4., 5., 6.]])
Tensor(shape=[2, 2, 5], dtype=int64, place=Place(cpu), stop_gradient=True,
       [[[1 , 2 , 3 , 4 , 5 ],
         [6 , 7 , 8 , 9 , 10]],

        [[11, 12, 13, 14, 15],
         [16, 17, 18, 19, 20]]])

Process finished with exit code 0
复制
paddle.zeros([m, n])             # 创建数据全为 0,形状为 [m, n] 的 Tensor
paddle.ones([m, n])              # 创建数据全为 1,形状为 [m, n] 的 Tensor
paddle.full([m, n], 10)          # 创建数据全为 10,形状为 [m, n] 的 Tensor
复制
paddle.ones([2,3])
输出
Tensor(shape=[2, 3], dtype=float32, place=Place(gpu:0), stop_gradient=True,
       [[1., 1., 1.],
        [1., 1., 1.]])
复制如果要在指定区间内创建 Tensor,可以使用paddle.arange、 paddle.linspace 实现。
paddle.arange(start, end, step)  # 创建以步长 step 均匀分隔区间[start, end)的 Tensor
paddle.linspace(start, stop, num) # 创建以元素个数 num 均匀分隔区间[start, stop)的 Tensor
复制paddle.arange(start=1, end=5, step=1)
复制输出
Tensor(shape=[4], dtype=int64, place=Place(gpu:0), stop_gradient=True,
       [1, 2, 3, 4])
复制在常见深度学习任务中,数据样本可能是图片(image)、文本(text)、语音(audio)等多种类型,在送入神经网络训练或推理前,这些数据和对应的标签均需要创建为 Tensor。以下是图像场景和 NLP 场景中手动转换 Tensor 方法的介绍。
import numpy as np
from PIL import Image
import paddle.vision.transforms as T
import paddle.vision.transforms.functional as F

fake_img = Image.fromarray((np.random.rand(224, 224, 3) * 255.).astype(np.uint8)) # 创建随机图片
transform = T.ToTensor()
tensor = transform(fake_img) # 使用 ToTensor()将图片转换为 Tensor
print(tensor)
复制除了手动创建 Tensor 外,实际在飞桨框架中有一些 API 封装了 Tensor 创建的操作,从而无需用户手动创建 Tensor。例如 paddle.io.DataLoader 能够基于原始 Dataset,返回读取 Dataset 数据的迭代器,迭代器返回的数据中的每个元素都是一个 Tensor。另外在一些高层 API,如 paddle.Model.fit 、paddle.Model.predict ,如果传入的数据不是 Tensor,会自动转为 Tensor 再进行模型训练或推理。
paddle.Model.fit、paddle.Model.predict 等高层 API 支持传入 Dataset 或 DataLoader,如果传入的是 Dataset,那么会用 DataLoader 封装转为 Tensor 数据;如果传入的是 DataLoader,则直接从 DataLoader 迭代读取 Tensor 数据送入模型训练或推理。因此即使没有写将数据转为 Tensor 的代码,也能正常执行,提升了编程效率和容错性。
以下示例代码中,分别打印了原始数据集的数据,和送入 DataLoader 后返回的数据,可以看到数据结构由 Python list 转为了 Tensor。
import paddle

from paddle.vision.transforms import Compose, Normalize

transform = Compose([Normalize(mean=[127.5],
                               std=[127.5],
                               data_format='CHW')])

test_dataset = paddle.vision.datasets.MNIST(mode='test', transform=transform)
print(test_dataset[0][1]) # 打印原始数据集的第一个数据的 label
loader = paddle.io.DataLoader(test_dataset)
for data in enumerate(loader):
    x, label = data[1]
    print(label) # 打印由 DataLoader 返回的迭代器中的第一个数据的 label
    break
复制在前文中,可以看到打印 Tensor 时有 shape、dtype、place 等信息,这些都是 Tensor 的重要属性,想要了解如何操作 Tensor 需要对其属性有一定了解,接下来分别展开介绍 Tensor 的属性相关概念。
Tensor(shape=[3], dtype=float32, place=Place(gpu:0), stop_gradient=True,
       [2., 3., 4.])
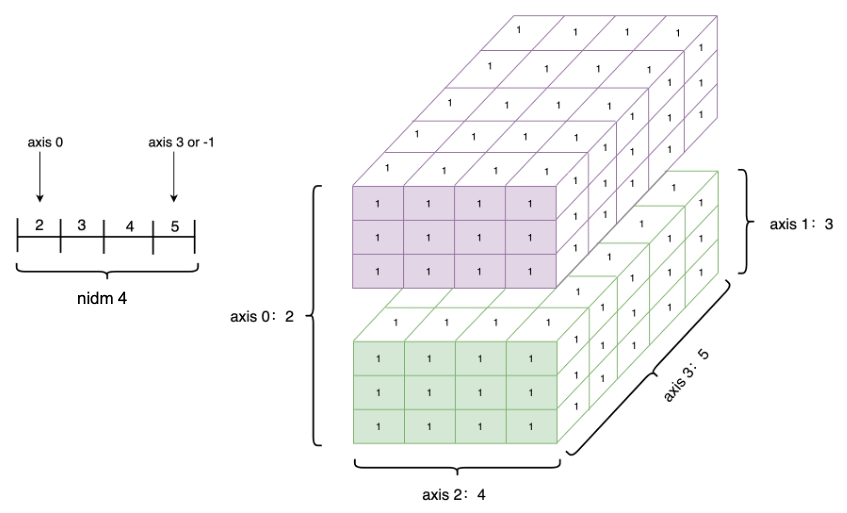
复制形状是 Tensor 的一个重要的基础属性,可以通过 Tensor.shape 查看一个 Tensor 的形状,以下为相关概念:
创建 1 个四维 Tensor ,并通过图形来直观表达以上几个概念之间的关系:
ndim_4_Tensor = paddle.ones([2, 3, 4, 5])
print("Data Type of every element:", ndim_4_Tensor.dtype)
print("Number of dimensions:", ndim_4_Tensor.ndim)
print("Shape of Tensor:", ndim_4_Tensor.shape)
print("Elements number along axis 0 of Tensor:", ndim_4_Tensor.shape[0])
print("Elements number along the last axis of Tensor:", ndim_4_Tensor.shape[-1])

复制
重新设置 Tensor 的 shape 在深度学习任务中比较常见,如一些计算类 API 会对输入数据有特定的形状要求,这时可通过 paddle.reshape 接口来改变 Tensor 的 shape,但并不改变 Tensor 的 size 和其中的元素数据。
以下示例代码中,创建 1 个 shape=[3] 的一维 Tensor,使用 reshape 功能将该 Tensor 重置为 shape=[1, 3] 的二维 Tensor。这种做法经常用在把一维的标签(label)数据扩展为二维,由于飞桨框架中神经网络通常需要传入一个 batch 的数据进行计算,因此可将数据增加一个 batch 维,方便后面的数据计算。
ndim_1_Tensor = paddle.to_tensor([1, 2, 3])
print("the shape of ndim_1_Tensor:", ndim_1_Tensor.shape)

reshape_Tensor = paddle.reshape(ndim_1_Tensor, [1, 3])
print("After reshape:", reshape_Tensor.shape)
复制
在指定新的 shape 时存在一些技巧:
origin:[3, 2, 5] reshape:[3, 10]      actual: [3, 10] # 直接指定目标 shape
origin:[3, 2, 5] reshape:[-1]         actual: [30] # 转换为 1 维,维度根据元素总数推断出来是 3*2*5=30
origin:[3, 2, 5] reshape:[-1, 5]      actual: [6, 5] # 转换为 2 维,固定一个维度 5,另一个维度根据元素总数推断出来是 30÷5=6
origin:[3, 2, 5] reshape:[0, -1]         actual: [3, 6] # reshape:[0, -1]中 0 的索引值为 0,按照规则,转换后第 0 维的元素数量与原始 Tensor 第 0 维的元素数量相同,为 3;第 1 维的元素数量根据元素总值计算得出为 30÷3=10。
origin:[3, 2] reshape:[3, 1, 0]          error: # reshape:[3, 1, 0]中 0 的索引值为 2,但原 Tensor 只有 2 维,无法找到与第 3 维对应的元素数量,因此出错。

复制飞桨框架的 API 有原位(Inplace)操作和非原位操作之分,原位操作即在原 Tensor 上保存操作结果,输出 Tensor 将与输入 Tensor 共享数据,并且没有 Tensor 数据拷贝的过程。非原位操作则不会修改原 Tensor,而是返回一个新的 Tensor。通过 API 名称区分两者,如 paddle.reshape 是非原位操作,paddle.reshape_ 是原位操作。
Tensor 的数据类型 dtype 可以通过 Tensor.dtype 查看,支持类型包括:bool、float16、float32、float64、uint8、int8、int16、int32、int64、complex64、complex128。
同一 Tensor 中所有元素的数据类型均相同,通常通过如下方式指定:
飞桨框架提供了paddle.cast 接口来改变 Tensor 的 dtype:
float32_Tensor = paddle.to_tensor(1.0)

float64_Tensor = paddle.cast(float32_Tensor, dtype='float64')
print("Tensor after cast to float64:", float64_Tensor.dtype)

int64_Tensor = paddle.cast(float32_Tensor, dtype='int64')
print("Tensor after cast to int64:", int64_Tensor.dtype)
复制索引或切片的第一个值对应第 0 维,第二个值对应第 1 维,依次类推,如果某个维度上未指定索引,则默认为 :
Python Numpy 切片
import paddle

# 创建 3 维 Tensor:
ndim_3_Tensor = paddle.to_tensor([[[[1, 2, 3, 4, 5],
                                    [6, 7, 8, 9, 10],
                                    [11, 12, 13, 14, 15]],
                                   [[21, 22, 23, 24, 25],
                                    [26, 27, 28, 29, 30],
                                    [31, 32, 33, 34, 35]]],

                                  [[[1, 2, 3, 4, 5],
                                    [6, 7, 8, 9, 10],
                                    [11, 12, 13, 14, 15]],
                                   [[29, 22, 23, 24, 25],
                                    [26, 57, 28, 29, 30],
                                    [31, 32, 33, 34, 59]]]])


print("Origin Tensor:", ndim_3_Tensor.ndim)
print("Tensor Shape:", ndim_3_Tensor.shape) # [2, 2, 3, 5]
print("Slice:", ndim_3_Tensor[1, 1, 2, 4].numpy()) # 对应 shape


print("First row:", ndim_3_Tensor[0].numpy())
print("First row:", ndim_3_Tensor[1, 1, 2, 4].numpy())
print("First column:", ndim_3_Tensor[:, 0].numpy())
print("Last column:", ndim_3_Tensor[:, -1].numpy())
print("All element:", ndim_3_Tensor[:].numpy())
print("First row and second column:", ndim_3_Tensor[1, 0].numpy())
复制