ctx[@"NativeMethod"] = ^(NSString *name) {
    // do something
    return someResult
}复制
// 创建一个ctx的JS上下文
JSContent *ctx = [[JSContent alloc] init];
// 创建一个变量name
[ctx evaluateScript:@"var name = 'jack'"];
// 创建一个方法
[ctx evaluateScript:@"var sayHi = function(name) { return 'hello ' + name }"];


// 通过ctx上下文对象,获取到hello方法
JSValue *sayHiUnction = ctx[@"sayHi"];
// 运行js方法
JSValue *greetings = [sayHiUnction callWithArguments:@[@"jack"]; // hello jack复制
ReactNative核心知识
// RCTRootView.m
- (void)javaScriptDidLoad:(NSNotification *)notification
{
  RCTAssertMainQueue();
  RCTBridge *bridge = notification.userInfo[@"bridge"];
  if (bridge != _contentView.bridge) {
    [self bundleFinishedLoading:bridge];
  }
}

- (void)bundleFinishedLoading:(RCTBridge *)bridge
{
  // 省略创建RCTRootContentView...

  [self runApplication:bridge];

  // 省略添加一个RCTRootContentView...
}

- (void)runApplication:(RCTBridge *)bridge
{
  NSString *moduleName = _moduleName ?: @""; // 这里是@"NewProject"
  NSDictionary *appParameters = @{
    @"rootTag": _contentView.reactTag,
    @"initialProps": _appProperties ?: @{},
  };

  [bridge enqueueJSCall:@"AppRegistry"                 method:@"runApplication"                   args:@[moduleName, appParameters]
             completion:NULL];
}复制

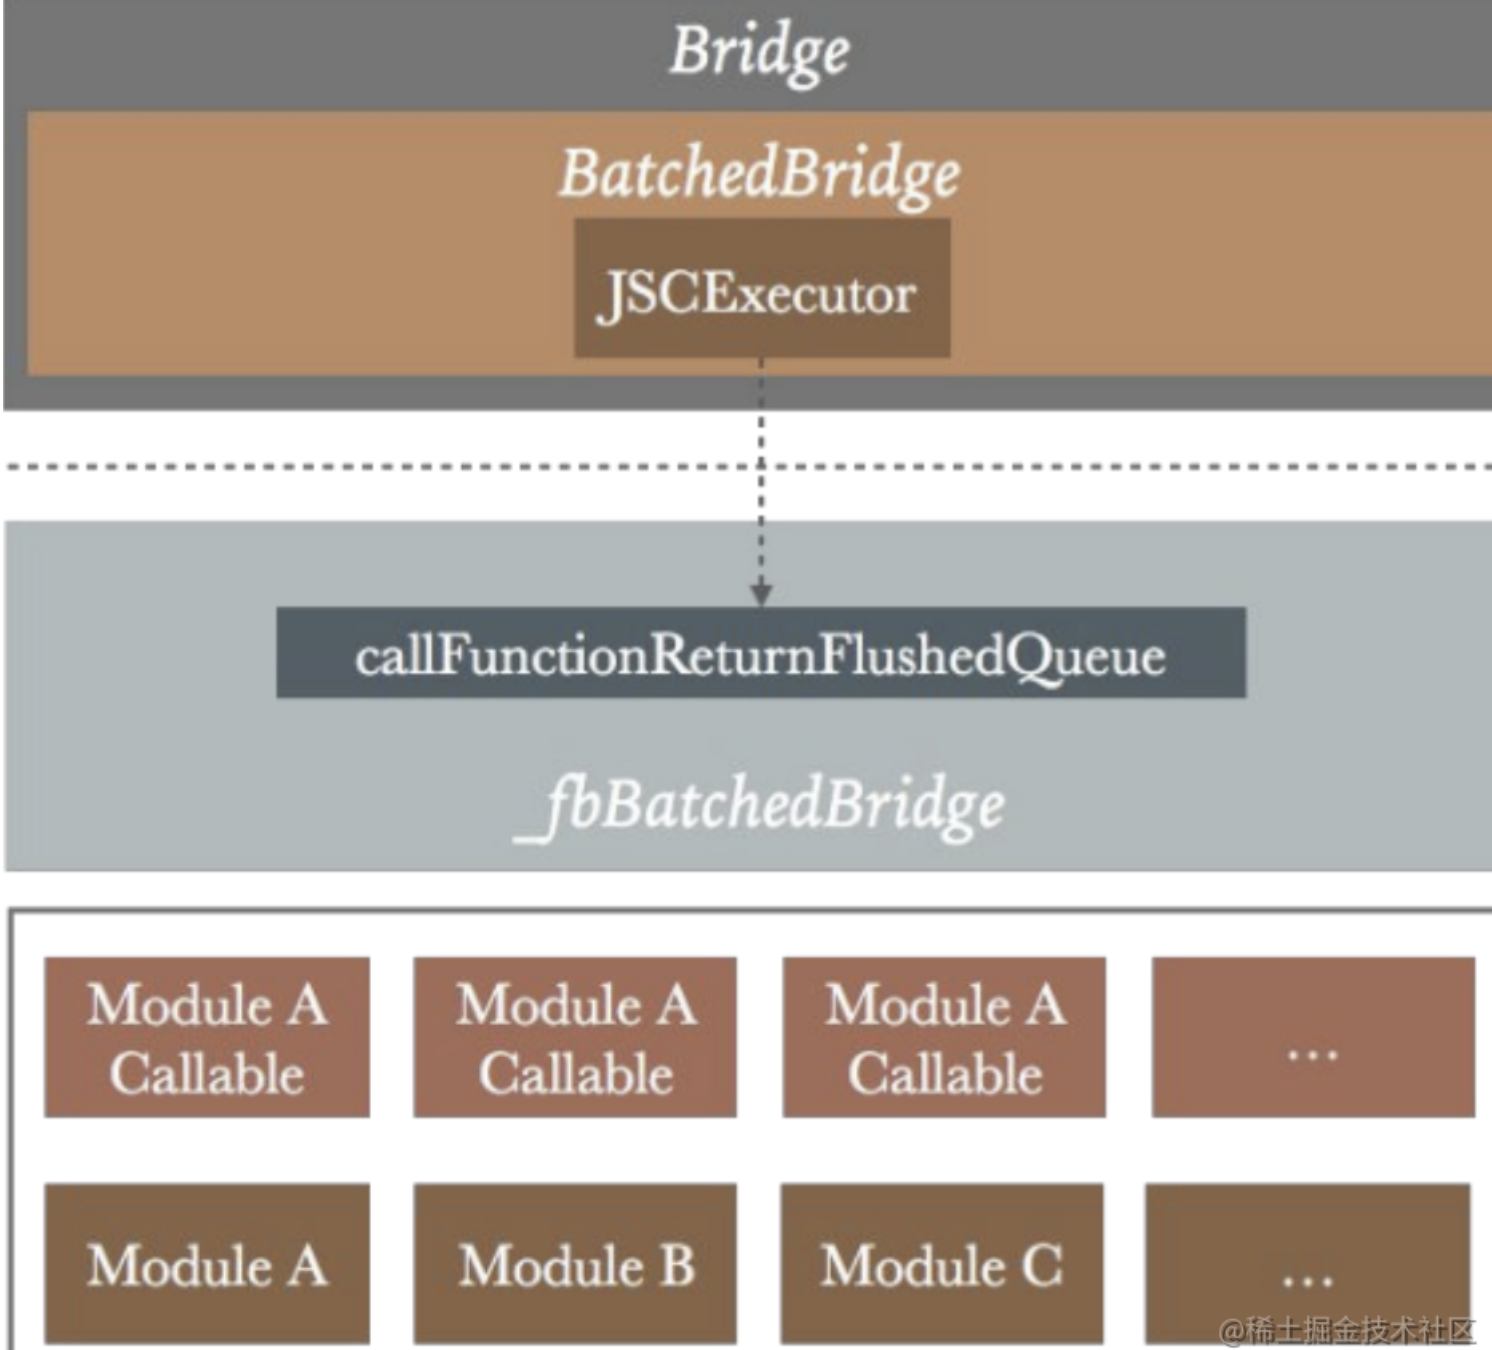
void JSIExecutor::bindBridge() {
  std::call_once(bindFlag_, [this] {
    SystraceSection s("JSIExecutor::bindBridge (once)");
    Value batchedBridgeValue =
        runtime_->global().getProperty(*runtime_, "__fbBatchedBridge");
    if (batchedBridgeValue.isUndefined() || !batchedBridgeValue.isObject()) {
      throw JSINativeException(
          "Could not get BatchedBridge, make sure your bundle is packaged correctly");
    }

    Object batchedBridge = batchedBridgeValue.asObject(*runtime_);
    callFunctionReturnFlushedQueue_ = batchedBridge.getPropertyAsFunction(
        *runtime_, "callFunctionReturnFlushedQueue");
    invokeCallbackAndReturnFlushedQueue_ = batchedBridge.getPropertyAsFunction(
        *runtime_, "invokeCallbackAndReturnFlushedQueue");
    flushedQueue_ =
        batchedBridge.getPropertyAsFunction(*runtime_, "flushedQueue");
  });
}复制

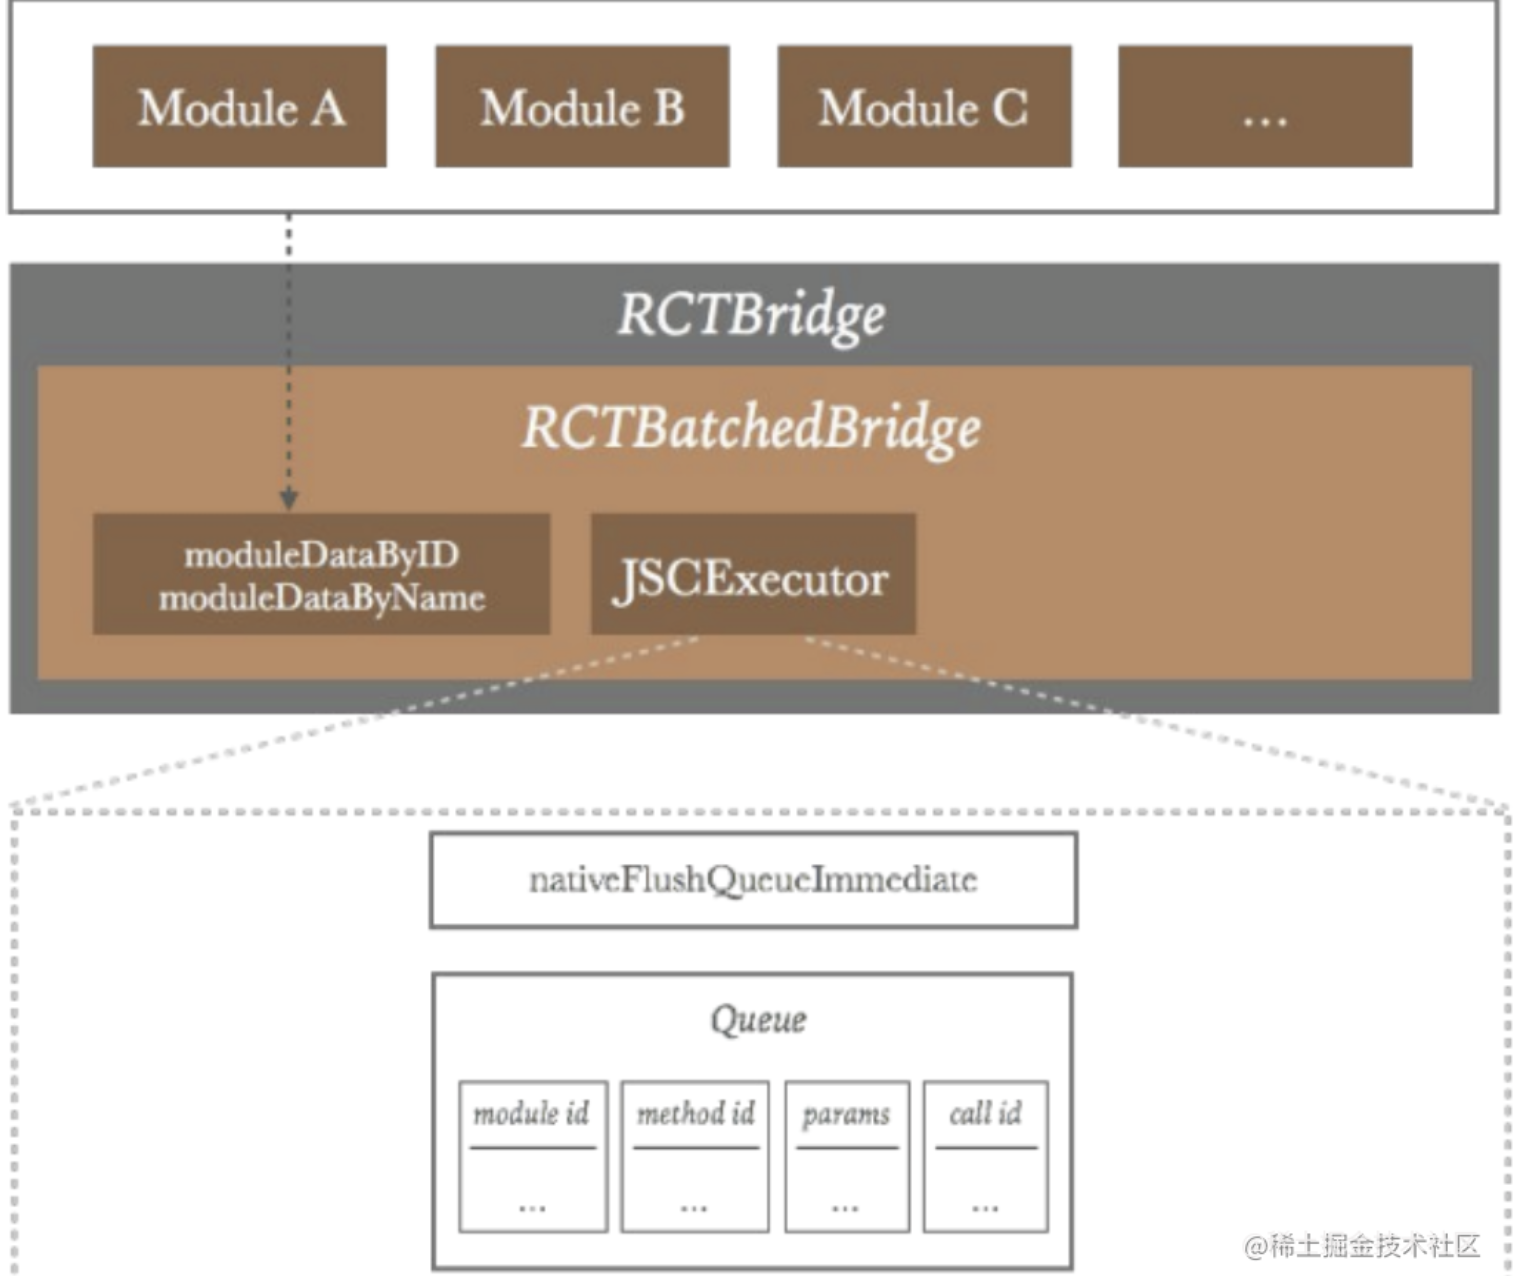
void JSIExecutor::initializeRuntime() {
  SystraceSection s("JSIExecutor::initializeRuntime");
  runtime_->global().setProperty(
      *runtime_,
      "nativeModuleProxy",
      Object::createFromHostObject(
          *runtime_, std::make_shared<NativeModuleProxy>(nativeModules_)));

  runtime_->global().setProperty(
      *runtime_,
      "nativeFlushQueueImmediate",
      Function::createFromHostFunction(
          *runtime_,
          PropNameID::forAscii(*runtime_, "nativeFlushQueueImmediate"),
          1,
          [this](
              jsi::Runtime &,
              const jsi::Value &,
              const jsi::Value *args,
              size_t count) {
            if (count != 1) {
              throw std::invalid_argument(
                  "nativeFlushQueueImmediate arg count must be 1");
            }
            callNativeModules(args[0], false);
            return Value::undefined();
          }));

  runtime_->global().setProperty(
      *runtime_,
      "nativeCallSyncHook",
      Function::createFromHostFunction(
          *runtime_,
          PropNameID::forAscii(*runtime_, "nativeCallSyncHook"),
          1,
          [this](
              jsi::Runtime &,
              const jsi::Value &,
              const jsi::Value *args,
              size_t count) { return nativeCallSyncHook(args, count); }));

  runtime_->global().setProperty(
      *runtime_,
      "globalEvalWithSourceUrl",
      Function::createFromHostFunction(
          *runtime_,
          PropNameID::forAscii(*runtime_, "globalEvalWithSourceUrl"),
          1,
          [this](
              jsi::Runtime &,
              const jsi::Value &,
              const jsi::Value *args,
              size_t count) { return globalEvalWithSourceUrl(args, count); }));

  if (runtimeInstaller_) {
    runtimeInstaller_(*runtime_);
  }
  bool hasLogger(ReactMarker::logTaggedMarker);
  if (hasLogger) {
    ReactMarker::logMarker(ReactMarker::CREATE_REACT_CONTEXT_STOP);
  }
}复制
var ele = {
    ...
    type: type, // 元素的类型
    key: key, // 元素key标示
    ref: ref, // 元素的引用
    props: props, // 元素的参数,包含children
    ...
}

// example 1
<div>hello</div>
// 会被描述为

{type: 'div',
    props: {
        children: ['hello']
    }
}

// example 2
<CustomerComponents />
// 会被描述为
{
    type: CustomerComponents
}复制
其他
- (BOOL)application:(UIApplication *)application didFinishLaunchingWithOptions:(NSDictionary *)launchOptions
{
  if (!self.bridge) {
    self.bridge = [self createBridgeWithDelegate:self launchOptions:launchOptions];
  }

  NSDictionary *initProps = [self prepareInitialProps];
  UIView *rootView = [self createRootViewWithBridge:self.bridge moduleName:self.moduleName initProps:initProps];

  if (@available(iOS 13.0, *)) {
    rootView.backgroundColor = [UIColor systemBackgroundColor];
  } else {
    rootView.backgroundColor = [UIColor whiteColor];
  }

  self.window = [[UIWindow alloc] initWithFrame:[UIScreen mainScreen].bounds];
  UIViewController *rootViewController = [self createRootViewController];
  rootViewController.view = rootView;
  self.window.rootViewController = rootViewController;
  [self.window makeKeyAndVisible];
  return YES;
}复制
- (void)setUp
{
  RCT_PROFILE_BEGIN_EVENT(0, @"-[RCTBridge setUp]", nil);

  //_performanceLogger日志工具初始化

  //_bundleURL获取

  //batchedBridge创建

  self.batchedBridge = [[bridgeClass alloc] initWithParentBridge:self];
  [self.batchedBridge start];

  RCT_PROFILE_END_EVENT(RCTProfileTagAlways, @"");
}

batchedBridge是RCTCXXBridge,它的初始化方法如下:
- (instancetype)initWithParentBridge:(RCTBridge *)bridge
{
  RCTAssertParam(bridge);

  if ((self = [super initWithDelegate:bridge.delegate
                            bundleURL:bridge.bundleURL
                       moduleProvider:bridge.moduleProvider
                        launchOptions:bridge.launchOptions])) {
    _parentBridge = bridge;
    _performanceLogger = [bridge performanceLogger];

    registerPerformanceLoggerHooks(_performanceLogger);

    /**
     * Set Initial State
     */
    _valid = YES;
    _loading = YES;
    _moduleRegistryCreated = NO;
    _pendingCalls = [NSMutableArray new];
    _displayLink = [RCTDisplayLink new];
    _moduleDataByName = [NSMutableDictionary new];
    _moduleClassesByID = [NSMutableArray new];
    _moduleDataByID = [NSMutableArray new];
    _objCModuleRegistry = [RCTModuleRegistry new];
    [_objCModuleRegistry setBridge:self];
    _bundleManager = [RCTBundleManager new];
    [_bundleManager setBridge:self];
    _viewRegistry_DEPRECATED = [RCTViewRegistry new];
    [_viewRegistry_DEPRECATED setBridge:self];
    _callableJSModules = [RCTCallableJSModules new];
    [_callableJSModules setBridge:self];

    [RCTBridge setCurrentBridge:self];

    [[NSNotificationCenter defaultCenter] addObserver:self
                                             selector:@selector(handleMemoryWarning)
                                                 name:UIApplicationDidReceiveMemoryWarningNotification
                                               object:nil];

    RCTLogSetBridgeModuleRegistry(_objCModuleRegistry);
    RCTLogSetBridgeCallableJSModules(_callableJSModules);
  }
  return self;
}


- (void)start
{
  RCT_PROFILE_BEGIN_EVENT(RCTProfileTagAlways, @"-[RCTCxxBridge start]", nil);

  [[NSNotificationCenter defaultCenter] postNotificationName:RCTJavaScriptWillStartLoadingNotification
                                                      object:_parentBridge
                                                    userInfo:@{@"bridge" : self}];

  //启动JS线程
  _jsThread = [[NSThread alloc] initWithTarget:[self class] selector:@selector(runRunLoop) object:nil];
  _jsThread.name = RCTJSThreadName;
  _jsThread.qualityOfService = NSOperationQualityOfServiceUserInteractive;
#if RCT_DEBUG
  _jsThread.stackSize *= 2;
#endif
  [_jsThread start];

  dispatch_group_t prepareBridge = dispatch_group_create();

  [_performanceLogger markStartForTag:RCTPLNativeModuleInit];

  //1.初始化Native Modules
  [self registerExtraModules];
  //2.创建Native Modules配置表
  // Initialize all native modules that cannot be loaded lazily
  (void)[self _initializeModules:RCTGetModuleClasses() withDispatchGroup:prepareBridge lazilyDiscovered:NO];
  [self registerExtraLazyModules];

  [_performanceLogger markStopForTag:RCTPLNativeModuleInit];

  // This doesnt really do anything.  The real work happens in initializeBridge.
  _reactInstance.reset(new Instance);

  __weak RCTCxxBridge *weakSelf = self;

  // 3.准备JS引擎工厂,创建JS引擎
  std::shared_ptr<JSExecutorFactory> executorFactory;
  if (!self.executorClass) {
    if ([self.delegate conformsToProtocol:@protocol(RCTCxxBridgeDelegate)]) {
      id<RCTCxxBridgeDelegate> cxxDelegate = (id<RCTCxxBridgeDelegate>)self.delegate;
      executorFactory = [cxxDelegate jsExecutorFactoryForBridge:self];
    }
    // 4.将Modules配置信息注册到JS引擎中
    if (!executorFactory) {
      auto installBindings = RCTJSIExecutorRuntimeInstaller(nullptr);
#if RCT_USE_HERMES
      executorFactory = std::make_shared<HermesExecutorFactory>(installBindings);
#else
      executorFactory = std::make_shared<JSCExecutorFactory>(installBindings);
#endif
    }
  } else {
    id<RCTJavaScriptExecutor> objcExecutor = [self moduleForClass:self.executorClass];
    executorFactory.reset(new RCTObjcExecutorFactory(objcExecutor, ^(NSError *error) {
      if (error) {
        [weakSelf handleError:error];
      }
    }));
  }

    //_turboModuleRegistry是一个TurboModule注册表,TurboModule是JS在RN中的一种优化方式,将常用的JS代码编译成可执行代码,提高执行速度。
  /**
   * id<RCTCxxBridgeDelegate> jsExecutorFactory may create and assign an id<RCTTurboModuleRegistry> object to
   * RCTCxxBridge If id<RCTTurboModuleRegistry> is assigned by this time, eagerly initialize all TurboModules
   */
  if (_turboModuleRegistry && RCTTurboModuleEagerInitEnabled()) {
    for (NSString *moduleName in [_turboModuleRegistry eagerInitModuleNames]) {
      [_turboModuleRegistry moduleForName:[moduleName UTF8String]];
    }

    for (NSString *moduleName in [_turboModuleRegistry eagerInitMainQueueModuleNames]) {
      if (RCTIsMainQueue()) {
        [_turboModuleRegistry moduleForName:[moduleName UTF8String]];
      } else {
        id<RCTTurboModuleRegistry> turboModuleRegistry = _turboModuleRegistry;
        dispatch_group_async(prepareBridge, dispatch_get_main_queue(), ^{
          [turboModuleRegistry moduleForName:[moduleName UTF8String]];
        });
      }
    }
  }

  // Dispatch the instance initialization as soon as the initial module metadata has
  // been collected (see initModules)
  dispatch_group_enter(prepareBridge);
  [self ensureOnJavaScriptThread:^{
    [weakSelf _initializeBridge:executorFactory];
    dispatch_group_leave(prepareBridge);
  }];

  // 5.加载boundle代码
  // Load the source asynchronously, then store it for later execution.
  dispatch_group_enter(prepareBridge);
  __block NSData *sourceCode;
  [self
      loadSource:^(NSError *error, RCTSource *source) {
        if (error) {
          [weakSelf handleError:error];
        }

        sourceCode = source.data;
        dispatch_group_leave(prepareBridge);
      }
      onProgress:^(RCTLoadingProgress *progressData) { }];

  // 模块和js代码加载完成后,执行js代码
  // Wait for both the modules and source code to have finished loading
  dispatch_group_notify(prepareBridge, dispatch_get_global_queue(QOS_CLASS_USER_INTERACTIVE, 0), ^{
    RCTCxxBridge *strongSelf = weakSelf;
    if (sourceCode && strongSelf.loading) {
      // 6.执行boundle代码
      [strongSelf executeSourceCode:sourceCode sync:NO];
    }
  });
  RCT_PROFILE_END_EVENT(RCTProfileTagAlways, @"");
}复制
// js thread only (which surprisingly can be the main thread, depends on used JS executor)
- (void)flushEventsQueue
{
  [_eventQueueLock lock];
  NSDictionary *events = _events;
  _events = [NSMutableDictionary new];
  NSMutableArray *eventQueue = _eventQueue;
  _eventQueue = [NSMutableArray new];
  _eventsDispatchScheduled = NO;
  [_eventQueueLock unlock];

  for (NSNumber *eventId in eventQueue) {
    [self dispatchEvent:events[eventId]];
  }
}复制
- (instancetype)initWithFrame:(CGRect)frame
                       bridge:(RCTBridge *)bridge
                     reactTag:(NSNumber *)reactTag
               sizeFlexiblity:(RCTRootViewSizeFlexibility)sizeFlexibility
{
  if ((self = [super initWithFrame:frame])) {
    _bridge = bridge;
    self.reactTag = reactTag;
    _sizeFlexibility = sizeFlexibility;
    _touchHandler = [[RCTTouchHandler alloc] initWithBridge:_bridge];
    [_touchHandler attachToView:self];
    [_bridge.uiManager registerRootView:self];
  }
  return self;
}复制
RCT_EXPORT_METHOD(createView
                  : (nonnull NSNumber *)reactTag viewName
                  : (NSString *)viewName rootTag
                  : (nonnull NSNumber *)rootTag props
                  : (NSDictionary *)props)
{
  RCTComponentData *componentData = _componentDataByName[viewName];
  if (componentData == nil) {
    RCTLogError(@"No component found for view with name \"%@\"", viewName);
  }

  // Register shadow view
  RCTShadowView *shadowView = [componentData createShadowViewWithTag:reactTag];
  if (shadowView) {
    [componentData setProps:props forShadowView:shadowView];
    _shadowViewRegistry[reactTag] = shadowView;
    RCTShadowView *rootView = _shadowViewRegistry[rootTag];
    RCTAssert(
        [rootView isKindOfClass:[RCTRootShadowView class]] || [rootView isKindOfClass:[RCTSurfaceRootShadowView class]],
        @"Given `rootTag` (%@) does not correspond to a valid root shadow view instance.",
        rootTag);
    shadowView.rootView = (RCTRootShadowView *)rootView;
  }

  // Dispatch view creation directly to the main thread instead of adding to
  // UIBlocks array. This way, it doesnt get deferred until after layout.
  __block UIView *preliminaryCreatedView = nil;

  void (^createViewBlock)(void) = ^{
    // Do nothing on the second run.
    if (preliminaryCreatedView) {
      return;
    }

    preliminaryCreatedView = [componentData createViewWithTag:reactTag rootTag:rootTag];

    if (preliminaryCreatedView) {
      self->_viewRegistry[reactTag] = preliminaryCreatedView;
    }
  };

  // We cannot guarantee that asynchronously scheduled block will be executed
  // *before* a block is added to the regular mounting process (simply because
  // mounting process can be managed externally while the main queue is
  // locked).
  // So, we positively dispatch it asynchronously and double check inside
  // the regular mounting block.

  RCTExecuteOnMainQueue(createViewBlock);

  [self addUIBlock:^(__unused RCTUIManager *uiManager, __unused NSDictionary<NSNumber *, UIView *> *viewRegistry) {
    createViewBlock();

    if (preliminaryCreatedView) {
      [componentData setProps:props forView:preliminaryCreatedView];
    }
  }];

  [self _shadowView:shadowView didReceiveUpdatedProps:[props allKeys]];
}
复制