使用ensp搭建路由拓扑,并使用ospf协议实现网络互通实操

使用,ensp,搭建,路由,拓扑,ospf,协议,实现,网络,互通 · 浏览次数 : 8

小编点评

**拓扑配置** ```                            # DeviceA Huawei>display current-configuration configuration ospf#ospf 1 area 0.0.0.0 network 192.168.0.0 0.0.0.255 area 0.0.0.1 network 192.168.1.0 0.0.0.255#return<Huawei>display current-configuration interface Ethernet 0/0/1#interface Ethernet0/0/1 ip address 192.168.1.1 255.255.255.0#return<Huawei>display current-configuration interface Ethernet 0/0/0#interface Ethernet0/0/0 ip address 192.168.0.1 255.255.255.0#return<Huawei> # DeviceB Huawei>display current-configuration configuration ospf#ospf 1 area 0.0.0.0 network 192.168.0.0 0.0.0.255#return<Huawei>display current-configuration interface Ethernet 0/0/0#interface Ethernet0/0/0 ip address 192.168.2.2 255.255.255.0#return<Huawei>display current-configuration interface Ethernet 0/0/1#interface Ethernet0/0/1 ip address 172.17.1.1 255.255.255.0#return<Huawei> # DeviceC Huawei>display current-configuration configuration ospf#ospf 1 area 0.0.0.0 network 192.168.0.0 0.0.0.255#return<Huawei>display current-configuration interface Ethernet 0/0/0#interface Ethernet0/0/0 ip address 192.168.2.3 255.255.255.0#return<Huawei>display current-configuration configuration ospf#ospf 1 area 0.0.0.0 network 192.168.1.0 0.0.0.255#return<Huawei>display current-configuration interface Ethernet 0/0/1#interface Ethernet0/0/1 ip address 172.17.1.2 255.255.255.0#return<Huawei> # DeviceD Huawei>display current-configuration configuration ospf#ospf 1 area 0.0.0.0 network 192.168.0.0 0.0.0.255#return<Huawei>display current-configuration interface Ethernet 0/0/0#interface Ethernet0/0/0 ip address 192.168.2.4 255.255.255.0#return<Huawei>display current-configuration interface Ethernet 0/0/1#interface Ethernet0/0/1 ip address 172.17.1.3 255.255.255.0#return<Huawei> # DeviceE Huawei>display current-configuration configuration ospf#ospf 1 area 0.0.0.0 network 172.16.1.0 0.0.0.255#return<Huawei>display current-configuration interface Ethernet 0/0/0#interface Ethernet0/0/0 ip address 172.16.1.2 255.255.255.0#return<Huawei>display current-configuration interface Ethernet 0/0/1#interface Ethernet0/0/1 ip address 172.16.1.1 255.255.255.0#return<Huawei> # DeviceF Huawei>display current-configuration configuration ospf#ospf 1 area 0.0.0.2 network 172.17.1.0 0.0.0.255#return<Huawei>display current-configuration interface Ethernet 0/0/0#interface Ethernet0/0/0 ip address 172.17.1.2 255.255.255.0#return<Huawei>display current-configuration interface Ethernet 0/0/1#interface Ethernet0/0/1 ip address 172.17.1.1 255.255.255.0#return<Huawei> ```

正文

转载请注明出处:

1.使用ENSP 搭建如下拓扑:


数据准备

  为完成此配置例,需准备如下的数据:

设备

Router ID

Process ID

IP地址

DeviceA

1.1.1.1

1

区域0:192.168.0.0/24

区域1:192.168.1.0/24

DeviceB

2.2.2.2

1

区域0:192.168.0.0/24

区域2:192.168.2.0/24

DeviceC

3.3.3.3

1

区域1:192.168.1.0/24、172.16.1.0/24

DeviceD

4.4.4.4

1

区域2:192.168.2.0/24、172.17.1.0/24

DeviceE

5.5.5.5

1

区域1:172.16.1.0/24

DeviceF

6.6.6.6

1

区域2:172.17.1.0/24

2.配置ospf

  DeviceA配置如下:

<Huawei>display current-configuration configuration ospf
#
ospf 1
 area 0.0.0.0
  network 192.168.0.0 0.0.0.255
 area 0.0.0.1
  network 192.168.1.0 0.0.0.255
#
return
<Huawei>display current-configuration interface Ethernet 0/0/1
#
interface Ethernet0/0/1
 ip address 192.168.1.1 255.255.255.0
#
return
<Huawei>display current-configuration interface Ethernet 0/0/0
#
interface Ethernet0/0/0
 ip address 192.168.0.1 255.255.255.0
#
return
<Huawei>

  DeviceB 配置:

<Huawei>display current-configuration configuration ospf
#
ospf 1
 area 0.0.0.0
  network 192.168.0.0 0.0.0.255
 area 0.0.0.2
  network 192.168.2.0 0.0.0.255
#
return
<Huawei>display current-configuration interface Ethernet 0/0/0
#
interface Ethernet0/0/0
 ip address 192.168.0.2 255.255.255.0
#
return
<Huawei>display current-configuration interface Ethernet 0/0/1
#
interface Ethernet0/0/1
 ip address 192.168.2.1 255.255.255.0
#
return
<Huawei>

  DeviceC 配置:

<Huawei>display current-configuration configuration ospf
#
ospf 1
 area 0.0.0.1
  network 192.168.1.0 0.0.0.255
  network 172.16.1.0 0.0.0.255
#
return
<Huawei>display current-configuration interface Ethernet 0/0/0
#
interface Ethernet0/0/0
 ip address 192.168.1.2 255.255.255.0
#
return
<Huawei>display current-configuration interface Ethernet 0/0/1
#
interface Ethernet0/0/1
 ip address 172.16.1.1 255.255.255.0
#
return
<Huawei>

  DeviceD配置如下:

<Huawei>display current-configuration configuration ospf
#
ospf 1
 area 0.0.0.2
  network 192.168.2.0 0.0.0.255
  network 172.17.1.0 0.0.0.255
#
return
<Huawei>display current-configuration interface Ethernet 0/0/0
#
interface Ethernet0/0/0
 ip address 192.168.2.2 255.255.255.0
#
return
<Huawei>display current-configuration interface Ethernet 0/0/1
#
interface Ethernet0/0/1
 ip address 172.17.1.1 255.255.255.0
#
return
<Huawei>

  DeviceE配置如下:

<Huawei>display current-configuration configuration ospf
#
ospf 1
 area 0.0.0.1
  network 172.16.1.0 0.0.0.255
#
return
<Huawei>display current-configuration interface Ethernet 0/0/0
#
interface Ethernet0/0/0
 ip address 172.16.1.2 255.255.255.0
#
return
<Huawei>

  DeviceF配置如下:

<Huawei>display current-configuration configuration ospf
#
ospf 1
 area 0.0.0.2
  network 172.17.1.0 0.0.0.255
#
return
<Huawei>
<Huawei>display current-configuration interface Ethernet 0/0/0
#
interface Ethernet0/0/0
 ip address 172.17.1.2 255.255.255.0
#
return
<Huawei>
<Huawei>

3.验证网络是否打通:

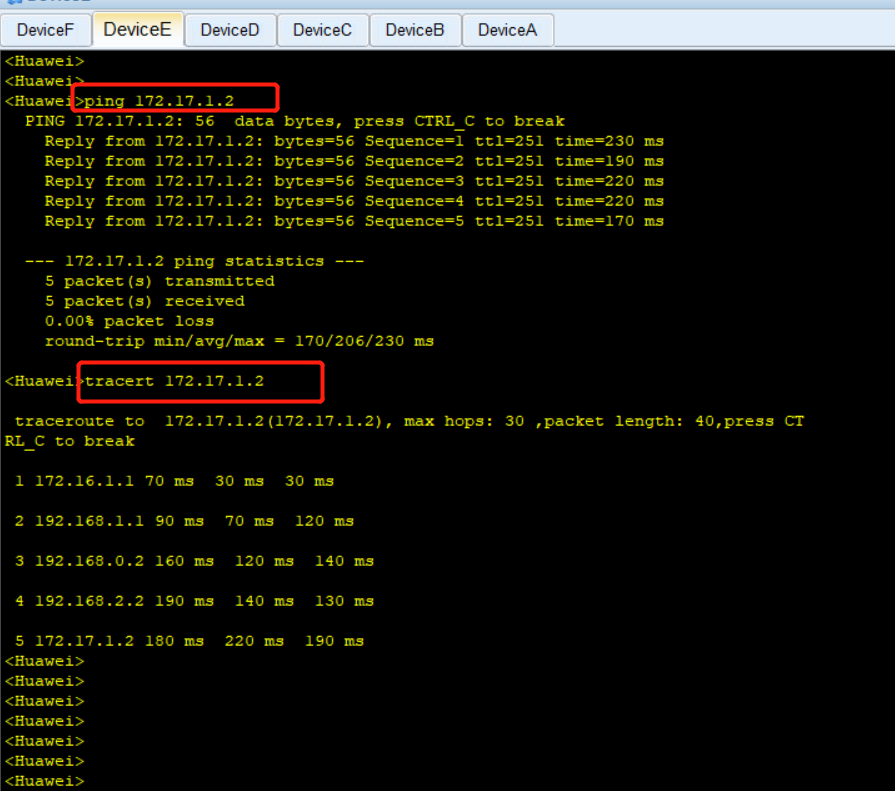
  在 DeviceE 设备上ping 另一个边缘区域的DeviceF,并跟踪过程:


 4.分别查看每个设备上的路由和ospf路由:

  DeviceA 的路由表和ospf 路由表:


   DeviceB 的路由表和ospf 路由表:


   DeviceC 的路由表和ospf 路由表:


   DeviceD 的路由表和ospf 路由表:


   DeviceE 的路由表和ospf 路由表:


   DeviceF 的路由表和ospf 路由表:


与使用ensp搭建路由拓扑,并使用ospf协议实现网络互通实操相似的内容:

使用ensp搭建路由拓扑,并使用ospf协议实现网络互通实操

转载请注明出处: 1.使用ENSP 搭建如下拓扑: 数据准备 为完成此配置例,需准备如下的数据: 设备 Router ID Process ID IP地址 DeviceA 1.1.1.1 1 区域0:192.168.0.0/24 区域1:192.168.1.0/24 DeviceB 2.2.2.2

使用ensp搭建路由拓扑,并使用isis协议实现网络互通实操

转载请注明出处: 1.通过拓扑搭建如下拓扑: 其中R7、R8为L1,R6为L1/2,R9为L2。 2.配置isis实现网络互通 R7配置如下: [Huawei]isis 1 [Huawei-isis-1]di th # isis 1 is-level level-1 network-entity 1

我如何使用工具学习网络技术?

在学习中使用哪些工具 “工欲善其事必先利其器。”在网络技术的学习过程中,往往需要使用一些工具,来辅助我们学习,以此将抽象的技术通过具体的方式来表现出来,便于加深网络理论的印象。 今天,我将列举我在学习过程中使用过的工具。以网络仿真工具为例,建议初学者选择一个厂商的软件作为主用软件(如eNSP或者HC

DHCP欺骗劫持与防御策略

DHCP欺骗劫持与防御策略 一、任务目的 掌握DHCP的欺骗原理与DHCP监听配置 二、任务设备、设施 ensp win10 VMware typora win7 三、任务拓扑结构图 四、基本配置 1.接口IP与默认路由配置(在这里同样可以使用ospf,加上反掩码效果一样) R1 system-vi

使用EF 连接 数据库 SQLserver、MySql 实现 CodeFirst

1.新建项目,下载Nuget安装包 创建项目需要注意几点,如果是基于 .net framework 的项目 需要选择 相应版本的 EF, 如果是跨平台则选择EF Core版本。 我这里选择的是 .net framework 版本。红框里面是 实现EF Code First 需要的包。 对应的版本:

使用explain优化慢查询的业务场景分析

问:你最害怕的事情是什么? 答:搓澡 问:为什么? 答:因为有些人一旦错过,就不在了 Explain 这个词在不同的上下文中有不同的含义。在数据库查询优化的上下文中,"EXPLAIN" 是一个常用的 SQL 命令,用于显示 SQL 查询的执行计划。执行计划是数据库如何执行查询的一个详细描述,包括它将

使用Github Action来辅助项目管理

Github action 是一个Github官方提供的非常流行且速度集成 持续集成和持续交付(CI/CD)的工具。它允许你在GitHub仓库中自动化、定制和执行你的软件开发工作流。你可以发现、创建和分享用于执行任何你想要的工作的操作,包括CI/CD,并在完全定制的工作流中组合操作。 持续集成需要做

使用 GPU 进行 Lightmap 烘焙 - 简单 demo

作者:i_dovelemon 日期:2024-06-16 主题:Lightmap, PathTracer, Compute Shader 引言 一直以来,我都对离线 bake lightmap 操作很着迷。一方面,这个方案历久弥新,虽然很古老,但是一直在实际项目中都有使用;另一方面,它能够产生非常高

使用 Spring 实现控制反转和依赖注入

使用 Spring 实现控制反转和依赖注入 概述 在本文中,我们将介绍IoC(控制反转)和DI(依赖注入)的概念,以及如何在Spring框架中实现它们。 什么是控制反转? 控制反转是软件工程中的一个原则,它将对象或程序的某些部分的控制权转移给容器或框架。我们最常在面向对象编程的上下文中使用它。 与传

使用Kubesec检查YAML文件安全

使用Kubesec检查YAML文件安全,YAML文件是Kubernetes配置的主要载体,因此,检查YAML文件的安全性对于确保Kubernetes集群的安全至关重要,Kubesec简介,使用Kubesec检查YAML文件安全,kubesec scan podyamlsafe.yaml