WebSocket是一种在单个TCP连接上进行全双工通信的协议。WebSocket使得客户端和服务器之间的数据交换变得更加简单,允许服务端主动向客户端推送数据。在WebSocket API中,浏览器和服务器只需要完成一次握手,两者之间就直接可以创建持久性的连接,并进行双向数据传输。
很多网站为了实现推送技术,所用的技术都是轮询。轮询是在特定的时间间隔(如每1秒),由浏览器对服务器发出HTTP请求,然后由服务器返回最新的数据给客户端的浏览器。这种传统的模式带来很明显的缺点,即浏览器需要不断的向服务器发出请求,然而HTTP请求可能包含较长的头部,其中真正有效的数据可能只是很小的一部分,显然这样会浪费很多的带宽等资源。
而比较新的技术去做轮询的效果是Comet。这种技术虽然可以双向通信,但依然需要反复发出请求。而且在Comet中,普遍采用的长链接,也会消耗服务器资源。
在这种情况下,HTML5定义了WebSocket协议,能更好的节省服务器资源和带宽,并且能够更实时地进行通讯。
添加maven引用
        <dependency>
            <groupId>org.springframework.boot</groupId>
            <artifactId>spring-boot-starter-websocket</artifactId>
        </dependency>
        <dependency>
            <groupId>org.springframework.boot</groupId>
            <artifactId>spring-boot-starter-thymeleaf</artifactId>
        </dependency>
配置应用属性
server.port=8300
spring.thymeleaf.mode=HTML
spring.thymeleaf.cache=true
spring.thymeleaf.prefix=classpath:/web/
spring.thymeleaf.encoding: UTF-8
spring.thymeleaf.suffix: .html
spring.thymeleaf.check-template-location: true
spring.thymeleaf.template-resolver-order: 1
添加WebSocketConfig
package com.test.config;

import org.springframework.context.annotation.Bean;
import org.springframework.context.annotation.Configuration;
import org.springframework.web.socket.config.annotation.EnableWebSocket;
import org.springframework.web.socket.server.standard.ServerEndpointExporter;

/**
 * @Author chen bo
 * @Date 2023/10
 * @Des
 */
@Configuration
public class WebSocketConfig {
    /**
     * bean注册:会自动扫描带有@ServerEndpoint注解声明的Websocket Endpoint(端点),注册成为Websocket bean。
     * 要注意,如果项目使用外置的servlet容器,而不是直接使用springboot内置容器的话,就不要注入ServerEndpointExporter,因为它将由容器自己提供和管理。
     */
    @Bean
    public ServerEndpointExporter serverEndpointExporter() {
        return new ServerEndpointExporter();
    }
}
添加WebSocket核心类
因为WebSocket是类似客户端服务端的形式(采用ws协议),那么这里的WebSocketServer其实就相当于一个ws协议的Controller
直接@ServerEndpoint("/imserver/{userId}") 、@Component启用即可,然后在里面实现@OnOpen开启连接,@onClose关闭连接,@onMessage接收消息等方法。
新建一个ConcurrentHashMap用于接收当前userId的WebSocket或者Session信息,方便IM之间对userId进行推送消息。单机版实现到这里就可以。集群版(多个ws节点)还需要借助 MySQL或者 Redis等进行订阅广播方式处理,改造对应的 sendMessage方法即可。
package com.test.util;

import com.google.gson.JsonParser;
import lombok.extern.slf4j.Slf4j;
import org.springframework.stereotype.Component;

import javax.websocket.*;
import javax.websocket.server.PathParam;
import javax.websocket.server.ServerEndpoint;
import java.util.Map;
import java.util.concurrent.ConcurrentHashMap;
import java.util.concurrent.atomic.AtomicInteger;
import com.google.gson.JsonObject;

/**
 * WebSocket的操作类
 * html页面与之关联的接口
 * var reqUrl = "http://localhost:8300/websocket/" + cid;
 * socket = new WebSocket(reqUrl.replace("http", "ws"));
 */
@Component
@Slf4j
@ServerEndpoint("/websocket/{sid}")
public class WebSocketServer {

    /**
     * 静态变量,用来记录当前在线连接数,线程安全的类。
     */
    private static AtomicInteger onlineSessionClientCount = new AtomicInteger(0);

    /**
     * 存放所有在线的客户端
     */
    private static Map<String, Session> onlineSessionClientMap = new ConcurrentHashMap<>();

    /**
     * 连接sid和连接会话
     */
    private String sid;
    private Session session;

    /**
     * 连接建立成功调用的方法。由前端<code>new WebSocket</code>触发
     *
     * @param sid     每次页面建立连接时传入到服务端的id,比如用户id等。可以自定义。
     * @param session 与某个客户端的连接会话,需要通过它来给客户端发送消息
     */
    @OnOpen
    public void onOpen(@PathParam("sid") String sid, Session session) {
        /**
         * session.getId():当前session会话会自动生成一个id,从0开始累加的。
         */
        log.info("连接建立中 ==> session_id = {}, sid = {}", session.getId(), sid);
        //加入 Map中。将页面的sid和session绑定或者session.getId()与session
        //onlineSessionIdClientMap.put(session.getId(), session);
        onlineSessionClientMap.put(sid, session);

        //在线数加1
        onlineSessionClientCount.incrementAndGet();
        this.sid = sid;
        this.session = session;
        sendToOne(sid, "上线了");
        log.info("连接建立成功,当前在线数为:{} ==> 开始监听新连接:session_id = {}, sid = {},。", onlineSessionClientCount, session.getId(), sid);
    }

    /**
     * 连接关闭调用的方法。由前端<code>socket.close()</code>触发
     *
     * @param sid
     * @param session
     */
    @OnClose
    public void onClose(@PathParam("sid") String sid, Session session) {
        //onlineSessionIdClientMap.remove(session.getId());
        // 从 Map中移除
        onlineSessionClientMap.remove(sid);

        //在线数减1
        onlineSessionClientCount.decrementAndGet();
        log.info("连接关闭成功,当前在线数为:{} ==> 关闭该连接信息:session_id = {}, sid = {},。", onlineSessionClientCount, session.getId(), sid);
    }

    /**
     * 收到客户端消息后调用的方法。由前端<code>socket.send</code>触发
     * * 当服务端执行toSession.getAsyncRemote().sendText(xxx)后,前端的socket.onmessage得到监听。
     *
     * @param message
     * @param session
     */
    @OnMessage
    public void onMessage(String message, Session session) {
        /**
         * html界面传递来得数据格式,可以自定义.
         * {"sid":"user","message":"hello websocket"}
         */
        JsonObject jsonObject = JsonParser.parseString(message).getAsJsonObject();
        String toSid = jsonObject.get("sid").getAsString();
        String msg = jsonObject.get("message").getAsString();
        log.info("服务端收到客户端消息 ==> fromSid = {}, toSid = {}, message = {}", sid, toSid, message);

        /**
         * 模拟约定:如果未指定sid信息,则群发,否则就单独发送
         */
        if (toSid == null || toSid == "" || "".equalsIgnoreCase(toSid)) {
            sendToAll(msg);
        } else {
            sendToOne(toSid, msg);
        }
    }

    /**
     * 发生错误调用的方法
     *
     * @param session
     * @param error
     */
    @OnError
    public void onError(Session session, Throwable error) {
        log.error("WebSocket发生错误,错误信息为:" + error.getMessage());
        error.printStackTrace();
    }

    /**
     * 群发消息
     *
     * @param message 消息
     */
    private void sendToAll(String message) {
        // 遍历在线map集合
        onlineSessionClientMap.forEach((onlineSid, toSession) -> {
            // 排除掉自己
            if (!sid.equalsIgnoreCase(onlineSid)) {
                log.info("服务端给客户端群发消息 ==> sid = {}, toSid = {}, message = {}", sid, onlineSid, message);
                toSession.getAsyncRemote().sendText(message);
            }
        });
    }

    /**
     * 指定发送消息
     *
     * @param toSid
     * @param message
     */
    private void sendToOne(String toSid, String message) {
        // 通过sid查询map中是否存在
        Session toSession = onlineSessionClientMap.get(toSid);
        if (toSession == null) {
            log.error("服务端给客户端发送消息 ==> toSid = {} 不存在, message = {}", toSid, message);
            return;
        }
        // 异步发送
        log.info("服务端给客户端发送消息 ==> toSid = {}, message = {}", toSid, message);
        toSession.getAsyncRemote().sendText(message);
        /*
        // 同步发送
        try {
            toSession.getBasicRemote().sendText(message);
        } catch (IOException e) {
            log.error("发送消息失败,WebSocket IO异常");
            e.printStackTrace();
        }*/
    }

}
添加controller
package com.test.controller;

import org.springframework.stereotype.Controller;
import org.springframework.ui.Model;
import org.springframework.web.bind.annotation.*;

import javax.servlet.http.HttpServletResponse;

/**
 * @Author chen bo
 * @Date 2023/10
 * @Des
 */
@Controller
public class HomeController {
    /**
     * 跳转到websocketDemo.html页面,携带自定义的cid信息。
     * http://localhost:8300/demo/toWebSocketDemo/user
     *
     * @param cid
     * @param model
     * @return
     */
    @GetMapping("/demo/toWebSocketDemo/{cid}")
    public String toWebSocketDemo(@PathVariable String cid, Model model) {
        model.addAttribute("cid", cid);
        return "index";
    }

    @GetMapping("hello")
    @ResponseBody
    public String hi(HttpServletResponse response) {
        return "Hi";
    }
}
添加html
注意:html文件添加在application.properties配置的对应目录中。
<!DOCTYPE html>
<html xmlns:th="http://www.thymeleaf.org">
<head>
    <meta charset="UTF-8">
    <title>聊天窗口</title>
</head>
<body>
<div>
我的用户名:
<input type="text" th:value="${cid}" readonly="readonly" id="cid"/>
</div>
<div id="chat-windows" style="width: 400px; height: 300px;overflow: scroll;border: blue 1px solid;"></div>
<div>收消息人用户名:<input id="toUserId" name="toUserId" type="text"></div>
<div>输入你要说的话:<input id="contentText" name="contentText" type="text"></div>
<div>
    <button type="button" onclick="sendMessage()">发送消息</button>
</div>
</body>

<script type="text/javascript">
    var socket;
    if (typeof (WebSocket) == "undefined") {
        alert("您的浏览器不支持WebSocket");
    } else {
        console.log("您的浏览器支持WebSocket");
        //实现化WebSocket对象,指定要连接的服务器地址与端口  建立连接

        var cid = document.getElementById("cid").value;
        console.log("cid-->" + cid);
        var reqUrl = "http://localhost:8300/websocket/" + cid;
        socket = new WebSocket(reqUrl.replace("http", "ws"));
        //打开事件
        socket.onopen = function () {
            console.log("Socket 已打开");
            //socket.send("这是来自客户端的消息" + location.href + new Date());
        };
        //获得消息事件
        socket.onmessage = function (msg) {
            console.log("onmessage--" + msg.data);
            //发现消息进入    开始处理前端触发逻辑
            var chatWindows = document.getElementById("chat-windows");
            var pElement = document.createElement('p')
            pElement.innerText = msg.data;
            chatWindows.appendChild(pElement);
        };
        //关闭事件
        socket.onclose = function () {
            console.log("Socket已关闭");
        };
        //发生了错误事件
        socket.onerror = function () {
            alert("Socket发生了错误");
            //此时可以尝试刷新页面
        }
        //离开页面时,关闭socket
        //jquery1.8中已经被废弃,3.0中已经移除
        // $(window).unload(function(){
        //     socket.close();
        //});
    }

    function sendMessage() {
        if (typeof (WebSocket) == "undefined") {
            alert("您的浏览器不支持WebSocket");
        } else {
            var toUserId = document.getElementById('toUserId').value;
            var contentText = document.getElementById('cid').value + ":" + document.getElementById('contentText').value;
            var msg = '{"sid":"' + toUserId + '","message":"' + contentText + '"}';
            console.log(msg);
            var chatWindows = document.getElementById("chat-windows");
            var chatWindows = document.getElementById("chat-windows");
            var pElement = document.createElement('p');
            pElement.innerText = "我:" + document.getElementById('contentText').value;
            chatWindows.appendChild(pElement);
            socket.send(msg);
        }
    }

</script>
</html>
1对1模拟演练
启动项目后,在浏览器访问http://localhost:8300/demo/toWebSocketDemo/{cid} 跳转到对应页面,其中cid是用户名。
为了便于1对1测试,这里我们启动两个浏览器窗口。
http://localhost:8300/demo/toWebSocketDemo/阳光男孩
http://localhost:8300/demo/toWebSocketDemo/水晶女孩
按照要求输入对方用户信息之后,便可以输入你要说的话,畅快聊起来了。
效果图如下:
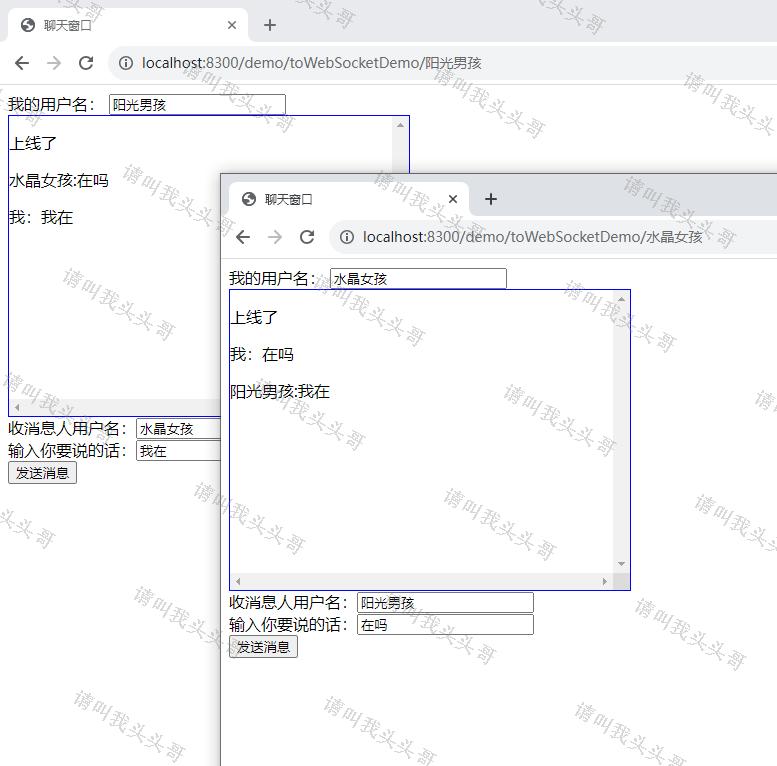
当然,如果收消息人用户名是自己的话,也可以自己给自己发送数据的。
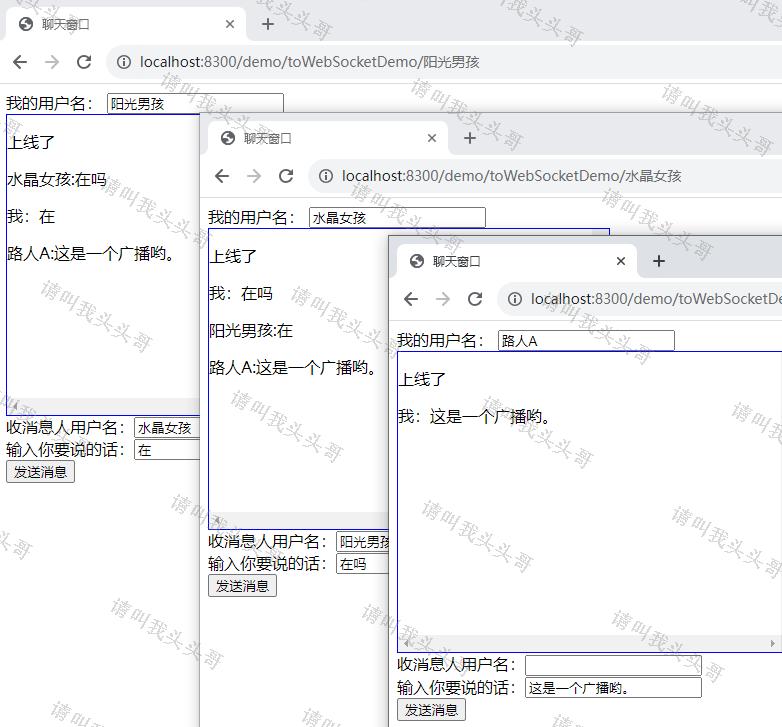
群发模拟演练
为了便于群发测试,这里我们启动3个浏览器窗口。
http://localhost:8300/demo/toWebSocketDemo/阳光男孩
http://localhost:8300/demo/toWebSocketDemo/水晶女孩
http://localhost:8300/demo/toWebSocketDemo/路人A
由于sendToAll方法中定义群发的条件为:当不指定 toUserid时,则为群发。
效果图如下:
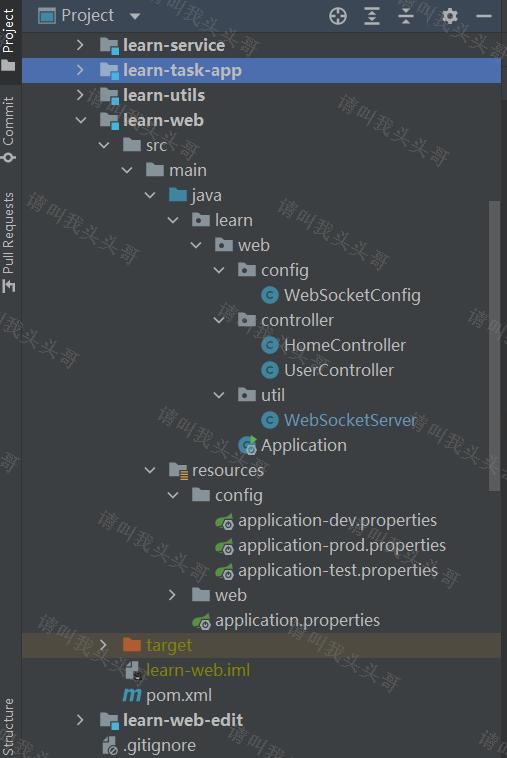
项目架构图如下:
https://github.com/toutouge/javademosecond
其他参考/学习资料:
作 者:请叫我头头哥
出 处:http://www.cnblogs.com/toutou/
关于作者:专注于基础平台的项目开发。如有问题或建议,请多多赐教!
版权声明:本文版权归作者和博客园共有,欢迎转载,但未经作者同意必须保留此段声明,且在文章页面明显位置给出原文链接。
特此声明:所有评论和私信都会在第一时间回复。也欢迎园子的大大们指正错误,共同进步。或者直接私信我
声援博主:如果您觉得文章对您有帮助,可以点击文章右下角【推荐】一下。您的鼓励是作者坚持原创和持续写作的最大动力!
博主尝试通过gitee的发行版,使用Springboot为基础框架,逐步整合JWT、JPA、VUE等常用功能项目。【本节完成】使用bcprov-jdk18on的sm2加密算法对用户密码进行签名及认证