Rust 实现的简单 http 转发

rust,实现,简单,http,转发 · 浏览次数 : 937

小编点评

## Summary of the Rust program: This program acts as a proxy, forwarding requests based on the provided protocol (http by default). It utilizes the tokio library for asynchronous operations. **Key functionalities:** * Parses command-line arguments containing the listen and forward addresses and ports. * Creates two connections, one for listening on the specified port and another for forwarding. * Forwards requests received on the listen port to the specified address and port on the other side. * Offers different handler implementations for various protocols (default, http, and https). **Components:** * **`Connection` struct:** Stores information about the connection, including protocol, transport, host, and port. * **`Listener` struct:** Creates and listens to a TCP listener on the specified address and port. * **`HttpHandler` struct:** Creates and handles HTTP requests by forwarding them to the backend server. * **`Handler` trait:** Defines a generic handler interface that specifies the `handle` method for handling incoming and outgoing data. **Usage:** 1. Run the program with the `cargo run` command. 2. Start an HTTP server using a Python script with the `hello.txt` file. 3. Access the forwarded page by visiting `http://localhost:8000/hello.txt` in your browser. **Notes:** * The code uses the `clap` library for parsing command-line arguments. * The `tokio` library is used for asynchronous operations. * Different handler implementations handle different protocols by forwarding the requests accordingly. * The program demonstrates forwarding requests between two different addresses and ports based on the provided protocol.

正文

学习Rust时练手的小程序,功能类似代理,将网络请求转发到新的地址和端口。

目前只有http请求的转发,未来希望能够代理各种常用的网络协议。
代码地址:https://gitee.com/wangyubin/mario

概要

程序主要有2个参数:

  1. -L:监听的地址和端口
  2. -F:转发的地址和端口

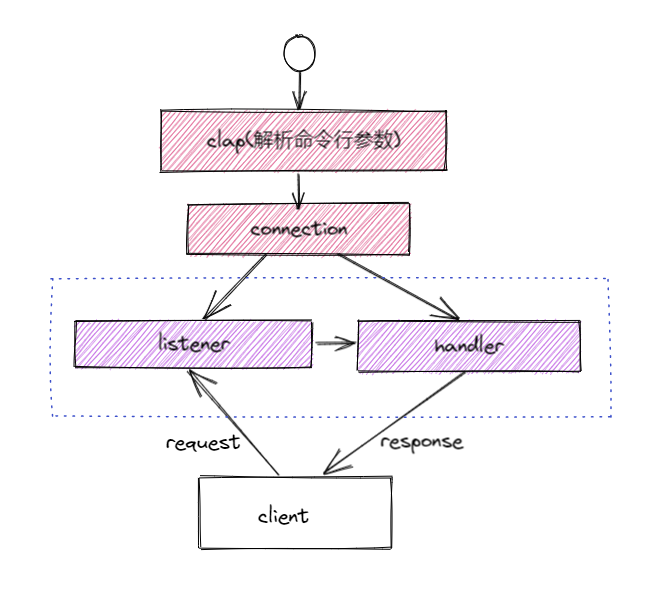
整体结构如下:
image.png

程序启动之后,解析 -L-F 参数,获取相应的的地址和端口,然后生成2个 connection
-L 参数对应的connection 生成监听器(listener), -F 参数对应的 connection 生成转发器(handler)。

client不直接请求最终的服务器,而是请求listener监听的地址,listener调用handler转发请求,并将请求结果返回给client

主要模块

程序的主要功能包括:

命令行参数解析

Rust的命令行参数解析常用的库是 clap

#[derive(Parser, Debug)]
#[clap(author, version, about, long_about = None)]
struct Args {
    /// Listen host and port
    #[clap(short = 'L', value_parser)]
    listen: String,

    /// Forward host and port
    #[clap(short = 'F', value_parser)]
    forward: String,
}

// 解析参数,获取地址和端口信息 
fn parse_args(s: &str) -> Connection {
    let strs: Vec<&str> = s.split("://").collect();
    let hostport: Vec<&str> = strs[1].split(":").collect();

    let pt: Vec<&str> = strs[0].split("+").collect();
    let mut p = Protocol::Default;
    let mut t = Transport::Default;

    if pt.len() == 1 || pt.len() == 2 {
        p = match pt[0] {
            "http" => Protocol::Http,
            "http2" => Protocol::Http2,
            _ => Protocol::Default,
        }
    }

    if pt.len() == 2 {
        t = match pt[1] {
            "tcp" => Transport::Tcp,
            "tls" => Transport::Tls,
            _ => Transport::Default,
        }
    }

    let host = match hostport[0] {
        "" => "127.0.0.1",
        _ => hostport[0],
    };

    Connection::new(p, t, host, hostport[1].parse::<u32>().unwrap())
}

Connection 定义

Connection 保存了监听和转发所需要的相关信息,目前主要有4个字段

pub enum Protocol {
    Default,
    Http,
    Http2,
}
pub enum Transport {
    Default,
    Tcp,
    Tls,
}

// 监听或者转发的链接
pub struct Connection<'a> {
    pub protocol: Protocol,   // 通信协议
    pub transport: Transport, // 传输协议
    pub host: &'a str,        // 主机(ip或者域名)
    pub port: u32,            // 端口
}

Listener 定义

listener 是用来监听client请求的,目前是创建了一个简单的 TcpListener 来监听请求。
这里用到了另一个知名的Rust库:
tokio


pub struct HttpListener<'a> {
    conn: Connection<'a>,
}

impl<'a> HttpListener<'a> {
    pub fn new(conn: Connection) -> HttpListener {
        HttpListener { conn }
    }

    pub async fn listen(&self, handler: &dyn Handler) -> Result<(), Box<dyn Error>> {
        let addr = format!("{}:{}", self.conn.host, self.conn.port);
        let listener = TcpListener::bind(addr).await.unwrap();

        while let Ok((inbound, _)) = listener.accept().await {
            match handler.handle(inbound).await {
                Err(e) => println!("error={}", e),
                _ => println!("success"),
            }
        }

        Ok(())
    }
}

Handler 定义

handler是用来处理请求转发的,它的主要作用是将listener和真正的服务连接起来。

pub struct HttpHandler<'a> {
    conn: Connection<'a>,
}

impl<'a> HttpHandler<'a> {
    pub fn new(conn: Connection<'a>) -> HttpHandler<'a> {
        HttpHandler { conn }
    }
}

#[async_trait]
impl<'a> Handler for HttpHandler<'a> {
    async fn handle(&self, mut inbound: TcpStream) -> Result<(), Box<dyn Error>> {
        let proxy_addr = format!("{}:{}", self.conn.host, self.conn.port);
        let mut outbound = TcpStream::connect(proxy_addr).await?;

        let (mut ri, mut wi) = inbound.split();
        let (mut ro, mut wo) = outbound.split();

        let client_to_server = async {
            io::copy(&mut ri, &mut wo).await?;
            wo.shutdown().await
        };

        let server_to_client = async {
            io::copy(&mut ro, &mut wi).await?;
            wi.shutdown().await
        };

        tokio::try_join!(client_to_server, server_to_client)?;

        Ok(())
    }
}

对于不同的协议,会有不同的handler,所以封装了一个trait来解耦 listenerhandler之间的联系。

#[async_trait]
pub trait Handler {
    async fn handle(&self, inbound: TcpStream) -> Result<(), Box<dyn Error>>;
}

这里需要安装 async_trait 这个额外的Rust库,因为Rust原生是不支持异步的trait的。

转发测试

最后看看测试的效果。

测试用的http服务

创建一个文本文件,然后用python在当前目录启动一个静态服务。

echo "hello rust" > hello.txt

python -m http.server 8080

在8080端口启动一个静态http服务,浏览器访问 http://localhost:8080/hello.txt,显示如下:
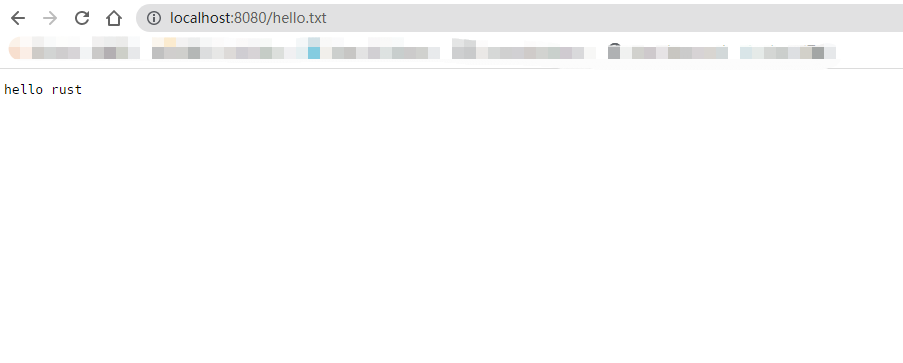
image.png

开启转发

下载 https://gitee.com/wangyubin/mario 的代码,在代码根目录下运行如下命令:

cargo run -- -L http://0.0.0.0:8000 -F http://:8080

再次访问浏览器:http://localhost:8000/hello.txt,显示结果和转发一样:
image.png

与Rust 实现的简单 http 转发相似的内容:

Rust 实现的简单 http 转发

学习Rust时练手的小程序,功能类似代理,将网络请求转发到新的地址和端口。 目前只有http请求的转发,未来希望能够代理各种常用的网络协议。 代码地址:https://gitee.com/wangyubin/mario 概要 程序主要有2个参数: -L:监听的地址和端口 -F:转发的地址和端口 整体

文盘Rust -- 用Tokio实现简易任务池

Tokio 无疑是 Rust 世界中最优秀的异步Runtime实现。非阻塞的特性带来了优异的性能,但是在实际的开发中我们往往需要在某些情况下阻塞任务来实现某些功能。

带有ttl的Lru在Rust中的实现及源码解析

TTL是Time To Live的缩写,通常意味着元素的生存时间是多长。 应用场景 数据库:在redis中我们最常见的就是缓存我们的数据元素,但是我们又不想其保留太长的时间,因为数据时间越长污染的可能性就越大,我们又不想在后续的程序中设置删除,所以我们此时需要设置过期时间来让数据自动淘汰。 sete

Lru在Rust中的实现, 源码解析

源码剖析-LRU(Least Recently Used)是一种常用的页面置换算法,其核心思想是选择最近最久未使用的页面予以淘汰。

Lfu缓存在Rust中的实现及源码解析

综上所述,LFU算法通过跟踪数据项的访问频次来决定淘汰对象,适用于数据访问频率差异较大的场景。与LRU相比,LFU更能抵御偶发性的大量访问请求对缓存的冲击。然而,LFU的实现较为复杂,需要综合考虑效率和公平性。在实际应用中,应当根据具体的数据访问模式和系统需求,灵活选择和调整缓存算法,以达到最优的性...

Lru-k在Rust中的实现及源码解析

Lru-k与lru的区别在于多维护一个队列,及每个元素多维护一个次数选项,对于性能的影响不大,仅仅多耗一点cpu,但是可以相应的提高命中率,下一章将介绍LFU按频次的淘汰机制。

文盘Rust -- r2d2 实现redis连接池

作者:贾世闻 我们在开发应用后端系统的时候经常要和各种数据库、缓存等资源打交道。这一期,我们聊聊如何访问redis 并将资源池化。 在一个应用后端程序访问redis主要要做的工作有两个,单例和池化。 在后端应用集成redis,我们主要用到以下几个crate:​ ​once_cell​​​、​ ​re

文盘Rust——起手式,CLI程序

我们来看看如何通过几个步骤快速的实现一个功能相对齐全的CLI程序。和做饭一样,能够快速获得成就感的方式是找半成品直接下锅炒一盘

Rust中的并发性:Sync 和 Send Traits

在并发的世界中,最常见的并发安全问题就是数据竞争,也就是两个线程同时对一个变量进行读写操作。但当你在 Safe Rust 中写出有数据竞争的代码时,编译器会直接拒绝编译。那么它是靠什么魔法做到的呢? 这就不得不谈 Send 和 Sync 这两个标记 trait 了,实现 Send 的类型可以在多线程

12. 用Rust手把手编写一个wmproxy(代理,内网穿透等), TLS的双向认证信息及token验证

TLS双向认证的基本原理及示意流程图,帮助更好的理解TLS的加密功能,及安全能力,此外还给出了部分源码的实现及Token实现在的方案及能力